Advertisement
Advertisement
Table of Contents

Related Manuals for Daymak Beast 2.0 Standard


Summary of Contents for Daymak Beast 2.0 Standard
- Page 1 Beast 2.0 standard / deluxe / d User Manual...
-
Page 2: About Daymak
Daymak warranties, services, and stocks parts for everything it sells. We support our prod- ucts. Please feel free to visit our website. You’ll nd the latest in cool transportation solutions,... - Page 3 Safety When operating the Beast please make sure you adhere to the following: Always check your mirrors and blind spots when operating through trails. Turn on headlights when in need of additional visibility. Make sure that your battery power is suffi cient before you go out to ride Do not ride with more than 1 passenger unless fi...
-
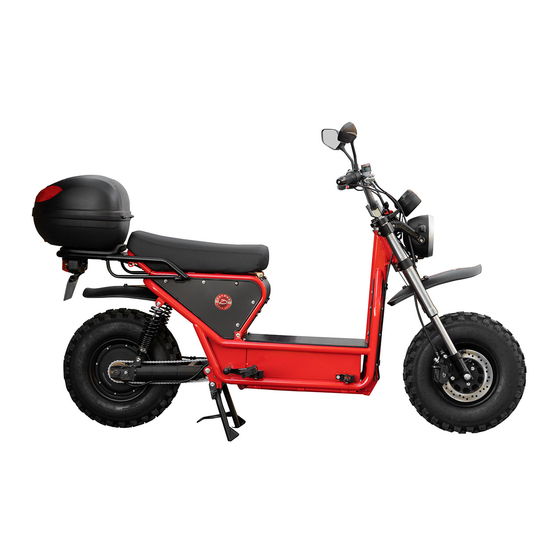
Page 4: Scooter Part Diagrams
Scooter Part Diagrams Diagram 1: The Beast Electric Scooter 1. Headlight Pedals 15. Ignition 2. Turn Signals Motor 16. Display 3. Shocks 10. Seat Lock 17. Brake Lever - Front 4. Tires 11. Trunk 5. Foot Rests 12. Charging Port 6. - Page 5 Beast Operation Turning the Unit On Below the front display you will nd a key hole where you put the keys that have come with your Beast. 1) Turn the key to this position to turn the unit on. The Key cannot be removed while it is in the on position.
- Page 6 Driving the Beast Engaging the motor On the right handlebar is a throttle that must be rotated towards you (bring the back of your hand towards your body) The throttle is very sensitive so be sure to turn it slowly. Make sure that you are either on the unit and can easily turn on the brakes (see below), or the unit is on a center kickstand.
- Page 7 Beast Operation (cont’d) Turning on your unit Handlebars, on each unit you will nd a few buttons and switches. Here is what everything does. Left Handle Bar 1) High Beam / Low Beam - Toggle this switch to choose between a low or high angle of the headlights. (The headlight must be on for this to have an e ect) 2) Turn Signals - Push this to the left to indicate turning to the left and into the middle once your done.
- Page 8 Once you have done that, a speedometer will show up and you are ready to go! For more information on the Daymak Drive App, please refer to the quick guide seen here: http://daymak.com/manuals/Daymak%20Drive%20Manual.pdf Please note the Beast D has two controllers, so any changes to e ect one motor, will not e ect the other.
- Page 9 Beast Operation (cont’d) You will nd above the ignition a display that will show you your metrics and performance for your Beast. Display 1) Speed - This display shows you how fast you are going in km/h 2) Motor Power - This meter shows how much power is being drawn from the motor.
-
Page 10: Charging The Unit
Charging the unit After using your Beast, you will need to charge the unit. The Beast comes with a charger that you can use to plug into a regular outlet. (The deluxe unit charger looks di erent slightly but functions the same way). If you are sitting on the Beast on underneath the seat between your legs you can nd the charging port. - Page 11 Remote / Alarm The Beast comes with a remote as well that has multiple functions. Here is what they do. 1) Panic Button - Press this button to set o the alarm. Use this in case of emergencies or to locate your vehicle. 2) Unlock Button - Press this button to disable the alarm.
- Page 12 Foot rests The Beast comes with extendable foot rests so you can taken an extra rider (for the rear ones) or change your riding style (for the front ones) Using your feet push the foot rests towards the Beast and it will pop out. Reverse this process stick them to the sides of the Beast.
- Page 13 Pedals The Beast also comes with pedals in case that you run completly out of power you can propel man- ually On each pedal on the axel where it screws in you can nd an R or an L for right or left respectively. Screw those into the right and left pedal arms of the unit.
- Page 14 Kick stands (cont’d) Engaging the center kick stand Engaging the center kick stand - 1) First put your right foot on the black metal pad of the center kick stand as seen here, and with your right hand hold on to the rear rack of the bike. 2) Simultaneously put your weight down on your right foot while pulling up with your right hand.
- Page 15 The Controller Daymak Drive Bluetooth Controller The Daymak Drive controller is what makes the unit do what it does when a function is press or a switch is switched. This controller is located underneath the seat. This should not be tampered with by consumers.
-
Page 16: Circuit Breaker
Circuit Breaker To prevent surges that may damage the unit, the Beast comes with a circuit breaker. This is located underneath the seat just above the controller. There is a blue switch that in the event of a surge will trigger and turn the whole unit o . In the event that your unit does not turn on at all (the display does not light at all once the... - Page 17 Quick Release Carrying Case The Beast comes with a quick release carrying case that can be take o or locked on to the unit. To un- lock or lock this case use the set of red keys that came with your unit. To unlock the case simply put the key in and turn it and lift up the lid.
- Page 18 Locking the Quick Release case To lock the quick release case you have to take a few steps. Once your done lightly pull the top of the lid to make sure it is properly locked. A quick video can be seen here : https://youtu.be/Ox0llfP9XOA 1) Put the key into the lock horizontally 2) Using your ngers push the top panel...
-
Page 19: Maintenance
Otherwise if possible bring the battery inside. Bring in your unit to your local Daymak dealer for a yearly check up if possible. Do not over charge the battery, once the battery is fully charged unplug it as soon as possible. - Page 20 Thank you for choosing Daymak...
Need help?
Do you have a question about the Beast 2.0 Standard and is the answer not in the manual?
Questions and answers