
Related Manuals for Noraxon Ninox Series


Summary of Contents for Noraxon Ninox Series
- Page 1 Ninox Hardware User Manual Ninox Video Camera User Manual User Manual User Manual User Manual (Rev B)
-
Page 2: Table Of Contents
Ninox Hardware User Manual Table of Contents Table of Contents Table of Contents Table of Contents General Warnings and Cautions ........................5 Risks and Benefits ............................ 5 Safety Information Summary ......................... 5 Introduction ................................6 Brief Description: ............................6 Intended Use .............................. 6 Definitions ................................ - Page 3 Ninox Hardware User Manual Optimize Shutter time, Gamma and Gain settings ........20 Freezing or missed video frames ......................20 Troubleshooting Chart ........................... 20 Website Link to FAQ ..........................21 Support, Service and Repair ........................22 Submitting Technical Support Requests .................... 22 10.1 Returning Equipment ..........................
- Page 4 The Noraxon name and logo, myoRESEARCH and Ultium are registered trademarks and myoANALOG, myoFORCE, myoMETRICS, myoMOTION, myoMUSCLE, myoPRESSURE, myoVIDEO, myoSYNC, forZe, NiNOX and TRUsync are common-law trademarks of Noraxon USA in the USA and other countries. All other trademarks are the property of their respective owners. © 2018, all rights reserved.
-
Page 5: General Warnings And Cautions
Ninox Hardware User Manual 1 General Warnings and Cautions 1.1 Risks and Benefits There is no identified risk of physical harm or injury no identified risk of physical harm or injury with use of the Ninox product. The benefit provided no identified risk of physical harm or injury no identified risk of physical harm or injury by use of the device is to provide reference video of activities and to measure movement patterns in 2D... -
Page 6: Introduction
The Ninox camera includes an on-board LED light that is intended to be used with reflective motion tracking markers. 2.2 Intended Use The Noraxon Ninox cameras are intended to be used for reference video and optical marker tracking in two dimensions (2D). (Rev B) -
Page 7: Definitions
Ninox Hardware User Manual 3 Definitions 3.1 Glossary of Terms A A A A ngle of View (AOV) ngle of View (AOV) – The angular extent of the scene viewed by the camera ngle of View (AOV) ngle of View (AOV) Aperture Aperture –... -
Page 8: Product Information
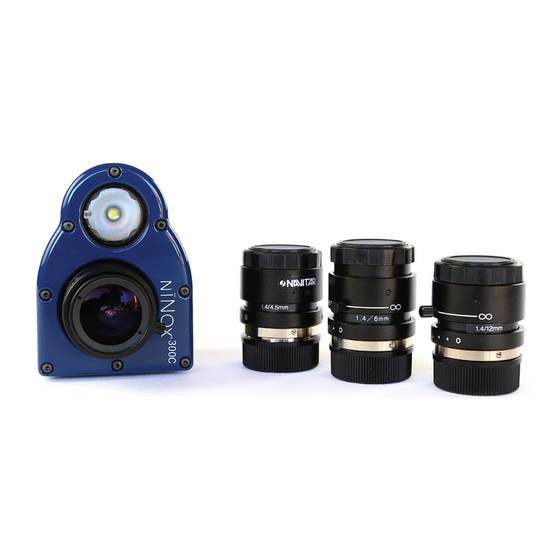
Navitar 6 mm Navitar 12mm 4.2 Software Requirements The Ninox camera requires software to perform its function, the equipment is offered in combination with the following computer program packages: Noraxon myoRESEARCH® (MR3.12 or newer) and Noraxon myoVIDEO® (MR3.14) Software Module (Rev B) -
Page 9: Setting Up The Hardware
Ninox Hardware User Manual 5 Setting up the Hardware 5.1 System Unboxing and Component Identification The Ninox camera system is packed within a reinforced padded box for storage and protection during transport. Upon arrival, carefully remove all contents and verify the following components are present. Contents will vary depending on the purchased package. -
Page 10: Camera Overview
Ninox Hardware User Manual 5.2 Camera Overview The below section will over the key components of the Ninox camera. Additional information can be found around the indicators and operation of the system in the following sections. Camera (Front) 1. 1. 1. 1. Marker Marker Marker Marker tracking... -
Page 11: Hardware Setup Instructions
Ninox Hardware User Manual 5.3 Hardware Setup Instructions Step 1 Insert CBL31 USB connector (USB3.0 micro b) into the USB3.0 receptacle on the camera. Tighten BOTH thumb screws to the secure CBL31 to the camera. Note: Failure to connect CBL31 to the camera with BOTH thumb screws can result in damage to the USB3.0 receptacle on the camera. -
Page 12: Determining Usb Hub Needs
Ninox Hardware User Manual Once selected, carefully screw on the lens to the Ninox camera. 5.4.1 Aperture and Focal Adjustment The C-mount lens used with the Ninox 300C has a set aperture and an adjustable focus. By rotating the cylinder on the lens labeled ‘Near ---- ∞’, one can manually adjust the focus of the lens for each use case. -
Page 13: Adjusting Computer Performance Settings
5.7 Installing the companion Software – myoResearch™ 3 To utilize the full functionality of the Ninox system, and ensure the system has updated drivers, Noraxon’s myoResearch 3 needs to be installed on the computer. Companion Software Installation The Ninox Cameras are compatible with Noraxon MR3 software. -
Page 14: Device Communication (Driver) Software Installation
Before the Ninox can be used, the device software settings must be configured to adjust frame rate, resolution, and other camera settings. Step 1 Open MR3, typically listed under Noraxon -> Click on the Hardware Setup Hardware Setup Hardware Setup button in the upper Hardware Setup right-hand corner. - Page 15 Ninox Hardware User Manual Step 3 The Ninox Settings dialog will appear as shown. A preview of the image will also be shown here. Within the “Settings” tab, select the desired collection frame rate (FPS). Select a Resolution for recording. The recommended resolution will show up based on chosen FPS.
-
Page 16: Basic Operating Instructions
Ninox Hardware User Manual 6 Basic Operating Instructions 6.1 Recording a Measurement Step 1 Within the Home screen, click on the myoVIDEO module icon. Create a New Subject Select New Configuration New Configuration New Configuration New Configuration..Step 2 Insert the devices to be used for the measurement into the configuration by dragging a device in from... -
Page 17: Additional Ninox Settings And Features
Ninox Hardware User Manual 7 Additional Ninox Settings and Features 7.1 Camera Settings Located under Hardware Setup, each individual camera has a General Settings menu. The options within this menu are detailed below: Name: Allows the user to alter the name of each camera. This makes it easy to toggle between Name: Name: Name:... -
Page 18: On-Board Led Light
Ninox Hardware User Manual 7.2 On-board LED light The on-board LED light is meant specifically for improving reflective marker tracking. The light is NOT meant to provide ambient lighting in low-light conditions. The keypad on the rear of the Ninox camera provides three different brightness levels (low, medium, high). -
Page 19: Maintenance
8.5 Companion Software Updates Perform a backup of the data folders to a separate drive as a precaution. Click on the Patch/Update link provided in the email or as given on the Noraxon website. Download the Patch/Update file. -
Page 20: Troubleshooting, Fault Diagnosis
Ninox Hardware User Manual Troubleshooting, Fault Diagnosis 9.1 Optimize Shutter time, Gamma and Gain settings 9.1.1 Overexposed image In the case of an overexposed image (bright spots/glare) the following procedure can be followed, in order, to optimize the video quality. 1. -
Page 21: Website Link To Faq
Laptop will reduce CPU performance to reduce heat Add a laptop cooling platform OR connect to power (running on battery power) 9.4 Website Link to FAQ Answers to frequent questions can be found at Noraxon’s Frequently Asked Questions (FAQ) website page at this link: https://www.noraxon.com/support-learn/technical-support/faqs/ (Rev B) -
Page 22: Support, Service And Repair
Using a freight-forwarder incurs additional brokerage fees. If a package is not a freight not a freight forwarder. forwarder. shipped to Noraxon via a carrier other than the ones listed above, it may be refused. (Rev B) -
Page 23: Appendices
Ninox Hardware User Manual 11 Appendices 11.1 Appendix A – Product Specifications Dimensions and Weight Ninox 125 1.98" L x 2.14" W x 2.98" H (5.03 cm x 5.43 cm x 7.57 cm) Weight: Less than 205 g. Ninox 300c ... -
Page 24: Appendix B - Computer Power Options And Graphics Card Driver Settings
Ninox Hardware User Manual 11.2 Appendix B – Computer Power Options and Graphics Card Driver Settings All changes to the computer settings must be made by a user with A A A A dministrator dministrator dministrator dministrator privileges. Power Options Before using the Ninox camera, the host computer must have the correct power and performance options set. - Page 25 Ninox Hardware User Manual Step 4 Click on Change Change Change Change Advanced Power Settings Advanced Power Settings Advanced Power Settings Advanced Power Settings Step 5 Find the USB Settings USB Settings - - - - > USB Selective > USB Selective USB Settings USB Settings >...
- Page 26 Ninox Hardware User Manual Step 8 Disable fast startup: Open Control Panel\Power Options and click Choose what the power buttons do Choose what the power buttons do Choose what the power buttons do Choose what the power buttons do on the left-hand side. If there is a checkbox labeled Turn on fast Turn on fast Turn on fast...
- Page 27 Ninox Hardware User Manual Step 3 Select the option to Search automatically for Search automatically for Search automatically for Search automatically for updated driver software. updated driver software. updated driver software. updated driver software. Step 4 If the latest drive is already installed, you will receive the message “The best driver software for your device is already installed”.
-
Page 28: Appendix C - Ninox 300C Lens Selection, Frame Rate, And Resolution Options
Ninox Hardware User Manual 11.3 Appendix C – Ninox 300C Lens Selection, Frame Rate, and Resolution Options The various lens options make this camera robust to a wide variety of work settings. Carefully select a lens based upon the field of view that is needed for your specific use-case. Figure 1 provides an overview of the required working distance for a specific frame rate and lens with the camera in a landscape orientation. - Page 29 Ninox Hardware User Manual Table 1: Ninox 300C Angle of View Lens H - Angle of View V - Angle of View 3.5 mm 75.5 46.6 4.5 mm 67.9 38.1 6 mm 50.0 28.4 12 mm 26.6 14.6 3.5 mm 20.9 15.0 4.5 mm...
-
Page 30: Appendix D - Ninox 125 Frame Rate And Resolution Options
Ninox Hardware User Manual 11.4 Appendix D – Ninox 125 Frame Rate and Resolution Options The Ninox 125 camera uses a non-adjustable, wide-angle, fixed focal length lens. The lens does not require focus therefore all images should be in focus from 1m to infinity. The recommended resolutions for the Ninox 125 camera are presented in Table 3.. -
Page 31: Appendix E - Manual Lens Focal Adjustment (Ninox 300C)
Ninox Hardware User Manual 11.5 Appendix E – Manual Lens Focal Adjustment (Ninox 300c) For extreme cases of bright or dark conditions, the aperture can be manually adjusted by removing the lens and loosening the set screw located between “C” and “O”. (Rev B)
Need help?
Do you have a question about the Ninox Series and is the answer not in the manual?
Questions and answers