PIONEER DJ DJM-750MK2 Operating Instructions Manual
Hide thumbs
Also See for DJM-750MK2:
- Operating instructions manual (28 pages) ,
- Operating instructions manual (16 pages) ,
- Service manual (122 pages)
Table of Contents
Advertisement
Available languages
Available languages
DJM-750MK2
pioneerdj.com/support/
rekordbox.com
For FAQs and other support information for this product, visit the above site.
Pour les FAQ et autres informations de support sur ce produit, consultez le site ci-dessus.
Häufig gestellte Fragen und weitere Support-Informationen für dieses Produkt finden Sie auf der oben
genannten Seite.
Per la sezione FAQ e altre informazioni di supporto per questo prodotto, visitare il sito indicato sopra.
Bezoek de bovenstaande website voor vaak gestelde vragen en andere informatie over ondersteuning voor dit
product.
Para consultar las preguntas más frecuentes y otras informaciones de asistencia para este producto, visite el
sitio indicado anteriormente.
Para obter informações sobre as FAQs e outras informações de apoio relativas a este produto, consulte o site
indicado acima.
О
а а
а а а
а
а а
а
.
Operating Instructions (Quick Start Guide)
Mode d'emploi (Guide de démarrage rapide)
Bedienungsanleitung (Kurzanleitung)
Istruzioni per l'uso (Guida di avvio veloce)
Handleiding (Snelstartgids)
Manual de instrucciones (Guía de inicio rápido)
Manual de instruções (Guia de início rápido)
И
(К а
DJ MIXER
TABLE DE MIXAGE
DJ-MISCHPULT
MIXER PER DJ
DJ MENGPANEEL
MESA DE MEZCLAS DJ
MESA DE MISTURA PARA DJ
DJ
а а
а
а
а
.
)
Advertisement
Chapters
Table of Contents

Related Manuals for PIONEER DJ DJM-750MK2


Summary of Contents for PIONEER DJ DJM-750MK2
- Page 1 DJ MIXER TABLE DE MIXAGE DJ-MISCHPULT MIXER PER DJ DJM-750MK2 DJ MENGPANEEL MESA DE MEZCLAS DJ MESA DE MISTURA PARA DJ pioneerdj.com/support/ rekordbox.com For FAQs and other support information for this product, visit the above site. Pour les FAQ et autres informations de support sur ce produit, consultez le site ci-dessus.
- Page 2 If you want to dispose this product, do not mix it with general household waste. There is a separate collection system for used electronic products in accordance with legislation that requires proper treatment, recovery and recycling. Private households in the member states of the EU, in Switzerland and Norway may return their used electronic products free of charge to designated collection facilities or to a retailer (if you purchase a similar new one).
- Page 3 POWER-CORD CAUTION Handle the power cord by the plug. Do not pull out the plug by tugging the cord and never touch the power cord when your hands are wet as this could cause a short circuit or electric shock. Do not place the unit, a piece of furniture, etc., on the power cord, or pinch the cord.
-
Page 4: Table Of Contents
Thank you for purchasing this Pioneer DJ product. Read this manual and the Operating Instructions that is available on the Pioneer DJ site before using the product. Both contain important infor- mation that you should understand to properly use the product. -
Page 5: Obtaining The Operating Instructions
Features This 4-channel DJ mixer is the next model in the DJM series from Pioneer DJ, the world standard in the disco and club scene. It sup- ports various types of DJ performances by incorporating the EQ FADER CURVE, SOUND COLOR FX, BEAT FX, and SEND/RETURN functions for mixing that were newly developed for the DJM-900NXS2, which is equip- ment for permanent installation in a club. -
Page 6: Part Names And Functions
Part names and functions Rear panel 1 u button (page 11 ) d AC IN Turns this unit on and off. Connect to a power outlet with a supplied power cord. Connect the power cord after all the connections are completed. 2 RETURN terminals (page 10 ) Be sure to use the supplied power cord. -
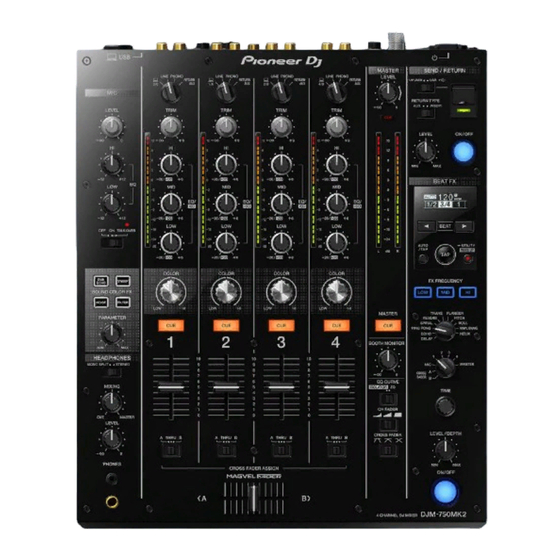
Page 7: Control Panel
Control Panel 1 PHONES terminal (page 11 ) 6 SOUND COLOR FX buttons Connect headphones. Turns on and off SOUND COLOR FX. 1/4” stereo phone plugs and 3.5 mm stereo mini plugs are supported. 7 OFF, ON, TALK OVER selector switch (page 11 ) 2 LEVEL control (page 11 ) Turns the microphone on and off. - Page 8 d EQ/ISO (HI, MID, LOW) controls (page 11 ) z TAP button Adjusts the sound quality of each channel. When the BPM measurement mode is set to [TAP], tap this button with a finger to input the BPM manually. e Channel Level Indicator (page 11 ) A UTILITY (WAKE UP) button Displays the sound level of each channel before it passes through the channel faders.
-
Page 9: Connections
! When connecting this unit with a computer, be sure to use the USB cable supplied with this unit. ! A USB hub cannot be used. Connecting input terminals Analog player Analog player Analog player Analog player Microphone rekordbox Computer To power outlet Pioneer DJ’s DJ player Pioneer DJ’s DJ player... -
Page 10: Connecting Output Terminals
(for booth monitor) 1 When connecting a mobile device, use the cable supplied with the device. For information on compatible mobile devices, see the Pioneer DJ site below. pioneerdj.com/support/ 2 Also connect the external effector to the [RETURN] terminal (input terminal). -
Page 11: Operation
Operation Basic Operation Monitoring sound with headphones 1 Connect headphones to the [PHONES] terminal. Outputting sound 2 Press the [CUE] button for the channel to monitor. 3 Set the [MONO SPLIT, STEREO] selector switch. 1 Press the [u] button. — [MONO SPLIT]: Outputs the sound of the channel selected with This unit turns on. -
Page 12: Additional Information
Additional information Troubleshooting ! If something is wrong with this unit, check the following issues, and also access the Pioneer DJ site and check [FAQ] for [DJM-750MK2]. pioneerdj.com/support/ Sometimes the problem may lie in another component. Inspect the other components and electrical appliances being used. If the problem cannot be rectified, ask your nearest service center or your dealer to carry out repair work. -
Page 13: Specifications
3.5 mm stereo mini jack ..............1 set USB terminal Type A ....................1 set Power supply...5 V/2.1 A or less B type ....................1 set ! The specifications and design of this product are subject to change without notice. ! © 2017 Pioneer DJ Corporation. All rights reserved. - Page 14 Si vous souhaitez vous débarrasser de cet appareil, ne le mettez pas à la poubelle avec vos ordures ménagères. Il existe un système de collecte séparé pour les appareils électroniques usagés, qui doivent être récupérés, traités et recyclés conformément à la législation. Les habitants des états membres de l’UE, de Suisse et de Norvège peuvent retourner gratuitement leurs appareils électroniques usagés aux centres de collecte agréés ou à...
- Page 15 Comment lire ce manuel Merci d’avoir acheté ce produit Pioneer DJ. Lisez ce manuel et le mode d’emploi disponible sur le site de Pioneer DJ avant d’utiliser le produit. Ces deux documents contiennent des infor- mations importantes que vous devez comprendre pour utiliser correcte- ment le produit.
-
Page 16: Informations Préliminaires
Caractéristiques Cette table de mixage à 4 canaux est le nouveau modèle de la série DJM de Pioneer DJ, la référence mondiale pour les discothèques et les clubs. Elle permet différents types de prestations DJ grâce aux fonctions de mixage EQ FADER CURVE, SOUND COLOR FX, BEAT FX et SEND/ RETURN nouvellement développées pour la DJM-900NXS2, un équi-... -
Page 17: Noms Et Fonctions Des Éléments
Noms et fonctions des éléments Panneau arrière 1 Touche u (page 10 ) c Prises SEND (page 9 ) Pour allumer et éteindre cet appareil. Raccordez à la prise d’entrée d’un générateur d’effets externe. Si un câble est raccordé uniquement à la prise [L (MONO)], un signal 2 Prises RETURN (page 9 ) audio monophonique est transmis. -
Page 18: Panneau De Commande
Panneau de commande 1 Prise PHONES (page 10 ) 7 Sélecteur OFF, ON, TALK OVER (page 10 ) Raccordez un casque. Active et désactive le microphone. Les jacks stéréo de 1/4” et les mini-jacks stéréo de 3,5 mm. 8 Indicateur du microphone (page 10 ) 2 Commande LEVEL (page 10 ) 9 Commandes EQ (HI, LOW) (page 10 ) Ajuste le niveau du son provenant du casque d’écoute. - Page 19 e Indicateur de niveau de canal (page 10 ) z Touche TAP Affiche le niveau du son de chaque canal avant qu’il passe par le Lorsque le mode de mesure du BPM est réglé sur [TAP], tapez sur fader de canal. cette touche avec un doigt pour définir manuellement le BPM.
-
Page 20: Raccordements
! Lorsque vous raccordez cet appareil à un ordinateur, veillez à utiliser le câble USB fourni avec cet appareil. ! Un concentrateur USB ne peut pas être utilisé. Raccordement des prises d’entrée Lecteur analogique Lecteur analogique Lecteur analogique Lecteur analogique Microphone rekordbox Ordinateur À une prise Lecteur DJ de Pioneer DJ Lecteur DJ de Pioneer DJ d’ alimentation... -
Page 21: Raccordement Des Prises De Sortie
1 Lorsque vous connectez un dispositif portable, utilisez le câble fourni avec l’appareil. Pour en savoir plus sur les dispositifs portables compatibles, consultez le site Pioneer DJ ci-dessous. pioneerdj.com/support/ 2 Raccordez aussi le générateur d’effets externe à la prise [RETURN] (prise d’entrée). -
Page 22: Fonctionnement
Fonctionnement Opérations de base Contrôle du son par un casque 1 Raccordez le casque à la prise [PHONES]. Restitution du son 2 Appuyez sur la touche [CUE] du canal à contrôler. 3 Réglez le sélecteur [MONO SPLIT, STEREO]. 1 Appuyez sur la touche [u]. —... -
Page 23: Informations Supplémentaires
Informations supplémentaires En cas de panne ! Si cet appareil ne fonctionne pas correctement, vérifiez les problèmes suivants, puis accédez également au site de Pioneer DJ et consultez [FAQ] pour [DJM-750MK2]. pioneerdj.com/support/ Parfois, le problème peut provenir d’un autre composant. Examinez les autres composants et appareils électriques utilisés. Si le problème ne peut pas être résolu, contactez votre service après-vente le plus proche ou votre revendeur pour une réparation. -
Page 24: Spécifications
! © 2017 Pioneer DJ Corporation. Tous droits de reproduction et de Spécifications traduction réservés. Caractéristiques générales – Appareil principal Alimentation ..........CA 110 V à 240 V, 50 Hz/60 Hz Consommation ..................40 W Consommation (en veille) ..............0,3 W Poids de l’appareil principal .............. - Page 26 Mischen Sie dieses Produkt, wenn Sie es entsorgen wollen, nicht mit gewöhnlichen Haushaltsabfällen. Es gibt ein getrenntes Sammelsystem für gebrauchte elektronische Produkte, über das die richtige Behandlung, Rückgewinnung und Wiederverwertung gemäß der bestehenden Gesetzgebung gewährleistet wird. Privathaushalte in den Mitgliedsstaaten der EU, in der Schweiz und in Norwegen können ihre gebrauchten elektronischen Produkte an vorgesehenen Sammeleinrichtungen kostenfrei zurückgeben oder aber an einen Händler zurückgeben (wenn sie ein ähnliches neues Produkt kaufen).
- Page 27 Inhalt Zum Lesen dieser Anleitung Vielen Dank, dass Sie sich für dieses Pioneer DJ-Produkt entschieden haben. Lesen Sie dieses Handbuch und die Bedienungsanleitung, die auf der Pioneer DJ-Website verfügbar sind, bevor Sie das Produkt verwenden. Beide enthalten wichtige Informationen, mit der Sie vor der Verwendung des Produkts vertraut sein sollten.
-
Page 28: Vor Der Inbetriebnahme
Merkmale Bei diesem 4-Kanal-DJ-Mixer handelt es sich um das nächste Modell der DJM-Serie von Pioneer DJ, dem weltweiten Standard in der Disko- und Club-Szene. Das Gerät ist zur Dauerinstallation in einem Club vorgesehen und unterstützt verschiedene Arten des DJ-Auftritts durch den Einsatz der Funktionen EQ FADER CURVE, SOUND COLOR FX, BEAT FX und SEND/RETURN zum Mischen, die für das Modell DJM-... -
Page 29: Bezeichnungen Und Funktionen Der Komponenten
Bezeichnungen und Funktionen der Komponenten Rückseite Verwenden Sie immer diese symmetrischen Ausgänge. 1 u-Taste (Seite 10 ) Stecken Sie nicht versehentlich das Netzkabel eines anderen Schalten Sie die Stromversorgung dieses Geräts ein und aus. Geräts ein. 2 RETURN-Buchsen (Seite 9 ) Stecken Sie hier keinen Stecker mit Phantomspeisung ein. -
Page 30: Bedienpult
Bedienpult 1 PHONES-Buchse (Seite 10 ) 6 SOUND COLOR FX-Tasten Zum Anschluss der Kopfhörer. Zum Ein- und Ausschalten von SOUND COLOR FX. Dieses Produkt unterstützt 1/4-Zoll-Stereo-Klinkenstecker 7 OFF, ON, TALK OVER-Wahlschalter (Seite 10 ) und 3,5-mm-Stereo-Miniklinkenstecker. Zum Ein- und Ausschalten des Mikrofons. 2 LEVEL-Regler (Seite 10 ) 8 Mikrofonanzeige (Seite 10 ) Stellt den Audiopegelausgang von den Kopfhörern ein. - Page 31 d EQ/ISO (HI, MID, LOW)-Regler (Seite 10 ) y BEAT c, d-Tasten Zum Einstellen der Tonqualität jedes Kanals. Zum Einstellen der Beat-Fraktion zum Synchronisieren des Effektsounds. e Kanalpegelanzeige (Seite 10 ) z TAP-Taste Anzeige des Soundpegels jedes Kanals, bevor er durch die Kanalfader läuft.
-
Page 32: Anschlüsse
! Wenn dieses Gerät mit einem Computer verbunden wird, verwenden Sie unbedingt das dem Gerät beiliegende USB-Kabel. ! Ein USB-Hub kann nicht verwendet werden. Anschließen der Eingangsbuchsen Plattenspieler Plattenspieler Plattenspieler Plattenspieler Plattenspieler rekordbox Computer Zur Netzsteckdose DJ Player von Pioneer DJ DJ Player von Pioneer DJ... -
Page 33: Anschließen Der Ausgangsbuchsen
1 Verwenden Sie für den Anschluss eines Mobilgeräts das mit dem Gerät gelieferte Kabel. Informationen zu kompatiblen Mobilgeräten finden Sie auf der Pioneer DJ Website unten. pioneerdj.com/support/ 2 Schließen Sie auch den externen Effektor an die Buchse [RETURN] (Eingangsbuchse) an. -
Page 34: Bedienung
Bedienung Grundlegender Betrieb Mithören von Ton mit Kopfhörern 1 Schließen Sie Kopfhörer an die Buchse [PHONES] an. Tonausgabe 2 Drücken Sie die [CUE]-Taste des Kanals, der mitgehört werden soll. 1 Drücken Sie die Taste [u]. 3 Stellen Sie den [MONO SPLIT, STEREO]-Wahlschalter Schalten Sie die Stromversorgung dieses Geräts ein. -
Page 35: Zusätzliche Informationen
Zusätzliche Informationen Störungssuche ! Wenn am Gerät eine Störung vorliegt, überprüfen Sie folgende Punkte. Rufen Sie außerdem die Pioneer DJ-Website auf und prüfen Sie [FAQ] für [DJM-750MK2]. pioneerdj.com/support/ Manchmal liegt das Problem an einer anderen Komponente. Überprüfen Sie die anderen Komponenten und elektrischen Geräte, die verwendet werden. -
Page 36: Technische Daten
! © 2017 Pioneer DJ Corporation. Alle Rechte vorbehalten. Technische Daten Allgemein – Haupteinheit Stromanforderungen ..110 V bis 240 V Wechselspannung, 50 Hz/60 Hz Leistungsaufnahme ................40 W Leistungsaufnahme (Standby) ............. 0,3 W Gewicht des Hauptgeräts ..............6,6 kg Max. Abmessungen ....320 mm (B) × 107,9 mm (H) × 387,9 mm (T) Betriebstemperatur ............ - Page 38 Se si vuole eliminare questo prodotto, non gettarlo insieme ai rifiuti domestici. Esiste un sistema di raccolta differenziata in conformità alle leggi che richiedono appositi trattamenti, recupero e riciclo. I privati cittadini dei paesi membri dell’UE, di Svizzera e Norvegia, possono restituire senza alcun costo i loro prodotti elettronici usati ad appositi servizi di raccolta o a un rivenditore (se si desidera acquistarne uno simile).
- Page 39 Vi ringraziamo per avere acquistato questo prodotto Pioneer DJ. Prima di utilizzare questo prodotto, leggere questo manuale e le Istruzioni per l’uso disponibili sul sito Pioneer DJ. I due documenti includono informazioni importanti che devono venire comprese prima di usare questo prodotto.
-
Page 40: Prima Di Cominciare
Caratteristiche Questo mixer DJ a 4 canali rappresenta il modello più recente della serie DJM di Pioneer DJ, lo standard di riferimento mondiale per la scena disco e club. L’unità supporta diversi tipi di performance DJ integrando le funzioni EQ FADER CURVE, SOUND COLOR FX, BEAT FX e SEND/ RETURN per un missaggio di nuova concezione ideato per l’unità... -
Page 41: Nome Delle Varie Parti E Funzioni
Nome delle varie parti e funzioni Pannello posteriore 1 Pulsante u (pagina 10 ) c Terminali SEND (pagina 9 ) Accende e spegne questa unità. Collegare ai terminali di ingresso di un’unità effetti esterna. Se un cavo è collegato solo al terminale [L (MONO)], verrà emesso solo 2 Terminali RETURN (pagina 9 ) segnale audio mono. -
Page 42: Pannello Di Controllo
Pannello di controllo 1 Terminale PHONES (pagina 10 ) 6 Pulsanti SOUND COLOR FX Collegare le cuffie. Attivano e disattivano la funzione SOUND COLOR FX. Questo prodotto supporta spine fono stereo da 1/4” e spine fono 7 Selettore OFF, ON, TALK OVER (pagina 10 ) stereo mini da 3,5 mm. - Page 43 d Controlli EQ/ISO (HI, MID, LOW) (pagina 10 ) z Pulsante TAP Regolano la qualità audio di ciascun canale. Se la modalità di misurazione BPM è impostata su [TAP], toccare questo pulsante col dito per inserire manualmente il valore BPM. e Indicatore del livello del canali (pagina 10 ) A Pulsante UTILITY (WAKE UP) Indica il livello audio di ciascun canale prima che passino attraverso...
-
Page 44: Collegamenti
! Quando si collega questa unità a un computer, accertarsi di utilizzare il cavo USB fornito con questa unità. ! Gli hub USB non possono essere utilizzati. Collegamento dei terminali di ingresso Lettore analogico Lettore analogico Lettore analogico Lettore analogico Microfono rekordbox Computer Ad una presa Lettore DJ di Pioneer DJ Lettore DJ di Pioneer DJ... -
Page 45: Collegamento Dei Terminali Di Uscita
1 Quando si collega un dispositivo mobile, utilizzare il cavo fornito in dotazione con il dispositivo. Per informazioni sui dispositivi mobili compatibili, visitare il sito Web di Pioneer DJ in basso. pioneerdj.com/support/ 2 Collegare anche un’unità effetti esterna al terminale [RETURN] (terminale di ingresso). -
Page 46: Impiego
Impiego Uso di base Monitoraggio audio in cuffia 1 Collegare una cuffia al terminale [PHONES]. Emissione di suono 2 Premere il pulsante [CUE] per il canale da monitorare. 3 Impostare il selettore [MONO SPLIT, STEREO]. 1 Premere il pulsante [u]. —... -
Page 47: Informazioni Aggiuntive
Informazioni aggiuntive Diagnostica ! Se si verifica un malfunzionamento dell’unità, controllare quanto segue e accedere al sito Pioneer DJ per controllare la sezione [FAQ] per [DJM-750MK2]. pioneerdj.com/support/ A volte il problema risiede in un altro componente. Controllare gli altri componenti e apparecchi elettronici usati. Se il problema non può essere eliminato, contattare il più... -
Page 48: Dati Tecnici
Tipo A ....................1 set Alimentazione...5 V/2,1 A o meno Tipo B ....................1 set ! I dati tecnici ed il design di questo prodotto sono soggetti a modifi- che senza preavviso. ! © 2017 Pioneer DJ Corporation. Tutti i diritti riservati. - Page 50 Deponeer dit product niet bij het gewone huishoudelijk afval wanneer u het wilt verwijderen. Er bestaat een speciaal wettelijk voorgeschreven verzamelsysteem voor de juiste behandeling, het opnieuw bruikbaar maken en de recycling van gebruikte elektronische producten. In de lidstaten van de EU, Zwitserland en Noorwegen kunnen particulieren hun gebruikte elektronische producten gratis bij de daarvoor bestemde verzamelplaatsen of een verkooppunt (indien u aldaar een gelijkwaardig nieuw product koopt) inleveren.
- Page 51 Hartelijk dank voor uw aankoop van dit Pioneer DJ product. Lees deze handleiding en de bedieningshandleiding die beschikbaar is op de website van Pioneer DJ voordat u het product gebruikt. Beide bevatten belangrijke informatie die u moet begrijpen om het product juist te gebruiken.
-
Page 52: Alvorens Te Beginnen
Kenmerken Dit 4-kanaals DJ-mengpaneel is het volgende model in de DJM-reeks van Pioneer DJ, de globale standaard in de disco- en clubwereld. Het kan gebruikt worden voor uiteenlopende soorten DJ-optredens dankzij functies zoals de EQ FADER CURVE, SOUND COLOR FX, BEAT FX en SEND/RETURN voor mengen die nieuw werden ontwikkeld voor de DJM- 900NXS2, apparatuur voor vaste installatie in een club. -
Page 53: Overzicht Van De Bedieningstoetsen
Overzicht van de bedieningstoetsen Achterpaneel 1 u toets (bladzijde 10 ) c SEND aansluitingen (bladzijde 9 ) Voor aanzetten en uitschakelen van dit apparaat. Aansluiten op ingangsaansluiting van een externe effectgenerator. Als er alleen een kabel is aangesloten op de [L (MONO)]-aansluiting, 2 RETURN aansluitingen (bladzijde 9 ) wordt een mono-audiosignaal uitgevoerd. -
Page 54: Regelpaneel
Regelpaneel 1 PHONES-aansluiting (bladzijde 10 ) 5 PARAMETER instelling Aansluiting voor hoofdtelefoon. Regelt de SOUND COLOR FX-parameter. Geschikt voor 1/4” stereostekker en 3,5 mm stereoministekker. 6 SOUND COLOR FX toetsen 2 LEVEL instelling (bladzijde 10 ) SOUND COLOR FX aan en uit zetten. Regelt het uitgangsniveau van de geluidsweergave via de 7 OFF, ON, TALK OVER keuzeschakelaar (bladzijde 10 ) hoofdtelefoon. - Page 55 c TRIM instelling (bladzijde 10 ) x Hoofdscherm Regelt het niveau van de geluidsingang naar elk kanaal. Toont de naam van het effect, BPM, effectparameter, enz. d EQ/ISO (HI, MID, LOW) instellingen (bladzijde 10 ) y BEAT c, d toetsen De geluidskwaliteit van elk kanaal regelen.
-
Page 56: Aansluiten Van Ingangsaansluitingen
! Als u dit toestel met een computer verbindt, gebruik dan de USB-kabel die met dit toestel is meegeleverd. ! Een USB-verdeelstekker (hub) kan niet worden gebruikt. Aansluiten van ingangsaansluitingen Ad una presa Ad una presa Ad una presa Ad una presa Microfoon rekordbox Computer Naar stopcontact DJ-speler van Pioneer DJ DJ-speler van Pioneer DJ... -
Page 57: Aansluiten Van Uitgangsaansluitingen
1 Gebruik de kabel die bij het apparaat is geleverd om een mobiel apparaat aan te sluiten. Zie de website van Pioneer DJ hieronder voor informatie over compatibele mobiele apparaten. pioneerdj.com/support/ 2 Sluit tevens een externe effectgenerator aan op de [RETURN]-aansluiting (ingangsaansluiting). -
Page 58: Basisbediening
Bediening Basisbediening Meeluisteren via een hoofdtelefoon 1 Sluit een hoofdtelefoon aan op de [PHONES]-aansluiting. Geluid weergeven 2 Druk op de [CUE]-knop voor het kanaal dat u wilt 1 Druk op de [u] toets. controleren. Schakel dit apparaat in. 3 Stel de keuzeschakelaar [MONO SPLIT, STEREO] in. 2 Stel de ingangskeuzeschakelaars in. -
Page 59: Aanvullende Informatie
Aanvullende informatie Verhelpen van storingen ! Als er iets mis is met dit toestel, controleer dan de onderstaande punten, en raadpleeg ook de website van Pioneer DJ en het gedeelte [FAQ] voor [DJM-750MK2]. pioneerdj.com/support/ Soms wordt het probleem door een andere component veroorzaakt. Inspecteer de andere componenten en elektrische apparaten die gebruikt wor- den. - Page 60 Type A ....................1 st. Stroomvoorziening...5 V/2,1 A of minder B type ....................1 set ! De technische gegevens en het ontwerp van dit product kunnen van- wege voortgaande verbetering zonder voorafgaande kennisgeving worden gewijzigd. ! © 2017 Pioneer DJ Corporation. Alle rechten voorbehouden.
- Page 62 Si desea deshacerse de este producto, no lo mezcle con los residuos generales de su hogar. De conformidad con la legislación vigente, existe un sistema de recogida distinto para los productos electrónicos que requieren un procedimiento adecuado de tratamiento, recuperación y reciclado. Las viviendas privadas en los estados miembros de la UE, en Suiza y Noruega pueden devolver gratuitamente sus productos electrónicos usados en las instalaciones de recolección previstas o bien en las instalaciones de minoristas (si adquieren un producto similar nuevo).
- Page 63 Gracias por adquirir este producto Pioneer DJ. Lea este manual y el Manual de instrucciones que se puede descargar del sitio de Pioneer DJ antes de utilizar el producto. Ambos manuales contienen información que debe comprender para utilizar correcta- mente el producto.
-
Page 64: Antes De Empezar A Usar La Unidad
Este mezclador de DJ de 4 canales es el siguiente modelo de la serie DJM de Pioneer DJ, el estándar mundial en el circuito de clubes y disco- tecas. Permite varios tipos de actuaciones de DJ gracias a la incorpora- ción de las funciones EQ FADER CURVE, SOUND COLOR FX, BEAT FX... -
Page 65: Nombres Y Funciones De Los Controles
Nombres y funciones de los controles Panel trasero 1 Botón u (página 10 ) c Terminales SEND (página 9 ) Conecta y desconecta la alimentación de esta unidad. Permiten realizar una conexión con el terminal de salida de una unidad de efectos externa. Si se conecta un cable al terminal 2 Terminales RETURN (página 9 ) [L (MONO)] solamente, se emitirá... -
Page 66: Panel De Control
Panel de control 1 Terminal PHONES (página 10 ) 6 Botones SOUND COLOR FX Permite conectar unos auriculares. Encienden y apagan SOUND COLOR FX. Se admiten clavijas de auriculares estéreo de 1/4” y miniclavijas 7 Conmutador selector OFF, ON, TALK OVER estéreo de 3,5 mm. - Page 67 c Control TRIM (página 10 ) x Pantalla principal Ajusta el nivel de sonido que entra en cada canal. Muestra el nombre del efecto, el BPM, el parámetro de efectos, etc. d Controles EQ/ISO (HI, MID, LOW) (página 10 ) y Botones BEAT c, d Ajustan la calidad de sonido de cada canal.
-
Page 68: Conexión De Terminales De Entrada
! No se puede usar un concentrador USB. Conexión de terminales de entrada Reproductor analógico Reproductor analógico Reproductor analógico Reproductor analógico Micrófono rekordbox Ordenador A la toma de corriente Reproductor de DJ de Pioneer DJ Reproductor de DJ de Pioneer DJ... -
Page 69: Conexión De Terminales De Salida
1 Cuando conecte un dispositivo móvil, utilice el cable que se proporciona con el dispositivo. Para obtener información sobre dispositivos móviles compatibles, consulte el sitio de Pioneer DJ a continuación. pioneerdj.com/support/ 2 Conecte también el efector externo al terminal [RETURN] (terminal de entrada). -
Page 70: Operación
Operación Funcionamiento básico Monitoreo de sonido con auriculares 1 Conecte los auriculares al terminal [PHONES]. Salida de sonido 2 Pulse el botón [CUE] del canal que se desea monitorear. 1 Pulse el botón [u]. 3 Ajuste el conmutador selector [MONO SPLIT, STEREO]. Conecte la alimentación de esta unidad. -
Page 71: Información Adicional
Información adicional Solución de problemas ! Si hay algún problema con esta unidad, compruebe los siguientes problemas y acceda también al sitio de Pioneer DJ y consulte en las [FAQ] el [DJM-750MK2]. pioneerdj.com/support/ Algunas veces, el problema puede estar en otro componente. Inspeccione los otros componentes y los aparatos eléctricos que esté utilizando. Si no se puede rectificar el problema, pida al centro de servicio más cercano o a su concesionario que realice el trabajo de reparación. -
Page 72: Especificaciones
! Las especificaciones y diseño de este producto están sujetos a cam- bios sin previo aviso. General – Unidad principal ! © 2017 Pioneer DJ Corporation. Todos los derechos reservados. Requisitos de potencia ......... CA 110 V a 240 V, 50 Hz/60 Hz Consumo de energía................40 W Consumo de energía (modo de espera) .......... - Page 74 Se quiser eliminar este produto, não o misture com resíduos domésticos gerais. Existe um sistema de recolha separado para produtos eletrónicos usados de acordo com a legislação que requer tratamento, recuperação e reciclagem adequados. Os consumidores dos Estados-membros da UE, da Suíça e da Noruega podem entregar equipamentos eletrónicos fora de uso em determinadas instalações de recolha ou a um retalhista (se adquirirem um equipamento novo similar).
- Page 75 Obrigado por adquirir este produto da Pioneer DJ. Antes de utilizar o produto, leia este guia de início rápido e o Manual de instruções disponível no site da Pioneer DJ. Ambos contêm informações importantes que deve compreender bem para poder utilizar correta- mente o produto.
-
Page 76: Antes De Começar
Características Esta mesa de mistura para DJ com 4 canais é o próximo modelo da série DJM da Pioneer DJ, padrão mundial para discotecas e bares. Suporta vários tipos de atuações de DJ incluindo as funções de mistura EQ FADER CURVE, SOUND COLOR FX, BEAT FX e SEND/RETURN recém-desenvolvidas para o modelo DJM-900NXS2, um equipamento... -
Page 77: Nomes De Peças E Funções
Nomes de peças e funções Painel posterior 1 Botão u (página 10 ) c Terminais SEND (página 9 ) Liga ou desliga a alimentação desta unidade. Ligue ao terminal de entrada de uma unidade de efeitos externa. Se estiver ligado um cabo apenas ao terminal [L (MONO)], a saída é de 2 Terminais RETURN (página 9 ) um sinal de áudio mono. -
Page 78: Painel De Controlo
Painel de controlo 1 Terminal PHONES (página 10 ) 6 Botões SOUND COLOR FX Ligue os auscultadores. Ligam e desligam SOUND COLOR FX. São suportadas fichas de auscultadores estéreo de 1/4” e mini fichas 7 Interruptor seletor OFF, ON, TALK OVER (página 10 ) estéreo de 3,5 mm. - Page 79 d Controlos EQ/ISO (HI, MID, LOW) (página 10 ) z Botão TAP Ajustam a qualidade de som de cada canal. Quando o modo de medição BPM está definido para [TAP], toque neste botão com um dedo para introduzir manualmente as BPM. e Indicador do nível dos canais (página 10 ) A Botão UTILITY (WAKE UP) Mostra o nível de som de cada canal antes de passar através dos...
-
Page 80: Ligar Terminais De Entrada
! Não pode ser utilizado um hub USB. Ligar terminais de entrada Leitor analógico Leitor analógico Leitor analógico Leitor analógico Microfone rekordbox Computador Para a saída de alimentação Leitor de DJ da Pioneer DJ Leitor de DJ da Pioneer DJ... -
Page 81: Ligar Terminais De Saída
1 Quando fizer a ligação a um dispositivo móvel, utilize o cabo fornecido com o dispositivo. Para obter informações sobre os dispositivos móveis compatíveis, consulte o site da Pioneer DJ indicado abaixo. pioneerdj.com/support/ 2 Ligue também o processador de efeitos externo ao terminal [RETURN] (terminal de entrada). -
Page 82: Funcionamento Básico
Funcionamento Funcionamento básico Monitorizar som com auscultadores 1 Ligue auscultadores ao terminal [PHONES]. Emitir som 2 Prima o botão [CUE] do canal a controlar. 3 Defina o interruptor seletor [MONO SPLIT, STEREO]. 1 Pressione o botão [u]. — [MONO SPLIT]: Faz a saída do som do canal selecionado com o Ligue a alimentação desta unidade. -
Page 83: Informações Adicionais
Informações adicionais Resolução de problemas ! Se a unidade não estiver a funcionar corretamente, verifique os pontos indicados a seguir; aceda também ao site da Pioneer DJ e consulte a sec- ção [FAQ] referente ao modelo [DJM-750MK2]. pioneerdj.com/support/ Às vezes o problema pode dever-se a outro componente. Inspecione os outros componentes e os aparelhos elétricos que estão a ser utilizados. Se não for possível resolver o problema, contacte o centro de assistência ou o fornecedor mais próximo para a realização do serviço de reparação. - Page 84 Tipo A ..................1 conjunto Fonte de alimentação...5 V/2,1 A ou menos Tipo B ..................1 conjunto ! As especificações e design deste produto estão sujeitos a alterações sem aviso prévio. ! © 2017 Pioneer DJ Corporation. Todos os direitos reservados.
- Page 86 Е а а а а а . С а а а а а а а а а а а а Чac а а - а ЕС, Ш а Н а а а а а В а а , а а а...
- Page 87 Содержание Как следует читать данное руководство Благодарим Вас за покупку этого изделия компании Pioneer DJ. Перед эксплуатацией данного аппарата прочтите это руководство и Инструкции по эксплуатации, которые можно найти на сайте Pioneer DJ. В них содержится важная информация, необходимая для правильной эксплуатации аппарата.
-
Page 88: До Начала
До начала Свойства Этот четырехканальный DJ-микшер — новая модель в серии DJM от Pioneer DJ, ставшей мировым стандартом дискотек и клубов. Он поддерживает DJ-исполнения различных типов за счет функций микширования EQ FADER CURVE, SOUND COLOR FX, BEAT FX и SEND/RETURN, разработанных для DJM-900NXS2 — оборудо- вания, которое... -
Page 89: Названия Деталей И Функции
Названия деталей и функции Задняя панель 1 Кнопка u (стр. 10 ) Не подключайте к разъему, с которого может подаваться фантомное питание. Включение и отключение питания данного аппарата. c Терминалы SEND (стр. 9 ) 2 Терминалы RETURN (стр. 9 ) Подключение... -
Page 90: Панель Управления
Панель управления 1 Терминал PHONES (стр. 10 ) 6 Кнопки SOUND COLOR FX Подключение наушников. Включение и выключение SOUND COLOR FX. Поддерживаются подключение стереоштекера 1/4” и мини-сте- 7 Селекторный переключатель OFF, ON, TALK OVER реоштекера 3,5 мм. (стр. 10 ) 2 Ручка... - Page 91 c Ручка TRIM (стр. 10 ) v Кнопка SEND/RETURN ON/OFF Регулировка уровня звука на входе каждого канала. Включение и выключение SEND/RETURN. d Ручки EQ/ISO (HI, MID, LOW) (стр. 10 ) w Ручка SEND/RETURN LEVEL Регулировка качества звучания каждого канала. Регулирует уровень звука SEND/RETURN. e Индикатор...
-
Page 92: Подключение Входных Терминалов
! При подключении данного аппарата к компьютеру используйте кабель USB из комплекта поставки данного аппарата. ! Концентратор USB не может использоваться. Подключение входных терминалов А а А а А а А а а а а а М rekordbox К К а Pioneer DJ DJ а Pioneer DJ... -
Page 93: Подключение Выходных Терминалов
В а 1 При подключении мобильного устройства пользуйтесь кабелем из комплекта поставки устройства. Информацию о поддерживаемых мобильных устройствах см. на сайте Pioneer DJ ниже. pioneerdj.com/support/ 2 Также, подключите внешний эффектор к терминалу [RETURN] (входной терминал). 3 Для сбалансированного выхода используйте разъемы [MASTER1]. Подключение к источнику несбалансированного входного сигнала... -
Page 94: Основное Управление
Управление Основное управление Контроль звучания с помощью наушников Вывод звучания 1 Подключите наушники к терминалу [PHONES]. 2 Нажмите кнопку [CUE] для канала, который нужно 1 Нажмите кнопку [u]. контролировать. Включите питание данного аппарата. 3 Установите переключатель селектора 2 Установите переключатели селектора входа. [MONO SPLIT, STEREO]. -
Page 95: Дополнительная Информация
Дополнительная информация Возможные неисправности и способы их устранения ! Если данный аппарат работает неправильно, выполните следующие проверки, а также обратитесь к сайту Pioneer DJ и просмотрите раздел [FAQ] для [DJM-750MK2]. pioneerdj.com/support/ Иногда проблема может заключаться в другом компоненте. Проверьте другие используемые компоненты и электроприборы. Если... -
Page 96: Технические Характеристики
! Технические характеристики и конструкция данного изделия Технические характеристики могут изменяться без уведомления. ! © Pioneer DJ Corporation 2017. Все права защищены. Общий раздел – Основной блок Требования к питанию ........110 В до 240 В переменного тока, 50 Гц/60 Гц... - Page 97 П а К а Па Д а а а а а а а Р а А а П а а Д а ( а . .): 5 D3-7-10-6b_B1_Ru Да а а а. С Да а а P1 - Г Г 2001 2002 2003...
- Page 100 © 2017 Pioneer DJ Corporation. All rights reserved. © 2017 Pioneer DJ Corporation. Tous droits de reproduction et de traduction réservés. PIONEER ELECTRONICS (THAILAND) CO., LTD. 17th Fl., KPN Tower, 719 Rama 9 Road, Bangkapi, Huaykwang, Bangkok 10310 6F, Yokohama i-Mark Place, 4-4-5 Minatomirai, Nishi-ku, Yokohama, Kanagawa 220-0012 JAPAN TEL: +66-2-717-0777 PIONEER TECHNOLOGY (MALAYSIA) SDN.
Need help?
Do you have a question about the DJM-750MK2 and is the answer not in the manual?
Questions and answers