Table of Contents
Advertisement
Quick Links
Advertisement
Table of Contents

Subscribe to Our Youtube Channel
Related Manuals for Ryobi LM-1320


Summary of Contents for Ryobi LM-1320
- Page 1 6986302 (STD) 06-11...
- Page 2 THANK YOU FOR BUYING A RYOBI LAWNMOWER Your new lawnmower has been engineered and manufactured to Ryobi’s high standard of dependability, ease of operation, and operator safety. Properly cared for, it will give you years of rugged, trouble free performance. If you use your lawnmower properly and only for what it is intended, you will enjoy years of safe, reliable service.
-
Page 3: Safety Alert Symbol
SAFETY ALERT SYMBOL Indicates danger, caution or warning. May be used in conjunction with other symbols or pictures. - Page 5 SPECIFIC SAFETY RULES FOR LAWNMOWER 1. Never allow children or people unfamiliar with 12. Use extreme caution when stepping back or these instructions to use the lawnmower. pulling the lawnmower towards you. 2. This appliance is not intended for used by 13.
-
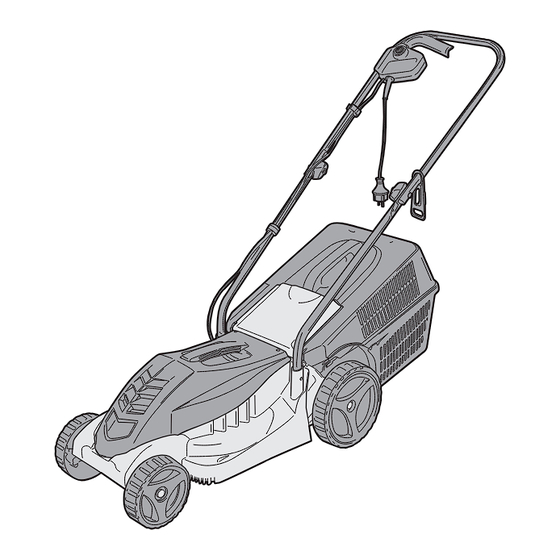
Page 6: Standard Accessories
DESCRIPTION Fig. 1 1. Lawnmower deck 7. Switch lever 2. Grass collection box 8. Rear deflector 2a) Grass collection box-upper 9. Cable retainer 2b) Grass collection box-lower 10. Washer (handlebar securing knob) 3. Lower handlebar 11.Bolt 4. Upper handlebar 12.Lock screw 5. - Page 7 ASSEMBLY HANDLEBAR (Fig. 2, 3) 1. Assemble the upper handlebar (4) to the lower handlebar (3) with the handlebar securing knob (5), washer (10) and bolt (11). 2. Insert the two lower handlebar tubes into the holes on main body, and fix the with lock screw (12) and washer (13).
-
Page 8: Attaching The Grass Collection Box
ASSEMBLY ATTACHING THE GRASS COLLECTION BOX (Fig. 5) 1. Ensure that the grass collection box has been assembled correctly. 2. Lift the rear deflector (8) on the mower deck. 3. Pass the collection box under the handlebar, align the attachment hooks and place the collection box into position. -
Page 9: Starting And Stopping
OPERATION STARTING AND STOPPING NOTE: The blade continues to rotate for a few seconds after the machine is switched off. Allow the motor/blade to stop rotating before switching “on” again. Do not rapidly switch off and on. Starting: 1. Set the mower to the required ‘cutting height’. 2. -
Page 10: General Maintenance
MAINTENANCE SAFETY Before any inspection, maintenance or cleaning of WARNING: the mower is conducted. If signs of damage are found, the 1. Ensure that the cutting blade has fully stopped mower unit should not be used until rotating. fully repaired by a qualified person. 2. - Page 11 MAINTENANCE CUTTING BLADE POWER SUPPLY CABLE 1. The cutting blade has sharp edges, always wear Before use, the power supply cable should be strong gloves to protect your hands when inspected for signs of damage or ageing. working with or around the cutting blade. 2.
-
Page 12: Warranty
RYOBI tool (hereinafter called “the Product”), for which it was not designed, or is not suited is warranted by Ryobi (herein called “the and no repairs, alterations or modifications Company”) to be free from defects in material...
Need help?
Do you have a question about the LM-1320 and is the answer not in the manual?
Questions and answers