Table of Contents
Advertisement
Quick Links
Advertisement
Table of Contents

Subscribe to Our Youtube Channel
Related Manuals for Numatic TTV-5565/200T


Summary of Contents for Numatic TTV-5565/200T
- Page 2 Before continuing, please refer to Quick Set Up Guide on Page 8 Index Page 2 Machine overview Page 3 Control panel overview Page 4 Rating label / Personal Protective Equipment / Recycling Page 5 Safety Precautions Page 6 / 7 Quick set-up guide Page 8 Machine set-up...
-
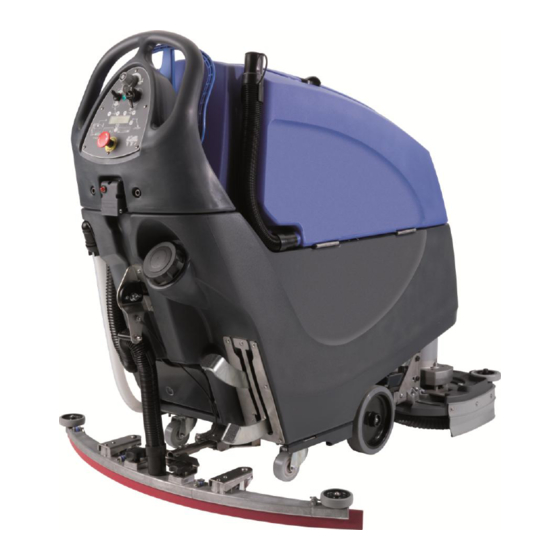
Page 3: Machine Overview
Machine Overview 1. Operator control panel ( see page 4 ) 13. Water pump 2. Charging socket 14. Gel batteries 3. Clean water tank fill point 15. 40 Amp battery fuses x2 4. Floor tool raise / lower lever 16. Clean Water Filter 5. -
Page 4: Control Panel Overview
Control Panel Overview Start / Stop Trigger Chemical Mix Adjustment Speed Control Off Aisle Vacuum Button / Whisper mode Forward / Reverse Switch Water Flow Rate Adjustment Battery Charge Level Indicator Recovery Tank ‘Full’ Indicator Hours Meter toggle Button Brush Pressure / Load Indicator Emergency Stop Button For full easy to follow Main Control ON/OFF Key... - Page 5 About the Machine Rating Label WEEE (Waste, Electrical and Electronic Equipment) Company name and address Machine Description Voltage Frequency Scrubber Dryer Accessories and Packaging should be WEEE Logo sorted for Environmentally- Friendly recycling. CE Mark Only for EU countries. Weight Do not dispose of Scrubber drier into household waste.
- Page 6 DO regularly examine the power cord for damage, such as cracking or ageing. If damage is found, replace the cord before further use. DO only replace the power cord with the correct Numatic approved replacement parts. DO ensure that the work area is clear of obstructions and / or people.
- Page 7 9. The batteries are to be disposed of safely and in accordance with the battery directive. 10. Only use genuine NUMATIC replacement batteries. 11. Do not allow the batteries to become fully discharged; it may not be possible to recharge them. Batteries should not be discharged below 9.5 volts with 10 amps flowing.
- Page 8 Quick Set Up Guide Please read before commencing any operation. After the removal of all the packaging, carefully open and check the contents of the start up pack (fig.1). Contents: 1 x Operator Manual 1 x Battery charging lead 2 x Keys 3 x 40 amp fuses (1 x spare) 1 x Maxi fuse-puller Fig.1...
-
Page 9: Machine Setup
Machine Set Up ALWAYS ENSURE THAT THE MACHINE IS SWITCHED OFF BEFORE MAKING ANY ADJUSTMENTS Fitting the floor-tool Fig.9 Fig.7 Fig.9a Fig.8 Lower the floor-tool arm by moving the release lever to the lower position (fig. 7) Push floor-tool onto the holder and secure with the easy-fit securing pin (fig 8) Push waste collection pipe onto the floor-tool;... -
Page 10: Fitting The Brushes
Machine Set Up Setting the width adjustment Adjustment of the Brush deck must take place with the deck in the raised position. Lift the Deck locking knob located at the front of the machine. (see fig.11), then pull the side pod at the handle position to expand or close to contract the deck to the desired width - 650mm (see Fig.11a) or 550mm (see Fig 11b) Note: Remove the brushes before adjusting width! Fig.11... -
Page 11: Filling The Clean Water Tank
Machine Set Up Filling the clean water tank The TTV-5565 is equipped with a large capacity 85 litre clean-water tank allowing, for large areas to be covered in a single fill. Fig.15 Fig.14 Fig.16 Fig.17 Fig.17a To fill the clean-water tank, extend the hose located to the rear of the machine in the centre of the removable filler cap, see Fig 14. -
Page 12: Chemical Dosing System
(fig. 18), remove the dosing bottle, unscrew the bottle cap (fig.19) and fill with appropriate cleaning chemical, or fit your own chemical container, reusing the original Numatic container cap. Refit dosing bottle (fig.19a) and replace bottle cap, and carefully lower waste-water tank. -
Page 13: Machine Operation
Machine Operation Lowering the floor tool Fig.20 Fig.21 After preparing the floor (see previous section), we are now ready to set the controls to suit the cleaning conditions. Before any settings can be applied, ensure the brush deck is lowered. (see fig 23) Move the Floor tool lever (see fig.20), to it’s lower position (see fig.21). -
Page 14: Setting The Cleaning Controls
Setting the cleaning controls Insert the key into the master control on/off and quarter-turn it clockwise to the ‘ON’ position. The battery charge-level indicator will illuminate for 5 seconds. Set Water Flow Rate as required, depending on floor type and level of soiling 1 L / Min 2 L / Min 3 L / Min... - Page 15 Brush pressure / Load adjustment The brush load lever is located to the right hand side of the machine. This option is for hard to clean patches, adding 10 kg extra pressure to the brushes. The brush load indicator on the control display shows the pressure applied, when the machine is being operated.
-
Page 16: Machine In Use
Machine Operation Breakaway floor-tool The floor-tool design incorporates a breakaway feature. Allowing it to safely disengage from its mounting should it become caught on an obstruction, during forward machine movement (See fig.26) Fig.26 To re-attach the blade to its holder. First loosen the retaining knobs on the floor-tool body and slide onto the holding bracket. - Page 17 Off-Aisle Cleaning Kit (Optional Extra Accessory)606182 Fig.30 The optional off-aisle cleaning kit gives added flexibility to the operator. The kit can be used to clean hard to reach / inaccessible areas. The TTV-5565 has been fitted with a whisper mode, this reduces the noise produced by the vacuum motor by 3dB. Press the off aisle button on the control panel (see fig.30) to turn on the off aisle function, the vacuum motor will run at 100% and the off aisle light will show a constant green.
-
Page 18: Regular Maintenance
Regular Maintenance ALWAYS ENSURE THAT THE MACHINE IS SWITCHED OFF PRIOR TO ANY MAINTENANCE USING THE MASTER CONTROL ON/OFF KEY. REMOVE THE KEY PRIOR TO ANY MAINTENANCE OPERATION. After use, empty waste-water tank using emptying hose and flush-out with clean water. Next remove floor-tool vacuum hose and flush-out with clean water. -
Page 19: Changing The Floor Tool Blades
Changing the Floor Tool Blades ALWAYS ENSURE THAT THE MACHINE IS SWITCHED OFF PRIOR TO ANY MAINTENANCE USING THE MASTER CONTROL ON/OFF KEY. REMOVE THE KEY PRIOR TO ANY MAINTENCANCE OPERATION. The floor-tool Fig.33 Fig.32 To clean the floor-tool, remove securing-pin and pull-free from the holder (see fig.32). Rinse the floor-tool assembly with clean water and refit. -
Page 20: Machine Charging
Machine Charging ALWAYS ENSURE THAT THE MACHINE IS SWITCHED OFF PRIOR TO CHARGING. The battery meter displays the charge level of the batteries; when fully charged, all meter lights are illuminated (see fig 36). Fig.36 As the machine is used and the batteries are discharged, the meter lights will go out from right to left. -
Page 21: Free-Wheel Function
Free-Wheel Function ALWAYS ENSURE THAT THE MACHINE IS ON LEVEL GROUND BEFORE DISENGAGING BRAKE ARM. NEVER DISENGAGE THE BRAKE WHEN THE MACHINE IS ON A SLOPE / GRADIENT The TTV-5565 is equipped with a free-wheel function that will enable the operator to move the machine manually if required. -
Page 22: Battery Care
Battery Care To ensure your machine remains at its maximum efficiency and prolong your battery life, please follow the simple steps below: Under normal daily usage: Recharge batteries after each use regardless of machine operation time (see page 19) Showing location of Viewing panel for charging-light sequence (fig 43). Fig.43 Yellow:- Charging Normally, 23 hours MAX Yellow Flashing:- Charging Finished, (Trickle Charging) -
Page 23: Specifications
Specifications Gross Floor Brush Protection Transaxle Brush Motor Vac Motor Speed Weight Tool Sizes sizes Class Weight (Full) size 400W / 280mm 280mm 600W 600W 4.2Kph 372Kg IPX4 1050 287Kg 400W 330mm 330mm Noise Water Nuchem Water Nuchem Transit Cleaning Maximum Climbing Max decibel level at 1 Time... - Page 24 233887 / 06/11 (A05)
- Page 25 Contact Service Agent. 233887 / 06/11 (A05)
-
Page 26: Troubleshooting
Failure to rectify the problem or in the event of a breakdown contact your Numatic dealer or the Numatic Technical helpline +44 (0)1460 269268 ( see back page for company addresses or dealers stamp) Recommended Spare Parts - TTV 5565... - Page 27 606167 Battery 221047 40 Amp fuse 206953 Detent pin FLOOR TOOLS: 606218 Floor Tool 606198 Linatex Blade Set 303871 Floor Tool bracket (moosehead) BRUSHES 606253 HD Nyloscrub (2 req) 330mm 606252 HD Nyloscrub (2 req) 280mm (STANDARD) (STANDARD) 606174 Polyscrub (2 req) 330mm 606173 Polyscrub (2 req) 280mm 606172...
- Page 28 233887 / 06/11 (A05)
- Page 29 233887 / 06/11 (A05)
- Page 30 233887 / 06/11 (A05)
- Page 31 DICHIARAZIONE DI CONFORMITÀ EU Me täten vakuutamme, että seuraava laite täyttää kaikki Oswiadczamy, ze nastepujacy sprzet spelnia wszystkie Noi, Numatic International Limited, cu sediul in Chard, Som- Käesolevaga deklareerime, et järgmine seade on Con la presente dichiariamo che i seguenti macchinari asiaa koskevat säännökset:...
- Page 32 233887 / 06/11 (A05)
Need help?
Do you have a question about the TTV-5565/200T and is the answer not in the manual?
Questions and answers