
Related Manuals for Numatic TTV 678-300


Summary of Contents for Numatic TTV 678-300
- Page 1 Owner Instructions Original Instructions Warning! Read instructions before using the machine TTV 678-300/400T Ride - on Scrubber Dryer www.numatic.com...
-
Page 2: Table Of Contents
Before continuing, please refer to Quick Set Up Guide on Page 7 Index Page 2 Machine overview Page 3 Control panel overview Page 4 Safety Precautions Page 5 Rating label / Personal Protective Equipment / Recycling Page 6 Quick set-up guide Page 7 Machine set-up Fitting the side pod skirts... -
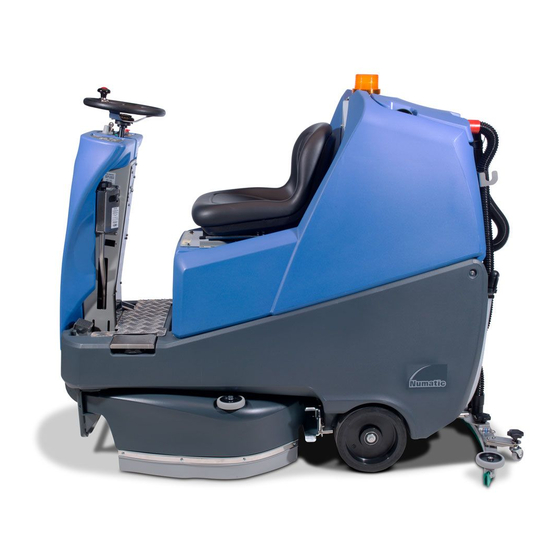
Page 3: Machine Overview
Machine Overview 12. 30 Amp battery fuses x4 ( 8 battery machine ) 1. Operator control panel ( see page 4 ) 40 Amp battery fuses x3 ( 6 battery machine ) 2. Brush load-adjuster knob 13. Gel batteries (606167) 3. -
Page 4: Control Panel Overview
Control Panel Overview Off Aisle Vacuum Button Battery Charge Level Indicator Main Control On / Off Key Brush Pressure / Load Indicator Clean Speed Button Machine ‘Off’ Isolator Button 4/5/6 Operator Pre-set Buttons Forward / Reverse Switch Water Flow Rate Indicator Horn Brush Speed Indicator For full easy to follow... -
Page 5: Safety Precautions
If damage is found, replace the lead before further use. only replace the charger lead with the correct Numatic approved replacement part. ensure that the work area is clear of obstructions and / or people. -
Page 6: Rating Label / Personal Protective Equipment / Recycling
Rating label / Personal Protective Equipment / Recycling Rating Label Company Name & Address Noise level Machine Description Hand arm vibration Voltage Frequency Whole body vibration Power rating WEEE Logo CE Mark Machine yr/wk Serial number Weight (ready to use) Safety Critical Components Charging Leads: Ho5VV-F x 1mm x 3 Core... -
Page 7: Quick Set-Up Guide
Quick Set Up Guide Please read before commencing any operation. After the removal of all the packaging, carefully open and check the contents of the start up pack (Fig.1). Contents: 1 x Operator Manual 2 x Battery charging lead 2 x Keys 4 x 40 amp fuses (1 x spare) TTV678/300T 5 x 30 amp (1 x spare) -
Page 8: Fitting The Side Pod Skirts
Machine Set Up ALWAYS ENSURE THAT THE MACHINE IS SWITCHED OFF BEFORE MAKING ANY ADJUSTMENTS Fitting the side pod skirts Fig.6a Fig.6b To fit the side pod skirts, first remove the steel retaining strip already fitted to the pod (Fig.6a). Align the steel retaining strip within the locating grooves of the rubber skirt and refit using existing screws (Fig.6b) Periodically the side skirts should be examined and checked for wear and damage. -
Page 9: Fitting The Brushes
Machine Set Up Fitting the brushes Fig.10 Fig.11 Featuring the new OBS (Octagonal Brush System); the brushes simply push-fit up onto the chucks making fitting and removal a simple process. Pull the side pod adjustment lever and set to the top position (Fig.10). Fig.12 The side pod will now pull open (Fig.11). -
Page 10: Setting The Width
Machine Set Up Setting the width adjustment Fig.13 First push the side pod in (see Fig.13), then pull the side pod adjustment lever and set it to one of the three width-settings (see Fig.13a) Repeat the operation on both sides. Fig.13a 650mm 750mm... -
Page 11: Chemical Dosing System
When handling and mixing chemicals. Always ensure that chemical manufacturers safety guidlines are followed. Only use chemicals recomended for use in auto scrubber-driers. Chemical dosing system The TTV-678 ride-on scrubber dryer has an optional automatic chemical-dosing system. Simply fill the 4 litre chemical dosing bottle and the machine will deliver the correct mix ratio as set by the operator, depending on the floor and cleaning conditions. -
Page 12: Lowering The Floor-Tool
Machine Set Up Lowering the brush deck Fig.20 Fig.21 Fig.22 After preparing the floor (see previous section), we are now ready to set the controls to suit the cleaning conditions. Before any settings can be applied, ensure the brush deck is lowered. While depressing left-hand foot pedal (see Fig.20), press down the release lever (see Fig.21) and gently release the foot pedal to lower the brush deck (see Fig.22). -
Page 13: Adjusting The Seat
Adjusting the seat Fig.24 Sitting in the driving position, adjust the seat forwards or backwards as necessary by using the lever found on the left-hand side (see Fig.24). Note: The seat is fitted with a pressure sensor that disables the machine until an operator is seated. Setting the cleaning controls Insert the key into the ignition and quarter-turn it clockwise to the ‘ON’... -
Page 14: Setting The Operator Pre-Set Buttons
Machine Operation Setting the operator pre-set buttons Settings can be stored using one of the three pre-set store buttons (S1/S2/S3). Once settings are entered (chemical dose, brush speed and water-flow), press and hold one of the three pre-set store buttons, a light will flash then remain constant; your settings are now saved. -
Page 15: Emergency Stop Button And Horn
Emergency-stop button and horn The TTV-678 is equipped with an electronic braking system. Simply lift your foot from the accelerator and the machine will stop. Fig.26a In an emergency, strike the emergency-stop isolator button The machine will be disabled. To reset, turn isolator button clockwise (see Fig.26). After resetting the emergency stop button, to restart the machine ,turn the ignition key to the off then the on Fig.26... -
Page 16: Off-Aisle Cleaning Kit ( Optional )
Machine Operation Breakaway floor-tool The floor-tool design incorporates a breakaway feature allowing it to safely disengage from its mounting should it become caught on an obstruction. (See Fig.29) Fig.29 To attach the blade to its holder, first loosen the retaining knobs on the floor-tool body and slide onto the holding bracket. - Page 17 Machine Cleaning ALWAYS ENSURE THAT THE MACHINE IS SWITCHED OFF PRIOR TO ANY MAINTENANCE. After use, empty waste-water tank using emptying hose and flush-out with clean water. Next remove floor-tool vacuum hose and flush out with clean water. Next empty clean water tank, using emptying hose and again flush out with clean water.
-
Page 18: Floor-Tool
Machine Cleaning ALWAYS ENSURE THAT THE MACHINE IS SWITCHED OFF PRIOR TO CLEANING. The Floor Tool Fig.33 Fig.32 To clean the floor-tool, remove securing-pin and pull-free from the holder (see Fig.32). Rinse the floor-tool assembly with clean water and refit. Fig.34 Fig.35 Periodically the floor-tool blades should be examined and checked for wear and damage. -
Page 19: Machine Charging
Machine Charging ALWAYS ENSURE THAT THE MACHINE IS SWITCHED OFF PRIOR TO CHARGING. The battery meter displays the charge level of the batteries; when fully charged, all meter lights are illuminated (see Fig.36). Fig.36 As the machine is used and the batteries are discharged, the meter lights will go out from right to left. - Page 20 Free-Wheel Function ALWAYS ENSURE THAT THE MACHINE IS ON LEVEL GROUND BEFORE DISENGAGING BRAKE ARM. NEVER DISENGAGE THE BRAKE WHEN THE MACHINE IS ON A SLOPE / GRADIENT. NEVER TOW THE MACHINE WITH THE BRAKE ENGAGED. The TTV-678 is equipped with a free-wheel function that will enable the operator to move / tow the machine. The motor brake is disengaged by opening the brake arm on the side of the drive wheel (see Fig.40).
- Page 21 Battery Care To ensure your machine remains at its maximum efficiency and prolong your battery life, please follow the simple steps below: Under normal daily usage: Recharge batteries after each use regardless of machine operation time (see page 19). Showing location of Viewing panel for charging-light sequence. Yellow:- Charging Normally, 23 hours MAX Yellow Flashing:- Charging Finished, (Trickle Charging) Green:- Fully Charged...
- Page 22 Under abnormal use; i.e. leaving the machine without charging for a period of time, we advise that you follow these steps: If the machine will be standing unused for a period of 30 days or more, then batteries must be fully charged and battery fuses removed using the Maxi fuse-puller provided, prior to this period.
- Page 23 ‘Causes Battery Indicator to Flash’ Diagnostic software is available via your service engineer. Failure to rectify the problem or in the event of a breakdown contact your Numatic dealer or the Numatic Technical helpline +44 (0)1460 269268 235470 09/13 (A10)
- Page 24 Contact Service Agent. 235470 09/13 (A10)
- Page 25 Contact Service Agent. 235470 09/13 (A10)
- Page 26 Recommended Spare Parts LINATEX BLADES: DrIVE MOTOr SpArE pArTS: 208203 - Linatex Blade (650mm) (Rear) 208145 - Wheel (Tyre) 208201 - Linatex Blade (650mm) (Front) 208146 - Armature Brush 606196 - Blade Set (650mm) 208147 - Motor Brush 208194 - Linatex Blade (850mm) (Front) 208148 - Friction Disc 208196 - Linatex Blade (850mm) (Rear) 208149 - Rubber Gasket...
- Page 27 235470 09/13 (A10)
- Page 28 235470 09/13 (A10)
- Page 29 235470 09/13 (A10)
-
Page 30: Specifications
Specifications Model - TTV678-300T Noise Brush Traction Transit Cleaning Climbing Scrub Vac Motor Power Max decibel Time Motors Drive Speed Speed Gradient Widths level at 1 meter 72dB (A) (ISO 650mm 3 x 24V 6 x 12V = 24V 400W 3744) 3.5 hrs 600W... - Page 31 EMC Directive 2004/108/EC RoHS Directive 2011/65/EU Machine Description: Scrubber Dryer Type: TTV series Manufactured by: Numatic International Limited Relevant standards upon which conformity is declared include: IEC 60335-1 2001 + A1 2004 + A2 2006 + National Deviations IEC 60335-2.72 Ed 2.0...
- Page 32 38/ 32 mm Adaptor Signed This Product has been comprehensively inspected and checked during every stage of its manufacture. including an in-depth electrical safety and functionality test. Specification subject to change without prior notice www.numatic.co.uk © Numatic International Limited 235470 09/13 (A10)
Need help?
Do you have a question about the TTV 678-300 and is the answer not in the manual?
Questions and answers