Table of Contents
Advertisement
Available languages
Available languages
Quick Links
SYSTEM
TERMOSTATO ELETTRONICO
PER FAN-COIL
E L E C T R O N I C
T H E R M O S TAT
F O R
FA N - C O I L
T H E R M O S TAT É L E C T R O N I Q U E P O U R FA N - C O I L
T E R M O S TAT O E L E C T R Ó N I C O PA R A FA N - C O I L
E L E K T R O N I S C H E R T H E R M O S TAT F Ü R FA N - C O I L
T E R M O S TAT E L E C T R O N I C P E N T R U V E N T I L AT O R
GW 20 853 - GW 21 853
Advertisement
Chapters
Table of Contents

Related Manuals for Gewiss GW 20 853


Summary of Contents for Gewiss GW 20 853
- Page 1 E L E K T R O N I S C H E R T H E R M O S TAT F Ü R FA N - C O I L T E R M O S TAT E L E C T R O N I C P E N T R U V E N T I L AT O R GW 20 853 - GW 21 853...
- Page 2 ATTENZIONE - IMPORTANTE • Ci congratuliamo con Lei per la scelta di prodotti Gewiss. I prodotti Gewiss sono costruiti con attente cure dei dettagli impiegando solo materiali di qualità elevata. I prodotti Gewiss Le garantiranno nel tempo prestazioni ottimali. • Leggere attentamente le seguenti istruzioni in quanto forniscono importanti informazioni sulle modalità...
-
Page 3: Table Of Contents
INDICE pag. • gENEralItà proDotto - Funzioni .................. • IstruzIoNI D’INstallazIoNE - Logica applicativa ..............- Collegamenti elettrici ............... • IstruzIoNI D’ImpIEgo - Comandi e segnalazioni ............- Modo di funzionamento ............ -
Page 4: Generalità Prodotto
GENERALITÀ PRODOTTO f u N z I o N I DatI prEstazIoNalI • Modalità di funzionamento: elettrovalvola termostatata e ventilazione fissa, elettrovalvola e ventilazione termostatate, solo ventilazione termostatata ed elettrovalvola non collegata. • Blocco del set di temperatura: meccanico con “disco range” (in dotazione) •... -
Page 5: Istruzioni D'installazione
ISTRUZIONI D INSTALLAZIONE l o g I C a a p p l I C a t I V a Consigli sul posizionamento: Installare il termostato a quota 1,50÷1,70 m dal pavimento, lontano da sorgenti di calo- re, prese d’aria, porte o finestre. OK ! h 1,5 m Termostato... -
Page 6: Collegamenti Elettrici
ISTRUZIONI D INSTALLAZIONE C o l l E g a m E N t I E l E t t r I C I Importante: L’installazione ed il collegamento elettrico dei dispositivi ed apparec- chiature devono essere eseguiti da personale qualificato ed in conformità alle norme e leggi vigenti. - Page 7 ISTRUZIONI D INSTALLAZIONE C o l l E g a m E N t I E l E t t r I C I Il filo d’impostazione deve sempre essere collegato al morsetto n° 3 o al morsetto n° 4. Impostazione del modo di comando della ventilazione del fan-coil N.B.: il comando dell’elettrovalvola è...
-
Page 8: Istruzioni D'impiego
ISTRUZIONI D IMPIEGO C o m a N D I E s E g N a l a z I o N I Commutatore velocità Fermo Led segnalazione stato ventilatore del carico: Lento Medio acceso = carico inserito Veloce Selettore per comando Manopola con scala del modo di lavoro: temperature: 5°C ÷... -
Page 9: Modo Di Funzionamento
ISTRUZIONI D IMPIEGO m o D o D I f u N z I o N a m E N t o In funzione dei dispositivi collegati (ventilatore e/o elettrovalvola) e del morsetto (n° 3 o n° 4) a cui viene collegato il filo preposto all’impostazione modo di funzionamento del ventilatore, il termostato può... - Page 11 E N g l I s H Electronic thermostat for Fan-Coil 20 sYstEm serie...
- Page 12 • Congratulations for having choosing a Gewiss product. Gewiss products are constructed with careful attention to detail, using only high quality materials. Gewiss products assure you of peak performan- ce over time. • Carefully read the following instructions since they contain important information on installing and operating the product.
- Page 13 INDEX page • gENEral proDuCt DEsCrIptIoN - Functions ................14 • INstallatIoN INstruCtIoNs - Location advice ............... 15 - Electrical connections ............. 16 • opEratINg INstruCtIoNs - Commands and signals ............18 - Operating mode ..............19...
- Page 14 GENERAL PRODUCT DESCRIPTION f u N C t I o N s opEratINg Data • Operating mode: thermostat-controlled solenoid valve and continuous fan ope- ration, thermostat-controlled solenoid valve and fan operation, thermostat-con- trolled fan operation only and solenoid valve not connected •...
- Page 15 INSTALLATION INSTRUCTIONS l o C a t I o N a D V I C E recommendations on positioning: Install the thermostat at a height of from 1.50 to 1.70 m from the floor, far away from sources of heat, air ducts, doors or windows. OK ! h 1,5 m Thermostat...
- Page 16 INSTALLATION INSTRUCTIONS E l E C t r I C a l C o N N E C t I o N s Important: electrical wiring installation of the devices and appliances should be car- ried out by qualified technicians in accordance with the regulations and laws in force. The manufacturer will not assume any responsibility for the use of products that must comply with special environmental and/or installation regulations;...
- Page 17 INSTALLATION INSTRUCTIONS E l E C t r I C a l C o N N E C t I o N s The setting wire must always be connected to terminal n° 3 or terminal n° 4. setting the fan-coil control mode N.B.: the solenoid valve is always thermostat controlled.
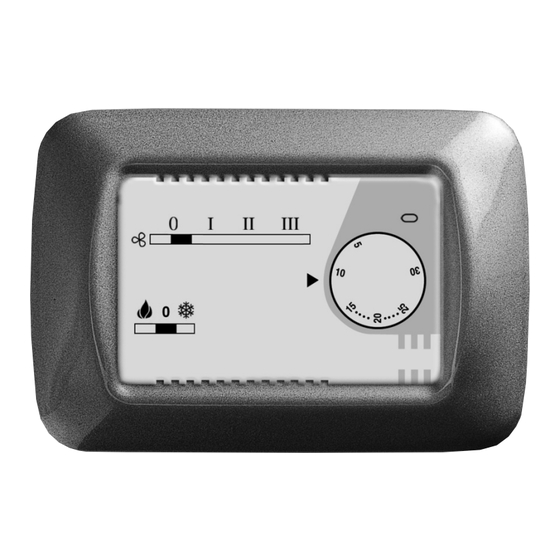
- Page 18 OPERATING INSTRUCTIONS C o m m a N D s a N D s I g N a l s Fan speed switch LED load state indicator: On = load on Medium High Operating mode control Knob with temperature switch: scale: 5°C to 30°C (Winter - OFF - Summer) Reference mark for setting...
- Page 19 OPERATING INSTRUCTIONS o p E r a t I N g m o D E Based on the devices connected (fan and/or solenoid valve) and the terminal (n° 3 or n° 4) to which the wire for the fan operating mode setting is connected, the ther- mostat can operate in the following modes: 1) thermostat-controlled solenoid valve and continuous fan operation (fig.
- Page 21 f r a N Ç a I s Thermostat électronique pour Fan-Coil 20 sYstEm serie...
- Page 22 ATTENTION - IMPORTANT • Nos compliments, vous avez choisi des produits Gewiss. Ces produits ont été fabriqués avec un soin tout particulier jusque dans les détails, en utilisant exclusivement des matériaux de haute qualité. Les produits Gewiss vous garantiront d’excellentes performances pendant longtemps.
- Page 23 sommaIrE page • gENEralItEs sur lE proDuIt - Fonctions ................24 • INstruCtIoNs pour l’INstallatIoN - Logique d’application .............. 25 - Raccordements électriques ............ 26 • INstruCtIoNs pour l’EmploI - Commandes et signalisations ..........28 - Mode de fonctionnement ............29 Ç...
-
Page 24: Generalites Sur Le Produit
GENERALITES SUR LE PRODUIT f o N C t I o N s DoNNEEs sur lEs pErformaNCEs DE l’apparEIl • Modalités de fonctionnement: électrovanne thermostatée et ventilation fixe, électrovanne et ventilation thermostatées, uniquement ventilation thermostatée et électrovanne non raccordée. • Modalités de fonctionnement: électrovanne thermostatée et ventilation fixe élec- trovanne et ventilation thermostatées •... -
Page 25: Instructions Pour L'installation
INSTRUCTIONS POUR L INSTALLATION l o g I Q u E D ’ a p p l I C a t I o N Conseils sur le positionnement: Installer le thermostat à une hauteur de 1,50÷1,70 m du sol, à l’abri des sources de chaleur, des courants d’air, loin des portes et des fenêtres. -
Page 26: Raccordements Électriques
INSTRUCTIONS POUR L INSTALLATION r a C C o r D E m E N t s E l E C t r I Q u E s Important: L’installation et le raccordement électrique des dispositifs et des appa- reillages doivent être effectués par des personnes qualifiées et en conformité avec les normes et les lois en vigueur. - Page 27 INSTRUCTIONS POUR L INSTALLATION r a C C o r D E m E N t s E l E C t r I Q u E s Le fil de programmation doit toujours être raccordé à la borne n° 3 ou à la borne n°...
-
Page 28: Instructions Pour L'emploi
INSTRUCTIONS POUR L EMPLOI C o m m a N D E s E t s I g N a l I s a t I o N s Commutateur de Arrêt Diode luminescente vitesse du ventilateur état de la charge: Lent allumée = charge ON Moyen... -
Page 29: Mode De Fonctionnement
INSTRUCTIONS POUR L EMPLOI m o D E D E f o N C t I o N N E m E N t En fonction des dispositifs connectés (ventilateur et/ou électrovanne) et du bornier (n° 3 ou n° 4) auquel est raccordé le fil destiné à la programmation du mode de fonc- tionnement du ventilateur, le thermostat peut opérer des trois façons suivantes: 1) électrovanne thermostatée et ventilation fixe (fig. - Page 31 E s p a Ñ o l Termostato electrónico para Fan-Coil 20 sYstEm serie...
- Page 32 ATENCIÓN - IMPORTANTE • Le felicitamos por haber elegido productos Gewiss. Los productos Gewiss se fabrican prestando especial atención en los detalles al emplear sólo materiales de calidad elevada. Los productos Gewiss le garantizarán prestaciones óptimas a través del tiempo.
- Page 33 INDICE pág. • DEsCrIpCIÓN gENEral DEl proDuCto - Funciones ................34 • INstruCCIoNEs para la INstalaCIÓN - Lógica aplicativa ..............35 - Conexion eléctricas ..............36 • INstruCCIoNEs para El EmplEo - Mandos y señalizaciones ............38 - Modo de funcionamiento ............39 Ñ...
-
Page 34: Descripción General Del Producto
DESCRIPCIÓN GENERAL DEL PRODUCTO f u N C I o N E s Datos DE las prEstaCIoNEs • Modalidades de funcionamiento: electroválvula termostatada y ventilación fija, electroválvula y ventilación termostatadas, sólo ventilación termostatada y elec- troválvula no conectada. • Bloqueo del set de temperatura: mecánico con “disco range” (incluido en el equipo). -
Page 35: Instrucciones Para La Instalación
INSTRUCCIONES PARA LA INSTALACIÓN l Ó g I C a a p l I C a t I V a Consejos sobre la colocación: Instalar el termostato en cota 1,50÷1,70 m desde el suelo, lejos de fuentes de calor, tomas de aire, puertas o ventanas. OK ! h 1,5 m Termostato... -
Page 36: Conexion Eléctricas
INSTRUCCIONES PARA LA INSTALACIÓN C o N E X I o N E s E l É C t r I C a s Importante: la instalación y la conexión eléctrica de los dispositivos y aparatos tie- nen que ser llevadas a cabo por personal cualificado y según las normas y leyes en vigor. - Page 37 INSTRUCCIONES PARA LA INSTALACIÓN C o N E X I o N E s E l É C t r I C a s N.B.: El hilo de fijación tiene que estar conectado siempre con el borne n° 3 o con el borne n°...
-
Page 38: Instrucciones Para El Empleo
INSTRUCCIONES PARA EL EMPLEO m a N D o s Y s E Ñ a l I z a C I o N E s Led señalización Conmutador velocidad Parado estado de la carga: Lento ventilador encendido = carga activada Medio Rápido Selector para accionamiento... -
Page 39: Modo De Funcionamiento
INSTRUCCIONES PARA EL EMPLEO m o D o D E f u N C I o N a m I E N t o En función de los dispositivos conectados (ventilador y/o electroválvula) y del borne (n° 3 o n° 4) con el que se conecta el hilo encargado de la fijación del modo de fun- cionamiento del ventilador, el termostato puede trabajar de los siguientes modos: 1) electroválvula termostatada y ventilación fija (fig. - Page 41 D E u t s C H Elektronischer Thermostat für Fan-Coil 20 sYstEm serie...
- Page 42 ACHTUNG - WICHTIG • Wir beglückwünschen Sie zur Wahl eines Gewiss-Produktes. Die Produkte von Gewiss werden unter Verwendung von Qualitätsmaterialien mit größter Sorgfalt hergestellt und garantieren lange Lebensdauer bei stets optimalen Leistungen. • Die folgende Anleitung liefert wichtige Information zu Installation und Betrieb und muss daher aufmerksam gelesen werden.
- Page 43 INHaltsVErzEICHNIs Seite • allgEmEINE CHaraKtErIstIKEN DEs proDuKtEs - Funktionen ................44 • INstallatIoNsaNlEItuNg - Anwendungslogik ..............45 - Elektrische Anschlüsse ............46 • BEtrIEBsaNlEItuNg - Bedienelemente und Anzeigen ..........48 - Funktionsweise ............... 49...
-
Page 44: Allgemeine Charakteristiken Des Produktes
ALLGEMEINE CHARAKTERISTIKEN DES PRODUKTES f u N K t I o N E N lEIstuNgsDatEN • Betriebsweise: Magnetventil thermostatgesteuert und Lüftung unverstellbar, Magnetventil und Lüftung thermostatgesteuert, nur die Lüftung ist thermostat- gesteuert und das Magnetventil ist nicht angeschlossen • Blockierung des Temperatur-Sollwerts: Mechanisch mit “Range-Scheibe” (im Lieferumfang enthalten) •... -
Page 45: Installationsanleitung
INSTALLATIONSANLEITUNG a N W E N D u N g s l o g I K Empfehlungen für die Wahl des Einbaustandorts: Den Thermostat in 1,50÷1,70 m Höhe vom Fußboden einbauen, fern von Wärmequellen, Luftschlitzen, Türen oder Fenster. OK ! h 1,5 m Thermostat Thermostat... -
Page 46: Elektrische Anschlüsse
INSTALLATIONSANLEITUNG E l E K t r I s C H E a N s C H l Ü s s E Wichtig: Installation und Stromanschluss der Vorrichtungen und Geräte sind von qualifiziertem Fachpersonal und unter Einhaltung der einschlägigen Normen und Gesetze durchzuführen. - Page 47 INSTALLATIONSANLEITUNG E l E K t r I s C H E a N s C H l Ü s s E Der Einstellungsdraht muss immer an der Klemme Nr. 3 oder an der Klemme Nr. 4 angeschlossen werden. Einstellung der steuerungsart der lüftung des fan-Coil N.B.: Das Magnetventil ist immer thermostatgesteuert.
-
Page 48: Betriebsanleitung
BETRIEBSANLEITUNG B E D I E N E l E m E N t E u N D a N z E I g E N Led für die Umschalter Stillstand Statusanzeige der Last: Langsam Lüftergeschwindigkeit Ein = Last eingeschaltet Mittel Schnell Wählschalter zur... -
Page 49: Funktionsweise
BETRIEBSANLEITUNG f u N K t I o N s W E I s E Je nach dem, welche Vorrichtungen (Lüfter und/oder Magnetventil) angeschlossen sind, und an welcher Klemme (Nr. 3 oder Nr. 4) der für die Einstellung der Funktionsweise des Lüfters dienende Draht angeschlossen wird, hat der Thermostat eine der folgenden Funktionsweisen: 1) Thermostatgesteuertes Magnetventil und unverstellbare Lüftung (Abb. - Page 51 R o m â n ă Termostat electronic pentru ventilator 20 SYSTEM Serie...
- Page 52 Atenție - impoRtAnt • Felicitări pentru că ați ales produsele Gewiss. Produsele Gewiss sunt realizate cu atenție la detalii, folosind doar materiale de înaltă calitate. Produsele Gewiss vă garantează performanțe excelente în timp. • Citiți cu atenție următoarele instrucțiuni, întrucât vă oferă informații importante cu privire la modalitățile de instalare și de funcționare.
- Page 53 inDeX pag. • DAte geneRAle pRoDus â - Funcţii ..................54 ă • instRucțiuni De instAlARe - Logica aplicativă ..............55 - Conexiuni electrice ..............56 • instRucțiuni De utilizARe - Comenzi și semnalizări ............58 - Mod de funcţionare ..............59...
- Page 54 DAte geneRAle pRoDus f u n c ţ i i DAte pRivinD peRfoRmAnțele • Moduri de funcționare: electrovalvă cu termostat și ventilare fixă, electrovalvă și ventilare cu termostat, doar ventilare cu termostat și electrovalvă neconectată. • Blocarea valorii setate a temperaturii: mecanică cu „disc de reglare” (în dotare) •...
- Page 55 instRucțiuni De instAlARe l o g i c A A p l i c A t i v ă â ă sfaturi cu privire la amplasare: Instalați termostatul la o înălțime de 1,50÷1,70 m față de pardoseală, departe de surse de căldură, prize de aer, uși sau ferestre.
- Page 56 instRucțiuni De instAlARe c o n e X i u n i e l e c t R i c e important: Instalarea și conexiunea electrică a dispozitivelor și aparatelor trebuie să fie efectuate de personal calificat și în conformitate cu normele și legile în vigoare. Producătorul nu își asumă...
- Page 57 instRucțiuni De instAlARe c o n e X i u n i e l e c t R i c e Firul de setare trebuie să fie întotdeauna conectat la terminalul nr. 3 sau la terminalul nr. 4. setarea modului de comandă a ventilatorului â...
- Page 58 instRucțiuni De utilizARe c o m e n z i Ș i s e m n A l i z ă R i Comutator viteză Oprit ventilator Lent Led semnalare sarcină: Mediu aprins = sarcină introdusă Rapid Selector pentru comanda- Manetă...
- Page 59 instRucțiuni De utilizARe m o D D e f u n c ţ i o n A R e În funcție de dispozitivele conectate (ventilator și/sau electrovalvă) și de terminal (nr. 3 sau nr. 4) la care este conectat firul destinat setării modului de funcționare a venti- latorului, termostatul poate funcționa după...
- Page 60 Compilare a Cura dell'installatore to be filled out by the installer remplir aux soins de l'installateur a rellenar por parte del instalador Vom installationpersonal auszufüllen se Va Completa de Către instalator CODICE ARTICOLO Item code Code article Código artículo Artikelcode Cod articol ........................
- Page 64 According to the applicable Decisions and European Directives, the responsible for placing the apparatus on the Community market is: GEWISS S.p.A. Via A.Volta, 1 IT-24069 Cenate Sotto (BG) Italy Tel: +39 035 946 111 Fax: +39 035 946 270 E-mail: qualitymarks@gewiss.com +39 035 946 111 sat@gewiss.com...
Need help?
Do you have a question about the GW 20 853 and is the answer not in the manual?
Questions and answers