Advertisement
CHRYSLER CAN BUS INTERFACE
CHTO-01
INSTALLATION INSTRUCTIONS
* READ IMPORTANT WARNING INSIDE
BEFORE ATTEMPTING ANY INSTALLATION
THE CHTO-01 IS DESIGNED TO BE USED WITH VEHI-
CLES THAT HAVE A FACTORY AMPLIFIED SYSTEM.
THE CHTO-01 WILL PROVIDE A 12VOLT SWITCHED
WIRE FOR PROPER RADIO OPERATION. THE CHTO-01
NOW PROVIDES MUTE, PARKING BRAKE, VSS OR
SPEED SENSE, AND A REVERSE OUTPUT TO MAKE
INSTALLING AN AFTERMARKET NAVIGATIONAL
RADIO SIMPLER AND LESS TIME COMSUMING.
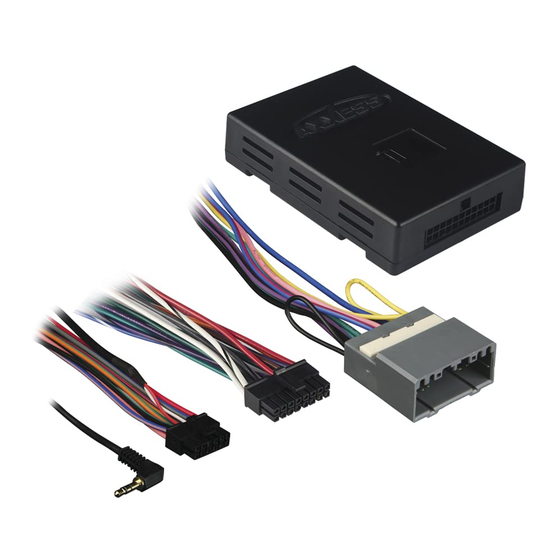
INTERFACE COMPONENTS
• CHTO-01
• 14 PIN HARNESS WITH RCA'S
• 12 PIN HARNESS TO 22 PIN CHRYSLER HARNESS
TOOLS REQUIRED FOR INSTALLATION
• Cutting Tool • Tape • Crimping Tool • Connectors
REV. 10-01-07
INSTCHTO-01
1-800-221-0932
www.metraonline.com
©Copyright 2004-2007 Metra Electronics Corporation
Advertisement
Table of Contents

Related Manuals for Metra Electronics CHTO-01


Summary of Contents for Metra Electronics CHTO-01
- Page 1 INSTALLATION INSTRUCTIONS * READ IMPORTANT WARNING INSIDE BEFORE ATTEMPTING ANY INSTALLATION THE CHTO-01 IS DESIGNED TO BE USED WITH VEHI- CLES THAT HAVE A FACTORY AMPLIFIED SYSTEM. THE CHTO-01 WILL PROVIDE A 12VOLT SWITCHED WIRE FOR PROPER RADIO OPERATION. THE CHTO-01...
- Page 2 CHTO-01 * IMPORTANT WARNING THIS PRODUCT INCLUDES INSTRUCTIONS FOR INSTALLATION WHICH MUST BE CAREFULLY FOLLOWED. THE INSTRUCTIONS ARE WORDED IN SUCH A MANNER TO ASSUME THAT THE INSTALLER IS CAPABLE OF COMPLETING THESE TYPE OF ELECTRONIC INSTALLATIONS. IF YOU ARE UNCLEAR AS TO...
- Page 3 APPLICATIONS CHRYSLER 300 2005-2007 ASPEN 2007 DODGE CALIBER 2007 CHARGER 2005-2007 DAKOTA 2005-07 DURANGO 2005-2007 MAGNUM 2005-2007 RAM 2006-2007 JEEP COMMANDER 2006-2007 COMPASS 2007 GRAND CHEROKEE 2005-2007 PATRIOT 2007...
- Page 4 TURE. * NOTE: THE VEHICLES IGNITION SWITCH MUST BE IN THE OFF POSITION BEFORE PLUGGING THE CHTO-01 MODULE IN. ALSO THE KEY MUST BE CYCLED AT A MEDIUM PACE AT LEAST TWO TIMES BEFORE BEGINNING TESTING. CONNECTIONS TO BE MADE ON THE 22 PIN HARNESS: 1.
- Page 5 Connect the Green/Purple wire to the reverse wire of the aftermarket radio. • When completed, plug the 14 pin harness into the CHTO-01. INSTALLING THE CHTO-01 1. With all connections completed to the aftermarket radio, plug the 22 pin connector into the vehicles corresponding wiring harnesses.
- Page 6 AUDIO LEVEL CONTROL Figure A AUDIO LEVEL When using the CHTO-01 with a radio that has a high audio pre-out voltage, usually greater than 2 volts, the audio signal may become distorted. To resolve this follow these steps: 1. Make sure the ignition is turned to the “off” position.
Need help?
Do you have a question about the CHTO-01 and is the answer not in the manual?
Questions and answers