Husqvarna 535iFR Operator's Manual
Hide thumbs
Also See for 535iFR:
- Workshop manual (36 pages) ,
- Operator's manual (96 pages) ,
- Operator's manual (96 pages)
Table of Contents
Advertisement
Quick Links
Advertisement
Table of Contents

Related Manuals for Husqvarna 535iFR


Summary of Contents for Husqvarna 535iFR
- Page 1 535iFR, 535iRXT, 535iRX Operator's manual 2-30...
-
Page 2: Table Of Contents
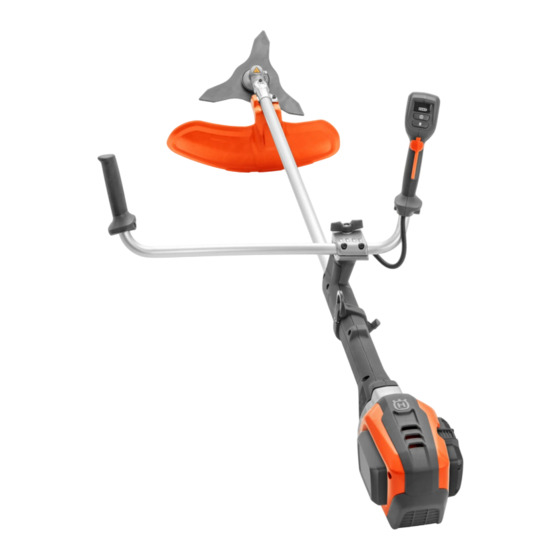
8. Power trigger 2. Saw blade (535iFR) 9. Power trigger lockout 3. Shaft 10. Add-on weight (accessory) 4. Balance 55 Harness (535iFR, 535iRX) 11. ErgoFeed button (535iRXT) 5. Balance XB Harness (535iRXT) 12. Handle 6. Knob 13. Warning indicator (LED) 7. - Page 3 23. State of charge 24. Battery indicator button Use heavy-duty slip-resistant boots. 25. Grass blade guard 26. Trimmer guard 27. Saw blade guard (535iFR) Only use a flexible cutting wire. Do not use 28. Drive disc metal cutting elements. 29. Washer 30.
-
Page 4: Safety
Safety Safety definitions • the product is repaired with parts that are not from the manufacturer or not approved by the Warnings, cautions and notes are used to point out manufacturer. specially important parts of the manual. • the product has an accessory that is not from the manufacturer or not approved by the manufacturer. - Page 5 Battery tool use and care a rotating part of the power tool may result in personal injury. • Recharge only with the charger specified by the • Do not overreach. Keep proper footing and balance manufacturer. A charger that is suitable for one type at all times.
- Page 6 Make sure that the cutting attachment stops • Keep your hands and feet away from the cutting completely. Remove the battery before you clean, attachment until it has stopped completely when the inspect or repair the product and/or the cutting product is deactivated.
- Page 7 Bluetooth CAUTION: Changes or modifications made Personal protective equipment to this equipment not expressly approved by Husqvarna may void the FCC authorization WARNING: Read the warning instructions to operate this equipment. that follow before you use the product. Notice: This device complies with Part 15 of FCC Rules •...
- Page 8 occur. Let your dealer help you select the right Do not wear jewelry, short pants, sandals or go with equipment. bare feet. Put your hair up safely above shoulder level. • Use a protective helmet where there is a risk of falling objects.
- Page 9 To do a check of the user interface 1. Push and hold the start/stop button (A). 1. Make sure that the power trigger is locked when the lock is in its initial position. a) The product is on when the LED (B) is on. b) The product is off when the LED (B) is out.
- Page 10 3. Release and attach the quick release mechanism to A locknut is used to attach some types of cutting make sure that it operates correctly. attachments. The locknut has a left thread. 4. If the harness has a hip pad and a hip strap, make sure that the quick release function operates correctly.
- Page 11 Safety instructions for assembly WARNING: A coasting blade can cause injury while it continues to spin after the switch has been released. Need to maintain WARNING: Read, understand and obey proper control until the blade has completely these instructions carefully before you use stopped rotating.
-
Page 12: Assembly
SAVE THESE INSTRUCTIONS Assembly To attach the handle 3. Adjust the handlebar to put the product in a good operation position. 1. Remove the nut and screw from the bottom of the handle. 2. Attach the handle onto the handlebar. 4. - Page 13 Cutting equipment and guards To remove the grass blade guard • Remove the bolt and remove the grass blade guard The product have different cutting attachment guards for (A) from the shaft. the cutting equipment that can be used. Make sure that you use the correct cutting attachment guard for the Technical data on page 28 .
- Page 14 (D) from the output shaft. 2. Remove the trimmer guard. To attach the trimmer head (535iFR, 535iRX) 1. Put the drive disc (B) on the output shaft. 2. Turn the output shaft to align one of the holes in the drive disc with the related hole in the gear housing.
- Page 15 “Click” To remove the trimmer head (535iRXT) To remove the trimmer head (535iFR, 535iRX) Note: To increase the life of the cord it can be soaked in 1. Put the locking pin (C) in the hole to lock the shaft.
- Page 16 Tighten in the opposite direction to how the cutting To remove the saw blade guard (535iFR) attachment rotates. Tighten it to a torque of 35-50 1. Remove the 4 bolts (L) from the holder (R) and remove the saw blade guard (A).
- Page 17 8. Attach a battery. 4. Tighten the chest strap below your left arm tightly. The chest strap must be tight against your body. To adjust the harness (535iFR, 535iRX) 5. Adjust the shoulder strap until the weight is equal on WARNING: Always attach this product to the the 2 shoulders.
-
Page 18: Operation
3. Follow the instruction steps in the Husqvarna Husqvarna Connect Connect app to connect and register the product. Husqvarna Connect is a free app for your mobile device. Note: Husqvarna Connect app is not available for download in all markets. - Page 19 To adjust the balance with the add-on weight 2. Slide the battery into the battery holder of the product. The battery must slide easily, if not, it is not If correct balance is difficult to achieve, attach the add- installed correct. The battery will lock into position on weight.
- Page 20 • Examine the support flange for cracks. Replace the 1. Push and hold the start button until the green battery support flange if it is damaged. LED and the white mode LED comes on. • Make sure that the locknut can not be removed by 2.
- Page 21 • Push the ErgoFeed button to start the automatic • Move in a regular pattern across the work area. adjustment of the trimmer line. Automatic shutdown function • Move the product fully to the left and right, to clear a The product has a shutdown function that stops the width of 4–5 m on each turn.
- Page 22 To fell a tree to the right 3. Do the first cut on the side of the tree to which it will fall. To fell to the right, push the bottom of the tree to the left. 1. Apply full throttle. 2.
- Page 23 Grass trimming with a trimmer head • For groups of thin trees: To trim the grass 1. Hold the trimmer head immediately above the ground at an angle. a) Cut the outer trees high up. b) Cut the outer trees to the correct height. c) Cut from the center.
-
Page 24: Maintenance
2. Do not push the trimmer head to the ground. The 2. Apply full throttle. ground and the product can be damaged. 3. Move the trimmer head from side to side and sweep 3. Do not let the trimmer head touch the ground the grass. - Page 25 Maintenance Daily Weekly Monthly Keep the handles dry, clean and free from oil and grease. Make sure that the cutting attachment is not damaged. Replace the cutting at- tachment if it is damaged. Make sure that the cutting attachment guard is not damaged. Replace the cut- ting attachment guard if it is damaged.
- Page 26 • Use a single-cut flat file. • Sharpen one tooth of the saw blade to the right and the next tooth to the left, see the illustration. 15˚ WARNING: Always discard a blade that is damaged. Do not try to make a bent or twisted blade straight and use it again.
-
Page 27: Troubleshooting
The bevel gear is filled to ¾ with grease at the factory. Before use, make sure that the grease level has not changed. Use Husqvarna special grease if it is necessary to fill up. Do not change the grease in the bevel gear. -
Page 28: Technical Data
• Clean the product and do a full servicing before you put the product in storage for a long time. Technical data Technical data 535iFR 535iRXT 535iRX Motor Motor type Husqvarna e-torq... -
Page 29: Accessories
535iFR 535iRXT 535iRX Equipped with grass blade (original), left/ 2.5/2.0 2.4/2.0 2.4/2.0 right, m/s Note: For comparison of vibrations levels, battery and combustion products use the vibration calculator. https:// www.husqvarna.com/uk/services-solutions/vibration-calculator/ ® Radio frequency data for Bluetooth Frequency band, GHz 2.4-2.4835 2.4-2.4835... - Page 30 Add-on weight 593 34 91-01 Balance XB 597 33 12-01 Registered trademarks ® Bluetooth word mark and logos are registered Bluetooth SIG, inc. and any use of trademarks owned by such marks by Husqvarna is under license. 609 - 001 -...
- Page 31 609 - 001 -...
- Page 32 Original instructions 1159438 2019-04-04...
Need help?
Do you have a question about the 535iFR and is the answer not in the manual?
Questions and answers