Avaya S8500 Installing And Configuring
Hide thumbs
Also See for S8500:
- Manual (330 pages) ,
- Job aids for field replacements (186 pages) ,
- Installing and configuring (118 pages)

Related Manuals for Avaya S8500


Summary of Contents for Avaya S8500
- Page 1 Installing and Configuring the Avaya S8500 Media Server Release 3.1 03-300143 Release 3.1 February 2006 Issue 4...
- Page 2 Avaya support Avaya provides a telephone number for you to use to report problems or to ask questions about your product. The support telephone number is 1-800-242-2121 in the United States. For additional support telephone numbers, see the Avaya Web site: http://www.avaya.com/support.
-
Page 3: Table Of Contents
About Processor Ethernet ......About S8500 LSP mode ....... . - Page 4 Configuring Telnet for Windows 2000/XP ..... . Installing Avaya Communication Manager .....
- Page 5 Opening the TCP ports on the S8500 LSP ..... . Resetting the S8500 LSP .......
- Page 6 S8500 LEDs ........
-
Page 7: Chapter 1: Introduction
These procedures are for installing Avaya Communication Manager and configuring a new Avaya S8500 Media Server and associated components in an IP-connected port network configuration. To configure the media server, use the Avaya Installation Wizard. To configure gateways and other hardware components, use two administration interfaces: Maintenance Web Interface ●... -
Page 8: How To Use This Documentation
The S8500 Media Server can be configured as a primary controller or as a Local Survivable Processor (LSP). Most of the installation procedures are the same for these two configurations but there are some differences. -
Page 9: Pre-Installation: Before Going On Site
This section describes the steps you need to take to before going to the installation site. Documentation Avaya recommends that you have the following documents on hand for the installation. These are included on the Documentation for Avaya Communication Manager, Media Gateways and Servers CD (03-300151). -
Page 10: Verifying Site Readiness
You have the current Communications Manager software update, if required, on your ● services laptop You have current firmware, including for the media server BIOS. Check the Avaya Support ● Web site (http://support.avaya.com), Download Software and Firmware, for the latest software and firmware. -
Page 11: Copying Files To The Laptop
(1.800.248.1234 or 1.720.444.5557). You must have the IL, FL, or product ID to get the password. - To log in through the services port as craft after you install the Avaya authentication file, use this password, which does not require an ASG challenge or response. -
Page 12: Obtaining License And Avaya Authentication Files
Internet access to the RFA Web page with Internet Explorer 5.0 or higher ● Before arriving on site, download the license and Avaya authentication files to the services laptop. The license and Avaya authentication files are installed during the installation process. -
Page 13: Pre-Installation: At The Site
Verify that the customer provides AC power to the rack from a nonswitched outlet. ● Verify that cabling for theTN2312BP (IPSI) circuit packs is labeled and runs from the ● control hardware rack to the port networks or that appropriate connectivity is provided. Installing and Configuring the Avaya S8500 Media Server February 2006... -
Page 14: Equipment Specifications
Table 2: S8500 Media Server features and specifications outlines the features and specifications of the Avaya S8500 Media Server. Note: Some values are shown at maximum configuration. Avaya values will be slightly Note: lower then the maximum. Table 2: S8500 Media Server features and specifications... - Page 15 Equipment specifications Table 2: S8500 Media Server features and specifications (continued) Feature Specifications Integrated Functions Ethernet ports: Two 10/1000/100BaseT Ethernet controllers One serial port (not used) Four USB ports (3 not used) Keyboard port (not used) Mouse port (not used)
-
Page 16: About The Server Availability Management Processor
S8500 Media Server. The SAMP provides remote maintenance and serviceability to the media server by monitoring and reporting alerts on the S8500 components. The SAMP also provides controls to turn the media server’s power on and off. -
Page 17: About Samp Functionality
About SAMP connections The SAMP card is installed in PCI-X slot 1 (full-height, 3/4 length slot) of the Avaya S8500 Media Server. The SAMP comes in a half-card PCI form factor and is powered externally. It supports one USB interface and two 10/100 Ethernet ports that are located on the rear of the media server. -
Page 18: About Samp Software
However, you may need to install an updated version of the software and you must configure the SAMP before it can be used. If a SAMP software update file is available on the Avaya Support website, you should have downloaded it to your laptop. See Using the Avaya Server Availability Management Processor (SAMP), 03-300322, for details on installing software on the SAMP and changing default settings. -
Page 19: S8500 Port Connections
S8500 port connections You connect to the various ports using standard CAT5 cables with RJ45 connectors on each end. If the S8500 Media Server has only one port network, connect it through the dual NIC. Figure 2: S8500 Media Server connectivity guide shows typical connectivity for the S8500 Media Server. -
Page 20: About Modem Connections
USB modems cannot connect to rotary lines. A Touch Tone line is required. Note: On an Avaya S8500 Media Server, modem connects to the USB port on the SAMP. Required options on the SAMP modem are set by Avaya defaults on the SAMP. For modem... -
Page 21: About Media Gateways
About Media Gateways About Media Gateways In a new installation, the Avaya S8500 Media Server works with only the Avaya G650 Media Gateway. In a migration the media server works with the following Avaya Media Gateways: MCC1 ● SCC1 ●... - Page 22 Chapter 1: Introduction .Table 3 lists the possible uses of the PE interface for an S8500 primary controller. Table 3: Use of the PE interface for a simplex S8500 primary controller Possible functions of Status of the function Administration needed...
-
Page 23: About S8500 Lsp Mode
About S8500 LSP mode About S8500 LSP mode Starting with release 3.1 of Communication Manager, the S8500 can be configured as a Local Survivable Processor (LSP) and can be the primary controller for an IP network with port networks. This new functionality is enabled by allowing H.248 gateways and H.323 endpoints to register with the S8500 using the S8500’s Processor Ethernet (PE) interface instead of a C-LAN... -
Page 24: S8500 Lsp License File
● Call Detail Recording (CDR) ● The S8500 as a primary controller can connect to gateways and endpoints with a mixture of the PE interface and C-LANs. The traffic over these interfaces can be load balanced. S8500 LSP License file The license file for an LSP should have the following attributes: Local Survivable Processor (FEAT_LSP) set to Y. -
Page 25: High Level Overview Of Installation Process
High level overview of installation process Devices that can be accessed with SSH include: Media servers on Release 3.1 of Communication Manager: S8300, S8400, S8500, ● S8700-series May include port number reference 5022 for direct SAT access. Server Availability Management Processor (SAMP) (used with S8500 Media Server) ●... -
Page 26: Installing Avaya Communication Manager
Avaya Installation Wizard. Configuring the media server Use the Avaya Installation Wizard to configure the media server. You must have the filled-out Electronic Preinstallation Worksheet (EPW) that provides the customer’s network information needed for configuring the network components. As part of the Wizard, you install the license and Avaya authentication files. -
Page 27: Installing And Cabling The Media Gateways
Finish the media server installation by clearing alarms, enabling alarm reporting, backing up the server files, and registering the configuration. Testing the finished installation This stage verifies the complete configuration operation and is the last task. Installing and Configuring the Avaya S8500 Media Server February 2006... - Page 28 Chapter 1: Introduction Installing and Configuring the Avaya S8500 Media Server February 2006...
-
Page 29: Chapter 2: Snmp Configuration
First configure the SNMP agents. Then install Avaya Communication Manager on the media server, configure the media server, and verify its operation. In a duplicated system, install Avaya Communication Manger on the first media server and verify its operation before you repeat the process on the second media server. -
Page 30: Default Ups Ip Addresses
Ensure you are plugged into the correct administration port on the SNMP module. ● Ensure the UPS is plugged into a nonswitched electrical outlet. ● Note: Avaya Terminal Emulation and HyperTerminal are supported terminal emulation Note: applications. When using your terminal emulation application, ensure that your laptop communication ●... -
Page 31: Administering The Snmp Module
SNMP module and the other end to the next available port on the Ethernet switch for Control Network A (CNA). For a connectivity guide, see the Quick Start for Hardware Installation: Avaya S8500 Media Server (555-245-701). Installing and Configuring the Avaya S8500 Media Server... - Page 32 Chapter 2: SNMP Configuration After you have configured the SNMP module in the UPS, you must configure the SNMP subagent on the Avaya Ethernet switch. Installing and Configuring the Avaya S8500 Media Server February 2006...
-
Page 33: Setting Selected Traps (Alarming)
UPS on Battery—Indicates AC fail with pending shutdown based on battery reserve ● available UPS in Bypass—Failure either Failed UPS or overload ● Replace battery—Failure of periodic (28-day) battery test indicating battery needs to be ● replaced. Installing and Configuring the Avaya S8500 Media Server February 2006... - Page 34 Chapter 2: SNMP Configuration Installing and Configuring the Avaya S8500 Media Server February 2006...
-
Page 35: Configuring The Snmp Subagent In The Avaya Ethernet Switch (If Used)
Do not use these procedures to set traps on a non-Avaya-supplied Ethernet switch. The simple network management protocol (SNMP) subagent in the Avaya Ethernet switch must be administered so it can report alarms to the media server when the hardware experiences problems. -
Page 36: Default Ip Addresses For Ethernet Switch
Ensure the Ethernet switch power cord is connected to the back of the switch and the back ● of a UPS. Note: Avaya Terminal Emulation and HyperTerminal are supported terminal emulation Note: applications. When using your terminal emulation application, ensure that your laptop communication ●... -
Page 37: Configuring The Ethernet Switch
Note: 1. Connect the services laptop computer (RS-232 serial port) to the port labeled Console on the front of Ethernet switch 1 (CNA) using the flat cable supplied with the Avaya Ethernet switch. 2. Open a VT-100 terminal emulation session on the services laptop. - Page 38 12. If two Ethernet switches are present for CNA, repeat steps 1 through 10 for the second switch. After you have configured the Avaya Ethernet switch, you must configure the media server(s). Installing and Configuring the Avaya S8500 Media Server...
-
Page 39: Chapter 3: Communication Manager Installation
Installation A new media server comes with a blank hard drive Use the bootable software distribution CD-ROM to install the Linux operating system and Avaya Communication Manager. This chapter covers the following tasks: Clearing the ARP cache on the laptop on page 39 ●... -
Page 40: Powering Up The Media Server
Immediately place the Avaya Communication Manager CD into the CD-ROM Note: drive on the media server. If you are installing an S8500 Media Server to run the Expanded Meet-me Conferencing (EMMC) application, use the CD labeled EMMC Software Disk 1. -
Page 41: Installing Avaya Communication Manager
To navigate on these screens, use the arrow keys to move to an option, then Note: press the space bar to select the option. Press Enter to submit the screen. 3. Select Install, ensure that <OK> is highlighted, and press Enter. Installing and Configuring the Avaya S8500 Media Server February 2006... - Page 42 CD-ROM drive drawer opens. You must remove the CD from the drive at this time. The reboot can take up to 3 minutes. The telnet session drops automatically. Note: If you are installing an S8500 Media Server to run the Expanded Meet-me Note: Conferencing (EMMC) application, you are finished with this document. Continue the EMMC installation using Installing and Troubleshooting the Expanded Meet-me Conferencing (EMMC) (04-300527).
-
Page 43: Chapter 4: Media Server Configuration
You can also install the certificate on your services laptop computer by following the instructions in your browser’s online help. 3. Log in as craft and use the initial craft password. Installing and Configuring the Avaya S8500 Media Server February 2006... -
Page 44: Copying Files To The Media Server
Note: On the initial Web page, some items may not appear at first. These include Note: Launch Avaya Station Administration Wizard in the Administration section and the Upgrade section including Launch Upgrade Tool. 5. Click Launch Maintenance Web Interface. Copying files to the media server You can use the Maintenance Web Interface to copy license and authentication files, service packs, and SAMP update files from the Services laptop to the media server. -
Page 45: Enabling Network Time Servers
Internet. To use a network time server, the NTP service must be enabled. The Avaya Installation Wizard prompts for enabling the NTP service. -
Page 46: Using The Installation Wizard
The Remote Maintenance Board (RMB) page is under Optional Services in the Wizard configuration process. Verify that the IP information was retrieved from the EPW. If the information is not there, manually complete all fields. Installing and Configuring the Avaya S8500 Media Server February 2006... -
Page 47: Installing Samp Firmware
If the information is not there, fill in the fields manually. Installing SAMP firmware See Using the Avaya Server Availability Management Processor (SAMP) for additional details on updating SAMP software. The SAMP firmware may need to be updated, depending on the currently installed version. The versions that require updates should be included in your project planning information. -
Page 48: Verifying Media Server Connection To The Customer's Lan (If Provided)
6. Verify that the ping was successful. Enabling firewall settings For the media server to receive SNMP traps from the UPS and Avaya Ethernet switch, you must enable the snmptrap, 162/udp port. The default is disabled. 1. Under Security, click Firewall. -
Page 49: Configuring The Modem
2. Click until you get to the Specify how you want to use this wizard page. 3. Select Configure individual services and click Continue. 4. In the left menu click Set Modem Interface. Installing and Configuring the Avaya S8500 Media Server February 2006... - Page 50 For example, to change the country code to Japan, type AT%T19,0,10. 7. Click Change. The system responds with a message indicating a successfully added modem route. 8. Click Close Window. Installing and Configuring the Avaya S8500 Media Server February 2006...
-
Page 51: Checking Led Activity On The Optional Dual Nic
Checking LED activity on the optional dual NIC When the S8500 media server is in service, check the LEDs on each port of the dual network interface card (NIC) to make sure there is a connection (left LED) and activity (right LED). For... - Page 52 Chapter 4: Media server configuration Installing and Configuring the Avaya S8500 Media Server February 2006...
-
Page 53: Configuring The Dual Network Interface Card
Configuring the dual network interface card This section describes the tasks required to configure the optional dual network interface card (NIC) on the Avaya S8500 Media Server. The tasks include: Configuring the network interface card on page 53 ● Configuring the network interface card on page 53 ●... - Page 54 If supported, select VLAN 802.1q priority tagging. 9. Click Change. The status of the configuration update appears in the window. When the update completes, the following message appears: Successfully configured ethernet interfaces. Installing and Configuring the Avaya S8500 Media Server February 2006...
-
Page 55: Testing Connectivity To Customer's Network
8. Click Start > Run to open the Run dialog box. 9. Type command and click OK to open an MS-DOS command window. 10. Type ping serveripaddress and click OK, where serveripaddress is the IP address of media server. Installing and Configuring the Avaya S8500 Media Server February 2006... - Page 56 11. Verify that the ping was successful. 12. If DNS is administered, type ping servername and press Enter, where servername is the host name of media server. 13. Verify that the ping was successful. Installing and Configuring the Avaya S8500 Media Server February 2006...
-
Page 57: Chapter 5: Ip Interface Translations
Configuration Manager, Avaya Terminal Emulation, or HyperTerminal. You also can use Avaya Site Administration (ASA) to issue SAT commands. You must use ASA Release 2.1, update 1, or a later version to administer new features in Release 3.0 of Avaya Communication Manager. -
Page 58: Inputting Initial System Translations
Number of Portnetworks: 1 Survivable Remote EPN? n Location: 1 IP Network Region:1 Cabinet Holdover: A-carrier-only Room: Floor: Building: CARRIER DESCRIPTION Carrier Carrier Type Number not-used not-used not-used G650-port G650-port Installing and Configuring the Avaya S8500 Media Server February 2006... -
Page 59: Enabling Ipsi
IP address to match. An asterisk (*) to the right of the Subnet Address field means that the subnet address displayed is not the correct one. Avaya Communication Manager does not have the subnet information. 3. If the information in the Subnet Address field is not correct, use the Maintenance Web Interface to change the media server configuration to match the Server IP address in configure server. -
Page 60: Adding The Ipsi To The System
Ignore Connectivity in Server Arbitration? n Enable QoS? n Primary IPSI QoS Parameters ------------ -------------- Location: 1A01 Call Control 802.1p: 6 Host: 172.22.22.174 Call Control DiffServ: 46 DHCP ID: ipsi-A01a Installing and Configuring the Avaya S8500 Media Server February 2006... -
Page 61: Setting Alarm Activation Level
2. In the CPE Alarm Activation Level field, select none, warning, minor, or major, according to customer request, and press Enter. 3. Repeat for each IPSI. Saving translations Type save translation and press Enter to save the translations to the hard drive. Installing and Configuring the Avaya S8500 Media Server February 2006... - Page 62 Chapter 5: IP interface translations Installing and Configuring the Avaya S8500 Media Server February 2006...
-
Page 63: Chapter 6: Ip Interface Configuration
IPSI firmware is upgraded. Refer to About media server port connections on page 18 for a guide to connecting the S8500 Ethernet cables. Connecting to the IPSIs Connect CAT5 cables from the IPSI circuit packs to the dedicated control network or to the customer LAN. -
Page 64: Ipsi Address Configuration
1. Fully insert the TN2312BP IPSI circuit pack. If necessary, reseat the circuit pack to start the programming sequence. Note: For the following step, do not use a graphic pencil. Note: Installing and Configuring the Avaya S8500 Media Server February 2006... - Page 65 1. While the first digit of the number is flashing, press the button until the correct tens digit, 0 through 6, shows on the display. When the correct digit appears, stop. The digit flashes a few times, or 5 seconds, then stops. The second digit starts flashing. Installing and Configuring the Avaya S8500 Media Server February 2006...
- Page 66 IPSI, the center of the "V" fills in. The filled in "V" looks like the bottom half of a diamond. For duplicated control network, repeat these steps for the second IPSI in the cabinet. Installing and Configuring the Avaya S8500 Media Server February 2006...
-
Page 67: Programming The Ipsi For Static Addressing
1. Services laptop 3. NIC adapter cable (if necessary) 2. PCMCIA Network Interface Card (NIC) 4. CAT5 crossover cable to IPSI Note: Ensure that you have the password before proceeding. Note: Installing and Configuring the Avaya S8500 Media Server February 2006... - Page 68 6. Log in as craft. Prompt = [IPADMIN]: 7. Enter show control interface and then enter show port 1 to see the current control interface settings. Installing and Configuring the Avaya S8500 Media Server February 2006...
- Page 69 13. Enter quit to save the changes and exit the IPSI session. 14. Telnet to 192.11.13.6 and login. 15. Use show control interface to verify the administration. 16. Type exit and press Enter to see the changes. Installing and Configuring the Avaya S8500 Media Server February 2006...
-
Page 70: Setting The Vlan And Diffserv Parameters
Note: Control network settings (IP address, subnet mask, and gateway) become Note: effective when you exit the IPADMIN session. 2. Disconnect the laptop from the faceplate. Installing and Configuring the Avaya S8500 Media Server February 2006... - Page 71 Clear the ARP cache on the laptop before connecting to another IPSI. If the Note: cache is not cleared, the laptop appears to stop and does not connect to the next IPSI. 4. Repeat for each IPSI circuit pack. Installing and Configuring the Avaya S8500 Media Server February 2006...
-
Page 72: Verifying Connectivity To Media Server
2. Select Query All and click View IPSI Version. 3. Verify the firmware release for each IPSI. 4. If an upgrade is required, follow the procedures in Firmware Download Procedures, which can be accessed from: ftp://ftp.avaya.com/incoming/Up1cku9/tsoweb/firmware/TNpackFirmwareDownloadInstructions.pdf Installing and Configuring the Avaya S8500 Media Server February 2006... -
Page 73: Enabling Control Of Ipsis
2. Make sure the IPSI Control of Port Networks: field is set to enabled. 3. Press Enter to effect the changes. Verifying license status On the Maintenance Web Interface, under Security, click License File and verify that the license mode is now normal. Installing and Configuring the Avaya S8500 Media Server February 2006... - Page 74 Chapter 6: IP interface configuration Installing and Configuring the Avaya S8500 Media Server February 2006...
-
Page 75: Chapter 7: Install An S8500 Media Server As An Lsp
For information on administration of Processor Ethernet, see Administrator Guide for Avaya Communication Manager (03-300509). To install a new S8500 Media Server as an LSP, first complete the tasks in Quick Start for Hardware Installation: Avaya S8500 Media Server, then complete the tasks in the previous sections of this document to: Install the S8500 Media Server hardware in the 19-in. - Page 76 For the Registration address field, enter the IP address of a CLAN that is ● controlled by the primary controller. If the primary controller is an S8500 Media Server, this address may optionally be a processor ethernet IP address, if used, for the primary controller.
-
Page 77: Administering The Primary Controller
7. On pages 2 and 3 of the screen, add any adjuncts that the LSP may support in the event of a failover from the primary controller. See Administrator Guide for Avaya Communication Manager for details on administering the Survivable Processor form. -
Page 78: Enabling License Server Capability On A Media Gateway
If a G700 Media Gateway is providing the serial number for the S8500 LSP license, skip this step and proceed to Installing and verifying the license on the new LSP on page 78. -
Page 79: Opening The Tcp Ports On The S8500 Lsp
Opening the TCP ports on the S8500 LSP Opening the TCP ports on the S8500 LSP Various TCP ports for processor ethernet should be open on the firewall to enable the processor ethernet connections to work for the LSP. Perform the following steps to verify that the ports are open: 1. -
Page 80: Resetting The S8500 Lsp
Chapter 7: Install an S8500 Media Server as an LSP 3. Click the Advanced Setting button. The advanced firewall settings Web page appears. 4. Check that the following defaults are set: Output to server is selected for gateway compatibility, ports 1024:65535 ●... -
Page 81: Verifying That The Primary Controller Identifies The New Lsp And Has Sent The Translations
Verifying that the primary controller identifies the new LSP and has sent the translations To verify that the new S8500 LSP has registered with, and has received translations from, the primary controller, perform the following steps: 1. Wait several minutes after resetting the S8500 LSP, then on the primary controller, use the SAT command list survivable-processor to verify that the LSP server registers and translations are updated. - Page 82 Chapter 7: Install an S8500 Media Server as an LSP Installing and Configuring the Avaya S8500 Media Server February 2006...
-
Page 83: Chapter 8: Post-Installation Administration
3. Type list ipserver-interface and press Enter to verify the location of the IPSI circuit packs. 4. Refer to your planning documents and check the administration status on the following items: ● list station ● list trunk-group ● list hunt-group Installing and Configuring the Avaya S8500 Media Server February 2006... -
Page 84: Setting Daylight Savings Time Rules
0 (zero). You cannot delete a daylight savings rule if it is in use on either the Locations or Date and Time screens. 3. When done, press Enter to effect the changes. Installing and Configuring the Avaya S8500 Media Server February 2006... -
Page 85: Setting Locations (If Necessary)
3. Type the information in the various fields for each media gateway. Note: In the Name field for location 1, call the media gateway (cabinet) Main. Note: 4. Press Enter to effect the changes. Installing and Configuring the Avaya S8500 Media Server February 2006... -
Page 86: Verifying Date And Time
You can only resolve alarms on the active media server. 2. Select the server alarms to be cleared and click Clear. 3. Resolve any major alarms using SAT commands or other standard troubleshooting procedures. Installing and Configuring the Avaya S8500 Media Server February 2006... -
Page 87: Backing Up Files To The Compact Flash Media
The industrial grade compact flash media provides improved data integrity and Note: reliability, enhanced durability, and extreme endurance. For these reasons Avaya requires the use of an industrial grade compact flash. To read more about the industrial grade compact flash, see the Hardware Description and Reference for Avaya Communication Manager (555-245-207). -
Page 88: Enabling Alarms To Inads Via Snmp
Maintenance Web Interface ● def-sat must be enabled to access the SAT commands ● 162/udp must be enabled to receive SNMP traps from the UPS and Avaya Ethernet switch ● Installing and Configuring the Avaya S8500 Media Server February 2006... -
Page 89: Chapter 9: Installation Verification
1. On a SAT command line, type test license and press Enter. 2. Verify that the Test Results screen shows PASS in the results column. Installing and Configuring the Avaya S8500 Media Server February 2006... -
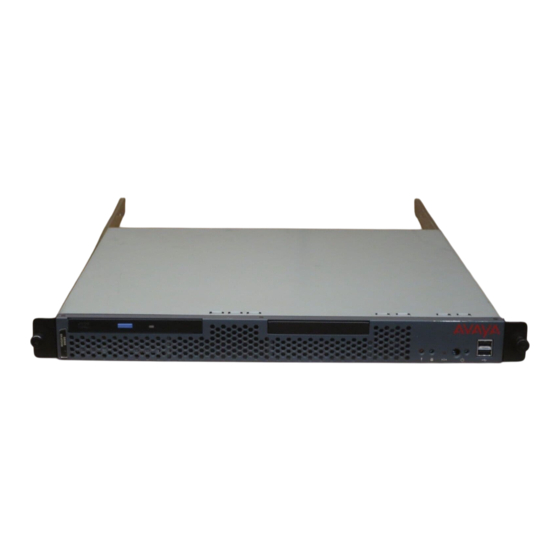
Page 90: S8500 Leds
Chapter 9: Installation verification S8500 LEDs The Avaya S8500 Media Server has five LEDs on the front and four LEDs in the back. See Figure 9: Front view of the Avaya S8500 Media Server on page 91 and Figure 10: S8500 Media Server, rear view on page 92. - Page 91 S8500 LEDs Figure 9: Front view of the Avaya S8500 Media Server h2ms85bf KLC 091704 Figure notes: 1: CD-ROM drive activity LED. When lit, the CD-ROM drive is in use. 2: CD eject button. Press to release a CD from the CD-ROM drive.
- Page 92 This LED is on the Ethernet connector. When lit, it indicates that activity LED there is activity between the media server and the network. For more detailed information on LEDs, see Maintenance Procedures for Avaya Communication Manager, Media Gateways and Servers, 03-300432. Installing and Configuring the Avaya S8500 Media Server...
-
Page 93: C360 Avaya Ethernet Switch Leds
LEDs are selectable with a set of two left/right buttons. The port LEDs display the status of the selected function for each port. See the documentation shipped with the Ethernet switch for the interpretation of the on/off/ blinking states of the LEDs. System and port function LEDs on C360 Avaya Ethernet switches LED Name Description System LEDs... -
Page 94: Ups Leds
Figure notes: 1. Normal mode indicator 5. Off button 2. Battery mode indicator 6. On button 3. Bypass mode indicator 7. Bar graph indicators 4. Test/Alarm reset button 8. Alarm indicators Installing and Configuring the Avaya S8500 Media Server February 2006... -
Page 95: Tn2312Bp Ipsi Leds
LED display, which indicates ● - type of IPSI IP address: dynamic (shows media gateway location) or static (shows I P) (IPSI LED display for static address on page 97) - connectivity Installing and Configuring the Avaya S8500 Media Server February 2006... - Page 96 7. Network Control RJ45 connector 3. Amber LED 8. 4-character LED display 4. Yellow LED (Tone Clock status) 9. Pushbutton switch 5. Emergency Transfer LED 10. Slot for maintenance cable Installing and Configuring the Avaya S8500 Media Server February 2006...
- Page 97 TN2312BP IPSI LEDs Figure 13: IPSI LED display for static address Figure notes: 1. IPSI has a static IP address 2. IPSI has connectivity and an IP address Installing and Configuring the Avaya S8500 Media Server February 2006...
- Page 98 Figure 14: IPSI LED display indicating connectivity status for DHCP address Connectivity status IPSI is connected to media server IPSI has an IP address Laptop computer is connected to IPSI services port Installing and Configuring the Avaya S8500 Media Server February 2006...
-
Page 99: Appendix A: Media Server Access
SSH access, how to log into the server command line with PuTTY. Note: A version of PuTTY that is defaulted for SSH server access is available for Avaya Note: services personnel only. In this version, some values below have already been pre-selected. - Page 100 You get a prompt in this case because it appears that the host key has changed. 9. If necessary, click Yes to accept the server’s host key. The system displays the PuTTY window. 10. Log in as craft. Installing and Configuring the Avaya S8500 Media Server February 2006...
-
Page 101: Connecting To The Media Server Directly
1. Plug one end of the CAT5 cable into the services access port on the back of the media server. Services laptop computer connected directly to the S8500 Media Server on page 102. 2. Plug one end of the CAT5 cable into the NIC on your computer. Use a NIC adapter if necessary. - Page 102 Appendix A: Media server access Figure 15: Services laptop computer connected directly to the S8500 Media Server cadlsrv3 KLC 093004 Figure notes: 1. Services laptop 3. NIC adapter cable (if necessary) 2. Network interface card (NIC) 4. Black CAT5 crossconnect cable...
-
Page 103: Connecting To The Media Server Remotely Over The Network
You can access the media server through an analog modem. The remote connection requires a minimum data speed of 33.5 kilobits per second. On the S8500 Media Server, access the media server through the remote maintenance board (SAMP) installed in the media server. For information on accessing the SAMP, see Using the Avaya Server Availability Management Processor (SAMP) (03-300322). -
Page 104: Accessing The Maintenance Web Interface
SAT (System Administration Terminal) command line prompt. SSH: To open a SSH session. Accessing the server’s command line interface with SSH on page 99 Telnet: To open a Telnet window session. Installing and Configuring the Avaya S8500 Media Server February 2006... -
Page 105: Logins For Avaya Technicians And Business Partners
Use port 5023 for this connection. When prompted, log in. Logins for Avaya technicians and Business Partners Avaya field technicians and Business Partners must use a services login such as craft or dadmin to perform initial configuration and upgrades. An Avaya field technician can use a unique password assigned to the customer’s system. -
Page 106: Configuring The Network For Windows 2000/Xp
9. Click the DNS tab. Ensure no DNS server is administered. The address field should be blank. 10. Click OK, OK, and Close to close all the windows. Installing and Configuring the Avaya S8500 Media Server February 2006... -
Page 107: Setting Browser Options For Internet Explorer 6.0
If the IP addresses have the first or first and second octets the same, you can shorten the addresses to xxx.xxx.* (example, 135.9.*). 5. Click OK, then OK, then OK to close all the dialog boxes. Installing and Configuring the Avaya S8500 Media Server February 2006... - Page 108 Appendix A: Media server access Installing and Configuring the Avaya S8500 Media Server February 2006...
-
Page 109: Appendix B: Installation Troubleshooting
Troubleshooting media server hardware installation on page 109 ● Troubleshooting configuring the media server hardware on page 110 ● Troubleshooting the installation of license files and Avaya authentication files on page 112 ● Troubleshooting media server hardware installation Troubleshooting media server hardware installation Problem... -
Page 110: Troubleshooting Configuring The Media Server Hardware
Cannot ping media Make sure that in the LAN security settings that “input to server” ● server from for icmp is enabled. customer’s network 1 of 2 Installing and Configuring the Avaya S8500 Media Server February 2006... - Page 111 IPSI does not have an IP address assigned to it. ● filled in IPSI has not been administered. ● Get alarm when first IPSI does not have current firmware. Upgrade firmware. ● connect to IPSI 2 of 2 Installing and Configuring the Avaya S8500 Media Server February 2006...
-
Page 112: Troubleshooting The Installation Of License Files And Avaya Authentication Files
Appendix B: Installation troubleshooting Troubleshooting the installation of license files and Avaya authentication files Troubleshooting the installation of license files and Avaya authentication files Problem Possible solution Cannot get files from RFA site Provide the correct SAP number. ● Provide the serial number for the reference IPSI ●... -
Page 113: Index
..... . LEDs ..program switch ID and cabinet Installing and Configuring the Avaya S8500 Media Server February 2006... - Page 114 ....terminal emulation ..... starting Installing and Configuring the Avaya S8500 Media Server February 2006...
- Page 115 ....using DHCP IP address ....using this documentation Installing and Configuring the Avaya S8500 Media Server February 2006...
- Page 116 Index Installing and Configuring the Avaya S8500 Media Server February 2006...
Need help?
Do you have a question about the S8500 and is the answer not in the manual?
Questions and answers