Table of Contents
Advertisement
Advertisement
Table of Contents

Subscribe to Our Youtube Channel
Related Manuals for Inovance AM600 Series


Summary of Contents for Inovance AM600 Series
- Page 1 AM600 Series PLC Hardware Manual User Guide Data code 19010853...
-
Page 2: Introduction
◆ The figures in this document are for reference and may be different from the actual product. ◆ Inovance is committed to continuous improvement of products. Product functions will be upgraded, and the documents provided are subject to change without notice. You can download the latest documents from www. -
Page 3: Basic System Startup Process
Introduction Basic System Startup Process Start Confirmation Install the modules Refer to Section 4.2 Install the power, CPU, and expansion modules. Carry out wiring Finish wiring of the power module. Refer to Section 5.3 - 5.7 Finish wiring of the CPU and expansion modules. Connect the system power Confirm the wiring is correct and verify the power supply meets Refer to Section 7.1... -
Page 4: Table Of Contents
Contents Contents Introduction ..........................Related Documents ............................Product Features ............................EMC Reference Compliance .......................... Basic System Startup Process ........................Chapter 1 Safety Instructions ....................... Before You Start ............................. Safety Instructions ............................Chapter 2 Product Information ....................2.1 Product System Assembly ......................12 2.1.1 Functions of the CPU Module ...................... - Page 5 Contents Chapter 4 Installation ......................... 4.1 Installation Environment Requirements ...................56 4.1.1 Installation Environment ........................4.1.2 Installation Clearance ........................4.1.3 Installation Instructions ........................4.2 Installation Method ........................57 4.2.1 Module Installation Process ......................4.2.2 Mounting the DIN Guide Rail to the Installation Plane in the Control Cabinet ......4.2.3 Connecting the Power Module, CPU Module, and Expansion Module ...........
- Page 6 Contents 5.5.2 Connection Through the EtherCAT Bus .................... 5.5.3 Connection Through the Profibus-DP Bus ..................5.5.4 Connection Through the CANopen/CANlink Bus ................5.5.5 Serial Communication Connection Through RS485 ................ 5.5.6 Monitoring Connection Through Ethernet ..................5.6 Wiring of Local Expansion Modules ...................90 5.6.1 DI Module ............................
- Page 7 Contents Memo No. ___________ Date ________________________________________________________________________________ ________________________________________________________________________________ _______________________________________________________________________________ ________________________________________________________________________________ ________________________________________________________________________________ ________________________________________________________________________________ ________________________________________________________________________________ ________________________________________________________________________________ ________________________________________________________________________________ ________________________________________________________________________________ ________________________________________________________________________________ _______________________________________________________________________________ ________________________________________________________________________________ ________________________________________________________________________________ ________________________________________________________________________________ ________________________________________________________________________________ ________________________________________________________________________________ ________________________________________________________________________________ ________________________________________________________________________________ ________________________________________________________________________________ ________________________________________________________________________________ ________________________________________________________________________________ ________________________________________________________________________________ ________________________________________________________________________________ ________________________________________________________________________________ ________________________________________________________________________________ ________________________________________________________________________________ ________________________________________________________________________________ ________________________________________________________________________________ ________________________________________________________________________________ ________________________________________________________________________________ ________________________________________________________________________________ ________________________________________________________________________________ ________________________________________________________________________________ ________________________________________________________________________________ ________________________________________________________________________________ ________________________________________________________________________________ ________________________________________________________________________________...
-
Page 8: Chapter 1 Safety Instructions
Chapter 1 Safety Instructions Chapter 1 Safety Instructions Before You Start ............................. Safety Instructions ............................ -
Page 9: Before You Start
Introduction Before You Start Thank you for purchasing the Inovance AM600 series programmable logic controller (PLC). This manual describes how to properly use this product. Before using the product (including installation, wiring, running, maintenance, and inspection), read this manual carefully and ensure that you understand the safety instructions. - Page 10 Introduction CAUTION ◆ An emergency stop circuit, protection circuit, forward/reverse operation interlocked circuit, and upper position limit and lower position limit interlocked circuit must be set in the external circuits of the PLC to prevent damage to the machine. ◆ To ensure safe operation, design external protection circuits and safety mechanisms for output signals that may cause critical accidents.
- Page 11 Introduction Wiring CAUTION ◆ Prevent metal filings and wire ends from dropping into ventilation holes of the PLC during screw hole processing. Failure to comply may result in fire, fault, and malfunction. ◆ The external wiring specifications and installation mode must comply with local regulations. For details, see the wiring section in this manual.
-
Page 12: Chapter 2 Product Information
Chapter 2 Product Information Chapter 2 Product Information 2.1 Product System Assembly ......................12 2.1.1 Functions of the CPU Module ......................2.1.2 Functions of Local Expansion Modules ..................... 2.1.3 Functions of Remote Expansion Modules ..................2.2 Product System Integration Diagrams ..................19 2.3 Models and Nameplates ......................21 -11-... -
Page 13: Product System Assembly
Introduction ■ Overview The AM600 is a modularized medium-sized PLC. Each rack can contain 16 local expansion modules and support remote rack expansion through industrial fieldbuses such as Profibus-DP, EtherCAT, and CANopen. I/O expansion for the AM600 local expansion modules, including the digital input/output modules, analog input/output modules, temperature module, and remote function modules, is based on the internal bus protocol. -
Page 14: Functions Of The Cpu Module
Introduction Guide rail: The AM600 series use a modularized structure. The power module, CPU module, and expansion modules must be installed on the guide rail and then fixed to the corresponding plane. Note: Use the standard DIN35 guide rail and ensure that it is not deformed or painted with isolating vanish and that its electrical conductivity is excellent. -
Page 15: Functions Of Local Expansion Modules
Introduction Communication Communication Ports of the CPU Cable Application Matching Module Protocol Module AM600-RTU-ECT Cat5e AM600-RTU-ECTA shielded AM600-0808ETNE Industrial control network. The maximum EtherCAT twisted communication rate is 100 Mbit/s. AM600-1616ETNE pair AM600-2HCE cable AM600-4PME PC communication and program download and Mini USB debugging 2.1.2 Functions of Local Expansion Modules... - Page 16 Introduction Model Appearance Category Description Order Code AM600-0016ER 16-channel DO module; relay output 01440017 16-channel DO module; transistor output AM600-0016ETP 01440003 DO module (source) 16-channel DO module; transistor output AM600-0016ETN 01440018 (sink) 32-channel DO module; transistor output AM600-0032ETN DO module 01440025 (sink) 4-channel AD module;...
-
Page 17: Functions Of Remote Expansion Modules
Introduction Model Appearance Category Description Order Code 4-channel DA module; support voltage/ AM600-4DA AO module 01440007 current analog output 4-channel temperature measuring for AM600-4PT 01440008 multiple types of thermal resistors 117.0 95.0 32.0 4-channel temperature measuring for AM600-4TC Temperature module 01440009 90.0 multiple types of thermocouples... - Page 18 Introduction Model Appearance Category Description Order Code POWER CANRUN CANERR CANopen communication CANopen-based communication module: AM600-RTU-COP 01440011 module supports the CANopen fieldbus. POWER EtherCAT EtherCAT communication EtherCAT-based communication module: AM600-RTU-ECT 01440013 module supports the EtherCAT fieldbus. POWER ECTA EtherCAT EtherCAT-based communication module: EtherCAT communication AM600-RTU-ECTA supports the EtherCAT fieldbus and...
- Page 19 Introduction Model Appearance Category Description Order Code 4-channel positioning output module for EtherCAT communication EtherCAT-based communication: supports AM600-4PME 01440035 positioning module the EtherCAT fieldbus and 4-channel positioning output. 2-channel high-speed counting module for EtherCAT communication EtherCAT-based communication: supports AM600-2HCE 01440036 high-speed counting module the EtherCAT fieldbus and 2-channel ABZ high-speed counting.
-
Page 20: Product System Integration Diagrams
Introduction 2.2 Product System Integration Diagrams Expansion Expansion Power module CPU module Tail board module module 0 1 2 3 POWER 4 5 6 7 CANRUN CANERR AM600 RUN/ STOP Risk of electric shock 小心触电 EtherCAT X210 cable communication cable T024-K terminal block CANopen communication... - Page 21 Introduction Expansion Expansion CPU module Power module Tail board module module 0 1 2 3 POWER 4 5 6 7 AM600 RUN/ STOP Risk of electric shock 小心触电 X210 cable DB9 expansion cable T024-K terminal block Connect to the high-speed I/O interface of the subsequent Profibus-DP device...
-
Page 22: Models And Nameplates
2.3 Models and Nameplates Module Model and Nameplate AM600-PS2 Product Information Series Module Type Output Current Power Inovance medium- 600 600 series PLC module sized PLC Automation-Motion Power module Nameplate MODEL: AM600-PS2 POWER INPUT: 100-240 VAC 1 A 50/60 Hz... - Page 23 Introduction Module Model and Nameplate AM600-0016ETP Product Information Series Inputs Module Type Output Type Logical I/O Inovance 600 series PLC Relay expansion module medium-sized PLC Automation-Motion Transistor (source) Outputs Transistor (sink) 16 16 outputs DO module 32 32 outputs Nameplate...
- Page 24 Introduction Module Model and Nameplate AM600-RTU-ECT Auto-scan EtherCAT EtherCAT Remote Communication Product Information Series Module Type protocol Inovance Remote interface 600 series PLC EtherCAT medium-sized PLC module Automation-Motion EtherCAT ECTA Auto-scan EtherCAT supported Profibus-DP communication CANopen module Nameplate CANopen Profibus-DP...
- Page 25 Introduction Module Model and Nameplate AM600-4PME Channel Product Information Module Type Auxiliary Function Series Count Inovance EtherCAT Positioning 600 series PLC medium-sized PLC channels module communication EtherCAT Automation-Motion communication positioning Nameplate module MODEL: AM600-4PME POWER INPUT: 24 VDC 250 mA OUTPUT: 24 VDC 0.5 A RES LOAD...
-
Page 26: Chapter 3 Specifications
Chapter 3 Specifications Chapter 3 Specifications 3.1 Application Environment Specifications ...................26 3.2 Hardware Performance Indicators of the CPU Module ............26 3.3 Specifications of the Power Module ..................30 3.4 Local Expansion Modules ......................32 3.4.1 DI Module ............................3.4.2 DO Module ............................3.4.3 AI Module ............................ -
Page 27: Application Environment Specifications
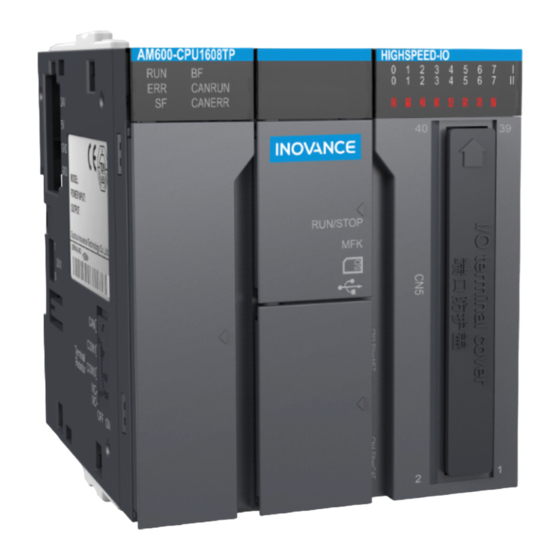
Introduction 3.1 Application Environment Specifications Transport Storage Parameter Type Working Environment Environment Environment Environment class IE33 IE22 IE12 Temperature -5℃ to 55℃ -40℃ to 70℃ -25℃ to 70℃ Humidity 10% to 95% without condensation Frequency 5 Hz to 150 Hz Environment Displacement 3.5 mm (direct installation) (<... - Page 28 Introduction 2 External interfaces of the CPU module SD card MFK button DIP switch interface System I/O indicator indicators CANRUN CANERR RUN/ STOP DB9(CN1) High-speed female connector I/O interface DB9(CN2) female connector Network USB port Network port (CN4) port (CN3) Figure 3-3 Interfaces of the CPU module (AM600-CPU1608TP as an example) 24 V power input terminal...
- Page 29 Introduction Function Definition Interface Name AM600-CPU1608TP AM610-CPU1608TP DB9 (CN1)/(female Two RS485 ports, supporting the Modbus protocol. socket) 1. CANopen protocol DB9 (CN2)/(female Profibus-DP protocol socket) 2. CANlink protocol Network port (CN4) EtherCAT protocol None 1. Modbus TCP 2. Standard Ethernet function Network port (CN3) 3.
- Page 30 Introduction 3 Basic I/O specifications of the CPU module ■ Input specifications Item Specifications High-speed input (differential or single-end) (X0- High-speed input (single-end) (X6-XF) Signal name 24 V input Differential input 24 V input 24 V DC (+20% to -15%, 24 V DC (+20% to -15%, pulsation Rated input voltage pulsation within 5%)
-
Page 31: Specifications Of The Power Module
Introduction 3.3 Specifications of the Power Module 1 Basic specifications Item Name Rated Value Test Conditions Remarks Primary side - ≥ 2 x 10⁶ Ω Ambient temperature: 25±5℃ , SELV Insulation Comply with LVD relative humidity: < 90% (without resistance directives. - Page 32 Introduction Name Function AC input 100 VAC to 240 VAC input Protective ground (connected to the ground wire of the AC input power) Function ground (connected to the system housing) The DC output terminal must meet the following requirements: Terminal Symbol Function Remarks 24 V...
-
Page 33: Local Expansion Modules
Introduction 3.4 Local Expansion Modules 3.4.1 DI Module Basic specifications Specifications Item AM600-1600END AM600-3200END Input channel Input connecting 18-channel wiring terminal 40-pin high density terminal mode Input type Input mode Sink/Source Sink/Source Input voltage class 24 VDC (maximum: 30 V) 24 VDC (maximum: 30 V) Power consumption of the internal 5 V... - Page 34 Introduction Module interface description Figure 3-9 DI module (AM600-1600END) interfaces Figure 3-10 DI module (AM600-3200END) interfaces Function Interface Name AM600-1600END AM600-3200END User input terminal 8 inputs x 2 8 inputs x 4 LED status indicator: Signal indicator ON: input active OFF: input inactive Connects to the backward module and does not support hot swap.
-
Page 35: Do Module
Introduction Dimensions (mm) 117.0 95.0 32.0 90.0 Figure 3-11 Dimensions of DI module (AM600-1600END) Figure 3-12 Dimensions of DI module (AM600-3200END) 3.4.2 DO Module Basic specifications ■ Basic specifications of the transistor output module Item AM600-0016ETP AM600-0016ETN AM600-0032ETN Output channel Output connecting 40-pin high density 18-channel wiring terminal 18-channel wiring terminal... - Page 36 Introduction Item AM600-0016ETP AM600-0016ETN AM600-0032ETN OFF max. leakage Below 0.5 mA current ON response time Below 0.5 ms (hardware response time) OFF response time Below 0.5 ms (hardware response time) Resistive 0.5 A/channel, 2 A/common load Max. load Inductive 12 W/24 VDC (total) load Lamp load 2 W/24 VDC (total)
- Page 37 Introduction Module interface description Figure 3-13 DO module (AM600-0016ETP, AM600-0016ETN, and AM600-0016ER) interfaces Figure 3-14 DO module (AM600-0032ETN) interfaces Function Interface Name AM600-0016ETP, AM600-0016ETN, and AM600-0016ER AM600-0032ETN User output terminal 8 inputs x 2 8-channels input x 4 Corresponds to various output signals. Signal indicator ON: output active OFF: output inactive...
- Page 38 Introduction Dimensions (mm) 117.0 95.0 32.0 90.0 Figure 3-15 Dimensions of DO module (AM600-0016ETP, AM600-0016ETN, and AM600-0016ER) Figure 3-16 Dimensions of DO module (AM600-0032ETN) -37-...
-
Page 39: Ai Module
Introduction 3.4.3 AI Module Basic specifications Item Specifications Input channel Power supply voltage 24 VDC (20.4 VDC to 28.8 VDC) (–15% to +20%) Power consumption of the internal 5 V power supply 85 mA (typical value) Voltage input impedance > 1 MΩ Current sampling impedance 250 Ω... - Page 40 Introduction Module interface description Figure 3-17 Interfaces of the AI module Interface Name Function 4-channel input (voltage and current input supported. For details about the use, see User input terminal "Chapter 5 Wiring" RUN: operation state indicator, which is on during normal operation and off when a fault occurs.
-
Page 41: Ao Module
Introduction 3.4.4 AO Module Basic specifications Item Specifications Output channel Power supply voltage 24 VDC (20.4 VDC to 28.8 VDC) (–15% to +20%) Power consumption of the internal 5 V 85 mA (typical value) power supply Voltage output load 1 kΩ to 1 MΩ Current load impedance 0 Ω... - Page 42 Introduction Module interface description Figure 3-19 Interfaces of the AO module Interface Name Function 4-channel output (Voltage and current output supported. For details about User output terminal "Chapter 5 Wiring" the use, see RUN: operation state indicator, which is on during normal operation and off when a fault occurs.
-
Page 43: Temperature Module
Introduction 3.4.5 Temperature Module Basic specifications ■ General specifications AM600-4PT AM600-4TC AM600-8TC Item Specifications Specifications Specifications Input channel Power supply 24 VDC (20.4 VDC to 28.8 VDC) (–15% to +20%) voltage Power consumption of 85 mA (typical value) the internal 5 V power supply Thermal resistor: Pt100, Sensor type... - Page 44 Introduction AM600-4PT (thermal resistor type) AM600-4TC (thermocouple type) AM600-8TC (thermocouple type) Celsius Fahrenheit Celsius Fahrenheit Celsius Fahrenheit Sensor Sensor Sensor Temperature Temperature Temperature Temperature Temperature Temperature Name Name Name Range (℃ ) Range (℉) Range (℃ ) Range (℉) Range (℃ ) Range (℉)...
-
Page 45: Remote Expansion Module (Ethercat)
Introduction 3.5 Remote Expansion Module (EtherCAT) 3.5.1 EtherCAT Communication Module Two interface modules (AM600-RTU-ECT and AM600-RTU-ECTA) that support EtherCAT communication are provided. The AM600-RTU-ECTA module supports automatic scan. The detailed specifications are as follows: Basic specifications Item Specifications 24 VDC (20.4 VDC to 28.8 VDC) (–15% to +20%), which can be connected from Power supply voltage an external power supply. - Page 46 Introduction Module interface description Signal indicator Internal 24 V power input POWER terminal EtherCAT Local expansion back-end interface EtherCAT communication port Figure 3-23 Interfaces of EtherCAT communication module (AM600-RTU-ECT/AM600-RTU-ECTA) Interface Name Function EtherCAT input interface EtherCAT output interface POWER: power indicator RUN: running indicator Signal indicators SF: expansion bus error indicator...
-
Page 47: I/O Module
Introduction 3.5.2 I/O Module Two I/O modules (AM600-0808ETNE and AM600-1616ETNE) that support EtherCAT remote communication are provided. The detailed specifications are as follows: Basic specifications Item Specifications Power specifications 24 VDC (20.4 VDC to 28.8 VDC) (–15% to +20%) Communication protocol EtherCAT industrial real-time bus protocol Max. -
Page 48: High-Speed Counting Module
Introduction Interface Name Function I/O status indicator: I/O signal indicator ON: I/O active OFF: I/O inactive 24 V power input terminal Module power input Sets the slave station address: ADDR1/ADDR0: station address DIP switch. The address is Address switch (rotary set in the hexadecimal format. - Page 49 Introduction ■ The following table lists the performance indicators: Item Specifications Communication protocol EtherCAT Service supported CoE (PDO, SDO) and FoE Minimum synchronization period of 6-axis 1250 μs (TYP) Synchronization mode The servo uses a DC distributed clock. I/O uses I/O synchronization. Physical layer 100BASE-TX Baud rate...
-
Page 50: Positioning Module
Introduction AM600-2HCE high-speed counting module dimensions (mm) Figure 3-28 Dimensions of the high-speedcounting module 3.5.4 Positioning Module A remote positioning module (AM600-4PME) that supports EtherCAT remote communication is provided. The specifications are as follows: Specifications Item Specifications 24 VDC (20.4 VDC to 28.8 VDC) (–15% to +20%), which can be connected Power supply voltage from an external power supply. - Page 51 Introduction Module interface description I/O signal indicator Signal indicator Address switch (rotary) EtherCAT communication port I/O terminal 24 V power input terminal Figure 3-29 Positioning module interfaces Interface Name Function X1 IN: EtherCAT input interface EtherCAT communication port X2 OUT: EtherCAT output interface that connects to the back-end EtherCAT slave station Power indicator Green On when the power is switched on...
-
Page 52: Remote Expansion Module (Profibus-Dp)
Introduction 3.6 Remote Expansion Module (Profibus-DP) Basic specifications Item Specifications 24 VDC (20.4 VDC to 28.8 VDC) (–15% to +20%), which can be connected from an Power supply voltage external power supply. Output current of the internal 5 1200 mA (rated) V power supply Profibus-DP Protocol for communication... -
Page 53: Remote Expansion Module (Canopen)
Introduction Interface Name Function Connects to the back-end module and does not support hot swap. For details about the Local expansion mod- "Chapter 4 Installation" ule back-end interface use, see Connects to the power module and does not support hot swap. For details about the use, Internal 24 V power "Chapter 4 Installation"... - Page 54 Introduction Module interface description Figure 3-32 CANopen module interfaces Interface Name Function DB9 interface CANopen communication port This 16-bit rotary switch is used to set the station address. Decimal slave station address = ADDR1 x 16 + ADDR0 (address range: 1 to 63). For details about "Chapter 5 Wiring"...
- Page 55 Introduction Dimensions (mm) 95.0 32.0 POWER CANRUN CANERR 90.0 Figure 3-33 Dimensions of the CANopen module -54-...
-
Page 56: Chapter 4 Installation
Chapter 4 Installation Chapter 4 Installation 4.1 Installation Environment Requirements ...................56 4.1.1 Installation Environment ........................4.1.2 Installation Clearance ........................4.1.3 Installation Instructions ........................4.2 Installation Method ........................57 4.2.1 Module Installation Process ......................4.2.2 Mounting the DIN Guide Rail to the Installation Plane in the Control Cabinet ......4.2.3 Connecting the Power Module, CPU Module, and Expansion Module ........... -
Page 57: Installation Environment Requirements
Introduction 4.1 Installation Environment Requirements 4.1.1 Installation Environment ■ Consider operability, serviceability, environment endurance when installing the PLC on the guide rail. Do not install the module in the following environment: ■ The ambient temperature is out of the range of -5 ℃ to 55 ℃ . ■... -
Page 58: Installation Method
Introduction 4.2 Installation Method 4.2.1 Module Installation Process Perform the following steps to install the module: Preparations Mount the DIN guide rail to the installation plane in the control cabinet Connect the power, CPU, and expansion modules Install the connected module group to the guide rail Install the system protection component (tail board ) Finish Figure 4-2 Installation procedure... -
Page 59: Connecting The Power Module, Cpu Module, And Expansion Module
Introduction Use M4 bolts to mount the DIN guide rail to the installation plane, as shown in the following figure: Figure 4-4 DIN guide rail installation 4.2.3 Connecting the Power Module, CPU Module, and Expansion Module The modules are connected through the connectors and locks of the modules. Here the connection between the CPU module and the power module is used as an example. -
Page 60: Mounting The Connected Module Group To The Guide Rail
Introduction Slide the lock on the CPU module as shown in the following figure to lock the two modules. Figure 4-7 Slide in the shown direction to lock ◆ Check whether the connection is firm after the modules are locked together. If the module CAUTION connection is not secured with the hooks, malfunction, fault, or drop-off may occur. - Page 61 Introduction Figure 4-9 Plug the module into the DIN guide rail Push up the DIN guide rail installation hooks of the module until they click to plug the module to the DIN guide rail. If your fingers cannot reach the DIN guide rail installation hooks, use a tool, for example, a screwdriver.
-
Page 62: Installing The System Protection Component - Tail Board
4.2.5 Installing the System Protection Component - Tail Board Modules of the AM600 series products are provided with front and rear connectors. To cover and protect the connector of the last module, a tail board is used. Perform the following steps to install the tail board: 4.3 Installing and Removing the Terminal Block... -
Page 63: Installing And Removing The Sd Card
Introduction Terminal block installation procedure ① Insert the protruding part into the terminal block mounting hole of the module and install the terminal block. ② Open the terminal cover and tighten the installation bolt of the terminal block. Figure 4-13 Terminal block installation 4.4 Installing and Removing the SD Card SD card installation The SD card slot uses a push-push structure. -
Page 64: Replacing Modules
Introduction SD card removal Push the SD card. The SD card is ejected. Then pull out the SD card straightly. Figure 4-15 Removing the SD card CAUTION ◆ Do not remove the SD card if it is used by any function. 4.5 Replacing Modules Comply with the following requirements when replacing a module installed on the DIN guide rail: If cables are connected to the modules, disconnect the cables or remove the terminal block and then... - Page 65 Introduction Figure 4-17 Unlocking the modules Slide the modules to uninstall them. Figure 4-18 Sliding the unlocked modules Replace the module. Figure 4-19 Replacing the module -64-...
- Page 66 Introduction Slide the modules to reconnect the connector. Figure 4-20 Sliding the modules Lock the connection locks of the modules. -65-...
- Page 67 Introduction Memo No. ___________ Date ________________________________________________________________________________ ________________________________________________________________________________ _______________________________________________________________________________ ________________________________________________________________________________ ________________________________________________________________________________ ________________________________________________________________________________ ________________________________________________________________________________ ________________________________________________________________________________ ________________________________________________________________________________ ________________________________________________________________________________ ________________________________________________________________________________ _______________________________________________________________________________ ________________________________________________________________________________ ________________________________________________________________________________ ________________________________________________________________________________ ________________________________________________________________________________ ________________________________________________________________________________ ________________________________________________________________________________ ________________________________________________________________________________ ________________________________________________________________________________ ________________________________________________________________________________ ________________________________________________________________________________ ________________________________________________________________________________ ________________________________________________________________________________ ________________________________________________________________________________ ________________________________________________________________________________ ________________________________________________________________________________ ________________________________________________________________________________ ________________________________________________________________________________ ________________________________________________________________________________ ________________________________________________________________________________ ________________________________________________________________________________ ________________________________________________________________________________ ________________________________________________________________________________ ________________________________________________________________________________ ________________________________________________________________________________ ________________________________________________________________________________ ________________________________________________________________________________...
-
Page 68: Chapter 5 Wiring
Chapter 5 Wiring Chapter 5 Wiring 5.1 Wiring Suggestions ......................................68 5.1.1 Grounding Requirements ..................................68 5.1.2 Wiring Requirements ...................................69 5.1.3 Installing the RFI Filter for the Power Module ...........................70 5.1.4 Insulation Transformer ..................................70 5.2 Selecting and Making Cables ..................................71 5.2.1 Selecting Cables....................................71 5.2.2 Making Fork-lug Cables ..................................71 5.2.3 Making Tubular-lug Cables .................................72 5.3 Wiring of the Power Module ....................................72... -
Page 69: Wiring Suggestions
Install the AM600 series module on the conductive backplate according to the following figure and paint the bolts that connect the guide rail under the AM600 modules to the conductive backplate to ensure reliable connection. -
Page 70: Wiring Requirements
Introduction If you solder a PVC cable to the shield of the shielded cable and connect the front end of the cable to the ground, the high-frequency impedance increases, weakening the shield effect. Therefore, this method is not recommended. Figure 5-3 Shielded cable grounding requirement Analog signal cables must be connected to the ground at one end close to the module. -
Page 71: Installing The Rfi Filter For The Power Module
Introduction 5.1.3 Installing the RFI Filter for the Power Module When the AM600 series modules are used in environment with strong interference sources (for example, AC drive), you are advised to use an RFI filter to suppress noise. RFI filter must be installed as close as the AM600 power module as possible and mounted to the conductive backplate with screws to ensure properly grounding. -
Page 72: Selecting And Making Cables
Introduction 5.2 Selecting and Making Cables 5.2.1 Selecting Cables Applicable Module Cable Lug Model American standard/AWG Crimping Plier RYO-8 Power module Fork lug TNS1.25-4 22-16 YYT-8 RYO-8 16-channel DI/DO module Fork lug TNS1.25-3 22-18 YYT-8 32-channel DI/DO module Tubular lug GTVE10006 YAC-5 RYO-8... -
Page 73: Making Tubular-Lug Cables
Introduction 5.2.3 Making Tubular-lug Cables The procedure for making a tubular cable is as follows: Peel off the insulation coating by 6 mm and pass the cable through a a cable marker sleeve. Insert the exposed end of the cable into the round hole of the lug and use the recommended crimping plier to crimp the hole. -
Page 74: Wiring Precautions
Introduction 5.3.2 Wiring Precautions Ensure that the external power supply is switched off during installation and wiring to avoid electric shock and module damage. Use a thick cable (max. sectional area: 2 mm²) as the 110 V/220 VAC power cable, twist the cable at the terminal, and keep the power cable part connected to the terminal as short as possible to avoid short circuit when the screw is loose. -
Page 75: High-Speed I/O Wiring Of The Cpu Module
Introduction 5.4 High-speed I/O Wiring of the CPU Module 5.4.1 Terminal Signal Arrangement The AM600/610 CPU modules support high-speed I/O. They provide a high-density port which supports 16-channel high-speed input (the first 6 channels support 24 V single-end input or differential input and the last 10 channels support 24 V single-end input) and 8-channel high-speed output. -
Page 76: External Wiring
Introduction 5.4.3 External Wiring Figure 5-13 External wiring If the SIRON T024-K switching terminals are used in switching wiring, see the following figure for the relationship between the terminal numbers and the CN5 pin numbers of the module: -75-... - Page 77 Xn3-DIFF Xn1-DIFF Xn3-24V Xn1-24V As shown in the preceding figure, Inovance provides the following items for customers: ① High- density extension cables; ② Connectors (used to make cables); ③ Switching terminal block. The order information is as follows: Order Code...
-
Page 78: Communication Wiring Of The Cpu Module
Introduction ◆ Note: The preceding figure shows the pin definitions and wiring of the high-density port of the AM600/610 CPU module. Read it carefully before performing wiring. NOTE 5.5 Communication Wiring of the CPU Module 5.5.1 Cable Connection Requirements Connecting the DB9 connector Plug the DB9 connector (with a cable) to the DB9 plug of the module. -
Page 79: Connection Through The Ethercat Bus
Introduction To prevent communication cables from being affected by other tension and ensure communication stability, fix the cables on the device side before EtherCAT, CANopen, or Profibus-DP communication starts, as shown in the following figure: POWER CANRUN CANERR STOP AM600 Risk of electric shock 小心触电... - Page 80 Introduction The following table lists the performance indicators: Item Specifications Communication protocol EtherCAT Service supported CoE (PDO, SDO) Minimum synchronization period of 2000 us 6-axis cam Synchronization mode The servo uses a DC-distributed clock. I/O uses I/O synchronization. Physical layer 100BASE-TX Baud rate 100 Mbit/s (100Base-TX)
-
Page 81: Connection Through The Profibus-Dp Bus
Introduction ■ Technical requirements No short circuit, circuit break, misplacement, or poor contact is detected in the 100% conduction test; The cable length is within the allowable tolerance range; The EtherCAT bus transfers network data through a shielded cable. The following table lists the cable specifications: Item Specifications... - Page 82 Introduction varies according to the communication baud rate of the master station, and the communication data cable length must comply with the Siemens DB9 wiring standard. Due to reasons such as interference and cable error, transmission distance of the Profibus-DP bus reaches approximately 60% of the theoretic value in the actual environment.
- Page 83 Introduction POWER 0 1 2 3 4 5 6 7 STOP AM600 Risk of electric shock 小心触电 Fix with cable ties Communication module - DP POWER POWER AM600 小心触电 Risk of electric shock 小心触电 Figure 5-23 Cable fixing requirement ◆ To prevent communication cables from being affected by other tension and ensure Caution communication stability, fix the cables on the device side before Profibus-DP communication starts.
- Page 84 A DB9 connector (female socket) equipped with a termination resistor is used as the Profibus-DP communication connector. The connector is compatible with a universal Profibus-DP interface. This connector is designed and manufactured by Inovance, as shown in the following figure. termination resistor switch Figure 5-25 DB9 connector circuit...
-
Page 85: Connection Through The Canopen/Canlink Bus
Introduction Actual Reachable Maximum Transmission Transmission Rate Theoretic Transmission Distance (m) Distance (m) 9.6 Kbps to 93.75 Kbps 1000 187.5 Kbps 500 Kbps 1.5 Mbps 12 Mbps 5.5.4 Connection Through the CANopen/CANlink Bus Networking diagram ■ The following figure shows the topological structure of the CAN bus connection. You are advised to use a shielded twisted pair for CAN bus connection and connect two 120 Ω... -
Page 86: Serial Communication Connection Through Rs485
Introduction Wiring CANopen uses a DB9 connector for data transmission. The following table defines the DB9 pins: Pin Diagram Signal Definition PIN2 CANL PIN7 CANH PIN3 CGND You are advised to use a shielded twisted pair for CAN bus connection and connect two 120 Ω termina- tion resistors at both ends of the bus to avoid signal reflection. - Page 87 Introduction RS485 bus 485+ 485- CGND 120Ω 120Ω termination termination resistor resistor 485+ 485- CGND 485+ 485+ 485- CGND 485- CGND Set the termination DIP switch DIP switch resistor through Used to set the switches 3 and 4 or 5 termination and 6 of the main resistor on the...
- Page 88 Introduction Figure 5-31 Incorrect star-shaped connection mode ■ Terminal wiring mode ① For nodes with the CGND terminal Check whether the RS485 bus contains three cables that connect to the 485+, 485-, and CGND terminals and ensure that the terminals are not connected incorrectly or reversely. If shielded cables are used, the shield layer must be connected to the CGND terminal.
-
Page 89: Monitoring Connection Through Ethernet
Introduction a multi-core unshielded cable b shielded twisted pair Figure 5-33 Terminal wiring Method 1: Check whether other terminals of the node share a reference ground with the 485 circuit. If yes, connect the CGND cable (shield layer) of the bus to the corresponding pin; Method 2: Find the reference ground of the 485 circuit on the board of the node and connect a cable from the reference ground to CGND or the shield layer;... - Page 90 Introduction CANRUN CANERR RUN/ STOP Ethernet cable Figure 5-34 Connection between the CPU module and PC It can also connect to the hub or switch through an Ethernet cable and then connect to other network devices through the hub or switch, achieving multi-point connections. Ethernet cable Switch Ethernet cable...
-
Page 91: Wiring Of Local Expansion Modules
Introduction 5.6 Wiring of Local Expansion Modules 5.6.1 DI Module AM600-1600END DI module ■ Terminal arrangement and signal definitions (AM600-1600END) DI module AM600-1600END Terminal Terminal Arrangement Type Function Remarks Symbol Input Interface Group 1 Input User input 0 of group 1 Sink/Source input Input User input 1 of group 1... - Page 92 Introduction AM600-3200END DI module ■ Terminal arrangement and signal definitions (AM600-3200END) DI Module (AM600-3200END) Terminal Arrangement Signal Definition The preceding table describes the internal circuit and external wiring of the port. Ensure that the wiring meets the corresponding requirements. -91-...
- Page 93 Ch2-I6 Figure 5-37 Wiring with SIRON T024-K switching terminals As shown in the preceding figure, Inovance provides the following items for customers to order: ① High- density extension cables; ② Connectors (used when you need to make cables); ③ Switching terminal console. The order information is as follows:...
-
Page 94: Do Module
Introduction 5.6.2 DO Module 1 DO Module (AM600-0016ETP/AM600-0016ETN/AM600-0016ER) ■ Terminal signal arrangement and definitions (AM600-0016ETP) Transistor output module (AM600-0016ETP) Terminal Arrangement Terminal Symbol Type Function Remarks Output interfaces of group 1 Output User output 0 of group 1 Source output, active high Output User output 1 of group 1 Source output, active high Output User output 2 of group 1... - Page 95 Introduction ■ Terminal signal arrangement and definitions (AM600-0016ER) Relay output module (AM600-0016ER) Terminal Arrangement No. Terminal Symbol Type Function Remarks Output interfaces of group 1 Output User output 0 of group 1 Sink output, active high Output User output 1 of group 1 Sink output, active high Output User output 2 of group 1...
- Page 96 Introduction Figure 5-39 AM600-0016ETN output wiring ◆ Relay output Figure 5-40 AM600-0016ER output wiring -95-...
- Page 97 Introduction 2 DO module (AM600-0032ETN) ■ Terminal signal arrangement and definitions Terminal Arrangement Terminal Definition The preceding table describes the internal circuit and external wiring of the port. Ensure that the wiring meets the corresponding requirements. If the SIRON T024-K switching terminals are used in switching wiring, see the following figure for the relationship between the terminal numbers and the terminal pin numbers of the module (If switching terminals of other models are used, confirm the relationship between the terminal numbers and the terminal pin numbers):...
- Page 98 Ch3-Q6 Ch2-Q6 Figure 5-41 Wiring with SIRON T024-K switching terminals As shown in the preceding figure, Inovance provides the following items for customers to order: ① High- density extension cables; ② Connectors (used when you need to make cables); ③ Switching terminal console. The order information is as follows:...
-
Page 99: Ai/Ao Module
Introduction 5.6.3 AI/AO Module 3 AI module AAM600-4AD wiring Terminal signal arrangement and definitions AI Module AM600-4AD Terminal Terminal Arrangement Type Function Remarks Symbol Input V+ of channel 0 Voltage input Input V-/I- of channel 0 Voltage/Current input Input I+ of channel 0 Current Input Internally connected Shielding ground... - Page 100 Introduction External wiring Figure 5-43 AO module wiring ◆ *1 Use 2-core shielded twisted pair cable for analog signal. ◆ *2 Indicates input impedance of 4AD. ◆ *3 For current input (4 to 20 mA, 0 to 20 mA), terminal (V+) must be connected to terminal (I+). ◆...
-
Page 101: Ao Module
Introduction 5.6.4 AO Module Terminal signal arrangement and definitions (AM600-4DA) AO Module AM600-4DA Terminal Terminal Arrangement Type Function Remarks Symbol Output V+ of channel 0 Voltage output Output V-/I- of channel 0 Voltage/Current output Output I+ of channel 0 Current output Internally connected to Shielding ground housing ground... -
Page 102: Temperature Module
Introduction Figure 5-45 Connection for current-controlled signal ◆ *1 Use 2-core shielded twisted pair cable as power cable. ◆ *2 If noises or ripples are generated in external wiring, connect a capacitor of 0.1 to 0.47 mF 25 V between terminals V+/I+ and VI-. NOTE Wiring instructions ■... - Page 103 Introduction External wiring Figure 5-46 AM600-4PT module wiring ◆ *1 Use shielded cables; ◆ *2 If two-wire wiring is used, the INB and Inb channels need to be shorted, and the cable resistance affects the measurement; ◆ *3 Use cables with small wire resistance and without resistance difference between the three wires;...
- Page 104 Introduction Note 1: For AM600-4TC, the L4+/L4-~L7+/L7- channels are reserved; Note 2: For AM600-8TC, the L7 sampling channel is used for compatibility which supports normal thermocouple sampling and external cold-side compensation. When the cold side of the thermocouple is far from the module, and the temperature difference is large, use the channel for external cold-side compensation if the requirement on temperature accuracy is high.
-
Page 105: Wiring Of Remote Expansion Modules (Ethercat)
Introduction 5.7 Wiring of Remote Expansion Modules (EtherCAT) 5.7.1 EtherCAT Wiring Requirements ■ Making network cables Figure 5-48 Making a cable ■ Use Cat5e shielded twisted pair cable with steel-shell molding wires. ■ Signal lead arrangement Signal Signal Direction Signal Description Output Data transmission + Output... - Page 106 Introduction ■ Communication connection Hold the RJ45 connector (with a cable) and insert it to the EtherCAT socket of the communication module until it clicks. Figure 5-49 Communication connection ■ Communication cable fixing requirement To prevent communication cables from being affected by other tension and ensure communication stability, fix the cables on the device side before EtherCAT communication starts, as shown in the following figure: POWER...
-
Page 107: Wiring Requirements For User Terminal Output Signals
Introduction LED Indicator Description Solution An error occurs in communication between the EtherCAT master Check whether the parameter settings are correct at the Blinking station and the EtherCAT slave master and slave stations. station. Remaining Check whether short circuit or overtemperature has The output channel is faulty. -
Page 108: Signal Wiring Of The I/O Module
Introduction 5.7.3 Signal Wiring of the I/O Module 1 AM600-0808ETNE module ■ Terminal arrangement Figure 5-52 Terminal signal arrangement ■ External wiring Internal equivalent circuit: -107-... - Page 109 Introduction 2 AM600-1616ETNE module ■ Terminal arrangement Figure 5-53 Terminal signal arrangement ■ External wiring -108-...
-
Page 110: Signal Wiring Of The High-Speed Counting Module
Introduction ■ Internal equivalent circuit 5.7.4 Signal Wiring of the High-speed Counting Module ■ Terminal arrangement Figure 5-54 Terminal signal arrangement of the AM600-2HCE -109-... - Page 111 Introduction ■ External wiring ■ Internal equivalent circuit -110-...
- Page 112 Introduction ■ Signal connections Figure 5-55 Signaling connections -111-...
- Page 113 Introduction ■ System connections EtherCAT master station Supporting AM600 series PLC main unit software InoProShop POWER CANRUN CANERR STOP Ethernet AM600 cable Risk of electric shock Connect to the main 小心触电 unit of the AM600 series PLC through EtherCAT slave...
-
Page 114: Signal Wiring Of The Positioning Module
Introduction 5.7.5 Signal Wiring of the Positioning Module ■ Terminal arrangement Figure 5-57 Terminal signal arrangement of the AM600-4PME ■ External wiring and internal equivalent circuit -113-... - Page 115 Introduction Internal equiva- lent circuit ■ Signal terminal wiring AM600-4PME Servo motor drive PULSE SIGN S-ON 24 VDC external power Positive limit switch * Positive limit Negative limit switch * * The logic of the switch status Negative can be set in the user limit program based on the actual switch characteristics.
- Page 116 Introduction ■ Communication system wiring EtherCAT master station Supporting AM600 series PLC main unit software InoProShop POWER CANRUN Ethernet CANERR cable STOP AM600 Risk of electric shock 小心触电 Connect to the main unit of the AM600 series PLC through an...
- Page 117 Introduction Memo No. ___________ Date ________________________________________________________________________________ ________________________________________________________________________________ _______________________________________________________________________________ ________________________________________________________________________________ ________________________________________________________________________________ ________________________________________________________________________________ ________________________________________________________________________________ ________________________________________________________________________________ ________________________________________________________________________________ ________________________________________________________________________________ ________________________________________________________________________________ _______________________________________________________________________________ ________________________________________________________________________________ ________________________________________________________________________________ ________________________________________________________________________________ ________________________________________________________________________________ ________________________________________________________________________________ ________________________________________________________________________________ ________________________________________________________________________________ ________________________________________________________________________________ ________________________________________________________________________________ ________________________________________________________________________________ ________________________________________________________________________________ ________________________________________________________________________________ ________________________________________________________________________________ ________________________________________________________________________________ ________________________________________________________________________________ ________________________________________________________________________________ ________________________________________________________________________________ ________________________________________________________________________________ ________________________________________________________________________________ ________________________________________________________________________________ ________________________________________________________________________________ ________________________________________________________________________________ ________________________________________________________________________________ ________________________________________________________________________________ ________________________________________________________________________________ ________________________________________________________________________________...
-
Page 118: Chapter 6 Programming Tool And Download
Chapter 6 Programming Tool and Download Chapter 6 Programming Tool and Download 6.1 Programming Tool Acquisition ....................118 6.2 Programming Environment and Software Installation ............118 6.2.1 Environment Requirements ......................6.2.2 Installation Procedure ........................6.2.3 InoProShop Uninstallation ......................-117-... -
Page 119: Programming Tool Acquisition
6.1 Programming Tool Acquisition User programming software InoProShop is free software for the Inovance AM600 series medium-sized PLC. You can obtain the installation file and references of the AM600 series products from the following paths: ■ Obtain the software installation CD from Inovance distributors at all levels. - Page 120 Introduction Step Description Double-click the Ino- ProShop (V*.*.*.*).exe file. The preparation page is displayed. Click Next to start installation. Set the installation path and click Next. Select the features to be installed on the displayed page and click Next. Keep the default selection un- less you have special requirements.
- Page 121 Introduction Step Description Click Next. Click Next. The installation progress is displayed. Wait and click Finish when the lower page is displayed. -120-...
-
Page 122: Inoproshop Uninstallation
Introduction Installation completed InoProShop supports different languages. You can choose Tools > Options > International Settings on the home page and change the language. 6.2.3 InoProShop Uninstallation Use the typical method of uninstalling software in a Window system to uninstall InoProShop. The proce- dure is as follows: ■... - Page 123 Introduction Memo No. ___________ Date ________________________________________________________________________________ ________________________________________________________________________________ _______________________________________________________________________________ ________________________________________________________________________________ ________________________________________________________________________________ ________________________________________________________________________________ ________________________________________________________________________________ ________________________________________________________________________________ ________________________________________________________________________________ ________________________________________________________________________________ ________________________________________________________________________________ _______________________________________________________________________________ ________________________________________________________________________________ ________________________________________________________________________________ ________________________________________________________________________________ ________________________________________________________________________________ ________________________________________________________________________________ ________________________________________________________________________________ ________________________________________________________________________________ ________________________________________________________________________________ ________________________________________________________________________________ ________________________________________________________________________________ ________________________________________________________________________________ ________________________________________________________________________________ ________________________________________________________________________________ ________________________________________________________________________________ ________________________________________________________________________________ ________________________________________________________________________________ ________________________________________________________________________________ ________________________________________________________________________________ ________________________________________________________________________________ ________________________________________________________________________________ ________________________________________________________________________________ ________________________________________________________________________________ ________________________________________________________________________________ ________________________________________________________________________________ ________________________________________________________________________________ ________________________________________________________________________________...
-
Page 124: Chapter 7 Running And Maintenance
Chapter 7 Running and Maintenance Chapter 7 Running and Maintenance 7.1 Running and Stop ........................124 7.2 Indicators and MFK Button .......................124 7.2.1 LED Fault Indicators ........................7.2.2 MFK Button Description ........................7.3 Routine Maintenance ........................126 7.3.1 Daily Spot Check Items ........................7.3.2 Periodic Spot Check ........................ -
Page 125: Running And Stop
Introduction 7.1 Running and Stop After the program is written into the CPU module, perform the following steps to start or stop the sys- tem. After the program is written into the CPU module when the CPU module is in STOP state, perform the following steps to start the system: 1. - Page 126 Introduction Indicators of the remote communication expansion module ■ EtherCAT slave station LED Indicator Meaning Solution Data is exchanged between the EtherCAT master station and the EtherCAT slave station. None The preset configuration and actual configuration match. Check the configuration and parameter settings.
-
Page 127: Mfk Button Description
Introduction LED Indicator Meaning Solution SF (red) BF (red) (green) The system expansion configuration Check whether the system configuration is Blinking is inconsistent with the actual consistent with the actual configuration. hardware configuration. Set a valid address in the range of 1 to 125. The address is not allowed, a module error occurs, or a diagnostic alarm is Replace the faulty module according to the... -
Page 128: Periodic Spot Check
Introduction 7.3.2 Periodic Spot Check The following table lists the spot checks that need to be performed once or twice every 6 or 12 months: Check Item Check Method Measure Check whether the input AC power of Power supply the system conforms to the product Check the power supply reliability. -
Page 129: Fault Code Display
Introduction Value Range (Hexadecimal) Fault Type No fault Local expansion bus diagnosis of the CPU module and I/O module diagnosis High-speed I/O diagnosis ModBusCOM0 diagnosis ModBusCOM1 diagnosis ModbusTCP diagnosis EtherCAT diagnosis (including back-end local bus diagnosis of the slave station interface module) Profibus-DP diagnosis (including back-end local bus diagnosis of the slave station interface module) CANopen diagnosis (including back-end local bus diagnosis of the slave... - Page 130 Introduction LED display for high-speed I/O Meaning Solution Check the detailed fault information on the High-speed input error background UI. Check the detailed fault information on the High-speed input alarm background UI. Check the detailed fault information on the High-speed output error background UI.
- Page 131 Introduction Memo No. ___________ Date ________________________________________________________________________________ ________________________________________________________________________________ _______________________________________________________________________________ ________________________________________________________________________________ ________________________________________________________________________________ ________________________________________________________________________________ ________________________________________________________________________________ ________________________________________________________________________________ ________________________________________________________________________________ ________________________________________________________________________________ ________________________________________________________________________________ _______________________________________________________________________________ ________________________________________________________________________________ ________________________________________________________________________________ ________________________________________________________________________________ ________________________________________________________________________________ ________________________________________________________________________________ ________________________________________________________________________________ ________________________________________________________________________________ ________________________________________________________________________________ ________________________________________________________________________________ ________________________________________________________________________________ ________________________________________________________________________________ ________________________________________________________________________________ ________________________________________________________________________________ ________________________________________________________________________________ ________________________________________________________________________________ ________________________________________________________________________________ ________________________________________________________________________________ ________________________________________________________________________________ ________________________________________________________________________________ ________________________________________________________________________________ ________________________________________________________________________________ ________________________________________________________________________________ ________________________________________________________________________________ ________________________________________________________________________________ ________________________________________________________________________________ ________________________________________________________________________________...
-
Page 132: Appendix: Revision History
Appendix: Revision History Appendix: Revision History Date Version Revision Description First release October 2018 -131-... - Page 133 Service Hotline: 400-777-1260 http: //www.inovance.com Suzhou Inovance Technology Co., Ltd. Add.: No. 16 Youxiang Road, Yuexi Town, Wuzhong District, Suzhou 215104, P.R. China Tel: +86-512-6637 6666 Fax: +86-512-6285 6720 Service Hotline: 400-777-1260 http: //www.inovance.com Copyright Shenzhen Inovance Technology Co., Ltd.
Need help?
Do you have a question about the AM600 Series and is the answer not in the manual?
Questions and answers
Program Upload procces
To upload a program for the Inovance AM600 Series PLC:
1. Connect the PC to the AM600 PLC using either a LAN cable (for network connection) or a Mini USB cable (for direct connection).
2. Ensure InoProShop software is installed on the PC. If installing for the first time, ensure over 5 GB of free space. For upgrades, back up files, uninstall the old version, restart the PC, and install the new version.
3. Locate and run the InoProShop installer (InoProShop V*.*.*.*.exe) to install the software.
4. Use InoProShop to upload the program to the AM600 PLC via the established connection.
This process allows programming from a remote PC or directly via USB.
This answer is automatically generated