
Related Manuals for R82 buffalo


Summary of Contents for R82 buffalo
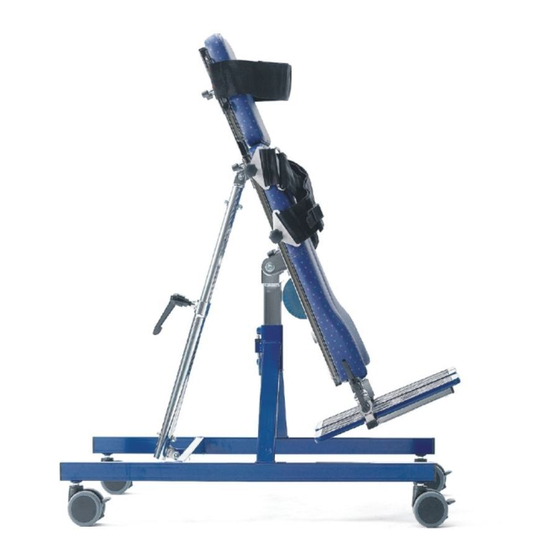
- Page 1 English manual © 2007 R82 A/S. All rights reserved. The R82 logo and the Buffalo are registered trademarks of R82 A/S. 07.2007...
-
Page 2: Table Of Contents
Contents Safety ................4 Guarantee................4 Tools .................. 4 Maintenance ..............4 Ready for use ..............5 Straps & Foot supports ............6 Heel support, "Duck Foot" and frame extension ....6 Chin Support and Side supports........7 Knee supports ..............7 Head support with nose hole .......... - Page 3 The Buffalo has been developed with an optimum of security and value in mind. The Buffalo is for indoor use only, and is to be used on a levelled, non tilting surface only. This manual has been made to help you gain as much use from the Buffalo...
-
Page 4: Safety
Take care that all the fixations and adjustments are placed and fitted correctly and check it on a regular basis. We do not recommend moving the Buffalo with the child in it over long distan- ces, over joints in carpets, over uneven surfaces or outside. -
Page 5: Ready For Use
The Buffalo is delivered in parts and folded to make it take up as little room as possible during transportation. To make your Buffalo ready for use, please follow the below description. * Lift the standing frame out of the box and remove the plastic bag. -
Page 6: Straps & Foot Supports
straps & foot supports The height of the straps is adjustable. Use the handle on the side (A). Adjust the height (B) and angle (C) of the foot supports as shown by using the black levers. Heel support, "duCk foot" and fraMe extension Heel support (A) and ‘duck foot’... -
Page 7: Chin Support And Side Supports
CHin support and side supports Mount the chin support on the long, through bars as shown. Fasten carefully (A). Side supports. Place the fittings in the slots as shown (B) and fasten in the desired height with the Allen key (C). Then place the side supports in the fittings. -
Page 8: Head Support With Nose Hole
Head support witH nose Hole Dismount the old fittings on the back of the chest plate (A). Use a 4 mm Allen key (6 mm if Buffalo size 3). Mount the new 3-pipe-fittings in the same holes on the plate. -
Page 9: Extra Cushion
Allen key (C). The pad on the back support can be adjusted si- deways (D). The vertical bar with the pad swings up and away, making it easy to get in and out of the Buffalo. -
Page 10: Table
taBle To mount the table, start by removing the upper trunk support. Then place the table on the long through bars (A), and place the upper trunk sup- port again. Use the Allen key to adjust height (B) and depth (C). Use the black lever to adjust the angle (D). -
Page 11: Manual Tilt
The Buffalo size 2 and 3 with manual tilt ang- les from vertical into the horizontal position by loosening the handle (C). The security lock (D) will hold the tilt table. -
Page 12: Mounting The Power Tilt 1/2
MountinG tHe power tilt 1/2 This is to show how you mount Power Tilt on a standard Buffalo. Power Tilt is only available for Buffalo size 2 & 3. 1) In order to attach the control box, fasten the plate in the holes. Then attach the control box to the plate. -
Page 13: Mounting The Power Tilt 2/2
MountinG tHe power tilt 2/2 4) The fitting for the manual tilt bar has to be exchanged with the new one. 5) Place the bar for the power tilt in the new fitting. Use an Allen key and a 17 mm fork wrench. -
Page 14: Product Identification
produCt identifiCation A) Serial number The label is placed on the right side of the frame on the inside of the bar. B) Manufacturer The label is placed on the right side of the frame on the outside of the bar. Dato: 31-01-02 Belast: 0840-01-111878-001... -
Page 15: Measurements
MeasureMents Size 1 Size 2 Size 3 cm (inch) cm (inch) cm (inch) Height, vertical (HV) 85 (33¼") 106 (41¼") 135 (52¾") Height, horizontal, wo/power (HH) 60-63 (23½-24½") 65 (25¼") 72 (28") Height, horizontal, w/power (HH) 67 (26¼") 74 (28¾") Height, from foot plate (H) 75-115 (30-45") 90-135 (35-53") 125-170 (49-67") -
Page 16: Technical Data
Frame: Chromed steel or powder lacquered steel Upholstery: Wooden plate with fire-resistant foam covered with fireresistant artificial leather produCer distriButor R82 A/S Parallelvej 3 8751 Gedved Denmark Please find your distributor on www.r82.com...
Need help?
Do you have a question about the buffalo and is the answer not in the manual?
Questions and answers