Table of Contents
Advertisement
Quick Links
Advertisement
Table of Contents

Related Manuals for Oakton T100WL


Summary of Contents for Oakton T100WL
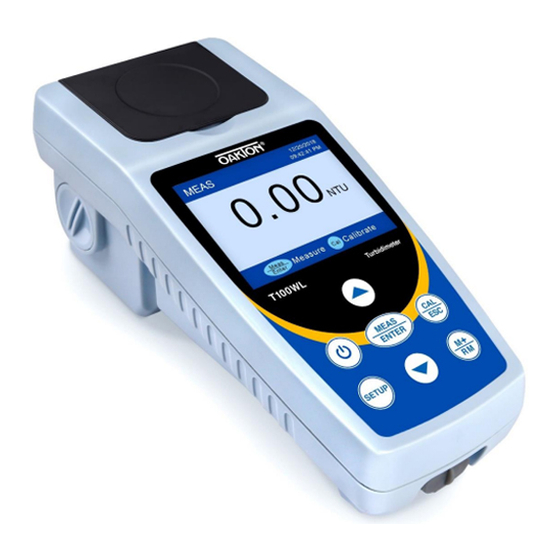
- Page 1 T100WL Portable Turbidity Meter 35635-10 Instruction Manual - 1 -...
-
Page 2: Table Of Contents
Table of Contents Introduction ........................... - 3 - Technical Specifications ......................- 4 - Instrumentation Illustration ......................- 5 - Summary ..........................- 5 - Configuration ......................... - 6 - Display Mode .......................... - 6 - Keypad ............................ - 7 - Power supply .......................... -
Page 3: Introduction
INTRODUCTION Thank you for purchasing Oakton T100WL Portable Turbidity Meter (hereafter referred to as the instrument). The instrument uses tungsten filament lamp as the light source and 90° scattering method, which is compliant with U.S EPA 180.1 method for the determination of turbidity in drinking, ground, surface, and saline waters, domestic and industrial wastes. -
Page 4: Technical Specifications
TECHNICAL SPECI FICATIONS Specification Description Measurement 90° scattering measurement, U.S EPA180.1 compliant Method Light Source Tungsten filament lamp 0 to 1000 NTU (FNU), automatic range switch 0.01 to 19.99 NTU(FNU) Measuring Range 20.0 to 99.9 NTU(FNU) 100 to 1000 NTU(FNU) ≤... -
Page 5: Instrumentation Illustration
INSTRUMENTATION ILLUSTRATION 3.1 Summary ① ② ③ ④ ⑪ ⑥ ⑤ ⑦ ⑧ ⑨ ⑩ Diagram-1 Flip cover of the sample vial holder (Close the Dust proof plug (Take off the plug when ⑦ ① cover when measuring) measuring) ⑧ ②... -
Page 6: Configuration
3.2 Configuration Calibration Solutions: ① 0.0, 20, 100, 400, 800 NTU ② Carrying case ③ T100WL Turbidimeter ⑩ ④ Microfiber cloth ⑤ ① Power adaptor (5V 1A) ⑥ Software flash drive ② ⑦ Silicone oil (10 ml) ③ ⑨ ⑧... -
Page 7: Keypad
Keypad Functions ① Calibration Mode ② Standard values Calibration ③ Operation guide Menu ④ Finished calibration indicator ① Parameter Setup Parameter ② Menu Setup ③ Operation guide ① Data Recall ② Saved data numberings Data Recall ③ Saved data ④ Operation guide 3.4 Keypad Diagram-3... -
Page 8: Power Supply
⚫ Power on/off ⚫ In measurement mode, press to enter or exit calibration mode ⚫ In parameter setup and data recall mode, press to return to measurement mode ⚫ In measurement mode, short press to perform single measurement; long press (>3s) to perform continuous measurement. - Page 9 automatic mode, the data (also the measurement interface) will be automatically saved after each measurement. The instrument has two types of measurement mode: normal measurement (as in Diagram 4) and TruRead measurement (Diagram 5). in Diagram 4 means that 12 sets of data has been saved.
-
Page 10: Setting For The First Time Use
3.7 Setting for first-time use. The instrument should be fully charged before first-time use. Check and adjust settings for the following items: date, time, system language, etc. See the detail in Section 6 Parameter setup. CALIBRATION 4.1 Preparation for Calibration Calibration point The instrument has 5 calibration points: 0 NTU, 20 NTU, 100 NTU, 400 NTU, and 800 NTU. -
Page 11: Calibration Procedure (Take 0 Ntu And 20 Ntu As An Example)
④ Stability of calibration solutions The U.S EPA approved AMCO polymer standard calibration solution is very uniform and stable. It does not precipitate, drift or condense. It can be used directly without shaking or fliping the vial (to make the solution even). For polymer calibration solutions that have not been used for a long time, slowly flip the vial twice and let it stand for 2 minutes. -
Page 12: Notes For Calibration
5) Place the 20.0 NTU calibration vial in the sample vial holder, press to start 20 NTU calibration. After calibration is done, press to confirm. The instrument will return to the calibration menu (see diagram on the right side). The OK sign indicates that 20 NTU has been calibrated 6) If you want to continue to calibrate 100, 400 and 800 NTU, place the 100 NTU calibration vial in the sample vial holder and press... -
Page 13: Turbidity Measurement
• Using the same sample vial to calibrate and measure can eliminate the error caused by different vials, thus reaching higher accuracy. For example, add distilled water to 1 vial for calibration and then add sample solution to 1 vial for measurement. Note that the solution vial should be rinsed thoroughly when changing solutions. -
Page 14: Measurement Preparation
5.2 Measurement Preparation a) Collect the sample solution with a clean container and add the solution to the 4/5 of the vial (about 18ml), see Diagram 7. Then close the lid. b) Before the measurement, users can slowly flip the sample vial a few times and let it stand for 2 to 5 minutes to eliminate potential air bubbles (see Diagram 8). -
Page 15: Notes For Measurement
times in parameter setting P2, and read the average value each time to improve the measurement accuracy. Compare the maximum and minimum values at the same time. If the difference is too large, it means that the measured value is not reliable, the solution may be unstable or there might be other factors affecting the measurement. -
Page 16: Parameter Setup Reference Table
6.2 Parameter Setup Reference Table Symbol Parameter Content Last calibration data and time View Continuous measurement 5-10-15-20 Measurement unit NTU-FTU Data logging mode manual-automatic Delete saved data No-Yes Auto-power off timer 10-20-30-OFF Select language English-Spanish-Chinese Date setting Time setting 6.3 Parameters Description P1 ─... -
Page 17: Data Output Via Usb Port
DATA OUTPUT VIA USB PORT 7.1 Display Interface ① ② ③ Diagram 10 ①— Display area for saved data To display numberings, date, time, measurement method (normal measurement or continuous measurement), measured values, and measurement unit. For continuous measurement, average, maximum, and minimum values will also be displayed. - Page 18 7.3 Install Software The instrument uses Turbidimeter PC-Link communication software. It is only compatible with Windows-based operating system. The communication port is USB. Copy and paste the program files from the USB drive to the computer. Connect USB cable to the instrument and computer, open Turbidimeter PC-Link.exe, the instrument will connect with computer automatically.
-
Page 19: Lamp Replacement
LAMP REPLACEMENT 8.1 Light source check Observe the light source on the left side of the sample vial holder as in Diagram 11. Turn on the . The light source will light up for 5 seconds. If it’s not lighting up or it’s instrument, and press flashing, please replace the lamp. -
Page 20: Warranty
The above limited warranty shall not cover problems caused by improper use, accidental damage, and unauthorized repairs. Oakton Instruments 625 E Bunker Court Vernon Hills, IL 60061 www.4oakton.com...
Need help?
Do you have a question about the T100WL and is the answer not in the manual?
Questions and answers