Advertisement
Quick Links
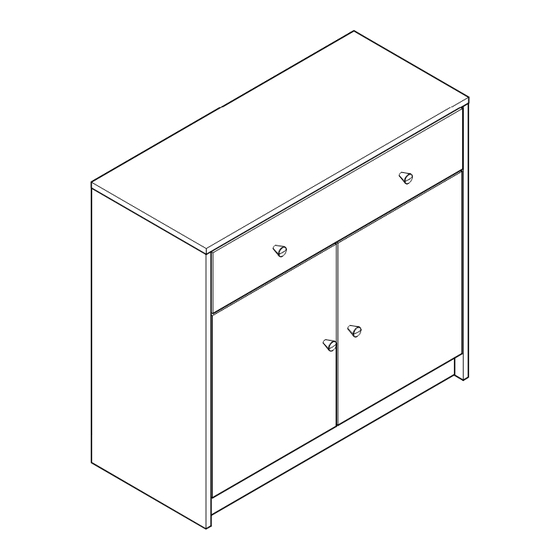
Maine 2 Door 1 Drawer Sideboard
Assembly Instructions
Dimensions
Width - 80cm
Depth - 35.5cm
Height - 74cm
Important
- Please read these instructions fully before starting assembly
If you need help or have damaged or missing parts, call the Customer Helpline:
Argos = 0345 6400800
Please keep for future reference
-
461/3369
464/6989
464/3724
803/2991
798/9409
803/3093
Version 2 Date: 21/09/17
Advertisement

Related Manuals for Argos HOME Maine 2 Door 1 Drawer Sideboard


Summary of Contents for Argos HOME Maine 2 Door 1 Drawer Sideboard
- Page 1 Width - 80cm Depth - 35.5cm Height - 74cm Important - Please read these instructions fully before starting assembly If you need help or have damaged or missing parts, call the Customer Helpline: Argos = 0345 6400800 Version 2 Date: 21/09/17...
-
Page 2: Handy Hints
Safety and Care Advice Important – Please read these instructions fully before starting assembly • Check you have all the • During assembly do not stand • To reduce components and tools listed on or put weight on the product, the likelihood of the following pages. - Page 3 Components - Panels If you have damaged or missing components, call the Customer Helpline: Argos = 0345 6400800 Please check you have all the panels listed below Pilot holes for guidance only Left panel Right panel Back panel (34.9 x 72.4cm) (34.9 x 72.4cm)
-
Page 4: Tools Required
Components - Fittings Please check you have all the fi ttings listed below Note: The quantities below are the correct amount to complete the assembly. In some cases more fi ttings may be supplied than are required. (This screw is included in (This screw is included in the runners bag) the door hinges bag) - Page 5 Assembly Instructions Step 1 2 Holes upside Attaching runners and hinges Position the Left out- side runners in from front edge of the Left side panel Use Screws to fix the Left outside runners Pilot holes for onto the Left side panel runner position 2 Holes upside Position the Right out-...
- Page 6 Assembly Instructions Step 1 - continued Use Screws to fix the Door hinges ‘back plates’ onto the Left side panel Insert Dowels into the Left side panel Screw Locking pins into the Left side panel Insert locking pins Note: as far as shown. Do not over tighten.
- Page 7 Assembly Instructions Step 2 Attaching bottom panel Use Screws to fix Plastic supports onto the Front panel Use Screws to fix Front panel onto the Bottom panel Note: of the Plastic supports even with the edges of Front panel Bottom panel Insert Dowels into the Bottom panel...
- Page 8 Assembly Instructions Step continued Carefully locate the Left panel onto the Middle panel Bottom panel Insert 3 Locking nuts into the Middle panel and Bottom panel Use a screwdriver to turn Locking nuts clockwise to lock. Carefully locate the Right panel onto the unit.
- Page 9 Assembly Instructions Step 3 Attaching top panel Screw Locking pins into the Top panel Insert locking pins Note: as far as shown. Do not over tighten. Carefully locate the Top panel onto the unit. Insert 4 Locking nuts into the unit. Use a screwdriver to turn Locking nuts clockwise...
- Page 10 Assembly Instructions Step 4 Fixing back panel Unfinished back surface Attach Back panel using nails Important: The unit MUST be ‘square’ when back is attached. Step 5 Drawer assembly Screw Locking pins into the Drawer front panel Insert locking pins Note: as far as shown.
- Page 11 Assembly Instructions Step 5 - continued Fix Drawer right panel , Drawer support and Drawer left panel onto Drawer front panel Insert 5 Locking nuts into the Drawer right panel , Drawer support Finished front edge and Drawer left panel Use a screwdriver to turn Locking nuts clockwise...
- Page 12 Assembly Instructions Step 5 - continued Position the Drawer back panel onto the unit using Screws Turn the unit upside down carefully. Use Screws to fix the Left inside runners Right inside runners onto the unit. Attach Handles onto Drawer front panel using Screws...
- Page 13 Assembly Instructions Step 6 Attaching shelf With help, carefully stand unit upright. Warning: The unit is heavy. Lift with care. Slide Support covers onto Shelf supports Insert Shelf supports (Support covers included) into the unit. Ensure they are well fitted before inserting the Shelves.
- Page 14 Assembly Instructions Step 8 Hanging doors With help, slot Door hinges onto ‘hinge plates’. Tighten screw shown to lock hinges in position. Repeat opposite door. See ‘ Hinge adjustment ’ in step 10 if the doors need adjusting.
- Page 15 Assembly Instructions Step 9 Hinge adjustment To move doors up or down: loosen screws shown and move doors to suit. Once doors are aligned, re-tighten Screws Door To move doors in or out: loosen screw shown and move doors to suit. Re-tighten screws.
- Page 16 Reposition this product and fix wall straps using Screws(2 pcs) Step 11 Slide the assembled drawer fully onto runners. Assembly is complete. If you need help or have damaged or missing parts, call the Customer Helpline: Argos = 0345 6400800...
-
Page 17: A Guide To - Wall Mounting & Fixings
A Guide to - Wall Mounting & Fixings Important: When drilling into walls always Important note: check that there are no hidden wires or pipes etc. If plastic wall plugs Make sure that the screws and wall plugs being used are supplied with your are suitable for supporting your unit.
Need help?
Do you have a question about the HOME Maine 2 Door 1 Drawer Sideboard and is the answer not in the manual?
Questions and answers