
Related Manuals for Honeywell DirectLine DL423


Summary of Contents for Honeywell DirectLine DL423
- Page 1 ® DirectLine DL423 Sensor Module for Conductivity/Resistivity Measurements User Manual 70-82-25-112 Rev. 3 September 2011 Honeywell Process Solutions...
- Page 2 September, 2011 Warranty/Remedy Honeywell warrants goods of its manufacture as being free of defective materials and faulty workmanship. Contact your local sales office for warranty information. If warranted goods are returned to Honeywell during the period of coverage, Honeywell will repair or replace without charge those items it finds defective.
- Page 3 Sensor. Insert 70-82-10-03, a quick reference guide for configuring and calibrating the DL423, should accompany this document. Contacts World Wide Web The following lists Honeywell’s World Wide Web sites that will be of interest to our customers. Honeywell Organization WWW Address (URL) Corporate http://www.honeywell.com...
-
Page 4: Table Of Contents
Contents 1. INTRODUCTION ........................1 Overview............................1 Electronics Module ......................... 1 Operator Interface........................... 2 Specifications..........................2 Model Selection Guide ........................4 2. INSTALLATION ........................6 Assembly and Wiring ........................6 Mounting ............................8 Conduit connections ........................11 3. CONFIGURATION ....................... 12 Overview............................ - Page 5 Tables Table 2-1 Assembly and Wiring Procedure for Field Wiring Connector__________________________ 7 Table 2-2 Remote Mounting Procedure for Conductivity Cells ________________________________ 8 Table 2-3 Conductivity Cell Remote Connections _________________________________________ 10 Table 3-1 Configuration Set Up Procedure ______________________________________________ 14 Table 4-1 Calibration Procedure ______________________________________________________ 18 Table 5-1 Online Parameter Descriptions _______________________________________________ 21 Table 5-2 Display Navigation Procedure ________________________________________________ 22 Table 5-3 Online Diagnostic Errors ____________________________________________________ 23...
- Page 6 Figures Figure 1-1 Electronics Module _________________________________________________________ 1 Figure 2-1 Cordset Connection and Wiring _______________________________________________ 6 Figure 2-2 Field Wiring Connector ______________________________________________________ 7 Figure 2-3 Remote Mounting __________________________________________________________ 9 Figure 2-4 Remote Mounting Hardware_________________________________________________ 11 Figure 7-1 Wiring for CE Mark Applications______________________________________________ 26 DirectLine®...
-
Page 7: Introduction
4 mA to 20 mA, depending upon the conductivity value that is sensed by the cell. The transmitted loop current is compensated for temperature internally using the standard Honeywell 8550 thermistor. For submersion or special wiring applications, the remote electronics module is compatible with a remote cable/connector that allows the electronics module to be Wall. -
Page 8: Operator Interface
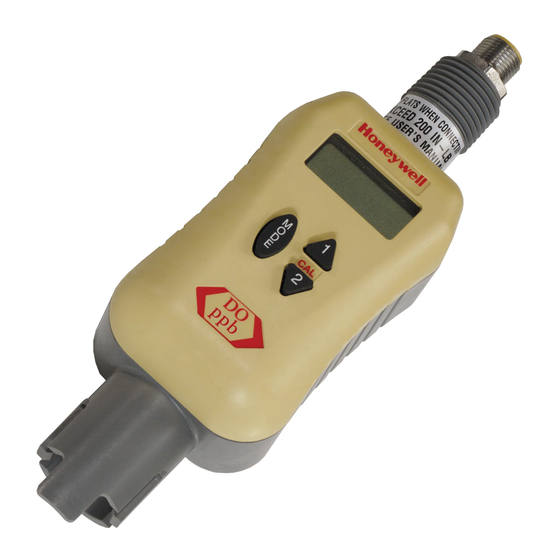
Introduction 1.3 Operator Interface The DirectLine® Sensor operator interface consists of three pushbuttons and one 4- digit, 7-segment LCD display with 3 decimal points, plus (+), and minus (–) signs. It is responsible for the display of measured values and configuration of parameter values. - Page 9 Introduction Cable Lengths Remote Sensor: Integral Cable 6m (19.7’) (cable integral to conductivity cell) 2m (6.56'), 3m (9.84'), 6m (19.69') and 15m Quick Disconnect (49.21') Power 16-42 Vdc, 23mA max Maximum load resistance: 250 ohms at 16 Vdc 600 ohms at 24 Vdc 1400 ohms at 42 Vdc Local Display and Buttons LCD 4-digit, 7-segment...
-
Page 10: Model Selection Guide
Introduction 1.5 Model Selection Guide Instructions Select the desired key number. The arrow to the right marks the selection available. Make the desired selections from Tables I through IV using the column below the proper arrow. A dot ( ) denotes availability. Key Number _ _ _ _ _ _ _ _ _... - Page 11 Introduction 9/11 DirectLine® DL423 Sensor Module User Manual...
-
Page 12: Installation
Installation 2. Installation 2.1 Assembly and Wiring Depending on the customer selected output cable options, the DirectLine can be wired to an appropriate 16-42 Vdc source using 2 different methods: 1) Cordset. See Figure 2-1. 2) Field wiring connector with customer supplied cable. See page 7. Refer to Section 7 for wiring for CE Mark applications. -
Page 13: Table 2-1 Assembly And Wiring Procedure For Field Wiring Connector
2.1.2 Field Wiring Connector with customer supplied cable Refer to Figure 2-2. The field wiring connector supports customer supplied cable with an outer diameter of 4-6mm, 2-wire twisted shielded pair. Table 2-1 Assembly and Wiring Procedure for Field Wiring Connector Step Procedure Disassemble field wiring connector... -
Page 14: Mounting
Installation 2.2 Mounting When the DL423 is specified with Table II = 5, the Remote Connector Assembly is supplied loose for connection of the conductivity cell cable to the DL423 module. Table 2-2 gives the mounting procedure. ATTENTION: The Blue and Brown leads (for 4973/4905 cells with integral and Quick Disconnect cables only) are shipped with a short piece of shrink tubing around the exposed ends for ESD protection of the EEPROM device. -
Page 15: Figure 2-3 Remote Mounting
Installation Figure 2-3 Remote Mounting 9/11 DirectLine® DL423 Sensor Module User Manual... -
Page 16: Table 2-3 Conductivity Cell Remote Connections
Installation Table 2-3 Conductivity Cell Remote Connections Remote Conenctor DL4000 4793/4905 Integral 4973/4905 Quick Terminal Cable Disconnect Cable Black Black Yellow Green Green Green White White Coax Not Used Blue Blue Not Used Brown Brown DirectLine® DL423 Sensor Module User Manual 9/11... -
Page 17: Conduit Connections
Installation Hose Clamp Slot for Pipe Mounting (Hose Clamp included in kit) Through Hole for DIN Rail Mounting Metal clip for Gray clip for “U” DIN rail mounting “G” DIN rail mounting Mounting Kit View from End View from End Panel Panel Panel... -
Page 18: Configuration
Configuration 3. Configuration 3.1 Overview Configuration Parameters Set Up consists of configuring the following functions: Cell Constant Selection – Only used with DL4000 conductivity cells. 4973/4905 style cells have an EEPROM that automatically loads the cell constant information into the DL423 module. The available selections are: 0.01, 0.1 (default), 1, 10, 25, 50. - Page 19 Configuration Noise Suppression Frequency Selection – Selection of 50 Hz or 60 Hz (default). Defaults to 60 Hz at unit reset. Output Configuration – The following Output Configuration functions can be selected: 0% Range 0 % Range values can be adjusted within a range ...
-
Page 20: Configuration Set Up Procedure
Configuration 3.2 Configuration Set Up Procedure ATTENTION: In Table 3-1, under the Press column: Hold means to hold the button down until the display changes. Momentarily means to press and release the indicated button. From the Online display, follow this procedure. ATTENTION: If no key is pressed for 60 seconds, the display will abort the entry mode and default to Online Display. - Page 21 Configuration Step Operation Press Display Enter Cell Factor MODE CFAC (for 1 second) then, Selection (if Momentarily (Current Selection) applicable) Edit Cell Factor MODE Flashing Display – You are now in EDIT Selection Hold mode (Value of current Cell Factor selection) Select desired Cell To select: Factor...
- Page 22 Configuration Step Operation Press Display Enter Noise MODE nSUP (for 1 second) then, Suppression Momentarily (Noise Suppression Frequency Selection) Frequency Edit Noise MODE Flashing Display – You are now in EDIT Suppression Hold mode Frequency (Value of current Frequency selection) Select desired To select 50 Hz or 60 Hz (default) Frequency...
- Page 23 Configuration Step Operation Press Display 100 % Calibration AdJH Momentarily Adjust 100 % MODE AdJH (flashes) – You are now in EDIT Calibration Hold mode Range: 19.60 to 20.40 mA typically (default 20.00 mA) +AdJH (increments value) AdJH (decrements value) Momentarily Save 100 % MODE...
-
Page 24: Calibration
Calibration 4. Calibration 4.1 Calibration Overview Calibration consists of the following functions: Cell Calibration Trim Value and Reset – may be reset to the Factory Default of 1.000. (go to Step 1) Cell Calibration – can only be selected when online PV is displayed. (go to Step 2) ... - Page 25 Calibration Step Operation Press Display Cell Calibration CCAL CCal Hold Conductivity/ To cancel, press Mode button. (3 seconds) Resistivity The display changes to a live solution PV value, so you can continue to monitor the sample. to edit the Solution PV value ...
- Page 26 Calibration Step Operation Press Display Temperature tCAL TCal Calibration Hold To cancel, press Mode button. (3 seconds) The display changes to a live temperature reading, so you can continue to monitor the sample. to edit the Displayed Temperature value. ...
-
Page 27: Operation
Operation 5. Operation 5.1 Displays Overview The DirectLine® DL423 displays the Online PV Type and Online Temperature. The table below describes these parameters. Table 5-2 is the Display Navigation Procedure. Table 5-1 Online Parameter Descriptions Parameter Description Online PV The currently selected PV type determines the current online PV display. -
Page 28: Table 5-2 Display Navigation Procedure
Operation ATTENTION: In Table 5-2, under the Press column: Momentarily means to press and release the indicated button. Table 5-2 Display Navigation Procedure Step Operation Press Display View Online PV value MODE (measured PV) Momentarily View Online MODE (measured temperature in °C or °F) Temperature Momentarily Proceed to step 2A or step 3. -
Page 29: Diagnostic Error Messages
Operation 5.2 Diagnostic Error Messages When a diagnostic error or status condition occurs, the Online Display alternates between measured PV and a text message. Table 5-3 Online Diagnostic Errors What you What it is What to do Configuration or Calibration data is Reset unit or cycle power. -
Page 30: Unit Reset
Operation 5.3 Unit Reset Overview Unit Reset initializes all of the DirectLine® Sensor’s calibration and configuration data to factory default values with the exception of the Factory Temperature Calibration correction values, according to Table 5-4 Factory Default Values. Procedure From the Online PV display, press and hold the buttons simultaneously until “rSEt”... -
Page 31: Spare Parts
Field Wiring connector The Field Wiring Connector is an all-plastic screw terminal M12 female type that can be purchased directly from Honeywell or from multiple vendors including: Turck Industries Part Number B8141-0 for a M12 field wiring connector that accommodates customer supplied cable. -
Page 32: Appendix: Ce Mark Applications
7. Appendix: CE Mark Applications In situations where the PV display appears to fluctuate due to field wiring electrical noise, the noise may be reduced by making the additional ground connections as described in Figure 7-1. Output cable Step 1 Connect or mount bracket to earth Qty. -
Page 33: Sales And Service
Middle East Headquarters 7490 Honeywell A/S Brazil Honeywell Middle East Fax: +(86-29) 8833-7489 Phone: (45) 39 55 55 55 Honeywell do Brasil & Cia SE Asia Countries Ltd. Phone: +(55-11) 7266-1900 see Honeywell Phone: +971 2 4041246 China – PRC - Shenzhen-... - Page 34 DirectLine® Sensor User Manual 6/00...
- Page 36 Honeywell Process Solutions 1100 Virginia Drive 70-82-25-112 Rev.3 Fort Washington, PA 19034 September 2011 https://www.honeywellprocess.com 2011 Honeywell International Inc.
Need help?
Do you have a question about the DirectLine DL423 and is the answer not in the manual?
Questions and answers