SOMFY Rollixo RTS Quick Commissioning Manual
Hide thumbs
Also See for Rollixo RTS:
- User manual (44 pages) ,
- Installation manual (23 pages) ,
- Quick commissioning manual (12 pages)
Table of Contents
Advertisement
Advertisement
Table of Contents

Related Manuals for SOMFY Rollixo RTS


Summary of Contents for SOMFY Rollixo RTS
- Page 1 Rolli o RTS Quick Commissioning Guide...
-
Page 2: Table Of Contents
Rollixo RTS Control Panel Mounting ......... Page 4 Somfy RDO Motor Wiring ..........Page 4 Safety Brake Wiring & Powering Up Rollixo RTS ....Page 5 Somfy RDO Motor Direction of Rotation Setting ....Page 6 Somfy RDO Motor Limit Setting ........Page 7 OSE Safety Edge Transmitter Pairing &... -
Page 3: Rollixo Rts Solutions
There are two Somfy wireless safety edge solutions available with the Rollixo RTS: Rollixo RTS ESE - ESE stands for ‘Electrical Safety Edge’ (sometimes referred to as a resistive safety edge). This kit is supplied with a safety edge transmitter and is connected to a Somfy RF Welded electrical safety edge. -
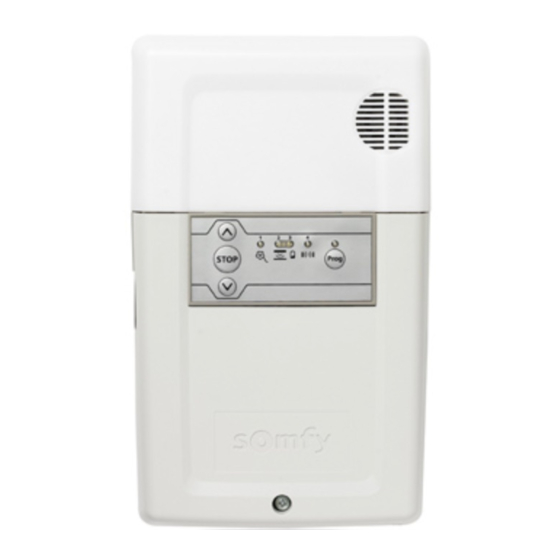
Page 4: Rollixo Rts Control Panel Overview
Rollixo RTS control panel No. Description Up button Stop button . . Down button . . . . Prog button . Prog STOP Prog LED . Motor & safety brake LED . Safety edge LED 8 Battery LED Photocell LED Mounting the Rollixo RTS ... -
Page 5: Safety Brake Wiring & Powering Up Rollixo Rts
Plug in the supply cable and edge transmitter has not been recognised. connect the the mains supply. Prog STOP (This is normal if the safety edge transmitter Prog STOP Prog has not been paired to the Rollixo RTS yet). Page 5 Prog... -
Page 6: Somfy Rdo Motor Direction Of Rotation Setting
20 mm Motor direction of rotation setting Press IN the motor limit buttons to allow the motor to rotate during the direction and limit setting procedure. Prog STOP At the same time press and hold the UP & DOWN buttons on the control panel until the door moves forward AND backwards, then release the buttons –... -
Page 7: Somfy Rdo Motor Limit Setting
Motor limit setting During the limit setting procedure, the Rollixo push button controls are in HOLD TO RUN mode. Motor limit directions as shutter box projects towards you. Left hand motor Right hand motor installation installation Yellow button White button Yellow button White button... -
Page 8: Ose Safety Edge Transmitter Pairing & Testing
20 mm Pairing the safety edge transmitter Bring the door and the bottom rail to a workable eye level. Press and hold the ‘Prog’ button 20 mm on the Rollixo panel until the LED light above it comes on – Then let go! Prog STOP Prog... -
Page 9: Positioning Of Magnets
Positioning of Magnets Bring the door down to its final closed/end limit position. If the door lands on floor and stops, go to point If the door comes to floor and retracts (bounces back) then see check the detail below, this happens because the doors safety edge system has been activated;... -
Page 10: Deleting Controls/Transmitters
Deleting all remote controls from the memory Prog STOP STOP Prog Press the ‘Prog’ button on the Rollixo RTS front panel for approximately 7 seconds until the LED goes out: Prog Prog Prog Prog Prog STOP STOP Prog STOP... -
Page 11: Complete Check List
Complete Check List Is the floor level? Up & Bottom limits set? Safety edge Transmitter waking up when tapped? Up, Stop & Down working correctly with Courtesy light? Does safety edge activate when it hits an obstruction? When closed is the rubber edge uniform and not deformed? Have magnets been fitted where necessary? Is the Alarm active? Do all the accessories and Key fobs work correctly? -
Page 12: Xse Transmitter - Installation Instructions
XSE transmitter - Installation instructions 5118797A SOMFY declares that this product complies with IP 44 the essential requirements of applicable European 433.42 MHz Ref.1782078 directives. A Declaration of Conformity is available 3,6V Lithium AA at www.somfy.com/ce (ROLLIXO). General view of the installation... - Page 13 XSE transmitter - Installation instructions > In the rubber Ø 3,3 mm Ø 3,3 mm Wiring the safety edge on the transmitter > Optical safety edge (OSE) 5 mm mini CLAC ! Do not strip the wires. Leave excess wire on each connector (min. 5 mm). Leave excess cable in case of a new installation. If recutting cables, use a suitable tool to remove the sheath without damaging the wires.
- Page 14 XSE transmitter - Installation instructions Commissioning and testing the safety edge L E D 1 L E D 2 M O D E S W 2 L E D 1 Green Green Orange Orange flashing flashing flashing L E D 2 L E D 1 L E D 1 L E D 1...
- Page 15 XSE transmitter - Installation instructions Configuring the XSE transmitter operating time Operating time Dipswitch 1 Dipswitch 2 25 secs (35 secs if base magnet installed) 35 secs 60 s • If not, the XSE transmitter maybe faulty. Repairs Test 2: launch safety edge detection (optional):...
- Page 16 Somfy Ltd Moorfield Road Yeadon Leeds West Yorkshire LS19 7BN T. 0113 391 3030 F. 0113 391 3010 E. sales.uk@somfy.com www.rollixo.co.uk...
Need help?
Do you have a question about the Rollixo RTS and is the answer not in the manual?
Questions and answers