Advertisement
Quick Links
Advertisement

Related Manuals for Harper DewEze 600 Series


Summary of Contents for Harper DewEze 600 Series
- Page 1 PIVOT SQUEEZE Pivot Squeeze 1-2019...
- Page 2 Pivot Squeeze...
- Page 3 Website www.deweze.com © 2019 Harper Industries, Inc. The Harper and DewEze names and the ATM logo are registered trademarks of Harper Industries, Inc. All other brand and product- names are trademarks or registered trademarks of their respective companies. Pivot Squeeze...
- Page 4 Harper Industries or at the manufacturing plant in Harper, KS. A part will be replaced after inspection discloses it to have been defective. This warranty does not apply to defects caused by damage or unreasonable use (includ- ing failure to provide reasonable and necessary maintenance, or by performing functions without genuine DewEze Flatbed accessories) while in the possession of the consumer.
- Page 5 PARTS SECTION Table of Contents Standard Parts 600/700 Common Parts......... Dual Lift Standard Parts......... OPERATOR SECTION To the Owner or Operator..........Pivot Squeeze Parts Warranty Statement............Crosstube and Arms........Table of Contents............XRM Crosstube and Arms......Specifications..............Feature Identification............Hydraulics Safety Guidelines Pivot Squeeze Hydraulics......
- Page 6 DewEze flatbeds are specifically designed Specifications to transport and feed round hay bales. Model Specifications MODEL WIDTH 7’ 1” 7’1” 7’ 1” 7’ 1” 7’ 1” 7’ 1” 7’ 9” 7’ 9” LENGTH 7’ 2” 7’7” 8’ 6” 8’ 11” 9’...
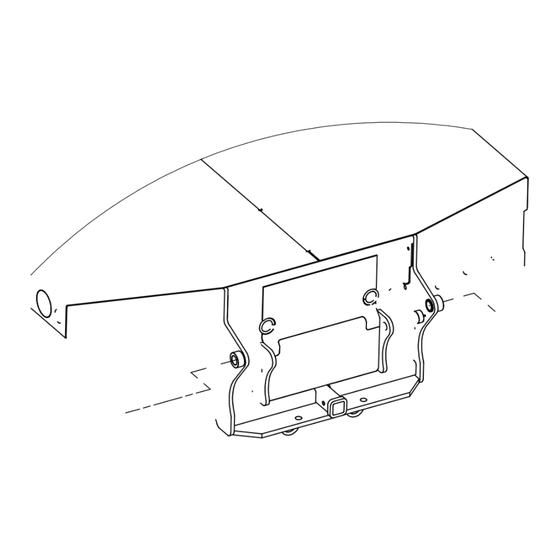
- Page 7 Feature Identification A. Headache Rack – protects the rear H. Safety Chain Loops – always use pickup window. The hydraulic oil tank and safety chains when towing. valve are located in the headache rack. I. Gooseneck Hitch – located under a B.
- Page 8 If you have any questions not answered in contact your dealer or Harper Industries. this manual or require additional copies, contact your dealer or Harper Industries. Flatbed Operation Safety •...
- Page 9 • Check with truck dealer for any load • Lift the bale onto the truck. limits, additional suspension or tire • Release the bale and repeat the requirements. The flatbed’s lifting operation for the second bale. capability may exceed the truck’s load capacity in some instances.
- Page 10 Lubrication • To unroll, lower the bale to the ground. • Turn the pump off and push the Grease the locations indicated in the FLOAT switch on the remote control. illustrations below once per week while the • Slowly drive STRAIGHT forward. The unit is in use and at the end of each bale will gradually unroll.
- Page 11 Hydraulic Oil • For easy hookup of the couplers, turn • Hydraulic fluid selection will affect the the pump switch off and activate the performance of the hydraulic system. control valve switches with the ignition on. This will release pressure in the lines.
- Page 12 If misalignment is visible, seek assistance from dealer. Use extreme caution when inspecting an engine. SAFETY WARNING! SAFETY WARNING! Serious injury or death could result from getting too close! Remove key from ignition when servicing. Harper Industries 600 & 700 Series Pivot Squeeze...
- Page 13 Pivot Squeeze...
- Page 14 Pivot Squeeze...
- Page 15 Table of Contents PARTS SECTION Standard Parts 600/700 Common Parts......... Dual Lift Standard Parts......... Pivot Squeeze Parts Crosstube and Arms........XRM Crosstube and Arms......Hydraulics Pivot Squeeze Hydraulics......XRM Hydraulics..........Hydraulic Reservoir Assy....... Pivot Squeeze Valve and Filter...... Gen. 2 Valve Service Parts......Gen.
- Page 16 Pivot Squeeze...
- Page 17 Pivot Squeeze ii 1.1...
- Page 18 Pivot Squeeze...
- Page 19 Pivot Squeeze ii 1.2...
- Page 20 Pivot Squeeze 1.2.1...
- Page 21 Pivot Squeeze ii 1.2.1...
- Page 22 Pivot Squeeze...
- Page 23 Pivot Squeeze 2.1.1...
- Page 24 Pivot Squeeze...
- Page 25 Pivot Squeeze...
- Page 26 Pivot Squeeze...
- Page 27 Pivot Squeeze XRM Hydraulics RIGHT SMALL LEFT Pivot Squeeze XRM Valve Hoses Hoses --70 --75 --82 --87 Pivot XRM Front to Back 220728 (111 in) 220729 (127 in) 220644 (137 in) 220731 (163in) (2ea) 223063 223064 223065 223066 Pivot Squeeze XRM Hoses Hoses 220732 (64 in) 220733 (72 in)
- Page 28 Pivot Squeeze...
- Page 29 Pivot Squeeze...
- Page 30 Pivot Squeeze...
- Page 31 Pivot Squeeze 3.4.1...
- Page 32 Pivot Squeeze...
- Page 33 Pivot Squeeze...
- Page 34 Pivot Squeeze 3.6.1...
- Page 35 Pivot Squeeze 3.6.2...
- Page 36 Pivot Squeeze...
- Page 37 Pivot Squeeze...
- Page 38 Pivot Squeeze...
- Page 39 Pivot Squeeze...
- Page 40 Pivot Squeeze...
- Page 41 Pivot Squeeze 4.4.1...
- Page 42 Pivot Squeeze...
- Page 43 Pivot Squeeze 5.1.1...
- Page 44 Pivot Squeeze...
- Page 45 Pivot Squeeze 5.2.1...
- Page 46 Pivot Squeeze...
- Page 47 Pivot Squeeze...
- Page 48 Pivot Squeeze...
- Page 49 Pivot Squeeze...
- Page 50 Pivot Squeeze...
- Page 51 Pivot Squeeze...
- Page 52 Pivot Squeeze...
- Page 53 Pivot Squeeze...
- Page 54 Pivot Squeeze 5.10...
- Page 55 Pivot Squeeze 5.11...
- Page 56 Pivot Squeeze 5.12...
- Page 57 Pivot Squeeze 5.13...
- Page 58 Pivot Squeeze 5.14...
- Page 59 Pivot Squeeze 5.15...
- Page 60 Pivot Squeeze...
- Page 61 GatorHyde Protective Coatings, Inc., 2210 South Highway 69, Wagoner, OK 74467 * (918) 485-2835 * www.gatorhyde.com Harper Industries Operator’s Manual Pivot Squeeze...
- Page 62 Appendix II – Remote Control Remote Control SYNCHRONIZING TRANSMITTER AND RECEIVER POWER To teach the transmitter ID code to the receiver, use the following procedure: BUTTON 1 1. Make sure the receiver and transmitter are OFF. 2. Press and hold transmitter's button 1 and 8 (as shown) then press Power button until both LEDs start blinking, then release buttons.
- Page 63 Pivot Squeeze ii 6.2...
- Page 64 2 Bank Wiring, Kar-Tech Remote Decal Part# 202045 Harness Part# 232087 BATTERY DIAGNOSTIC POWER GREEN TRANSMIT LOAD UNLOAD SQUEEZE UNSQUEEZE The Pivot Squeeze Bed 3rd BANK 3rd BANK Has a Double Poppet Valve RETRACT EXTEND With Jumper Wires Between FLOAT WORK LIGHTS C &...
- Page 65 SOLENOID FIRES UNLOAD LOAD SQUEEZE UNSQUEEZE PAGE 2 11/6/2013 Pivot Squeeze ii 6.3...
- Page 66 3rd Bank Wiring, Kar-Tech Remote Decal Part# 202046 Harness Part# 232088 BATTERY/DIAGNOSTIC GREEN POWER TRANSMIT UNLOAD LOAD SQUEEZE UNSQUEEZE 3rd BANK 3rd BANK RETRACT EXTEND FLOAT WORK LIGHTS COILS "C" & "D" 3/11/2011 Pivot Squeeze...
- Page 67 SOLENOID FIRES FLOAT RETRACT EXTEND 3/11/2011 Pivot Squeeze ii 6.4...
- Page 68 2 Bank Wiring, Kar-Tech Remote Gen 3 Double Poppet, Deutsch Decal Part# 202053 Harness Part# 232098 BATTERY DIAGNOSTIC POWER GREEN TRANSMIT UNLOAD LOAD SQUEEZE UNSQUEEZE 3rd BANK 3rd BANK RETRACT EXTEND FLOAT WORK LIGHTS COILS "C" & "D" PAGE 1 9/19/2014 Pivot Squeeze...
- Page 69 SOLENOID FIRES UNLOAD LOAD SQUEEZE UNSQUEEZE PAGE 2 9/19/2014 Pivot Squeeze ii 6.5...
- Page 70 3rd Bank Wiring, Kar-Tech Remote Gen 3 Double Poppet, Deutsch Decal Part# 202054 Harness Part# 232099 BATTERY/DIAGNOSTIC GREEN POWER TRANSMIT UNLOAD LOAD SQUEEZE UNSQUEEZE 3rd BANK 3rd BANK RETRACT EXTEND FLOAT WORK LIGHTS COILS "C" & "D" 9/19/2014 Pivot Squeeze...
- Page 71 SOLENOID FIRES FLOAT RETRACT EXTEND 9/19/2014 Pivot Squeeze ii 6.6...
- Page 72 Heavy Duty E/H Power Kit Appendix III * Read all instructions rst. 1. Attach adapters to E/H valve and install inside cavity on headache rack. 2. Attach valve harness per diagram on decal. 3. Attach return hose to valve and filter housing. Attach pressure hose from pump.
- Page 73 9. Attach power harness as indicated. 10. Attach 30-amp fuse holder to positive terminal on battery, run wire through switch on dash and then to the red wire on the harness. 11. Attach suction hose and pressure hose to pump with adapters provided. 12.
- Page 74 Pivot Squeeze...
- Page 75 Pivot Squeeze ii 6.8...
- Page 76 Pivot Squeeze...
- Page 77 Pivot Squeeze ii 6.9...
- Page 78 Controlling E/H Solenoid Harness From Flatbed Harness # 232115 To the Switch Post on the E/H Solenoid This Plug to B Coil on Valve Fused and Switched Power Supply Here Plug With Purple Wire From Valve Harness Here Red Wire from Make Sure the Valve Harness Here Purple &...
- Page 79 Pivot Squeeze...
- Page 80 2 Bank Wiring, Kar-Tech Remote Gen 3 Double Poppet, Deutsch Decal Part# 202053 Harness Part# 232098 BATTERY DIAGNOSTIC POWER GREEN TRANSMIT UNLOAD LOAD SQUEEZE UNSQUEEZE 3rd BANK 3rd BANK RETRACT EXTEND FLOAT WORK LIGHTS COILS "C" & "D" PAGE 1 9/19/2014 Pivot Squeeze iv 6.9...
- Page 81 SOLENOID FIRES UNLOAD LOAD SQUEEZE UNSQUEEZE PAGE 2 9/19/2014 Pivot Squeeze v 6.9...
- Page 82 3rd Bank Wiring, Kar-Tech Remote Gen 3 Double Poppet, Deutsch Decal Part# 202054 Harness Part# 232099 BATTERY/DIAGNOSTIC GREEN POWER TRANSMIT UNLOAD LOAD SQUEEZE UNSQUEEZE 3rd BANK 3rd BANK RETRACT EXTEND FLOAT WORK LIGHTS COILS "C" & "D" 9/19/2014 Pivot Squeeze vi 6.9...
- Page 83 SOLENOID FIRES FLOAT RETRACT EXTEND 9/19/2014 Pivot Squeeze vii 6.9...
- Page 84 Independent Arm Control www.gatorhyde.com 120319 ADAPTER, 6MJ-6MB 223042 Pivot Cylinder, 3.0 x 5.0 Hydraulics 212021 Seal Kit 223043 Pivot Cylinder, 3.25 x 5.0 212025 Seal Kit Harper Industries Operator’s Manual 260302 Shim Washer 9/22/2014 420005 COUPLER, PIONEER MALE Pivot Squeeze 6.10...
- Page 85 NOTES Harper Industries, Inc. Telephone: 620-896-7381 151 E. Highway 160 Toll-Free: 800-835-1042 Harper, KS 67058 Fax: 620-896-7129 Website: www.harperindustries.com E-mail: info@harperindustries.com Pivot Squeeze...
Need help?
Do you have a question about the DewEze 600 Series and is the answer not in the manual?
Questions and answers