Advertisement
Quick Links
1.
Check Part No./Kit is correct
2.
Read through instruction before installing 4.
Recommendations
It is essential that all bolt connections be checked after driving a short distance when you fi rst install your
Rhino-Rack Batwing Awning. Bolt connections should be checked again at regular intervals depending on road
conditions, usage, loads and distances travelled. You should also check the roof bars each time they are refi tted.
Use only non-stretch fastening ropes or straps.
Please remove Batwing Awning and crossbars when putting vehicle through an automatic car wash.
Do not stow away the awning for long periods if it is wet. You must allow the awning material to dry completely
before storing for extended periods of time. When rolling up the awning, avoid excessive bunching up of the
material before stowing. The awning should be rolled up as neatly as possible following the instruction on page 9.
Torque settings
Unless stated otherwise in these instructions, all fasteners should be set to the following torque settings -
M6: 4-5Nm (3-4lbs/ft), M8: 8-10Nm (6-7.5lbs/ft) and M10: 16-18Nm (12-13lbs/ft).
Load Ratings
With the addition of the Batwing Awning, the load capacity of your crossbars will have to be adjusted accordingly.
The Batwing Awning with mounting brackets weighs approximately 20kg.
Note for Dealers and Fitters
It is your responsibility to ensure this fi tting instruction is given to the end user or client
Rhino-Rack
22 Hanson Pl, Eastern Creek,
NSW 2766, Australia.
(Ph) (02) 8846 1900
rhinorack.com.au
These instructions remain the property of Rhino-Rack Australia Pty Ltd and may not be used or changed for any other purpose than intended.
33100 LH - Batwing Awning
33200 RH - Batwing Awning
Important Information
Document No: R1686
Prepared By: Kayle Everett
Authorised By: Nicholas Clarke
3.
Fit roof rack accessory
Check and recheck all fasteners are secure
CONTROLLED
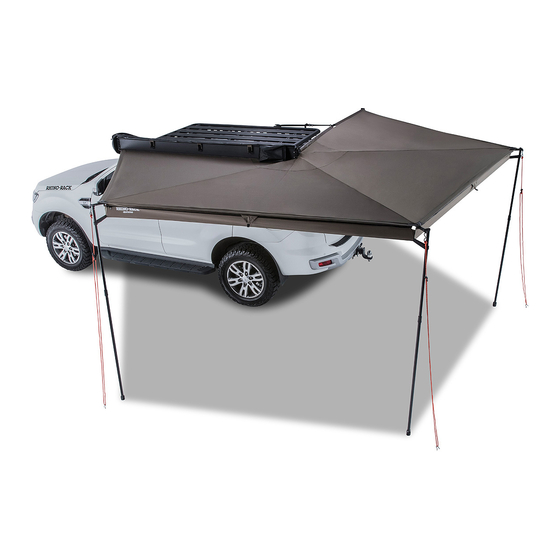
Note: Use caution in windy
conditions. The pegs and ropes
must always be used when the
Batwing Awning is open.
Fit Time: 15min
Issue No: 07
Issue Date: 14/12/2018
Page 1 of 12
Advertisement

Related Manuals for Rhino-Rack 33100 LH


Summary of Contents for Rhino-Rack 33100 LH
- Page 1 Prepared By: Kayle Everett Issue No: 07 rhinorack.com.au Authorised By: Nicholas Clarke Issue Date: 14/12/2018 These instructions remain the property of Rhino-Rack Australia Pty Ltd and may not be used or changed for any other purpose than intended. Page 1 of 12...
- Page 2 33100 LH, 33200 RH - Batwing If awning is wet, be sure to dry before you stow. Always use sand screws (31113 , sold as separate) when awning is open on beach or sand. Always use guy ropes when awning is deployed.
-
Page 3: Installation And Setup
33100 LH, 33200 RH - Batwing 14,15,16. 19,20,10. Installation hardware kit Item Assembled Batwing Part No. Item Hardware kit Part No. Batwing Main Extrusion M6 x 20mm Hex Bolt B082 SP266(LH) M6 Spring Washer W004 Batwing Bag SP267(RH) M6 x 16mm Flat Washer... - Page 4 33100 LH, 33200 RH - Batwing Install the pick up mounting points at the rear of the vehicle, on the opposite side you intend to fi x the Batwing awning to. Tighten in place with allen key provided. Slide the bracket assemblies into either of the slots of the Batwing awning.
- Page 5 33100 LH, 33200 RH - Batwing Unzip the bag. Remove the peg bag from the peg pouch at the rear of the Flip the peg pouch over the back of the awning. awning. Page 5 of 12...
- Page 6 33100 LH, 33200 RH - Batwing End horizontal 2. Tension strap as support may have a slight required. curve after tensioning. This is normal on some vehicles. Page 6 of 12...
- Page 7 33100 LH, 33200 RH - Batwing Unclasp the supports and drop them down into position. Be aware on some vehicles the 4th support can hit the rear of the vehicle when dropped down. Simply undo the tension strap, drop the support, then re-attach the retention strap.
- Page 8 33100 LH, 33200 RH - Batwing Drive the metal pegs into suitable ground on the out- side of the supports. Hook the ropes the to the awning, fi xing it in place as shown. RAIN Metal Hook Guy Rope Tensioning guy ropes will allow rain to fl...
- Page 9 33100 LH, 33200 RH - Batwing Swing each arm back towards the body of the awning. As you move through positions 1 - 4, stack each arm on top of the one before it as shown. Place all 4 arms back onto the magnets at the same time.
-
Page 10: Important Notes
33100 LH, 33200 RH - Batwing Replace the metal pegs and guy ropes to their original position. Zip the outer bag closed. Important Notes The support arms are designed to allow slight adjustment by the end user. When housed, if the arms are not sitting fl... - Page 11 33100 LH, 33200 RH - Batwing Should a spar hinge be damaged from stronger than expected wind conditions, they can be replaced with the spare pieces provided. Remove awning from vehicle. Use a 13mm spanner and a 6mm allen key to undo the casting assembly.
- Page 12 33100 LH, 33200 RH - Batwing Slide the bag free, off the awning body. Slide the new bag in as shown. Be sure correct orientation is used. The matte fi nish of the PVC bag faces the outside. Replace the plastic plugs with those provided in the new bag kit.
Need help?
Do you have a question about the 33100 LH and is the answer not in the manual?
Questions and answers