Table of Contents
Advertisement
Available languages
Available languages
Quick Links
HOYER Handel GmbH
Tasköprüstraße 3
DE-22761 Hamburg
GERMANY
Stand der Informationen · Status of information · Version des informations · Stand van de informatie
Stan informacji · Stav informací · Stav informácií:
06/2019
ID: SDBK 2400 F5_19_V1.1
IAN 317392_1904
DAMPFBÜGELEISEN SDBK 2400 F5
CORDLESS STEAM IRON SDBK 2400 F5
FER À REPASSER VAPEUR SDBK 2400 F5
DE
AT
CH
Bedienungsanleitung
DAMPFBÜGELEISEN
FR
BE
Mode d'emploi
FER À REPASSER VAPEUR
PL
Instrukcja obsługi
ŻELAZKO NA PARĘ
SK
Návod na obsluhu
NAPAROVACIA ŽEHLIČKA
IAN 317392_1904
GB
IE
Operating instructions
CORDLESS STEAM IRON
NL
BE
Gebruiksaanwijzing
STOOMSTRIJKIJZER
CZ
Návod k obsluze
NAPAŘOVACÍ ŽEHLIČKA
DE
BE
CZ
PL
NL
SK
Advertisement
Chapters
Table of Contents

Related Manuals for Silvercrest SDBK 2400 F5


Summary of Contents for Silvercrest SDBK 2400 F5
- Page 1 DAMPFBÜGELEISEN SDBK 2400 F5 CORDLESS STEAM IRON SDBK 2400 F5 FER À REPASSER VAPEUR SDBK 2400 F5 Bedienungsanleitung Operating instructions HOYER Handel GmbH DAMPFBÜGELEISEN CORDLESS STEAM IRON Tasköprüstraße 3 Mode d'emploi Gebruiksaanwijzing DE-22761 Hamburg FER À REPASSER VAPEUR STOOMSTRIJKIJZER GERMANY Instrukcja obsługi...
- Page 2 Deutsch ..................2 English ................... 16 Français ................. 30 Nederlands ................48 Polski ..................62 Česky ..................76 Slovenčina ................90...
- Page 3 Übersicht / Overview / Aperçu de l'appareil / Overzicht / Przegląd / Přehled / Prehľad...
-
Page 4: Table Of Contents
Inhalt 1. Übersicht ..................3 2. Bestimmungsgemäßer Gebrauch ............4 3. Sicherheitshinweise ................. 4 4. Lieferumfang ................... 7 5. Normal oder kabellos bügeln ............7 6. Vor dem ersten Gebrauch ..............8 7. Bedienung ..................8 Wassertank füllen ................. 9 Bügeltemperatur einstellen .............. -
Page 5: Übersicht
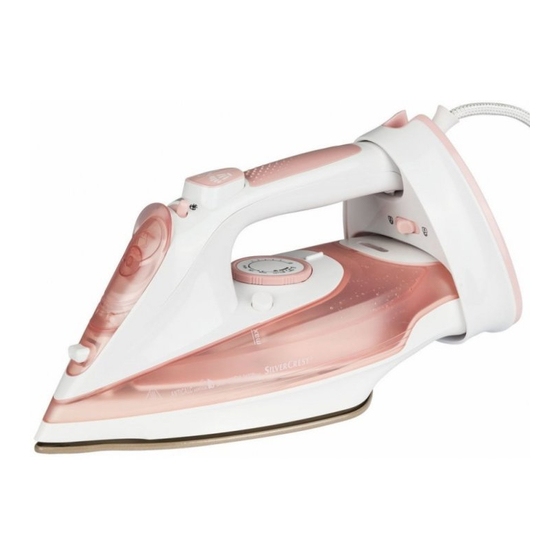
1. Übersicht Spritzdüse Deckel (des Wassertanks) Dampfmengenregler: von kein Dampf bis viel Dampf Dampfstoß-Taste Sprüh-Taste Griff Abstellvorrichtung bewegliche Schutzhülse für Anschlussleitung Anschlussleitung mit Netzstecker Kabelaufwicklung Schalter der Abstellvorrichtung Elektrokontakte Verriegelungsöffnung Temperatur-Kontrollleuchte Wassertank Positionsmarke zum Einstellen des Temperaturreglers Temperaturregler 18 SELF CLEAN Selbstreinigungs-Taste 19 max Markierung für maximale Füllhöhe des Wassertanks... -
Page 6: Bestimmungsgemäßer Gebrauch
Herzlichen Dank für Ihr Symbole am Gerät Dieses Symbol warnt Sie vor Vertrauen! dem Berühren der heißen Oberfläche. Wir gratulieren Ihnen zu Ihrem neuen kabel- losen Dampfbügeleisen. VERTICAL Vertikales Dampfbügeln möglich Für einen sicheren Umgang mit dem Produkt DRIP STOP Tropfstopp und um den ganzen Leistungsumfang ken- nenzulernen:... - Page 7 Anweisungen für den sicheren Betrieb Dieses Gerät kann von Kindern ab 8 Jahren und von Personen mit reduzierten physischen, sensorischen oder mentalen Fähigkei- ten oder Mangel an Erfahrung und/oder Wissen benutzt wer- den, wenn sie beaufsichtigt oder bezüglich des sicheren Gebrauches des Gerätes unterwiesen wurden und die daraus re- sultierenden Gefahren verstanden haben.
- Page 8 GEFAHR für Kinder GEFAHR durch Stromschlag Verpackungsmaterial ist kein Kinder- Verlegen Sie die Anschlussleitung so, dass spielzeug. Kinder dürfen nicht mit den niemand auf diese treten, daran hängen Kunststoffbeuteln spielen. Es besteht Er- bleiben oder darüber stolpern kann. stickungsgefahr. Schließen Sie den Netzstecker nur an eine ordnungsgemäß...
-
Page 9: Lieferumfang
5. Normal oder GEFAHR von Verletzungen durch Verbrennen kabellos bügeln Berühren Sie nicht die heißen Oberflä- chen des Gerätes. Das Dampfbügeleisen kann kabellos betrie- Lassen Sie das Gerät vollständig abküh- ben werden. Dadurch wird das Dampfbü- len, bevor Sie es reinigen oder wegräu- geleisen etwas leichter und das Kabel ist men. -
Page 10: Vor Dem Ersten Gebrauch
6. Vor dem ersten 7. Bedienung Gebrauch 1. Stellen Sie sicher, dass der Netzste- GEFAHR! cker 9 gezogen ist. Die Bügelsohle 20 wird durch den Be- 2. Der Schalter 11 steht in der Position trieb sehr heiß. Berühren Sie das Nehmen Sie das Dampfbügeleisen von Dampfbügeleisen im Betrieb nur am der Abstellvorrichtung 7. -
Page 11: Wassertank Füllen
7.1 Wassertank füllen 7.2 Bügeltemperatur einstellen GEFAHR! HINWEIS: Das Dampfbügeleisen muss Ziehen Sie den Netzstecker 9 aus der zum Aufheizen mit der Abstellvorrichtung 7 Steckdose, wenn Sie den Wasser- verbunden sein. tank 15 auffüllen. 1. Bild C: Stellen Sie die gewünschte Tem- • Verwenden Sie sauberes Leitungswasser peratur mit dem Temperaturregler 17 ohne irgendwelche Zusätze (z. -
Page 12: Bügeln Ohne Dampf
7.4 Bügeln ohne Dampf 5. Stellen Sie am Temperaturregler 17 die gewünschte Temperatur (mindestens Empfindliche Stoffe werden mit niedrigeren ) ein. Die Temperatur-Kontrollleuch- Temperaturen und ohne Dampf gebügelt. te 14 leuchtet auf. Zum Befeuchten steht Ihnen die Sprühfunktion 6. Sobald die Bügeltemperatur erreicht ist zur Verfügung. -
Page 13: Dampfstoßfunktion
7.6 Dampfstoßfunktion Selbstreinigung Die Dampfstoßfunktion erfordert eine hohe VORSICHT: Temperatur. Wählen Sie eine Temperaturstu- Füllen Sie keinen Essig, kein Entkal- fe zwischen und MAX. Dafür muss der kungsmittel und keine anderen Zusätze Wassertank 15 mindestens zu einem Viertel in den Wassertank 15. Zusätze können gefüllt sein. -
Page 14: Aufbewahren
9. Aufbewahren 10. Entsorgen Dieses Produkt unterliegt der europäischen Richtlinie GEFAHR! 2012/19/EU. Das Symbol Bewahren Sie das Dampfbügeleisen au- der durchgestrichenen Ab- ßerhalb der Reichweite von Kindern auf. falltonne auf Rädern bedeu- tet, dass das Produkt in der 1. Stellen Sie den Temperaturregler 17 auf Europäischen Union einer getrennten Müll- MIN. -
Page 15: Problemlösung
11. Problemlösung 12. Technische Daten Sollte Ihr Gerät einmal nicht wie gewünscht Modell: SDBK 2400 F5 funktionieren, gehen Sie bitte erst diese Netzspannung: 220 - 240 V ~ 50/60 Hz Checkliste durch. Vielleicht ist es nur ein klei- Schutzklasse: nes Problem, das Sie selbst beheben können. -
Page 16: Garantie Der Hoyer Handel Gmbh
13. Garantie der Garantieumfang Das Gerät wurde nach strengen Qualitäts- HOYER Handel GmbH richtlinien sorgfältig produziert und vor Aus- Sehr geehrte Kundin, sehr geehrter Kunde, lieferung gewissenhaft geprüft. Sie erhalten auf dieses Gerät 3 Jahre Ga- Die Garantieleistung gilt für Material- oder rantie ab Kaufdatum. - Page 17 • Sollten Funktionsfehler oder sonstige Män- gel auftreten, kontaktieren Sie zunächst Service-Center das nachfolgend benannte Service-Center telefonisch oder per E-Mail. Service Deutschland • Ein als defekt erfasstes Produkt können Tel.: 0800 5435 111 Sie dann unter Beifügung des Kaufbe- (kostenfrei) legs (Kassenbon) und der Angabe, wor- E-Mail: hoyer@lidl.de in der Mangel besteht und wann er...
- Page 18 Contents 1. Overview ..................17 2. Intended purpose ................18 3. Safety information ................. 18 4. Items supplied ................21 5. Normal or cable-free ironing ............21 6. Before using for the first time ............21 7. Operation ..................22 Filling the water tank ................
-
Page 19: Overview
1. Overview Spray nozzle Lid (of the water tank) Steam flow rate controller: from no steam to a lot of steam Steam jet button Spray button Handle Stand Moving protective sleeve for power cable Power cable with mains plug Cable spool Switch on stand Electrical contacts Lock opening... -
Page 20: Intended Purpose
Thank you for your trust! Symbols on your device This symbol warns you against touching the hot sur- Congratulations on your new cable-free face. steam iron. VERTICAL Vertical steam ironing is For a safe handling of the product and in or- possible der to get to know the entire scope of fea- DRIP STOP... - Page 21 Instructions for safe operation This device can be used by children from the age of 8 and peo- ple with restricted physical, sensory or intellectual abilities or people without adequate experience and/or understanding, if they are supervised or instructed on how to use this device safely and if they are aware of the resulting risks.
- Page 22 If the device (steam iron or stand) never- theless falls into water, pull out the pow- DANGER! Fire hazard er plug immediately and only then Use the device on a stable, level and remove the device from the water. Do heat-resistant surface.
-
Page 23: Items Supplied
4. Items supplied Storage Figure B: the steam iron is locked in place 1 steam iron on the stand 7. 1 stand 7 1 measuring beaker 21 1 set of operating instructions 6. Before using for the first time 5. Normal or cable-free 1. -
Page 24: Operation
7. Operation 7.1 Filling the water tank DANGER! DANGER! Pull the mains plug 9 out of the socket The sole plate 20 becomes very hot before you fill up the water tank 15. during operation. During operation touch only the handle 6 and the control •... -
Page 25: Set Iron Temperature
7.2 Set iron temperature 7.4 Ironing without steam Sensitive fabrics are ironed at lower temper- atures and without steam. In order to damp- NOTE: The steam iron must be connected to en them, the spray function is available. the stand 7 in order to heat up. 1. -
Page 26: Steam Jet Function
8. Cleaning flow rate controller 3 to the desired steam flow rate and start ironing. The steam will ... DANGER! … start to come out as soon as you hold Pull the mains plug 9 out of the wall the steam iron horizontal, and socket before you clean the steam iron. -
Page 27: Storage
10. Disposal 5. Wait until the temperature control lamp 14 goes out. This product is subject to the 6. The switch 11 is in the position . Pick provisions of European Direc- up the steam iron together with the tive 2012/19/EC. The sym- stand 7. -
Page 28: Trouble-Shooting
If your device fails to function as required, please try this checklist first. Perhaps there is Model: SDBK 2400 F5 only a minor problem, and you can solve it Mains voltage: 220 - 240 V ~ 50/60 Hz yourself. -
Page 29: Warranty Of The Hoyer Handel Gmbh
13. Warranty of the The warranty applies to material or factory defects. HOYER Handel GmbH Excluded from the warranty are Dear Customer, wear parts subject to normal wear your device is provided with a 3 year war- and damages to fragile parts, e.g. ranty starting with the purchase date. - Page 30 At www.lidl-service.com you can download this and many other manuals, product vide- Supplier os and installation software. Please note that the following address is no service address. First contact the afore- mentioned Service Centre. HOYER Handel GmbH Tasköprüstraße 3 DE-22761 Hamburg GERMANY This QR code takes you directly to the Lidl Ser- vice website (www.lidl-service.com), where...
- Page 32 Sommaire 1. Aperçu de l'appareil ..............31 2. Utilisation conforme ..............32 3. Consignes de sécurité ..............32 4. Éléments livrés ................35 5. Repassage normal ou sans câble ..........35 6. Avant la première utilisation ............36 7. Utilisation ..................36 Remplissage du réservoir d'eau ............37 Réglage de la température du fer ............
-
Page 33: Aperçu De L'appareil
1. Aperçu de l'appareil Buse de vaporisation Couvercle (du réservoir d'eau) Curseur de réglage du débit de vapeur : d'aucune vapeur à beaucoup de vapeur Bouton jet de vapeur Bouton pulvérisation Poignée Support Gaine de protection flexible pour câble de raccordement Câble de raccordement avec fiche secteur Enrouleur pour le câble Interrupteur du support... -
Page 34: Utilisation Conforme
Merci beaucoup pour Symboles sur l'appareil Ce symbole indique de ne votre confiance ! pas toucher la surface brû- lante. Nous vous félicitons pour l'achat de votre nou- veau fer à repasser vapeur sans fil. VERTICAL Repassage vapeur verti- cal possible Pour manipuler le produit en toute sécurité... - Page 35 Instructions pour une utilisation en toute sécurité Cet appareil peut être utilisés par des enfants de plus de 8 ans et des personnes ayant des capacités physiques, sensorielles ou mentales réduites ou un manque d'expérience et/ou de connais- sance lorsqu'ils sont surveillés ou qu'ils ont été informés de l'utili- sation sûre de l'appareil et ont compris les risques qui en résultent.
- Page 36 DANGER ! Risque DANGER pour les enfants d'électrocution Le matériel d'emballage n'est pas un Disposez le câble de raccordement de jouet. Les enfants ne doivent pas jouer façon à ce que personne ne puisse mar- avec les sachets en plastique. Ceux-ci cher dessus, se prendre dedans ou tré- présentent un risque d'asphyxie.
-
Page 37: Éléments Livrés
4. Éléments livrés sur le support, jamais sur la semelle. La surface sur laquelle il est posé doit être 1 fer à repasser vapeur stable et résistante à la chaleur. Débran- 1 support 7 chez la fiche secteur en cas d'interrup- 1 gobelet doseur 21 tions prolongées ou si vous quittez la 1 mode d’emploi ... -
Page 38: Avant La Première Utilisation
7. Utilisation Rangement Figure B : le fer à repasser vapeur est ver- rouillé sur le support 7. DANGER ! 6. Avant la première Pendant l’utilisation, la semelle du fer à repasser 20 atteint une température très utilisation élevée. Lorsque vous utilisez le fer à re- passer vapeur, ne touchez que la poi- 1. -
Page 39: Remplissage Du Réservoir D'eau
7.1 Remplissage du réservoir 7.2 Réglage de la d'eau température du fer REMARQUE : Le fer à repasser vapeur doit DANGER ! être posé sur le support 7 pour pouvoir Débranchez la fiche secteur 9 de la chauffer. prise de courant avant de remplir le ré- servoir d'eau 15. -
Page 40: Repassage Sans Vapeur
7.4 Repassage sans vapeur 3. Posez le fer à repasser vapeur sur le support 7. Les tissus délicats doivent être repassés à 4. Branchez la fiche secteur 9 sur la prise faible température et sans vapeur. Pour les de courant. humidifier, vous pouvez utiliser la fonction 5. -
Page 41: Nettoyage
moins au quart. Le curseur de réglage du dé- Auto-nettoyage bit de vapeur 3 est placé sur le symbole à gauche. ATTENTION : • Pendant que vous passez le fer à repas- Ne versez pas de vinaigre, d'anti-cal- ser vapeur sur le vêtement, appuyez sur caire ou d'autres additifs dans le réser- le bouton jet de vapeur 4 voir d'eau 15. -
Page 42: Rangement
9. Rangement 10. Mise au rebut Ce produit est soumis aux exigences de la directive 2012/19/UE. Le symbole DANGER ! de la poubelle sur roues bar- Conservez le fer à repasser vapeur hors rée signifie que, dans l’Union de portée des enfants. européenne, le produit doit faire l’objet d’une collecte séparée des dé- 1. -
Page 43: Dépannage
13. Garantie de Il répond également des défauts de confor- mité résultant de l‘emballage, des instruc- HOYER Handel GmbH tions de montage ou de l‘installation lorsque valable pour la celle-ci a été mise à sa charge par le contrat France ou a été... - Page 44 Article 1648 1er alinéa du Code Etendue de la garantie civil L’appareil a été fabriqué selon des prescrip- tions de qualité rigoureuses et a été vérifié L‘action résultant des vices rédhibitoires doit minutieusement avant livraison. être intentée par l‘acquéreur dans un délai La garantie s’applique aux défauts de maté- de deux ans à...
- Page 45 • Envoyez ensuite gratuitement à l’adresse de service qu’on vous a donnée le pro- Fournisseur duit considéré comme défectueux en y Attention ! L’adresse suivante n’est pas joignant la preuve d’achat (ticket de une adresse de service. Contactez caisse) et l’indication du défaut ainsi que d’abord le centre de service cité...
-
Page 46: Garantie De Hoyer Handel Gmbh Valable Pour La Belgique
14. Garantie de Etendue de la garantie L’appareil a été fabriqué selon des prescrip- HOYER Handel GmbH tions de qualité rigoureuses et a été vérifié valable pour la minutieusement avant livraison. Belgique La garantie s’applique aux défauts de maté- riel ou de fabrication. Chère cliente, cher client, Vous obtenez pour cet appareil une garantie Sont exclus de la garantie les pièces... - Page 47 • Envoyez ensuite gratuitement à l’adresse de service qu’on vous a donnée le pro- Fournisseur duit considéré comme défectueux en y Attention ! L’adresse suivante n’est pas joignant la preuve d’achat (ticket de une adresse de service. Contactez caisse) et l’indication du défaut ainsi que d’abord le centre de service cité...
- Page 49 Inhoud 1. Overzicht ..................51 2. Correct gebruik ................52 3. Veiligheidsinstructies ..............52 4. Levering ..................55 5. Normaal of snoerloos strijken ............55 6. Vóór het eerste gebruik ...............56 7. Bediening ..................56 Waterreservoir vullen ............... 57 Strijktemperatuur instellen..............57 Sproeifunctie ................... 57 Strijken zonder stoom ............... 58 Strijken met stoom ................
-
Page 50: Inhoud
Inhoud 1. Overzicht ..................49 2. Correct gebruik ................50 3. Veiligheidsinstructies ..............50 4. Levering ..................53 5. Normaal of snoerloos strijken ............53 6. Vóór het eerste gebruik ...............54 7. Bediening ..................54 Waterreservoir vullen ............... 55 Strijktemperatuur instellen..............55 Sproeifunctie ................... 55 Strijken zonder stoom ............... 56 Strijken met stoom ................ -
Page 51: Overzicht
1. Overzicht Sproeikopje Deksel (van het waterreservoir) Stoomhoeveelheidregelaar: van geen stoom tot veel stoom Stoomknop Sproeiknop Handgreep Strijkijzerhouder Beweegbare beschermhuls voor aansluitsnoer Aansluitsnoer met stekker Kabelopwikkeling Schakelaar van het strijkijzerhouder Elektrische contacten Vergrendelingsopening Controlelampje voor de temperatuur Waterreservoir Positiemarkering voor het instellen van de temperatuurregelaar Temperatuurregelaar 18 SELF CLEAN Zelfreinigingsknop... -
Page 52: Correct Gebruik
Hartelijk dank voor uw Symbolen op het apparaat Dit symbool waarschuwt voor vertrouwen! het aanraken van het hete op- pervlak. Hartelijk gefeliciteerd met uw nieuwe snoerlo- ze stoomstrijkijzer. VERTICAL Verticaal stoomstrijken mogelijk Om het product veilig te gebruiken en om DRIP STOP Druppelstop alle functies van het apparaat te leren ken-... - Page 53 Instructies voor een veilig gebruik Dit apparaat kan worden gebruikt door kinderen vanaf 8 jaar en door personen met verminderde fysieke, sensorische of mentale capaciteiten of een gebrek aan ervaring en/of kennis, wanneer zij onder toezicht staan of met betrekking tot het veilige gebruik van het apparaat instructies hebben gekregen en de daaruit voortvloeiende risico's hebben begrepen.
- Page 54 GEVAAR van een elektrische Let erop, dat het aansluitsnoer niet vast- schok door vocht geklemd wordt of bekneld raakt. Leg het apparaat nooit zo neer, dat het Om de stekker uit het stopcontact te trek- in aangesloten toestand in water kan ken, moet u altijd aan de stekker trek- vallen.
-
Page 55: Levering
5. Normaal of greep en de bedieningselementen aan. Strijk nooit kledingstukken die zich op snoerloos strijken het lichaam bevinden. Het stoomstrijkijzer kan zonder snoer wor- WAARSCHUWING voor materiële den gebruikt. Daardoor wordt het stoom- schade strijkijzer wat lichter en het snoer zit tijdens Gebruik uitsluitend de originele acces- het strijken niet meer in de weg. -
Page 56: Vóór Het Eerste Gebruik
6. Vóór het eerste 7. Bediening gebruik 1. Zorg ervoor, dat de stekker 9 niet in het GEVAAR! stopcontact zit. De strijkzool 20 wordt erg heet tijdens 2. De schakelaar 11 staat in de stand het gebruik. Raak het stoomstrijkijzer tij- Neem het stoomstrijkijzer uit de strijk- dens het gebruik alleen aan de hand- ijzerhouder 7. -
Page 57: Waterreservoir Vullen
7.1 Waterreservoir vullen 7.2 Strijktemperatuur instellen GEVAAR! AANWIJZING: Het stoomstrijkijzer moet Trek de stekker 9 uit het stopcontact, voor het opwarmen met de strijkijzerhou- wanneer u het waterreservoir 15 vult. der 7 zijn verbonden. • Gebruik schoon kraanwater zonder eni- 1. Afbeelding C: stel de gewenste tem- ge toevoeging (bijv. -
Page 58: Strijken Zonder Stoom
7.4 Strijken zonder stoom 5. Stel de gewenste temperatuur in met de temperatuurregelaar 17 (ten minste Gevoelige stoffen worden met lagere tempe- ). Het controlelampje voor de tempe- raturen en zonder stoom gestreken. Om ratuur 14 gaat branden. deze te bevochtigen kunt u de sproeifunctie 6. -
Page 59: Reinigen
2. Zet het stoomstrijkijzer in de strijkijzer- houder 7. AANWIJZING: Voor het gladmaken van hangende kledingstukken kunt u de stoom- 3. Steek de stekker 9 in het stopcontact. 4. Zet de stoomhoeveelheidregelaar 3 op stoot ook verticaal gebruiken. en de temperatuurregelaar 17 op MAX. 5. -
Page 60: Weggooien
11. Problemen oplossen de vulopening van het waterreservoir (on- der deksel 2) weg. Wanneer uw apparaat een keer niet functio- 7. Zet het strijkijzer op de strijkijzerhou- neert zoals gewenst, doorloopt u eerst deze der 7 en zet de schakelaar 11 in de checklist. -
Page 61: Technische Gegevens
12. Technische gegevens 13.Garantie van HOYER Handel GmbH Model: SDBK 2400 F5 Geachte klant, Netspanning: 220 - 240 V ~ 50/60 Hz U heeft op dit apparaat 3 jaar garantie van- Beschermings- af de koopdatum. Wanneer dit product on- klasse: volkomenheden vertoont, heeft u wettelijke... - Page 62 Omvang van de garantie • Wanneer zich functiestoringen of ande- re onvolkomenheden voordoen, neemt u Het apparaat werd zorgvuldig geproduceerd eerst telefonisch of per e-mail con- volgens strenge kwaliteitsrichtlijnen en nauw- tact op met het hierna genoemde ser- gezet gecontroleerd vóór levering. vicecenter.
- Page 63 Leverancier Let erop, dat het onderstaande adres geen serviceadres is. Neem eerst contact op met het bovengenoemde servicecenter. HOYER Handel GmbH Tasköprüstraße 3 DE-22761 Hamburg DUITSLAND...
- Page 64 Spis treści 1. Przegląd..................63 2. Zakres użytkowania ..............64 3. Wskazówki bezpieczeństwa ............64 4. Zakres dostawy ................67 5. Prasowanie z przewodem i bezprzewodowe ........67 6. Przed pierwszym użyciem .............. 68 7. Obsługa ..................68 Napełnianie zbiornika na wodę ............69 Nastawianie temperatury prasowania ............
-
Page 65: Przegląd
1. Przegląd Dysza spryskująca Zatyczka (zbiornika na wodę) Regulator ilości pary: od braku pary do dużej ilości pary Przycisk uderzenia pary Przycisk spryskiwania Uchwyt Podstawa Ruchoma osłona na przewód zasilający Przewód zasilający z wtyczką sieciową Podstawa do nawijania przewodu Przełącznik podstawy Styki elektryczne Otwarcie blokady Lampka kontrolna temperatury... -
Page 66: Zakres Użytkowania
Dziękujemy za Państwa Symbole na urządzeniu Ten symbol ostrzega przed zaufanie! dotykaniem gorących po- wierzchni. Gratulujemy Państwu zakupu nowego bez- przewodowego żelazka parowego. VERTICAL Możliwe prasowanie w pozycji pionowej Aby móc bezpiecznie posługiwać się pro- DRIP STOP Zapobieganie kapaniu duktem i poznać cały zakres jego możliwo- ści: 2. - Page 67 Wskazówki dotyczące bezpiecznej pracy Urządzenie może być używane przez dzieci od ósmego roku życia i osoby o obniżonych zdolnościach fizycznych, sensorycz- nych bądź umysłowych albo niemające doświadczenia i/lub wiedzy o jego obsłudze, jeśli znajdują się one pod nadzorem in- nych osób lub zostały poinstruowane o bezpiecznym używaniu urządzenia i zrozumiały związane z tym zagrożenia.
- Page 68 NIEBEZPIECZEŃSTWO wyniku kontaktu z ostrymi krawędziami porażenia prądem lub gorącymi elementami. Nie należy spowodowane wilgocią owijać przewodu wokół urządzenia Nigdy nie odstawiać urządzenia w taki (niebezpieczeństwo uszkodzenia prze- sposób, by podłączone do zasilania wodu!). mogło wpaść do wody. Należy uważać, aby przewód zasilają- Urządzenie należy chronić...
-
Page 69: Zakres Dostawy
5. Prasowanie z prze- Zagrożenie na skutek uderzenia pary. Przed napełnieniem zbiornika świeżą wodem i bezprzewo- wodą urządzenie powinno ostygnąć. dowe Ostrzeżenie przed poparzeniem parą oraz pryskającą, gorącą wodą pod- Żelazka można używać w sposób bezprze- czas używania przycisku uderzenia pa- wodowy. -
Page 70: Przed Pierwszym Użyciem
6. Przed pierwszym 7. Obsługa użyciem 1. Upewnić się, że wtyczka sieciowa 9 NIEBEZPIECZEŃSTWO! jest wyciągnięta z gniazdka. Podczas pracy stopa żelazka 20 na- 2. Przełącznik 11 musi znajdować się w grzewa się do wysokiej temperatury. pozycji . Zdjąć żelazko parowe z Podczas pracy żelazka parowego moż- podstawy 7. -
Page 71: Napełnianie Zbiornika Na Wodę
7.1 Napełnianie zbiornika 7.2 Nastawianie na wodę temperatury prasowania WSKAZÓWKA: W celu nagrzania NIEBEZPIECZEŃSTWO! żelazko parowe musi być połączone z pod- Wyciągnąć wtyczkę sieciową 9 z stawą 7. gniazdka, jeśli ma być napełniany zbiornik na wodę 15. 1. Rys. C: Nastawić żądaną temperaturę za pomocą... -
Page 72: Prasowanie Bez Pary
7.4 Prasowanie bez pary 5. Nastawić na regulatorze temperatu- ry 17 żądaną temperaturę (co najmniej Delikatne materiały należy prasować w niż- ). Świeci się lampka kontrolna tem- szej temperaturze i bez pary. Do zwilżania peratury 14. służy funkcja spryskiwania. 6. Po osiągnięciu temperatury prasowa- nia i zgaśnięciu lampki kontrolnej tem- 1. -
Page 73: Funkcja Uderzenia Pary
7.6 Funkcja uderzenia pary Samooczyszczanie Do prasowania parą potrzebna jest wysoka OSTROŻNIE: temperatura. Wybrać nastawę temperatury Nie wlewać do zbiornika na wodę 15 do MAX. W tym celu należy napeł- octu, odkamieniaczy ani innych dodat- nić zbiornik na wodę 15 co najmniej do po- ków. -
Page 74: Przechowywanie
9. Przechowywanie 10. Utylizacja Produkt podlega przepisom dyrektywy europejskiej 2012/19/UE. Symbol prze- NIEBEZPIECZEŃSTWO! kreślonego kontenera na Żelazko parowe należy przechowywać w śmieci na kółkach oznacza, miejscu niedostępnym dla dzieci. że na terenie Unii Europej- skiej produkt musi zostać dostarczony do 1. -
Page 75: Dane Techniczne
11. Rozwiązywanie 12. Dane techniczne problemów Model: SDBK 2400 F5 Jeżeli urządzenie nie działa zgodnie z ocze- Napięcie kiwaniami, należy je w pierwszej kolejności sieciowe: 220 - 240 V ~ 50/60 Hz sprawdzić według poniższej listy kontrolnej. Klasa ochrony: I Może się... -
Page 76: Gwarancja Firmy Hoyer Handel Gmbh
13. Gwarancja firmy tychmiast po rozpakowaniu produktu. Naprawy dokonywane po upływie okresu HOYER Handel GmbH obowiązywania gwarancji płatne. Drogi Kliencie, Zakres gwarancji Na niniejsze urządzenie jest udzielana 3 -let- Urządzenie wyprodukowano zgodnie suro- nia gwarancja obowiązująca od dnia jego wymi przepisami dotyczącymi jakości i do- zakupu. - Page 77 Postępowanie w przypadku Posługując się tym kodem QR można przejść bezpośrednio do strony marki Lidl gwarancji (www.lidl-service.com) i otworzyć instrukcję Aby zapewnić szybkie załatwienie zgłasza- obsługi, wprowadzając numer artykułu nego przypadku, należy stosować się do (IAN) 317392_1904. poniższych wskazówek: • W przypadku wszystkich zapytań nale- ży mieć...
- Page 78 Obsah 1. Přehled ..................77 2. Použití k určenému účelu ............... 78 3. Bezpečnostní pokyny ..............78 4. Rozsah dodávky ................80 5. Normální nebo bezkabelové žehlení ..........81 6. Před prvním použitím ..............81 7. Obsluha ..................82 Naplnění nádržky na vodu ..............82 Nastavení...
-
Page 79: Přehled
1. Přehled Kropicí tryska Víko (nádržky na vodu) Regulátor páry: od žádné páry po hodně páry Tlačítko parního rázu Tlačítko kropení Rukojeť Odstavné zařízení Pohyblivý ochranný obal pro napájecí vedení Napájecí vedení se síťovou zástrčkou Navíjení kabelu Vypínač odstavného zařízení Elektrické... -
Page 80: Použití K Určenému Účelu
Děkujeme za vaši důvěru! Symboly na přístroji Tento symbol vás varuje před dotykem horkých povrchů. Gratulujeme vám k zakoupení vaší nové bez- kabelové napařovací žehličky. VERTICAL Možné vertikální žehlení s párou Pro bezpečné zacházení s výrobkem a DRIP STOP Zastavení kapek zachování... - Page 81 Pokyny pro bezpečný provoz Tento přístroj smí používat děti starší 8 let a osoby s omezenými fyzickými, senzorickými nebo duševními schopnostmi nebo oso- by, které nemají dostatek zkušeností anebo znalostí, pouze pod dohledem nebo pokud byly poučeny, jak přístroj bezpečně pou- žívat, a pochopily, jaké...
-
Page 82: Rozsah Dodávky
dě už nepoužívejte, nechejte ho překon- přestávkách nebo při opuštění místnosti trolovat v opravně. vytáhněte. Nádržka na vodu nesmí být naplněna NEBEZPEČÍ poranění popále- vodou nad značku max, aby se zabrá- ním nilo přetečení. Nedotýkejte se horkého povrchu přístro- Neobsluhujte přístroj mokrýma rukama. NEBEZPEČÍ... -
Page 83: Normální Nebo Bezkabelové Žehlení
5. Normální nebo bez- 6. Před prvním použitím kabelové žehlení 1. Ujistěte se, že je síťová zástrčka 9 vyta- žena. Napařovací žehličku můžete používat i bez 2. Vypínač 11 je nastaven v poloze kabelu. Tím je napařovací žehlička o něco Odeberte napařovací žehličku z odstav- lehčí... -
Page 84: Obsluha
7. Obsluha 7.1 Naplnění nádržky na vodu NEBEZPEČÍ! Žehlicí plocha 20 je během provozu NEBEZPEČÍ! velmi horká. Napařovací žehličky se Vytáhněte síťovou zástrčku 9 ze zásuv- během provozu dotýkejte pouze na ru- ky, když chcete naplnit nádržku na vo- kojeti 6 a ovládacích prvcích. du 15. -
Page 85: Nastavení Teploty Žehlení
7.2 Nastavení teploty žehlení 7.4 Žehlení bez páry Citlivé látky se žehlí při nízkých teplotách a bez páry. K navlhčení je vám k dispozici UPOZORNĚNÍ: Napařovací žehlička funkce kropení. musí být pro rozehřátí spojena s odstavným zařízením 7. 1. Nastavte regulátor množství páry 3 na a regulátor teploty 17 na MIN. -
Page 86: Funkce Parního Rázu
8. Čištění Výstup páry ... … začne, když napařovací žehličku dr- žíte vodorovně a … přestane, když: NEBEZPEČÍ! - držíte napařovací žehličku svisle, Předtím než budete napařovací žehličku - napařovací žehličku postavíte do od- čistit, vytáhněte síťovou zástrčku 9 ze stavného zařízení 7, zásuvky. -
Page 87: Uschování
10. Likvidace 6. Vypínač 11 je nastaven v poloze Zvedněte napařovací žehličku s odstav- Tento výrobek podléhá ev- ným zařízením 7. ropské směrnici 2012/19/ 7. Držte přístroj vodorovně nad žáruvzdor- EU. Symbol přeškrtnuté po- nou mísou. pelnice na kolečkách zname- 8. Stisknete tlačítko 18 SELF CLEAN a drž- ná, že výrobek musí... -
Page 88: Řešení Problémů
11. Řešení problémů 12. Technické parametry Pokud by váš přístroj nefungoval podle poža- Model: SDBK 2400 F5 davků, projděte si prosím nejdříve tento kont- Síťové napětí: 220 - 240 V ~ 50/60 Hz rolní seznam. Možná se jedná o nepatrný... -
Page 89: Záruka Společnosti Hoyer Handel Gmbh
13. Záruka společnosti Ze záruky jsou vyloučeny díly pod- léhající rychlému opotřebení, které HOYER Handel GmbH jsou vystaveny běžnému opotřebe- Vážená zákaznice, vážený zákazníku, ní, a poškození křehkých dílů, např. na tento přístroj jste získali 3 letou záruku vypínačů, baterií, osvětlení nebo od data nákupu. - Page 90 Na www.lidl-service.com si můžete stáhnout tento a mnoho dalších manuálů, produktová videa a instalační software. S tímto QR kódem se dostanete přímo na servisní stránku Lidl (www.lidl-service.com) a můžete zadáním čísla výrobku (IAN) 317392_1904 otevřít váš návod k použití. Servisní střediska Servis Česko Tel.: 800143873 E-Mail: hoyer@lidl.cz...
- Page 92 Obsah 1. Prehľad ..................91 2. Použitie podľa určenia ..............92 3. Bezpečnostné upozornenia ............. 92 4. Rozsah dodávky................95 5. Normálne alebo bezkáblové žehlenie ..........95 6. Pred prvým použitím ..............95 7. Obsluha ..................96 Plnenie nádržky na vodu..............96 Nastavenie žehliacej teploty..............
-
Page 93: Prehľad
1. Prehľad Striekacia tryska Veko (nádržky na vodu) Regulátor množstva pary: žiadna para až veľa pary Tlačidlo parného rázu Kropiace tlačidlo Rukoväť Odkladacie zariadenie Pohyblivé ochranné puzdro na pripojovací kábel Pripojovací kábel so zástrčkou Priestor na navinutie kábla Spínač odkladacieho zariadenia Elektrické... -
Page 94: Použitie Podľa Určenia
Ďakujeme vám za vašu Symboly na prístroji Tento symbol vás varuje pred dôveru! dotýkaním sa horúcich povr- chov. Gratulujeme vám k novej bezkáblovej napa- rovacej žehličke. VERTICAL Vertikálne žehlenie s pa- rou možné Pre bezpečné zaobchádzanie s výrobkom a DRIP STOP Zastavenie kvapkania oboznámenie sa s rozsahom výkonov: •... - Page 95 Pokyny pre bezpečnú prevádzku Tento prístroj môžu používať deti od 8 rokov a osoby s obmedze- nými fyzickými, zmyslovými alebo duševnými schopnosťami ale- bo s nedostatkom skúseností a/alebo vedomostí, pokiaľ sú pod dohľadom alebo ak boli poučené o bezpečnom používaní prí- stroja a z toho vyplývajúcich nebezpečenstvách.
- Page 96 NEBEZPEČENSTVO zásahu Vytiahnite zástrčku zo zásuvky, ... elektrickým prúdom v … po každom použití, dôsledku vlhkosti … pri poruche, Prístroj nikdy neodkladajte tak, aby mo- … keď prístroj nepoužívate, hol v zapojenom stave spadnúť do vody. … skôr ako budete prístroj čistiť a Prístroj chráňte pred vlhkosťou, kvapka- …...
-
Page 97: Rozsah Dodávky
Nežehlite napr. zipsy, železné gombí- ky alebo aplikácie, ktoré by mohli po- UPOZORNENIE: Ak chcete žehliť s veľ kým škodiť žehliacu plochu. počtom parných rázov za sebou, odporú- Do vodnej nádržky nenalievajte ocot, čame žehlenie s káblom. To je výhodnejšie, odvápňovací... -
Page 98: Obsluha
7. Obsluha 7.1 Plnenie nádržky na vodu NEBEZPEČENSTVO! NEBEZPEČENSTVO! Pri plnení nádržky na vodu 15 vytiahni- Žehliaca plocha 20 sa pri prevádzke te zástrčku 9 zo zásuvky. veľmi zohreje. Naparovacej žehličky sa počas prevádzky dotýkajte iba na ruko- • Používajte čistú vodu z vodovodu bez väti 6 alebo na ovládacích prvkoch. -
Page 99: Nastavenie Žehliacej Teploty
7.2 Nastavenie žehliacej 7.4 Žehlenie bez pary teploty Citlivé materiály sa žehlia na nízkych teplo- tách a bez pary. Na zvlhčovanie máte k dis- pozícii funkciu kropenia. UPOZORNENIE: Naparovacia žehlička musí byť za účelom zohriatia spojená s 1. Nastavte regulátor množstva pary 3 na odkladacím zariadením 7. -
Page 100: Funkcia Parného Rázu
8. Čistenie Výstup pary ... … sa začína, keď naparovaciu žehličku držíte vo vodorovnej polohe a … zastaví sa, keď: NEBEZPEČENSTVO! - naparovaciu žehličku držíte vo zvislej Pred čistením naparovacej žehličky vy- polohe, tiahnite zástrčku 9 zo zásuvky. - naparovaciu žehličku postavíte do Prístroj nechajte pred čistením vychlad- odkladacieho zariadenia 7, núť. -
Page 101: Uskladnenie
10. Likvidácia 6. Spínač 11 je v polohe . Nadvihnite naparovaciu žehličku s odkladacím za- Tento produkt podlieha európ- riadením 7. skej smernici 2012/19/EÚ. 7. Prístroj držte vo vodorovnej polohe nad Symbol prečiarknutého smet- teplovzdornou miskou. ného koša na kolesách zna- 8. Stlačte a držte stlačené tlačidlo 18 mená, že produkt musí... -
Page 102: Riešenie Problémov
11. Riešenie problémov 12. Technické údaje Ak váš prístroj nebude fungovať tak, ako si Model: SDBK 2400 F5 želáte, prečítajte si, prosím, najskôr tento Sieťové napätie: 220 - 240 V ~ 50/60 Hz kontrolný zoznam. Možno ide len o malý... -
Page 103: Záruka Spoločnosti Hoyer Handel Gmbh
13. Záruka spoločnosti Záruka sa nevzťahuje na namáhané diely, ktoré sú vystavené normálne- HOYER Handel GmbH mu opotrebeniu, na poškodenia Vážená zákazníčka, vážený zákazník, krehkých dielov, napr. spínačov, ba- na tento prístroj sa vzťahuje záruka 3 roky térií, osvetľovacích prostriedkov ale- od dátumu kúpy. - Page 104 Na www.lidl-service.com si môžete stiahnuť túto a ďalšie príručky, produktové videá a in- štalačný softvér. S týmto QR kódom sa dostanete priamo na stránku Lidl servisu (www.lidl-service.com) a po zadaní čísla artikla (IAN) 317392_1904 si môžete otvoriť svoj ná- vod na obsluhu. Servisné...
Need help?
Do you have a question about the SDBK 2400 F5 and is the answer not in the manual?
Questions and answers