Table of Contents
Advertisement
Quick Links
CA-HR-PSA-EVO.002
INSTALLATION KIT FOR SPH-EVO82DAB-208
Original radio system
Pull upwards to remove and disconnect buttons
Interface
1
3
Installation manual SPH-EVO82DAB-208 | Version 1.0
EN - Installation Manual
Screen cover
Screen support
Screen linkage
Unit support
Remove front cover by lifting up as shown
Remove two Torx screws on top
Dashboard cover
Screw covers
Screen connector cover
2
4
Advertisement
Table of Contents

Related Manuals for Pioneer CA-HR-PSA-EVO.002


Summary of Contents for Pioneer CA-HR-PSA-EVO.002
- Page 1 CA-HR-PSA-EVO.002 INSTALLATION KIT FOR SPH-EVO82DAB-208 EN - Installation Manual Screen cover Dashboard cover Screen support Screw covers Interface Screen linkage Unit support Screen connector cover Original radio system Remove front cover by lifting up as shown Pull upwards to remove and disconnect buttons Remove two Torx screws on top Installation manual SPH-EVO82DAB-208 | Version 1.0...
- Page 2 Remove the screen by pulling it towards you Remove the plastic screen holder Remove the original stereo Mount the unit supports as shown by using the countersunk screws (supplied with the Pioneer product) Install the interface (see connections next page) Installation manual SPH-EVO82DAB-208 | Version 1.0...
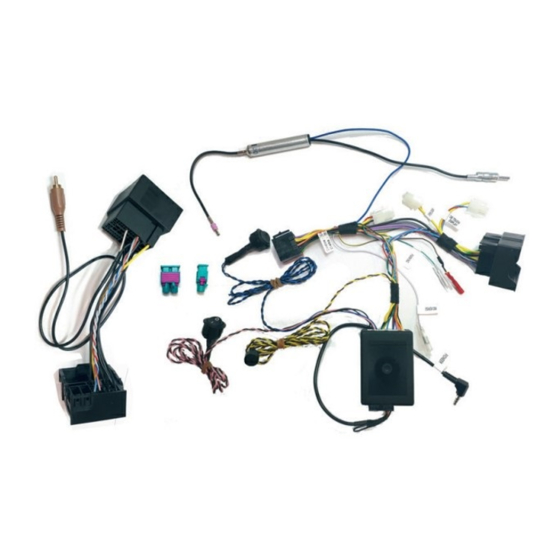
- Page 3 1. To car main connector 10. To car antenna connector 2. To radio MUTE (yellow wire on RCA lead from Pioneer radio) 11. To Pioneer FM/AM antenna input (backside of Pioneer unit 3. To radio PARKING signal 12. Connect to:...
- Page 4 Locate the fusebox in the engine bay and open it Install the supplied fuse (21) into the shown potition After all connections are made, slid ein the Pioneer unit with the Install the screen linkage using the original screws display cable over the top and the buzze on the side...
- Page 5 Mount screen support to the screen using Mount screen cover onto the screen support the two center screws on each side using the remaining four screws as indicated (included with SPH-EVO82DAB-208) (included with SPH-EVO82DAB-208) Mount screw covers, paying attention to the marked numbers and locations Install the front cover and chrome trim bezel on the screen Insert the connector into the screen Installation manual SPH-EVO82DAB-208 | Version 1.0...
- Page 6 Slide the screen holder into the bracket and secure with two Final product image screws (included with SPH-EVO82DAB-208) Final Product image Scan the QR code to watch a tutorial video for the menu settings explained below Steering Wheel Controls Steering Wheel Controls for SMEG / OPENDASH for NAC radio The steering wheel functions...
- Page 7 Menu Settings for NAC radio only The command keys, which are used to enter, - Option 1: lights off, one short beep. navigate and exit the menu, are: - Option 2: lights on for 15”, two short beeps. 1. IGNITION key - Option 3: lights on for 30”, three short beeps.
Need help?
Do you have a question about the CA-HR-PSA-EVO.002 and is the answer not in the manual?
Questions and answers