
Related Manuals for ATEN CL3884NW


Summary of Contents for ATEN CL3884NW
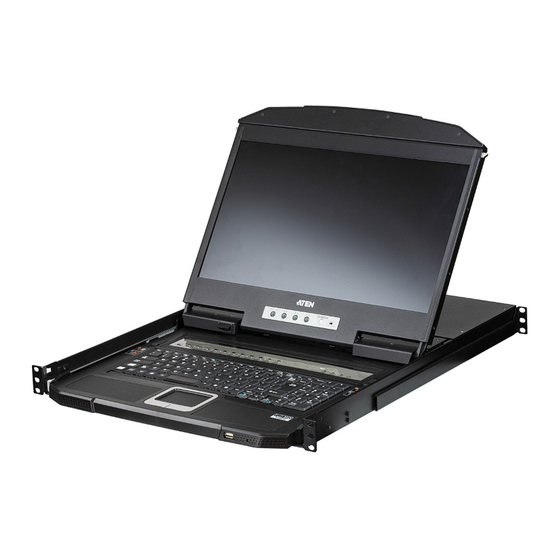
- Page 1 4-Port USB HDMI Multi-View Dual Rail WideScreen LCD KVM Switch CL3884NW User Manual www.aten.com...
-
Page 2: Emc Information
CL3884NW User Manual EMC Information FEDERAL COMMUNICATIONS COMMISSION INTERFERENCE STATEMENT: This equipment has been tested and found to comply with the limits for a Class A digital device, pursuant to Part 15 of the FCC Rules. These limits are designed to provide reasonable protection against harmful interference when the equipment is operated in a commercial environment. -
Page 3: User Information
CL3884NW User Manual User Information Online Registration Be sure to register your product at our online support center: International http://eservice.aten.com Telephone Support For telephone support, call this number: International 886-2-8692-6959 China 86-400-810-0-810 Japan 81-3-5615-5811 Korea 82-2-467-6789 North America 1-888-999-ATEN ext 4988... -
Page 4: Package Contents
© Copyright 2019 ATEN® International Co., Ltd. Manual Date: 2020-02-13 ATEN and the ATEN logo are registered trademarks of ATEN International Co., Ltd. All rights reserved. All other brand names and trademarks are the registered property of their respective owners. -
Page 5: Table Of Contents
CL3884NW Front View ........ - Page 6 CL3884NW User Manual The LCD Buttons ........25 LCD Adjustment Settings .
- Page 7 CL3884NW User Manual Auto Scan Mode ..........63 Auto Scanning - Display Modes .
- Page 8 Connection Tables ......... 121 CL3884NW to Compatible 4-Port Switches ....121 Supported KVM Switches .
-
Page 9: About This Manual
CL3884NW User Manual About this Manual This user manual is provided to help you get the most from your CL3884NW system. It covers all aspects of installation, configuration and operation. An overview of the information found in the manual is provided below. -
Page 10: Conventions
For information about all ATEN products and how they can help you connect without limits, visit ATEN on the Web or contact an ATEN Authorized Reseller. Visit ATEN on the Web for a list of locations and telephone numbers: International http://www.aten.com... -
Page 11: Introduction
In addition, being able to cascade up to 2 levels, the CL3884NW can reach up to a maximum of 16 video sources that can be simultaneously displayed and controlled with independent keyboard and mouse. -
Page 12: Features
Boundless Switching – simply moves the mouse cursor across windows to switch to other video sources Video DynaSync™ – an exclusive ATEN technology that eliminates boot- up display problems and optimizes the resolution when switching among different sources ... -
Page 13: Space Utility Optimization
Chapter 1. Introduction Space Utility Optimization Exclusive LED illumination light – designed by ATEN to illuminate the keyboard and touchpad to allow visibility in low-light conditions Integrated KVM console with an 18.5” LED-backlit widescreen LCD monitor in a dual rail housing with top and bottom clearance for smooth operation in a 1U high system rack ... -
Page 14: Requirements
CL3884NW User Manual Requirements Refer to the table below to prepare the required devices, equipment, and cables to set up a CL3884NW system. CL3884NW External 1 x HDMI monitor and cable Console 1 x USB mouse (Optional) ... -
Page 15: Components
Chapter 1. Introduction Components CL3884NW Front View Press the Exit/Light pushbutton for two seconds to turn the LED light ON or Off. (Default: On) EXIT / LIGHT... - Page 16 Auto Scan Mode, page 63, for full details. Multi-View Mode Press these pushbuttons to cycle through different display & LCD/2nd modes, and multi-view modes for your CL3884NW and the Display Mode second screen. See Display Modes, page 32, and LCD & 2nd Pushbuttons / Display, page 44 for details.
-
Page 17: Cl3884Nw Rear View
AC source plugs in here. Power Switch This standard rocker switch powers the unit on and off. RS-232 Serial You can control the CL3884NW by sending serial commands Port through the RS-232 Serial Port. See Chapter 7, RS-232 Operation for details. - Page 18 The external console’s USB keyboard and mouse, HDMI display, and speakers cables plug in here. KVM Port The provided KVM Cable Sets (USB, HDMI, and Audio) that Section link the CL3884NW to your computers plug in here.
-
Page 19: Hardware Setup
You must unplug the power cords of any computers that have the Keyboard Power On function. 3. CL3884NW packing material has been inserted to protect the CL3884NW during shipping. Slide the LCD module out (see Opening / Closing the Console, page 19), until the packing material is visible. - Page 20 CL3884NW User Manual 4. The LCD KVM switch is designed for rack mounting. If the KVM switch is not rack mounted be sure to place it on a completely flat and firm surface before pulling the device in or out to prevent damage due to uneven force on the module.
-
Page 21: Standard Rack Mounting
Chapter 2. Hardware Setup Standard Rack Mounting A standard rack mounting kit is provided with your CL3884NW and can be mounted in 1U of rack space. The kit enables the switch to be mounted in rack with a depth of 58.0 80.0 cm. - Page 22 1. Attach the left and right mounting brackets to the back of the rack, installing four screws in the tabs to secure them in place. 2. Two people to insert the CL3884NW, by sliding its left and right side bars into the mounting brackets.
-
Page 23: Grounding
Chapter 2. Hardware Setup 3. While one person hold the weight of the CL3884NW, have a second person to install four screws in the front tabs to secure the module to the front of the rack. Note: Allow at least 5.1 cm on each side for proper ventilation, and at least 12.7 cm at the back for the power cord and cable clearance. -
Page 24: Single Level Installation
In a single level installation, there are no additional switches cascaded from the first unit. To set up a single level installation do the following: 1. Ground the CL3884NW by connecting one end of a grounding wire to the grounding terminal and the other end to a suitable grounded object. -
Page 25: Cable Connection Diagrams
Chapter 2. Hardware Setup Cable Connection Diagrams KVM Cable Installation Diagrams... -
Page 26: Cascading
121 in the Appendix. Note: The CL3884NW can only be installed as the first switch in a two level installation as its LCD, keyboard and mouse are used as the console and all second level switches require an external console port to be cascaded. -
Page 27: Two Level Installation Diagram
After they are all on, the master unit must be powered on next. Only after all the switches have been powered on in this sequence, can the computers be powered on. Note: Remember to turn on the Power Switch on the CL3884NW. Two Level Installation Diagram (4X4 multi-view) -
Page 28: Connecting The Cm1284 With Computers And Video Sources
CL3884NW User Manual Connecting the CM1284 with Computers and Video Sources... -
Page 29: Basic Operation
Basic Operation Opening / Closing the Console The CL3884NW's console consists of two modules: an 18.5” LCD display module located under the top cover, and a keyboard / touch pad module below the LCD module. The modules can either slide together, or independently. This allows you to have the LCD display available for viewing while the keyboard / touch pad module is conveniently out of the way when not in use. - Page 30 CL3884NW User Manual 2. Pulling, slide the Panel Module all the way out until it automatically clicks in place. 3. Raise the LCD Module all the way back to expose the LCD screen.
- Page 31 Chapter 3. Basic Operation 4. Use the Lower Release Bar Handle to pull the Keyboard Module straight out until it clicks in place. Lower Release Bar Lower Release Bar 5. To independently retract they keyboard into the rack, slide both Keyboard Module Releases and push the Keyboard Module all the way in.
- Page 32 CL3884NW User Manual 6. Slide the keyboard in until its completely inserted into the rack. 7. To close the LCD screen, lower the LCD Module until it lies flat and slide it back in.
-
Page 33: Operating Precautions
Chapter 3. Basic Operation Operating Precautions The maximum load bearing capacity of the keyboard module is 30kg. Failure to heed the information below can result in damage to the keyboard module. Right! Rest your hands and arms lightly on the keyboard module as you work. -
Page 34: Powering Off And Restarting
CL3884NW User Manual Powering Off and Restarting If it becomes necessary to power off the CL3884NW, do the following before restarting it: 1. Shut down all the computers that are attached to the CL3884NW. Note: Unplug the power cords of any computers that have the Keyboard Power On function. -
Page 35: Lcd Osd Configuration
Chapter 3. Basic Operation LCD OSD Configuration The LCD Buttons The LCD OSD allows you to set up and configure the LCD display. Four buttons are used to perform the configuration, as described in the table, below: Button Function MENU When you have not entered the LCD OSD Menu function, pressing this button invokes the Menu function, and brings up... -
Page 36: Lcd Adjustment Settings
CL3884NW User Manual LCD Adjustment Settings An explanation of the LCD OSD adjustment settings is given in the table below: Setting Explanation Brightness Adjusts the background black level of the screen image. Contrast Adjusts the foreground white level of the screen image. - Page 37 Chapter 3. Basic Operation You can identify the source connected to the CL3884NW from the channel information at the top-left corner in the screen: This computer is connected to Port 1 Click to extend the window to full screen This computer is named PC 1 Note: To hide this information, disable the Channel Info setting (Display >...
-
Page 38: Port Id Numbering & Port Selection
Port ID Numbering Port ID number: This number is assigned according to the port that the computer is connected to on the rear of the CL3884NW. For example, a computer connected to port 1 is assigned port ID 1. Device name: By default, the computer connected to port 1 is named PC 1, the computer connected to port 2 is named PC 2, and so forth. -
Page 39: Switching
Chapter 3. Basic Operation Switching The CL3884NW supports group switching and independent switching: Group switching: switches to the KVM (keyboard, video, mouse), audio, and USB sources of one computer. Independent switching: switches to KVM (keyboard, video, mouse), stereo audio, and USB sources independently, on different computers. This allows you to work on one computer (KVM), access the audio on another (stereo audio), and connect to peripheral devices on a third (USB). -
Page 40: Osd Switching
CL3884NW User Manual OSD Switching You can switch to a computer by accessing the Quick Access Toolbar with the console mouse. To switch computers with the OSD, do the following: 1. Move the cursor to the top of the OSD to display the Quick Access Bar. -
Page 41: Boundless Switching
Boundless Switching Boundless Switching allows the CL3884NW to switch computers by sliding the mouse cursor across the screen borders. The mouse cursor can be moved up, down, left, or right– off one screen and onto another to switch keyboard/ mouse control to the adjacent computer. -
Page 42: Display Modes
CL3884NW User Manual Display Modes You can view multiple computers connected to the CL3884NW on the same screen, in different layout by setting the display mode. This section introduces you to different display modes, and ways of switching to them. - Page 43 Chapter 3. Basic Operation Method Action Description Hotkey Switch to a particular port to display the computer in full screen. See Invoke Hotkey Mode, page 61 for hotkey instructions. OSD Menu In the OSD, click from the Quick Access Toolbar, go to Display > Multiview Mode, and then select Single.
-
Page 44: Quad View
CL3884NW User Manual Quad View A quad view displays four computers on the monitor in equal sized windows. Method Action Description Multi-View Press this pushbutton to display Mode & quad view mode. LCD/2nd Display Mode Pushbuttons / LEDs Quick Move the mouse to the top center of... -
Page 45: Picture In Picture - Dual
Chapter 3. Basic Operation Picture in Picture - Dual A dual PiP view shows 2 computers on the monitor with one as the main display, and the other overlapping the main display in an inset window. Method Action Description Multi-View Press this pushbutton to display Mode &... -
Page 46: Picture In Picture - Triple
CL3884NW User Manual Picture in Picture - Triple A triple PiP view has 3 computers on the monitor with one computer as the main display and the other two overlapping the main display in inset windows. Method Action Description Multi-View Press this pushbutton to display Mode &... -
Page 47: Picture In Picture - Quad
Chapter 3. Basic Operation Picture in Picture - Quad A quad PiP view has 4 computers on the monitor with one computer as the main display and the other three overlapping the main display in inset windows. Method Action Description Multi-View Press this pushbutton to display Mode &... -
Page 48: Picture On Picture
CL3884NW User Manual Picture on Picture A picture-on-picture (PoP) view shows 4 computers in separate windows on the monitor. In editor mode, you can use the console mouse to resize and re-position each window on the screen. Method Action Description... -
Page 49: Picture By Picture - Dual
Chapter 3. Basic Operation Picture by Picture - Dual The picture-by-picture (dual) view displays 2 computers side by side on the monitor. Method Action Description Quick Access Move the mouse to the top Toolbar center of the OSD to display the Quick Access Toolbar, and then select from the Quick Access Toolbar. -
Page 50: Picture By Picture - Triple
CL3884NW User Manual Picture by Picture - Triple The picture-by-picture (triple) view displays 3 computers side by side on the monitor. Method Action Description Quick Access Move the mouse to the top Toolbar center of the OSD to display the Quick Access Toolbar, and then select from the Quick Access Toolbar. -
Page 51: Picture By Picture - Quad
Chapter 3. Basic Operation Picture by Picture - Quad The picture-by-picture (quad) view displays 4 computers side by side on the monitor. Method Action Description Quick Access Move the mouse to the top Toolbar center of the OSD to display the Quick Access Toolbar, and then select from the Quick Access Toolbar. -
Page 52: Preset Configuration
CL3884NW User Manual Preset Configuration You can save up to 4 sets of configuration, including the display mode, source assignment, division sizes, division locations, and KVM/Audio/USB focus status to easily toggle between different display configurations. To save a configuration, follow the steps below. - Page 53 Chapter 3. Basic Operation Method Action Description OSD Menu In the OSD, click from the Quick Access Toolbar, go to Display > Save to Fn, and then select your desired preset configuration (Fn1, Fn2, Fn3, and Fn4). Note: You may need a password to access the OSD Menu.
-
Page 54: Lcd & 2Nd Display
CL3884NW User Manual LCD & 2nd Display There are three display modes for your CL3884NW LCD, and the second display. Multi-view with Full-screen Full-screen with Multi-view Multi-view with Multi-view Note: By default, the CL3884NWis set to display Multi-view on the LCD, and Full-screen on the second display. -
Page 55: Osd Operation
The on-screen display (OSD) is a mouse and keyboard enabled, menu driven method to handle computer control and switching operations. All procedures start from the OSD main screen. The CL3884NW can be operated and configured via the following OSD components: Quick Access Toolbar: This toolbar provides quick access for changing the display mode, saving display templates, and customizing division sizes. -
Page 56: The Quick Access Toolbar
CL3884NW User Manual The Quick Access Toolbar You can use the Quick Access Toolbar to conveniently switch display modes, customize window size and location via the editor mode, and apply and save display templates. To display the Quick Access Toolbar, move the console mouse to the top of the scree. -
Page 57: The Editor Mode
Chapter 4. OSD Operation The Editor Mode Use the editor mode to customize the source display. You can resize windows, change the display source, or relocate windows. To enable the editor mode, follow the steps below. 1. Make sure the following functions are enabled to allow console mouse to operate. - Page 58 CL3884NW User Manual 4. Configure and adjust the display as required. You can do the following when the editor mode is enabled: Function Action Change the display mode Click a display mode from the Quick Access Toolbar. Click to display the window in full screen.
-
Page 59: The Osd Menu
The OSD Menu The OSD Menu contains all the display settings and system settings for the CL3884NW. To access the OSD Menu, use any of the following methods: Tap [Scroll Lock] twice on the console keyboard Move the console mouse to the top center of the OSD to display the Quick Access Toolbar, and then click Note: The hotkey to activate the OSD can be changed to the Ctrl key. -
Page 60: Osd Main Screen
CL3884NW User Manual OSD Main Screen You can close the OSD Menu by pressing [Esc] or Spacebar. [Esc] returns to the previous page. When you invoke the OSD, a screen similar to the one below appears: OSD functions are used to configure and control the OSD. For example, you... -
Page 61: General
Locks or unlocks the CL3884NW’s panel pushbuttons. Logout Timeout Never / 10s / 30s / 60s Sets how long the CL3884NW waits / 5 mins / 10 mins after the last input or RS-232 command before automatically logging out from the OSD Menu or closing an RS-232 session. - Page 62 CL3884NW User Manual Setting Options Description Keyboard Language Auto Detect / English Auto detects the language of the local keyboard. For these options to be available, make sure to enable Keyboard Emulation in the OSD Menu. Hardware Cursor Enable / Disable...
-
Page 63: Display
Single / Quad / PiP2 / Sets or changes the display mode for PiP3 / PiP4 / PoP / the CL3884NW. For details about each PbP1 / PbP2 / PbP3 / display mode, see Display Modes, Fn1 / Fn2 / Fn3 / Fn4 page 32. - Page 64 LCD / 2nd Display Multi+Full / Full+Multi / Sets the display mode for your Mode Multi x 2 CL3884NW LCD and the second monitor. Transparency Enable / Disable Enable this setting to make the inset window(s) of a PiP display semi- transparent.
-
Page 65: Port Configuration
Port 1 Name Type to name the computers connected to port 1 / port 2 / port 3 / Port 2 Name port 4 on the CL3884NW. The Port 3 Name CL3884NW only supports English characters of upper and lower cases, Port 4 Name numbers, hyphens, and underscores. -
Page 66: Advanced
The OSD Menu, page 49. Auto Scan Disable / Enable Enable this function to have the CL3884NW cycle from port to port at the defined Auto Scan Duration. This gives users an automated way of viewing all the computers connected to the ports.c... - Page 67 Note: When an error occurs and the video can not be displayed using the specified EDID mode, the CL3884NW will automatically default the EDID mode to ATEN Default. Remix: This mode sends the optimum EDID to all connected displays.
-
Page 68: Password
CL3884NW User Manual Password Setting Options Description Password Password Protection Enable / Disable Enable this function to password protect access to the OSD Menu. The default password is password. Change Password Enable / Disable Enable this function to change the login password for the OSD Menu. -
Page 69: Maintenance
Select an option load a previously Profile 3 / Profile 4 backed up OSD configuration. Reset to Default Yes / Cancel Select Yes to set the CL3884NW to default. MFG No. Read-only information Displays the manufacturing code of the CL3884NW. -
Page 70: Manufacturing Number
Manufacturing Number The “MFG Number” (Manufacturing Number) is an internal serial number used by ATEN’s factory and technical support staff to identify products. This number does not affect products’ warranty. If your product requires after-sales services, you may provide the MFG Number to ATEN’s sales or technical... -
Page 71: Keyboard Port Operation
Keyboard Port Operation Hotkey Port Control Hotkey port control allows you to provide KVM focus to a particular computer directly from the keyboard. The CL3884NW provides the following hotkey port control features: Selecting the Active Port Auto Scan Mode Switching ... -
Page 72: Control And F12 Keys
CL3884NW User Manual Control and F12 Keys 1. Hold down the Ctrl key; 2. Press and release the F12 key; 3. Release the Ctrl key: [Ctrl] + [F12] When Hotkey mode is active: The Caps Lock, and Scroll Lock LEDs flash in succession to indicate that the HDM is in effect. -
Page 73: Auto Scan Mode
Chapter 5. Keyboard Port Operation Auto Scan Mode The Auto Scan feature automatically cycles the KVM focus through the computer ports at regular intervals. This allows you to monitor the computer activity without having to switch from port to port manually. Although the video focus switches from port to port, the keyboard, mouse, and USB focus do not switch. -
Page 74: Computer Keyboard / Mouse / Usb Device Reset
CL3884NW User Manual To resume Auto Scanning, press any key or left-click. Scanning continues from where it left off. While Auto Scan mode is in effect, ordinary keyboard and mouse functions are suspended – only Auto Scan mode compliant keystrokes and mouse clicks can be input. -
Page 75: Port Os Control
Chapter 5. Keyboard Port Operation Port OS Control A port’s operating system can be changed to match that of the computer attached to the port. To change a port’s operating system, key in the following hotkey combination: 1. Invoke hotkey mode with the [Num Lock] + [-] or [Ctrl] + [F12] combination. -
Page 76: Hotkey Summary Table
(microphone and speakers) to the specified computer in a single station setup. [Port ID] specifies the target computer: When [Port ID] is omitted, the CL3884NW switches to the specified device on the next computer device. [Port ID] = 1, 2, 3, or 4 [Device] specifies the focused device: ... - Page 77 Display B displays full-screen mode.) n = 2 (CL3884NW displays full-screen mode, and Display B displays multi-view mode.) n = 3 (Both the CL3884NW and Display B displays mutli-view mode.) [B] [Enter] Enable or disable the Beeper. [L] [Enter] Unblock or block the front panel pushbuttons.
- Page 78 n = 4 (Implements the Fn4 key configuration) [E] [Enter] Enable or disable Power On Detection with which the CL3884NW switches to the next powered-on computer when a computer that has KVM focus is powered off. [H] [Enter] Enable or disable the Hardware Cursor Mode.
- Page 79 Invoke Hotkey Action [F4] [Enter] List the current settings of the CL3884NW. To use this function, open a text editor or word processor, and place the cursor in the page window before invoking the HSM and enter the hotkey. [F5] [Enter] Performs a keyboard / mouse reset on the target computer.
- Page 80 CL3884NW User Manual This Page Intentionally Left Blank...
-
Page 81: Keyboard Emulation
Chapter 6 Keyboard Emulation Mac Keyboard The PC compatible (101/104 key) keyboard can emulate the functions of the Mac keyboard. The emulation mappings are listed in the table below. PC Keyboard Mac Keyboard [Shift] Shift [Ctrl] Ctrl [Ctrl] [1] [Ctrl] [2] [Ctrl] [3] [Ctrl] [4] [Alt]... -
Page 82: Sun Keyboard
CL3884NW User Manual Sun Keyboard The PC compatible (101/104 key) keyboard can emulate the functions of the Sun keyboard when the control key [Ctrl] is used in conjunction with other keys. The corresponding functions are shown in the table below. -
Page 83: Rs-232 Operation
1. Connect your controller or PC to the CL3884NW. Use an RJ-45 to DB-9 serial adapter (not provided) to connect the computer’s serial port to the RS-232 In port of the CL3884NW, as shown below: Please see below for CL3884NW RJ-45 and RS-232 port pin define. - Page 84 Stop bits: 1 Parity: None Flow Control: None 4. When the session is connected, you can send RS-232 commands to control the CL3884NW from the controller PC. For information on RS-232 commands, see RS-232 Commands, page 75.
-
Page 85: Rs-232 Commands
Chapter 7. RS-232 Operation RS-232 Commands This section lists the RS-232 commands and provides information on command syntax. Verification Messages Refer to the following table for details on verification messages that appear in the command line after entering a command. Verification Message Description Command OK... -
Page 86: Log In
CL3884NW User Manual Log In The Login command allows you to log in to the CL3884NW and begin sending RS-232 commands. When you log in, the RS-232 link is “opened” and the CL3884NW will not respond to front panel pushbuttons, hotkeys, OSD, or remote control signals - until the RS-232 link is closed (see Open/Close RS-232 Link, page 78). -
Page 87: Logout
Chapter 7. RS-232 Operation Logout The Logout command allows you to logout of the CL3884NW and close the RS-232 link. Type your command in the following format: Command + [Enter] Command Description logout Logout Command For example, to logout of the CL3884NW, type the following: logout [Enter] Note: Each command string can be separated with a space. -
Page 88: Open/Close Rs-232 Link
The Open/Close RS-232 Link command allows you to open/close the link between the computer sending RS-232 commands and the CL3884NW. When the link is “open” the CL3884NW only accepts RS-232 commands and will not respond to front-panel pushbuttons, hotkeys, OSD, or remote control signals - until the link is closed. -
Page 89: Switch Port
Chapter 7. RS-232 Operation Switch Port The switch port command allows you to switch between computers connected to the CL3884NW’s ports. Type your command in the following format: Command + Input Command + [Enter] Command Description Switch Port Command Input Command... -
Page 90: Pip Mode
CL3884NW User Manual PiP Mode The PiP Mode command allows you to change the Picture in Picture display mode settings. Type your command in the following format: PiP Configuration Setting: Command + Config1 + Config2 + Config3 + Config4 + Config5 + [Enter]... -
Page 91: Quad View Mode
Chapter 7. RS-232 Operation Quad View Mode The Quad View Mode command allows you to change the Quad View display mode settings. Type your command in the following format: Command + Control1 + Control2 + Control3 + Control4 + [Enter] Command + Control + [Enter] Command Description... -
Page 92: Change Display Mode
CL3884NW User Manual Change Display Mode The Change Display Mode command allows you to change the Display mode being used. Type your command in the following format: Command + Control + [Enter] Command Description display Change Display Mode Command Control... -
Page 93: Port Disable
Chapter 7. RS-232 Operation Port Disable The Port Disable command allows you to disable a ports display from being shown. Type your command in the following format: Command + Control + Control + [Enter] Command Description Port Disable Command Control Description Disable video out of port number, x= 1~4 Example: p3... -
Page 94: Osd Language
CL3884NW User Manual OSD Language The OSD Language command allows you to change the OSD language setting. Type your command in the following format: Command + Control + [Enter] Command Description lang OSD Language Command Control Description Change OSD language to English. -
Page 95: Keyboard Language Layout
Chapter 7. RS-232 Operation Keyboard Language Layout The Keyboard Language Layout command allows you to change the keyboard language layout. Type your command in the following format: Command + Control + [Enter] Command Description layout Keyboard Language Layout Command Control Description auto Change the keyboard language layout to auto detect the... -
Page 96: Set Operating System
CL3884NW User Manual Set Operating System The Set Operating System command allows you to set the operating system for a port. Type your command in the following format: Command + Control + Control1 + [Enter] Command Description Set Operating System Command... -
Page 97: Auto Scan
Chapter 7. RS-232 Operation Auto Scan The Auto Scan command allows you to set and enable Auto scan mode. Type your command in the following format: Command + Control + [Enter] Command Description scan Auto Scan Command Control Description Auto scan all ports Auto scan all ports with computers powered on Sets the KVM focus duration when scanning, xx= 5, 10, 15, 60, 90 seconds... -
Page 98: Port Id Display
CL3884NW User Manual Port ID Display The Port ID Display command allows you to configure the port ID for each port. Type your command in the following format: Command + Control + [Enter] Command Description portid Port ID Display Command... -
Page 99: Security
Chapter 7. RS-232 Operation Security The Security command allows you to secure access to the OSD Menu with password. Use the Formula - to set Parameters - to create a Command. Formula: Command + Control + [Enter] Command Description security Security Command Control Description... -
Page 100: Keyboard Emulation
CL3884NW User Manual Keyboard Emulation The Keyboard Emulation command allows you to enable/disable the keyboard emulation feature. Type your command in the following format: Command + Control + [Enter] Command Description kbemu Keyboard Emulation Command Control Description Disable keyboard emulation function... -
Page 101: Video Dynasync
The resolution is 1920 x 1080 @60Hz port 1 Set the EDID to the EDID of the monitor connected to port 1 of the CL3884NW. remix Set the EDID to an optimum among all the connected displays. For example, to set the default EDID setting, type the following:... -
Page 102: Hardware Cursor
CL3884NW User Manual Hardware Cursor The Hardware Cursor command allows you to enable/disable the hardware cursor feature. Type your command in the following format: Command + Control + [Enter] Command Description Hardware Cursor Command Control Description Disable the hardware cursor... -
Page 103: Activate Beeper
Chapter 7. RS-232 Operation Activate Beeper The Activate Beeper command allows you to enable/disable the beeper function. Type your command in the following format: Command + Control + [Enter] Command Description beeper Activate Beeper Command Control Description Disable beeper Enable beeper For example, to enable the beeper, type the following: beeper on [Enter] Note: Each command string can be separated with a space. -
Page 104: Hotkey Setting
CL3884NW User Manual Hotkey Setting The Hotkey Setting command allows you to enable/disable and change the hotkey used to invoke the HSM (Hotkey Setting Mode). Type your command in the following format: Command + Control + [Enter] Command Description hotkey... -
Page 105: Osd Hotkey
Chapter 7. RS-232 Operation OSD Hotkey The OSD hotkey command allows you to change the hotkey used to invoke the OSD. Type your command in the following format: Command + Control + [Enter] Command Description osdkey OSD hotkey command Control Description scroll Change OSD invoke key to: [Scroll] [Scroll]... -
Page 106: Power On Detection
CL3884NW User Manual Power on Detection The Power on Detection command allows you to enable/disable the power on detection feature. Type your command in the following format: Command + Control + [Enter] Command Description Power on Detection Command Control Description... -
Page 107: Fn Key
Chapter 7. RS-232 Operation Fn Key The Fn Key command allows you to save and select Fn keys for a focused ports display settings. Type your command in the following format: Command + Control + [Enter] Command Description Fn Key Command Control Description savex... -
Page 108: Usb Reset
CL3884NW User Manual USB Reset The USB Reset command allows you to reset the USB connection. Type your command in the following format: Command + Control + [Enter] Command Description usbreset USB Reset Command Control Description Enable USB reset connection... -
Page 109: Restore Default Value
Command Description redefault Restore Default Value Command Control Description Enable restore default values For example, to restore all CL3884NW settings back to the default, type the following: redefault on [Enter] Note: Each command string can be separated with a space. -
Page 110: Firmware Upgrade
CL3884NW User Manual Firmware Upgrade The Firmware Upgrade command allows you to enable the firmware upgrade mode. Type your command in the following format: Command + Control + [Enter] Command Description upgrade Firmware Upgrade Command Control Description Enable firmware upgrade mode... -
Page 111: Kvm Status
Chapter 7. RS-232 Operation KVM Status The KVM Status command allows you to display read-only information about the CL3884NW’s current configuration status. Type your command in the following format: Command + [Enter] Command Description status KVM Status Command For example, to display the CL3884NW’s configuration status, type the... -
Page 112: Hotkey List
CL3884NW User Manual Hotkey List The Hotkey List command allows you to display a list of the KVM’s hotkeys. Type your command in the following format: Command + [Enter] Command Description list Hotkey List Command For example, to display the KVM’s hotkey list, type the following:... -
Page 113: Info
Chapter 7. RS-232 Operation Info The Info command allows you to display the CL3884NW’s current firmware version and copyright information. Type your command in the following format: Command + [Enter] Command Description info Info Command For example, to display the CL3884NW’s device information, type the... - Page 114 CL3884NW User Manual This Page Intentionally Left Blank...
-
Page 115: The Firmware Upgrade Utility
Check the web site regularly to find the latest packages and information. To upgrade your CL3884NW, follow the steps below. 1. Connect a PC’s USB port to the CL3884NW using the supplied KVM cable. Note: Slide your Firmware Upgrade Recovery Switch to Normal position for upgrade. - Page 116 CL3884NW User Manual 4. A confirmation screen appears, press [Yes] to invoke Firmware Upgrade mode (see page 59) 5. After you press [Yes], wait for the below screen to appear.
- Page 117 Chapter 8. The Firmware Upgrade Utility 6. Double-click the executable in the downloaded package. This screen appears. 7. Select the Firmware Upgrade Utility and click Next. This window appears.
- Page 118 CL3884NW User Manual 8. Read the License Agreement, select I Agree, and then click Next. The Firmware Upgrade Utility main screen appears and lists the devices that can be upgraded. 9. Select a device from the Device List and click Next to start the upgrade.
- Page 119 Note: Select Check Firmware Version for the Utility to prompt you with a confirmation message before executing the upgrade if the upgrade package is of an older version compared to the firmware on your CL3884NW. 10. When the upgrade is complete, the CL3884NW reboots itself.
-
Page 120: Backup / Restore
CL3884NW User Manual Backup / Restore To upgrade your CL3884NW, follow the steps below. 1. Connect a PC’s USB port to the CL3884NW using the supplied KVM cable. Note: Slide your Firmware Upgrade Recovery Switch to Normal position for upgrade. - Page 121 Chapter 8. The Firmware Upgrade Utility 5. After you press [Yes], wait for the below screen to appear. 6. Double-click the executable in the downloaded package. This screen appears.
- Page 122 9. To back up the OSD configuration, follow the steps below. a) (Optional) Set up a password that will be required when applying this configuration file to the CL3884NW. b) Click Backup and follow the on-screen instruction to save the configuration file.
-
Page 123: Upgrade Failed
5. After the CL3884NW has been successfully upgraded, power it off, and slide the Firmware Upgrade Recovery Switch back to the Normal position. 6. If the CL3884NW is one of the cascaded switches, plug it back into the installation. 7. Power the CL3884NW back on. -
Page 124: Powering Off And Restarting
CL3884NW User Manual Powering Off and Restarting If it becomes necessary to power off the unit, before starting it back up you must do the following: 1. Shut down all the computers that are attached to the switch. 2. Unplug the switch’s power adapter cable. -
Page 125: Appendix
Appendix Safety Instructions General This product is for indoor use only. Read all of these instructions. Save them for future reference. Follow all warnings and instructions marked on the device. Do not place the device on any unstable surface (cart, stand, table, etc.). If the device falls, serious damage will result. - Page 126 CL3884NW User Manual If an extension cord is used with this device make sure that the total of the ampere ratings of all products used on this cord does not exceed the extension cord ampere rating. Make sure that the total of all products plugged into the wall outlet does not exceed 15 amperes.
-
Page 127: Rack Mounting
Appendix Rack Mounting Before working on the rack, make sure that the stabilizers are secured to the rack, extended to the floor, and that the full weight of the rack rests on the floor. Install front and side stabilizers on a single rack or front stabilizers for joined multiple racks before working on the rack. -
Page 128: Technical Support
CL3884NW User Manual Technical Support International For online technical support – including troubleshooting, documentation, and software updates: http://support.aten.com For telephone support, see Telephone Support, page iii: North America Email Support support@aten-usa.com Online Troubleshooting http://www.aten-usa.com/support Technical Documentation Support Software Updates... -
Page 129: Specifications
Appendix Specifications Function CL3884NW Computer Connections Direct Maximum 16 (via cascade) Port Selection OSD, Hotkey, Pushbutton, RS-232 Commands Connectors 4 x HDMI Female KVM Ports 4 x USB Type B Female 4 x 3.5 mm Audio Jack Female (Green) Power... - Page 130 CL3884NW User Manual Function CL3884NW Input Video Resolution 1920 x 1080 @ 60Hz Second Console 1920 x 1080 @ 60Hz Panel Spec LCD Module 18.5" TFT-LCD Resolution 1920 x 1080 @ 60Hz Response Time 20 ms Viewing Angle 178° (H), 178° (V) Support Color 16.77M colors...
-
Page 131: Connection Tables
CL3884NW to Compatible 4-Port Switches Switches Computers Supported KVM Switches The table below lists KVM switches that are compatible with the CL3884NW and the type of expansion that they use. (KVM switches listed below are sold separately. Contact your dealer for details.) Expansion Type... -
Page 132: Osd Factory Default Settings
CL3884NW User Manual OSD Factory Default Settings The factory default settings are as follows: Setting Default OSD Hotkey [Scroll Lock] [Scroll Lock] OSD Language English Pushbutton Lock Disable Display B Status Follow Display A Scan Duration 5 Seconds Logout Timeout... -
Page 133: Optional Rack Mounting
Appendix Optional Rack Mounting Front-L Brackets Mounting The CL3884NW package includes two Front-L brackets for another mounting option for CL3884NW: 1. Attach the left and right Front-L brackets to the front of the rack, placing screws in the tabs to secure them in place. - Page 134 2. Attach the left and right mounting brackets to the back of the rack, placing screws in the tabs to secure them in place. 3. Two people insert the CL3884NW, by sliding its left and right side bars into the mounting brackets. The mounting brackets and the Front-L brackets hold the weight of the CL3884NW while you place screws in the front tabs to secure the CL3884NW to the front of the rack.
-
Page 135: Easy Installation Kit Mounting
Appendix Easy Installation Kit Mounting Other than the standard mounting kit and the Front-L brackets mounting, two other rack mounting options are available for CL3884NW. These are shown in the following table: Bracket Type Depth (cm) Easy Installation–Short (2K-0005) 57.0–70.0 Easy Installation–Long (2K-0006) - Page 136 CL3884NW User Manual 2. Attach the left and right easy-installation mounting rails to the inside of the rack. The flange that supports the CL3884NW will be to the inside. Rear Flang Rear Flang Slide bar Slide bar Rear Attachment Rear Attachment...
- Page 137 Appendix 3. Slide the CL3884NW onto the support flanges. Use the screws supplied with this package to loosely attach the front of the CL3884NW to the front of the rack (only tighten the screws part way). 4. Slide the rear attachment sliding brackets along the slide bars until they...
- Page 138 CL3884NW User Manual 5. Slide the CL3884NW open and closed a couple of times to be sure that it is properly aligned and operating smoothly. (See p. 19 for opening and closing procedures.) 6. After determining that the CL3884NW is properly lined up and operating correctly, finish up by fully tightening down the partially tightened front attachment screws inserted in step 3.
-
Page 139: Troubleshooting
USB port on the switch’s rear panel, then plug it back in. PC or OS does not The CL3884NW has a built-in USB 2.0 support USB 2.0. hub, so does not support PCs or OS that do not support USB 2.0. -
Page 140: Fn Key Reference
The GUI connection The CL3884NW Perform a KVM reset or reinstall the window stalls / does needs to be reset. latest CL3884NW software on all your not connect computers. Some characters I They keyboard layout The keyboard layout setting for the enter from the does not match. -
Page 141: Limited Warranty
What is covered by the Limited Hardware Warranty ATEN will provide a repair service, without charge, during the Warranty Period. If a product is detective, ATEN will, at its discretion, have the option to (1) repair said product with new or repaired components, or (2) replace the entire product with an identical product or with a similar product which fulfills the same function as the defective product. - Page 142 CL3884NW User Manual This Page Intentionally Left Blank...
-
Page 143: Index
Index single level 14 Invoking Hotkey Mode 61 Keyboard Emulation Auto Scanning Mac 71 Invoking Auto Scan 63 Sun 72 Pausing Auto Scan 63 KVM adapter cables 3 Stopping 64 Beeper Adjustment settings 26 Control 64 Hotkey Control 64 mounting rack 11 AC Power Rear view 6 Front view 4... - Page 144 CL1308 / CL1316 User Manual rack mounting 117 Telephone support iii Selecting the Active Port 62 Troubleshooting 129 single level installation 14 Specifications 119 User Notice iii stacking 11 Technical Support 118...
- Page 145 CL3884NW User Manual Auto Scanning Invoking Auto Scan 63 Pausing Auto Scan 63 Stopping 64 Beeper Control 64 Hotkey Control 64 CL5708 / CL5716 AC Power Rear view 7 Front view 5 Components 5 computer connection tables 121 Console Opening 19...
- Page 146 CL3884NW User Manual Summary Table 66 Hotkey Mode exiting 62 invoking 61 Hotkey Port Control 61 Installation single level 14 Invoking Hotkey Mode 61 Keyboard Emulation Mac 71 Sun 72 KVM adapter cables 4 Adjustment settings 26 mounting rack 11...
- Page 147 CL3884NW User Manual Manual 29 Powering Off 24 Rack mounting Optional 123 rack mounting 11 safety information 117 Rear View AC power 7 Requirements OS Support 4 Restarting 24 RoHS ii safety instructions general 115 rack mounting 117 Selecting the Active Port 62...
Need help?
Do you have a question about the CL3884NW and is the answer not in the manual?
Questions and answers