
Related Manuals for EuroLite LED C-1


Summary of Contents for EuroLite LED C-1
- Page 1 BEDIENUNGSANLEITUNG USER MANUAL LED C-1 DMX-Controller Für weiteren Gebrauch aufbewahren! © Copyright Keep this manual for future needs! Nachdruck verboten! Reproduction prohibited!
-
Page 2: Table Of Contents
DMX-protocol ............................... 18 Control Channels ............................18 CLEANING AND MAINTENANCE ......................... 19 TECHNICAL SPECIFICATIONS........................20 Das neueste Update dieser Bedienungsanleitung finden Sie im Internet unter: You can find the latest update of this user manual in the Internet under: www.eurolite.de 2/20 51928612_V_1_1.DOC... -
Page 3: Einführung
- sich die letzte Version der Anleitung im Internet herunter laden EINFÜHRUNG Wir freuen uns, dass Sie sich für eine EUROLITE LED C-1 DMX Lichtsteuerung entschieden haben. Wenn Sie nachfolgende Hinweise beachten, sind wir sicher, dass Sie lange Zeit Freude an Ihrem Kauf haben werden. -
Page 4: Bestimmungsgemässe Verwendung
Bitte überprüfen Sie vor der ersten Inbetriebnahme, ob kein offensichtlicher Transportschaden vorliegt. Sollten Sie Schäden am Netzteil oder am Gehäuse entdecken, nehmen Sie das Gerät nicht in Betrieb und setzen sich bitte mit Ihrem Fachhändler in Verbindung. Der Aufbau des Gerätes entspricht der Schutzklasse III. Das Gerät darf niemals ohne geeigneten Transformator betrieben werden. -
Page 5: Geräteübersicht
Das Gehäuse darf niemals umliegende Gegenstände oder Flächen berühren! Achten Sie bei der Montage, beim Abbau und bei der Durchführung von Servicearbeiten darauf, dass der Bereich unterhalb des Montageortes abgesperrt ist. Die maximale Umgebungstemperatur T = 45° C darf niemals überschritten werden. Nehmen Sie das Gerät erst in Betrieb, nachdem Sie sich mit seinen Funktionen vertraut gemacht haben. -
Page 6: Installation
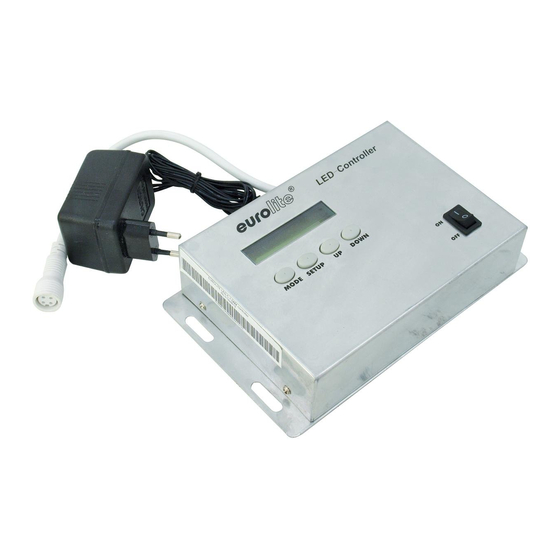
(8) DMX-512 OUT (9) DMX-512 IN (10) Signalanschluss (11) Netzanschluss INSTALLATION Montage BRANDGEFAHR! Achten Sie bei der Installation des Gerätes bitte darauf, dass sich im Abstand von mind. 0,5 m keine leicht entflammbaren Materialien (Deko, etc.) befinden. Das Gerät kann sowohl hängend als auch stehend installiert werden. Hängende Installation LEBENSGEFAHR! Bei der Installation sind insbesondere die Bestimmungen der BGV C1 (vormals VBG 70) -
Page 7: Anschluss Ans Netz
WICHTIG! ÜBERKOPFMONTAGE ERFORDERT EIN HOHES MAß AN ERFAHRUNG. Dies beinhaltet (aber beschränkt sich nicht allein auf) Berechnungen zur Definition der Tragfähigkeit, verwendetes Installations- material und regelmäßige Sicherheitsinspektionen des verwendeten Materials und des Gerätes. Versuchen Sie niemals, die Installation selbst vorzunehmen, wenn Sie nicht über eine solche Qualifikation verfügen, sondern beauftragen Sie einen professionellen Installateur. -
Page 8: Anschluss Der Teile
Die LED C-1 DMX Lichtsteuerung lässt sich im Stand Alone-Betrieb ohne Controller einsetzen. Chaser Ein Chaser ist eine Aneinanderreihung von verschiedenen Programmen (Modi), die nacheinander abgespielt werden. Mit der EUROLITE LED C-1 DMX Lichtsteuerung lassen sich bis zu 11 verschiedene Chaser auswählen. Auswählen eines Chasers Drücken Sie die MODE Taste und wählen Sie den gewünschten Chaser. -
Page 9: Dmx-Gesteuerter Betrieb
Drücken Sie nun die SET UP Taste, bis im Display „DMX Channel“ angezeigt wird. Mit UP/DOWN Tasten können Sie die DMX Startadresse einstellen. Ansteuerung: Nachdem Sie die Startadresse definiert haben, können Sie die LED C-1 DMX Lichtsteuerung über Ihren Controller ansteuern. 9/20... -
Page 10: Dmx-Protokoll
Ω Achtung: Am letzten Gerät muss die DMX-Leitung durch einen 120 . Widerstand abgeschlossen werden damit die Geräte korrekt funktionieren. DMX-Protokoll Steuerkanäle Kanal 1 130-142 Slow flow 2 Wert: Option 0-12 Blackout 143-155 Roll chase 1 13-25 156-168 Roll chase 2 26-38 Grün 169-181 Multi colour... -
Page 11: Reinigung Und Wartung
REINIGUNG UND WARTUNG Der Unternehmer hat dafür zu sorgen, dass sicherheitstechnische und maschinentechnische Einrichtungen mindestens alle vier Jahre durch einen Sachverständigen im Umfang der Abnahmeprüfung geprüft werden. Der Unternehmer hat dafür zu sorgen, dass sicherheitstechnische und maschinentechnische Einrichtungen mindestens einmal jährlich durch einen Sachkundigen geprüft werden. Dabei muss unter anderem auf folgende Punkte besonders geachtet werden: 1) Alle Schrauben, mit denen das Gerät oder Geräteteile montiert sind, müssen fest sitzen und dürfen nicht korrodiert sein. -
Page 12: Introduction
- download the latest version of the user manual from the Internet INTRODUCTION Thank you for having chosen a EUROLITE LED C-1 DMX Lighting Controller. If you follow the instructions given in this manual, we are sure that you will enjoy this device for a long period of time. -
Page 13: Operating Determinations
This device falls under protection-class III. The device always has to be operated with an appropriate transformer. Always plug in the power unit last. If the device has been exposed to drastic temperature fluctuation (e.g. after transportation), do not switch it on immediately. -
Page 14: Overview
Please use the original packaging if the device is to be transported. Please consider that unauthorized modifications on the device are forbidden due to safety reasons! If this device will be operated in any way different to the one described in this manual, the product may suffer damages and the guarantee becomes void. -
Page 15: Installation
INSTALLATION Rigging DANGER OF FIRE! When installing the device, make sure there is no highly-inflammable material (decoration articles, etc.) within a distance of min. 0.5 m. The device can be installed on the ground or on the wall or ceiling. Hanging installation DANGER TO LIFE! Please consider the EN 60598-2-17 and the respective national norms during the... -
Page 16: Connection With The Mains
OPERATION After you connected the effect to the mains, the EUROLITE LED C-1 DMX Lighting Controller starts running. Stand Alone operation In the Stand Alone mode, the LED C-1 DMX Lighting Controller can be used without controller. -
Page 17: Chaser
Chaser A chaser is a sequence of different programs (modes) that will be called up one after another. With the EUROLITE LED C-1 DMX Lighting Controller, you can select up to 11 different chasers. Selecting a chaser Press the MODE button and select the desired chaser. -
Page 18: Dmx-Protocol
Press the SET UP button until the display shows „DMX-Channel“. The desired DMX start address can be selected via the UP or DOWN buttons. Controlling: After having addressed the LED C-1 DMX Lighting Controller, you may now start operating it via your lighting controller. Note: It’s necessary to insert the XLR termination plug (with 120 Ohm) in the last device in the link in order to... -
Page 19: Cleaning And Maintenance
Channel 4 Value: Option Value: Option 0-11 R + G 132-143 Y + B 12-23 R + Y 144-155 Y + P 24-35 R + B 156-167 Y +C 36-47 R + P 168-179 Y +W 48-59 R + C 180-191 B +P 60-71 R + W... -
Page 20: Technical Specifications
If the power supply cable of this device becomes damaged, it has to be replaced by a special power supply cable available at your dealer. Should you have further questions, please contact your dealer. TECHNICAL SPECIFICATIONS Power supply: 230 V AC, 50 Hz ~ via 9-12 V DC, 500 mA power unit included in the delivery Power consumption: Dimensions (LxWxH):...
Need help?
Do you have a question about the LED C-1 and is the answer not in the manual?
Questions and answers