Bunn trifecta Technical Training Manual
Hide thumbs
Also See for trifecta:
- Installation & operating manual (20 pages) ,
- Installation manual (3 pages) ,
- Service & repair manual (15 pages)
Table of Contents
Advertisement
Quick Links
Advertisement
Table of Contents

Related Manuals for Bunn trifecta


Summary of Contents for Bunn trifecta
- Page 1 BUNN TECHNICAL TRAINING ® trifecta™...
-
Page 2: Table Of Contents
Control Board Removal and Replacement ............... 26 Triac Map ..........................27 Schematic Wiring Diagram ....................28 Fill Sequence Components ....................29 Turbulent Brew Time Sequence Components ..............30 Press-Out Sequence Components ................... 30 © 2009 Bunn-O-Matic Corporation. All Rights Reserved Rev. A... -
Page 3: Unit 1: Installation
Unit Objectives Given a realistic scenario depicting a new site install, the learner will be able to install and setup the trifecta coffee brewer for customer turnover without error. Given a new trifecta, all the necessary tools and safety equipment, the learner will be able to install the brewer without error. -
Page 4: Site Requirements
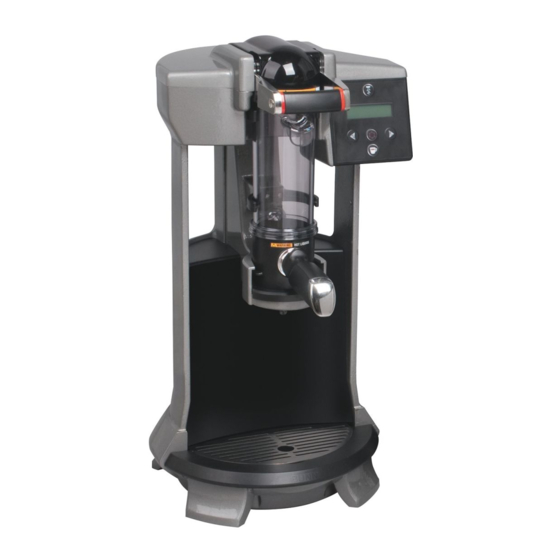
Installation Site Requirements Space • trifecta dimensions are 23” H x 12” W x 12” D • Weight 35 lbs Plumbing • 1/4 male flare fitting • Dedicated water supply with shut-off • Connected to cold water supply • Water pressure 20-90psi, 50psi if regulator is needed Electrical • 120VAC, 2 wire plus ground... -
Page 5: Electrical Install
Parameters” section of the “Installation & Operating Guide” if the parameters need to be adjusted. Step 8: If the instruction in this section was followed correctly, the brewer is now ready for use. Brew Chamber Check Valve Brew Cup Bunn-O-Matic Corporation... -
Page 6: Unit 2: Setup
Unit Objectives Given a realistic scenario depicting a new site install, the learner will be able to install and setup the trifecta coffee brewer for customer turnover without error. Given an installed trifecta, all the necessary tools and safety equipment, the learner will be able to setup the brewer for initial operation. -
Page 7: User Interface
When trying to access either level of the programming menus, a message will display reading “MEMORY IS LOCKED CONSTANT CHANGE IS NOT POSSIBLE”. Set Position You are able to access the programming menus in level 1 or level 2. Bunn-O-Matic Corporation... -
Page 8: Level 1 Programming
Level 2 contains menus for advanced parameter settings and factory setup menus that are used in development of the trifecta™. Generally, level 2 factory default values will require no adjustment. Level 1 Optional Adjustment Menus By default, “ENABLED” will be flashing to indicate that the brewing parameters may be... -
Page 9: Level 2 Programming
This screen will allow the user to reset all brew settings, calibrations, temperature adjustments, coffee names and recipes to the factory presets. Level 2 Optional Adjustment Menus Note: These menus are generally used for developmental purposes only. While some of the menus can be adjusted in the event of coffee not mixing properly, others are not to be adjusted at all in the field. Brew Water Calibration Bunn-O-Matic Corporation... - Page 10 This will cause the pressure to build up in the chamber during the end of the brew. This menu screen works in conjunction with items 8 and 12. This screen allows the amount of pressure build up in the chamber to be adjusted during the end of a brew cycle. trifecta™ Training Manual...
-
Page 11: Brew Water Calibration
This screen allows the user to adjust how long the turbulence air ON time is. Range: OFF/ 1-25 sec. This screen allows the user to adjust how long the turbulence air off time is. Range: OFF/ 1-20 sec. Bunn-O-Matic Corporation... -
Page 12: Brewing Process
(74°C - 96°C) trifecta™ Brewing Process The trifecta™ offers the barista the opportunity to create an individual experience while producing a unique, deep, amplified coffee beverage by utilizing the parameters in three phases. Using an air infusion process, the brewer heightens the quality of coffee. This unique process allows the barista to develop a distinct single cup of coffee with the flavor profile to elevate the coffee experience. -
Page 13: Hydrolysis
Step 4: When brewing has finished, place an empty cup on the drip tray and then press rinse. Step 5: Remove the brew cup assembly and empty out the wet coffee grounds. Step 6: Rinse the brew cup thoroughly and place it back under the brew chamber. Bunn-O-Matic Corporation... -
Page 14: Unit 3: Machine Composition
Given a realistic scenario requiring the learner to access the internal components of the trifecta, the learner will be able to remove the top cover, front panel, brew chamber and arm cup support. -
Page 15: Exterior Overview
The Enclosure The majority of the service work done to the trifecta™ will require the service technician to access the inside of the brewer. The components that make up the enclosure are the top cover, cup support and front panel. Once the en- closure is removed, there will be access to the hot water tank, CBA and other electrical components. -
Page 16: Upper Component Mounting Assembly
Display/Switch Board The user interface allows the user to program or adjust the brewer for product recipes and begin the brew process and finish with a rinse process. An overlay is used with the description of the buttons. Sprayhead Parts Review Brew Chamber Vent Line Rinse Line Brew Chamber Switch Sprayhead/Rinse Cone trifecta™ Training Manual... -
Page 17: Sprayhead Assembly
A safety device made up of contacts on a bimetallic arm, which bends when heated, causing the contact points to open. The device acts as a safety protection in the event of a tank over heating. Flow Meter A volumetric meter using a paddle wheel with magnets. The wheel rotates when water flows through the meter generating a pulse signal for every amount of milliliters passing through. The flow meter is used as a dry plug in prevention and used as the primary component for determining the amount of brew water, also referred to as a flow count. Bunn-O-Matic Corporation... -
Page 18: Brew Chamber Assembly
• Inlet Valve • Flow Meter • Tank Assembly • Cup Platform • Check Valve • Vent Valve • Press-out Air Pump • Turbulent Air Pump • Brew Cup • Brew Chamber • Brew Chamber Top with Micro Switch trifecta™ Training Manual... -
Page 19: Rinse Sequence
The brew chamber is ready to be disengaged from the brew cup by lifting up on the top handle and rotating the brew top upwards. Remove the brew cup from the cup support base and empty the coffee grounds from the cup. Thoroughly rinse the brew cup and screen in preparation for the next brew process. Bunn-O-Matic Corporation... -
Page 20: Unit 4: Preventive Maintenance
Given a trifecta brewer, all the necessary tools and safety equipment, the learner will be able to identify the components that need to be serviced for each PM cycle. -
Page 21: Pm Parts
O-Ring PN: 43004.0000 Advanced PM The advanced PM Kits for the trifecta™ will consist of all the components needed when replacing a brew chamber assembly. • PN: 43279.1000 - Kit, Brew Chamber with Decal • PN: 42383.1000 - Kit, Brew Cup • PN: 42508.1000 - Kit, Wave Spring 3.37ODX2.94ID... -
Page 22: Unit 5: Troubleshooting
Unit Objectives Given a realistic scenario depicting a broken trifecta coffee brewer, the learner will be able to effectively troubleshoot, diagnosis, and repair the problem returning the brewer to normal operation. Given a trifecta brewer displaying an error message, all the necessary tools and safety equipment, the learner will be able to access the software and diagnosis the problem. -
Page 23: Load Component Testing
Many of the issues with the trifecta™ will generate an error message. The CPU has many sensors throughout the machine that will allow it to engage its functions; if it does not get an input signal from one of those sensors, it will generate a trouble code that is shown on the display. -
Page 24: Control Switch Testing
Some error messages will need to be reset manually, while others will reset automatically after the problem is fixed. trifecta™ Error Messages Check the wire for shorts. Parameter: < 254 Ohms (greater than boiling) for > = 3.0 seconds. -
Page 25: Accessing The Brew Lockout Switch
Step 16: Remove the brew chamber switch from the bracket by squeezing the two tabs together. Be careful not to lose the switch actuator pin while the switch it out. Step 17: Reassembly of the sprayhead is the opposite of disassembly. C-Clip Brew Chamber Vent Line Rinse Line Brew Chamber Switch Sprayhead/Rinse Cone Bunn-O-Matic Corporation... -
Page 26: Hot Water Tank Removal
Step 8: Disconnect all of the pin connectors on the CBA except for the 4-pin J8 connector that is located to the right of the transformer on the CBA. Step 9: Disconnect the four spade terminal connections at the top left section of the CBA. trifecta™ Training Manual... -
Page 27: Triac Map
Switch/Display Press-Out Pump LEDs Rinse Solenoid Brew Solenoid Brew Lockout Switch Vent Valve Turbulent Pump Flow Meter Heater Relay • TH1 - Heater • TH2 - Rinse Solenoid • TH3 - Not Used • TH4 - Brew Solenoid Bunn-O-Matic Corporation... -
Page 28: Schematic Wiring Diagram
Training Manual... -
Page 29: Fill Sequence Components
• Check for a kink or obstructed water line after the solenoid. • Replace the dual inlet solenoid. • Replace the control board. Error Message The error message will appear when the brewer is no longer receiving a flow count or pulse input from the flow meter. Note: The count number that is generated by the flow of water through the flow meter can be seen during the brewing process. The flow count number will be counting down to zero during this part of the brewing process. • Check for a loose wire connection or connector plug alignment. • Replace the flow meter. • Replace the control board. Bunn-O-Matic Corporation... -
Page 30: Turbulent Brew Time Sequence Components
• Press-Out Air Pump How to Troubleshoot Press-Out Components Step 1: Enter the level 1 programming menus by pressing and holding both arrows for approximately 3 seconds until the display screen reads “Recipe Changes” “Enabled - Locked”. trifecta™ Training Manual... - Page 31 • Replace the vent valve. • Replace the control board. Note: If the rinse water is leaking around the brew chamber top, this indicates that an air leak is occurring during the press-out process. Replace the o-ring PN: 42264.0000. Bunn-O-Matic Corporation...
Need help?
Do you have a question about the trifecta and is the answer not in the manual?
Questions and answers