
Related Manuals for Enraf Nonius Endolaser 120


Summary of Contents for Enraf Nonius Endolaser 120
-
Page 1: Instructions For Use
Endolaser 120 EN109-1633750-40 IFU December 16, 2019 Instructions for use Page 1 of 46 EN109-1633750-40 IFU... -
Page 2: Table Of Contents
Table of contents Introduction ..............................3 Description-symbols used and device markings ................6 Device components ............................8 Package contents ............................10 Installation ..............................11 Intended use and intended user ......................14 Indications ..............................15 Contra-indications ............................16 Precautionary instructions ........................17 10 Operation ................................ -
Page 3: Introduction
Device Description The Endolaser 120 is a multi-wavelength low level laser therapy device. It is equipped with a full color touch screen in a PC-ABS plastic housing. The user-friendly interface includes pre-set clinical protocols, parameters that can be set manually and favorites that can be created and stored for future use. - Page 4 • Principle of Operation The Endolaser 120 contains a mains electricity (AC-powered) diode laser intended to be used to provide low-level laser therapy (LLLT) for a variety of clinical applications (e.g., to treat pain, promote healing of wounds/injuries/disorders of the joints and soft/connective tissues, for non- needle acupuncture).
- Page 5 Method of Operation The Endolaser 120 works by delivering coherent laser light to the patient. The type of laser light is determined by the laser diode. There are four types of probes (single/cluster and 808nm/905nm wavelength). When the treatment screen is entered through the navigation, its parameters are initialized to factory defaults or set to values as specified in a clinical protocol or favorite.
-
Page 6: Description-Symbols Used And Device Markings
2 Description-symbols used and device markings Symbol used Description Follow the instructions in the Instructions for Use. It is important that you read, understand and observe the precautionary and operating instructions General Prohibition Sign. Prohibition is used to mean “You MUST NOT” Warning or Caution: Indicates a hazardous situation which, if not avoided, could result in: Death or serious injury to the patient (or) - Page 7 CE Mark along with number indicates conformity with European Council of Directive concerning Medical Devices and that this device is under the direct supervision of the Notified Body. Emergency Stop button. Laser aperture indicates laser opening. Warning: laser radiation. Remote Interlock. Avoid direct eye exposure.
-
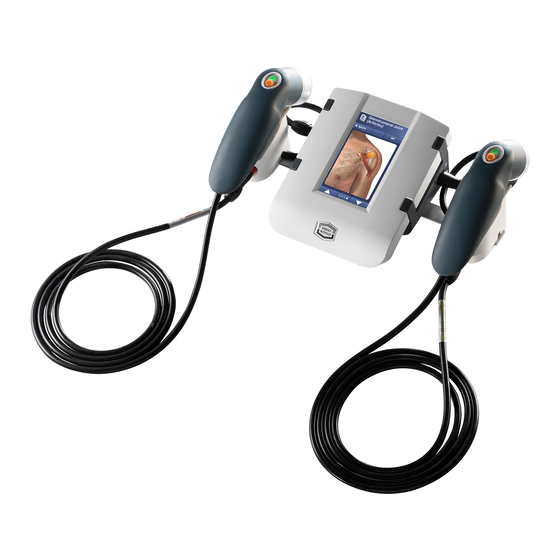
Page 8: Device Components
3 Device components Parts Description Numbered Description Purpose Part LCD Touch Screen Color TFT display 4.3” with touch screen. Displays the User Interface that allows the operator to control the device and change parameters of treatment protocols. Reference label Provides information about the device, such as type and serial number, as well as connection data such as mains voltage and maximum current consumption. - Page 9 Parts Description Numbered Description Purpose Part Laser Aperture Cluster Diode Opening for laser beam Connection Laser Probe Holder Connect Laser Probe Holder here [10] Remote Interlock Connection to external Remote Interlock system at the back of the Laser Probe Holder [11] Emergency Stop Button Immediately abort laser output...
-
Page 10: Package Contents
CP4X100C (808 nm, 4x100 mW continuous cluster Laser Probe) 1632.804 CP4X400C (808 nm, 4x400 mW continuous cluster Laser Probe) Ordering information For the ordering data of the Endolaser 120, standard accessories and optional accessories we refer to our website www.enraf-nonius.com. Page 10 of 46 EN109-1633750-40 IFU... -
Page 11: Installation
5 Installation Inspection In case any damage is noticed after unpacking the device, please immediately contact your local distributor. DO NOT USE the device! Good air circulation is essential to prevent internal heat build-up. Do not install the unit in a location near heat sources such as radiators or air ducts, and prevent exposure to direct sunlight. - Page 12 Failure to properly install the device could result in serious eye damage. The Endolaser 120 contains a Remote Interlock which is located on the Laser Probe Holder. It can be recognized by the Remote Interlock symbol: The Remote Interlock contains a DC jack at the back of the Laser Probe Holder, which can be connected with an external Remote Interlock system.
- Page 13 Reed / Proximity Switch Reed / Proximity Switch DC Jack Page 13 of 46 EN109-1633750-40 IFU...
-
Page 14: Intended Use And Intended User
6 Intended use and intended user Intended use The Endolaser 120 is a Low Level Laser Therapy (LLLT) unit. The treatment is based on a light source that generates light of a single wavelength. LLLT emits no heat, no sound, or vibration. The light energy absorbed into the patient’s tissue, triggers biological changes at a cellular level. -
Page 15: Indications
7 Indications The Endolaser 120 can be used for the below mentioned symptoms or medical conditions: Indications Dermal wounds (open wounds, chronic ulcers, pressure sores) • Arthritic conditions (Rheumatoid arthritis, osteoarthritis) • Acupuncture and (myofascial) trigger points • Soft-tissue injuries (muscle tears, bruising, hematoma) •... -
Page 16: Contra-Indications
8 Contra-indications The Endolaser 120 MUST NOT be used for the below mentioned symptoms or medical conditions. Contra-indications Low Level Laser Therapy should not be applied to: eyes • over the low back, abdomen or pelvic region during pregnancy or menstruation •... -
Page 17: Precautionary Instructions
9 Precautionary instructions If the use of this device may have caused or contributed to an undesirable event such as death or serious injury to the user, the manufacturer AND the competent authority of the Member State MUST be notified immediately! The device is not intended for use in so-called "wet rooms"... - Page 18 Maintenance shall not be performed on the equipment when equipment is in use or connected to a patient. Medical electrical devices such as the Endolaser 120 are subject to special precautions with regard to electromagnetic compatibility (EMC) and must be installed and commissioned in accordance with the EMC advice given in the Instructions For Use.
- Page 19 Portable RF communications equipment (including peripherals such as antenna cables and external antennas) should be used no closer than 30 cm to any part of the Endolaser 120, including cables specified by the manufacturer. Otherwise degradation of the performance of this equipment could result.
-
Page 20: Operation
At the end of the self-test the device enters the Key control screen. • Key Code Control Endolaser 120 should be protected against unauthorized use, by entering user defined key code to unlock the device. The device is protected with a key code control. A user defined key code allows access to the graphical user interface. - Page 21 Navigation The Endolaser 120 is equipped with touch screen technology. Select a menu item by touching the button to navigate to the next screen. You can navigate back to the previous screen by touching the back button at the top of the screen.
- Page 22 System Settings Select System Settings in the Home Menu, to adjust various settings, check the software version or restore the device to factory defaults. Set Language 1) Select “System Settings” 2) Select “Language” 3) Select the preferred language with the buttons.
- Page 23 System Info 1) Select “System Info” In the next screen information about the unit can be found. The currently installed software version is shown. 2) Push BACK to return to the previous menu. Change Key Code Note: In case the user defined key code has been forgotten, use the recovery code 102030661 to reset to default...
- Page 24 Service Menu 1) Select “Service Menu” Restore Factory Defaults will The Service menu is intended delete any favorites stored on for Enraf-Nonius qualified the device and clear any service organizations and can system settings, returning the only be entered with an access device in its original factory code.
- Page 25 Clinical Protocols A list of common laser therapy treatments can be found under Clinical Protocols. These evidence- based protocols have been created by professional and expert operators after years of experience in the field. The pre-set clinical protocols are adjustable and rewritable. 1) Select “Clinical Protocols”...
- Page 26 6) Select on which channel the therapy should be executed: A or B. The channel names are linked to the connected probes. When only a single probe is connected this screen is skipped (defaults to this probe). The treatment screen shows all parameters at a glance.
- Page 27 The treatment is now ready to start. The LED on the probe turns green, indicating that the laser is ready. 8) Press the trigger on the Laser Probe to start treatment. The LED on the probe will turn orange, indicating that the laser is active.
- Page 28 Manual Operation With Manual Operation mode, personal parameter settings can be defined for the Laser Probe. Manual Operation has two selectable operation modes: Points (cm ) or milliwatt. 1) Selecting Manual Operation in the Home screen will bring up the channel selection screen.
- Page 29 Manual Operation: Points (cm The treatment screen shows all parameters at a glance. 4a) Set the desired parameters by pressing: Points (cm • Joule per point/cm • Output power • (mW) The treatment time will be automatically set depending on the other parameter settings.
- Page 30 Manual Operation: milliwatt Selecting manual mode milliwatt will bring you to this treatment screen. The treatment screen shows all parameters at a glance. 4b) Set the desired by pressing: Treatment time • Output power (mW) • The total dosage is automatically set depending on the other parameter settings.
- Page 31 Manual Operation: Starting and Stopping Treatment The treatment is now ready to start. The LED on the probe turns green, indicating that the laser is ready. 6) Pressing the trigger on the probe will start treatment. The LED on the probe will turn orange, indicating that the laser is active.
- Page 32 1) Press the store button, via the buttons. favorite. to save the program settings. 20 store locations are available 5) Push OK to save the favorite. for the Endolaser 120. 3) Push OK to confirm. Page 32 of 46 EN109-1633750-40 IFU...
- Page 33 Loading and Deleting Favorites 1) Select “Favorites” in the 2) To load a program select a 3) To delete a Favorite press Home menu. Favorite via the buttons the delete button (L) and select the Favorite to be removed via The parameter screen will the ...
-
Page 34: Application Information
Do not look at the radius issued by the handpiece or the direct return which is reflected during treatment. The Endolaser 120 is a near-infrared (NIR) diode laser band generator, designed and produced according to state-of-the-art safety standards and is classified as Class 3B laser equipment. - Page 35 Laser aperture The laser aperture is located at the head of the Laser Probe. The laser aperture symbol engraved on the Laser Probe indicates the direction of the laser beam. Target Light All Laser Probes have a target light. When treating a patient without probe-skin contact, the red target light helps the therapist to focus on the area to treat.
- Page 36 Protocol for the safe application of Low Level Laser Therapy Check for contraindications • (Consider the risks = relative CI’s) • Position and instruct patient • Ensure comfortable body positioning, inform the patient that he / she may feel nothing during treatment Prepare treatment area •...
- Page 37 Apply treatment. • Ensure adequate monitoring Conduct post-treatment procedures. • Inspect the exposed treatment area, and record any adverse reaction. Clean and disinfect the applicator faceplate (if contact) to prevent cross-contamination between patients. Ensure optimal device function. Ensure post-treatment equipment maintenance. •...
-
Page 38: Maintenance And Troubleshooting
12 Maintenance and troubleshooting Cleaning and Disinfection Before performing any user maintenance, switch off the device and disconnect the plug from the Mains supply. Do not spray the cleaning agent directly on the glass panel. Do not use cleaning agents that contain strong alkalis, lye, acid, detergents with fluoride or detergents with ammonia. - Page 39 Laser Probe Error Laser Probe must be connected to the Laser Probe holder. Do not connect the Laser Probe directly to the Endolaser 120. Remote Interlock or Emergency stop activated Restart the device by switching the power off and on. Check Remote interlock connections if problem persists.
- Page 40 Maintenance shall not be performed on the equipment when equipment is in use or connected to a patient. It is mandatory to have the Endolaser 120 checked yearly by authorized personnel of Enraf-Nonius or by its authorized distributor. It is also recommended that a service history record is maintained. In some countries, this is even obligatory.
-
Page 41: Specifications
13 Specifications Technical data Electrical info Mains voltage 100 - 240 Volt Frequency 50/60 Hz Max. power output 20 VA Dimensions Main device (length x width x height) 22 x 16 x 14 cm Weight unit 1.6 kilogram Technical specifications Laser Probe 100 mW Pulsed (LP100P) Max. - Page 42 Treatment time 0:00 – 5:00 / 0:05, 5:00 – 10:00 / 0:30, 10:00 – 30:00 / 1:00 Beam divergence 489 x 140 mrad Pulse duration Continuous Maximum laser output 100 mW ± 20% Nominal ocular hazard distance Laser Protective Goggles Optical density (808 - 840 nm) Optical density (840 - 950 nm) CE rating (808 –...
- Page 43 Portable RF communications equipment (including peripherals such as antenna cables and external antennas) should be used no closer than 30 cm to any part of the Endolaser 120, including cables specified by the manufacturer. Otherwise degradation of the performance of this equipment could result.
-
Page 44: Contact
14 Contact For assistance, please visit our website http://www.enraf-nonius.com The latest version (in electronic or printed format) of the Instructions for Use can be obtained free of charge from our website www.enraf-nonius.com or by contacting distributor or by calling the telephone number: +31-(0)10-2030600. - Page 45 Page 45 of 46 EN109-1633750-40 IFU...
- Page 46 Copyright: Enraf-Nonius B.V. Vareseweg 127 | 3047 AT | Rotterdam | The Netherlands Tel: +31 (0)10-20 30 600 | info@enraf-nonius.nl EN109-1433750-40...
Need help?
Do you have a question about the Endolaser 120 and is the answer not in the manual?
Questions and answers