geo-FENNEL Selection Pro Series User Manual
Hide thumbs
Also See for Selection Pro Series:
- User manual (16 pages) ,
- Instruction manual (19 pages) ,
- User manual (28 pages)

Related Manuals for geo-FENNEL Selection Pro Series


Summary of Contents for geo-FENNEL Selection Pro Series
- Page 1 DE | EN | FR FLG 66-Xtreme GREEN SP BEDIENUNGSANLEITUNG USER MANUAL MODE D‘EMPLOI www.geo-fennel.com...
-
Page 2: Table Of Contents
Sehr geehrter Kunde, vielen Dank für das Vertrauen, welches Sie uns beim Erwerb Ihres neuen geo-FENNEL-Gerätes der „Selection Pro“-Reihe entgegengebracht haben. Dieses hochwertige Qualitätsprodukt wurde mit größter Sorgfalt produziert und quali- tätsgeprüft. Im Vergleich zur bisher anerkannten guten Qualität unserer Produkte zeichnet sich die „Selection Pro“-Reihe u.a. -
Page 3: Lieferumfang
Technische Daten Selbstnivellierbereich ± 2° Nivelliergenauigkeit ± 2 mm / 10 m Arbeitsbereich 40 m* (Radius) Stromversorgung Li-Ion Alkaline-Batterien (alternativ) Betriebsdauer (alle Linien geschaltet) 16 Stunden (Li-Ion) Staub- /Wasserschutz (Schutzklasse) IP 65 Laserklasse Temperaturbereich 0°C bis +40°C Gewicht (Gerät mit Batterien) 1,4 kg LIEFERUMFANG •... -
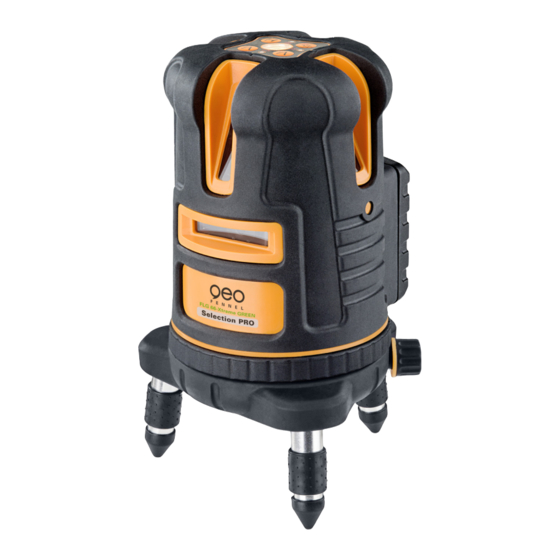
Page 4: Bedienelemente
BEDIENELEMENTE Dosenlibelle Bedienfeld AN-/AUS-Schalter und Transportsicherung Laseraustrittsfenster Seitenfeintrieb Batteriefach 5/8“-Anschluss für Stativ justierbare Füße... -
Page 5: Bedienfeldc
BEDIENFELD AN/AUS-LED Gerät AN/AUS vertikale Laserlinie V1 AN/AUS vertikale Laserlinie V2 AN/AUS horizontale Laserlinie H Manuell-LED AN/AUS Manuell-Funktion... -
Page 6: Stromversorgung
STROMVERSORGUNG Der Laser kann mit Li-Ion-Akku und alternativ mit handelsüblichen 4 x AA Alkaline- batterien betrieben werden. LI-ION-AKKU Der Laser ist mit einem wiederaufladbaren Li-Ion-Akkupack ausgestattet. Akku- pack in das Gerät einsetzen und mit Schraube des Batteriefachs verschließen. 4 X AA ALKALINE-BATTERIEN Der Laser kann alternativ mit Alkaline-Batterien betrieben werden. -
Page 7: Gerät Aufstellene
GERÄT AUFSTELLEN 1. Auf Stativ: Gerät mit der 5/8“-Stativanzugsschraube eines handelsüblichen Baustativs verbinden. 2. Auf dem Fußboden: Mit Bodenstativ (fest mit dem Gerät verbunden) aufstel- len. Gerät mit Hilfe der Dosenlibelle im Bedienfeld immer möglichst waagerecht auf- stellen, damit die Selbstnivellierung des Gerätes einwandfrei arbeitet. Feinjustierung durch justierbare Stativbeine vornehmen. - Page 8 HÖHENVERSTELLBARE FÜSSE Gegebenenfalls Dosenlibelle des Bedienfeldes mit Hilfe der 3 höhenverstellbaren Füße des Gerätefußes einspielen, damit die maximale Genauigkeit erreicht wird. FOLGENDE LASERLINIEN KÖNNEN GESCHALTET WERDEN...
-
Page 9: Gerät Einschaltenf
GERÄT EINSCHALTEN AN-/AUS-Schalter in Position „ON“ bringen. Das Gerät ist nun betriebsbereit (AN/ AUS-LED leuchtet). Steht das Gerät zu schräg (außerhalb des Selbstnivellierbe- reiches), ertönt ein akustisches Warnsignal. Eingeschaltete Laserlinien blinken als zusätzliche Warnung. Zum Ausschalten AN-/AUS-Schalter wieder in Position „OFF“ stellen. Das Gerät ist nun ausgeschaltet, und der Kompensator wird blockiert, um Beschädigungen während des Transportes zu vermeiden. -
Page 10: Sicherheitshinweise
SICHERHEITSHINWEISE PRÜFUNG DER NIVELLIERGENAUIGKEIT Gerät in der Mitte zwischen zwei Wänden aufstellen, die ungefähr 5 m voneinander entfernt sind. Laserkreuz auf Wand markieren. Gerät um 180° drehen und Laserkreuz markieren. Gerät etwa 0,6 m von Wand A aufstellen und Markierungen, wie vorstehend beschrieben, wiederho- len. - Page 11 CE-KONFORMITÄT Das Gerät hat das CE-Zeichen gemäß den Normen EN 61010-1:2001 + corr- 1+2, IEC 60825-1:2014. WARN- UND SICHERHEITSHINWEISE • Richten Sie sich nach den Anweisungen der Bedienungsanleitung. • Anleitung vor Benutzung des Gerätes lesen. • Blicken Sie niemals in den Laserstrahl, auch nicht mit optischen Instrumenten. Es besteht die Gefahr von Augenschäden.
- Page 12 GARANTIE Die Garantiezeit beträgt zwei (2) Jahre, beginnend mit dem Verkaufsdatum. Die Garantie erstreckt sich nur auf Mängel wie Material-oder Herstellungsfehler, sowie die Nichterfüllung zugesicherter Eigenschaften. Ein Garantieanspruch besteht nur bei bestimmungsgemäßer Verwendung. Mecha- nischer Verschleiß und äußerliche Zerstörung durch Gewaltanwendung und Sturz unterliegen nicht der Garantie.
- Page 13 NOTIZEN...
- Page 14 Dear customer, Thank you for your confidence having purchased a geo-FENNEL instrument of „Selection Pro“ series. This high-quality product was produced and tested with due prudence. Among others „Selection Pro“ is defined by even clearer visible lines which you are originally used to from our standard range of instruments.
-
Page 15: Supplied With
Technical Specifications Self-levelling range ± 2° Levelling accuracy ± 2 mm / 10 m Working range 40 m* (radius) Power supply (all lines illuminated) Li-Ion Alkaline batteries (altern.) Operating time 16 hours (Li-Ion) Dust / water protection IP 65 Laser class Temperature range 0°C to +40°C Weight (instrument with batteries) -
Page 16: Operational Elements
OPERATIONAL ELEMENTS Circular bubble Keypad ON/OFF knob / transport lock Laser emitting windows Fine adjustment screw Battery compartment 5/8“ thread for tripod Adjustable support leg... -
Page 17: Keypadc
KEYPAD ON/OFF LED instrument ON/OFF vertical laser line V1 ON/OFF vertical laser line V2 ON/OFF horizontal laser line H MANUAL LED MANUAL function... -
Page 18: Power Supply
POWER SUPPLY Both the standard Li-Ion battery or 4 x AA Alkaline batteries can be used. LI-ION BATTERY PACK FLG 66-Xtreme GREEN SP comes with Li-Ion rechargeable battery pack. Mount the rechargeable battery box and close the battery compartment with the battery box screw. -
Page 19: Set Up The Instrumente
SET UP THE INSTRUMENT 1. On a tripod: Connect the laser the to 5/8“ retaining bolt of builder‘s tripod. 2. On the floor: Set up the laser on the floor tripod. Set up the instrument as upright as possible by means of the circular vial of the keypad to allow the self-levelling system to function within the range. - Page 20 HEIGHT ADJUSTABLE SUPPORT LEGS If necessary centre the circular bubble of the keypad by means of height adjustable support legs in order to reach maximum accuracy. FOLLOWING LASER LINES CAN BE PROJECTED:...
-
Page 21: Power On The Instrumentf
POWER ON THE INSTRUMENT Set ON/OFF knob to position „ON“ . The instrument is now ready for use (ON/OFF LED is illuminated). An audible and optical (blinking lines) alarm indicates when the instrument was set up outside of the compensator range. Set up the instru- ment on a more even surface. -
Page 22: Safety Notes
SAFETY NOTES ACCURACY CHECK Set up instrument in the middle of two walls which are about 5 m apart. Mark visible laser cross on one wall. Turn unit to opposite wall and mark laser cross. Repeat measurements with distance of about 0,6 m to one wall and about 4,4 m to second wall. Deviation between two measurements taken from the centre and two measurements taken at 0,6 m and 4,4 m must not exceed 3 mm. - Page 23 CE-CONFORMITY Instrument has CE-mark according to EN 61010-1:2001 + corr. 1+2, IEC 60825-1:2014. SAFETY INSTRUCTIONS • Follow up instructions given in user manual. • Do not stare into beam. Laser beam can lead to eye injury. A direct look into the beam (even from greater distance) can cause damage to your eyes.
- Page 24 WARRANTY This product is warranted by the manufacturer to the original purchaser to be free from defects in material and workmanship under normal use for a period of two (2) years from the date of purchase. During the warranty period, and upon proof of purchase, the product will be repaired or replaced (with the same or similar model at manufacturers option), without charge for either parts or labour.
- Page 25 NOTES...
- Page 26 Cher client, Nous tenons à vous remercier pour la confiance que vous nous avez témoignée, par l‘acquisition de votre nouvel instrument geo-FENNEL de la série „Selection PRO“ . Ce produit de qualité haut de gamme a été fabriqué et contrôlé...
-
Page 27: Inclus Dans Le Coffret
Caractéristiques techniques Plage d‘auto nivellement ± 2° Précision ± 2 mm / 10 m Portée 40 m* (rayon) Alimentation Li-Ion Piles alcalines (alternat.) Autonomie du laser (toutes les lignes allumées) 16 heures (Li-Ion) Étanchéité IP 65 Classe du laser Plage de température 0°C à... -
Page 28: Description
DESCRIPTION Nivelle circulaire Clavier Bouton ON/OFF / verouillage pour transport Vitre protection du laser Molette de reglage fin Compartiment piles Filetage 5/8“ Pieds adjustables... -
Page 29: Clavier Du Laser
CLAVIER DU LASER Diode ON/OFF du laser Bouton ON/OFF de la verticale V1 Bouton ON/OFF de la verticale V2 Bouton ON/OFF de l‘horizontale H Diode du mode MANUEL Mode MANUEL... -
Page 30: Batterie Et Chargeur
BATTERIE ET CHARGEUR Le laser fonctionne aussi bien sur batterie que sur piles. PACK ACCUS LI ION Le FL 66-Xtreme GREEN SP est livré avec des battéries rechargeables Li Ion. Placez le pack accu au dos du laser, puis verrouillez le à l‘aide la vis. 4 X AA PILES ALCALINE Le FLG 66-Xtreme GREEN SP fonctionne également avec des piles alcalines. -
Page 31: Installation Du Lasere
INSTALLATION DU LASER 1. Sur un trépied: Vissez le laser sur la pompe de filetage 5/8“ du trépied. 2. Sur le sol: Installez le laser sur le mini trépied fourni de serie. Installez le laser le plus droit possible en centrant la vielle dans son cercle pour permettre au laser de fonctionner en etant dans sa plage de compensation. - Page 32 PIEDS REGLABLES Pour centrer la nivelle dans son cercle, vous pouvez utiliser les pieds réglables pour bénéficier d‘une grande précision de réglage. TOUTES LES LIGNES CI DESSOUS PEUVENT ÊTRE PROJETER...
-
Page 33: Allumer L'appareilf
ALLUMER L‘APPAREIL Mettre le bouton en position ON. L ‘instrument est maintenant prêt à être utilisé (la diode ON/OFF doit être allumée). Un signal sonore et lumineux (les lignes clignotent) indique si l‘instrument est en dehors de sa plage de compensation. Si c‘est le cas, placez l‘instrument sur une surface plus plane. -
Page 34: Notices De Securité
NOTICES DE SECURITÉ CONTROLLER LA PRÉCISION Poser l‘appareil au milieu de deux murs d‘une distance d‘à peu près 5m. Faire une marque visible sur le mur à l‘endroit où la croix laser est projetée. Tournez l‘appareil à 180° pourvoir si les croix sont bien alignées sur les marques. - Page 35 CONFORMITE CE L ‘instrument porte le label CE conformément aux normes EN 61010-1:2001 + corr. 1 + 2, IEC 60825- 1:2014. INDICATIONS D‘AVERTISSEMENT ET DE SECURITE • Prière de respecter les instructions fournies dans le mode d‘emploi du niveau. • Lire ces instructions avant d‘utiliser l‘instrument.
- Page 36 GARANTIE La durée de garantie est de deux (2) ans à partir de la date d‘achat. Cette garantie ne couvre que les défauts tels que le matériel défectueux ou les anomalies de fabrication, ainsi que le manque des propriétés prévues. Le droit à la garantie n‘est valabel que si l‘utilisation du niveau a été conforme aux préscriptions.
- Page 37 ANNOTATIONS...
- Page 38 ZUBEHÖR / ACCESSORIES / ACCESSOIRES FS 10 FS 30-L ARTIKEL-NR. / REFENCE NO. / RÉFÉRENCE 302000 ARTIKEL-NR. / REFENCE NO. / RÉFÉRENCE 156 Kurbelstativ / elevating tripod / trépied à colonne Kurbelstativ / elevating tripod / trépied à colonne drehbarer Stativkopf / rotating head / Tête de trépied drehbarer Stativkopf / rotating head / Tête de trépied rotative rotative...
- Page 39 Einteilung / graduation / graduation: cm/inch Adapter / adapter / filetage: 5/8“ & 1/4“ für alle geo-FENNEL Laser / for all geo-FENNEL laser Max. Länge / maximal length / longueur max.: 3,40 m / pour tous les lasers geo-FENNEL...
- Page 40 GmbH Technische Änderungen vorbehalten. All instruments subject to technical changes. Kupferstraße 6 Sous réserve de modifications techniques. D-34225 Baunatal Tel. +49 561 / 49 21 45 +49 561 / 49 72 34 12/2015 info@geo-fennel.de Precision by tradition. www.geo-fennel.de...
Need help?
Do you have a question about the Selection Pro Series and is the answer not in the manual?
Questions and answers