Table of Contents
Advertisement
Quick Links
PFM1 Series
PAFC-100 Converter &
PFD1 Family of Detectors
and Operation Manual
Contact Information:
Parker Hannifin Corporation
Veriflo Division
Chemical Delivery Products
7075 East Southpoint Road
Tucson, Arizona 85756
phone 520 574 2600
fax 520 574 2700
www.parker.com/veriflo
Mobile App: m.parker.com/veriflo
Veriflo
Advertisement
Table of Contents

Related Manuals for Parker PFM1 Series


Summary of Contents for Parker PFM1 Series
-
Page 1: Contact Information
PFM1 Series PAFC-100 Converter & PFD1 Family of Detectors Installation and Operation Manual Contact Information: Parker Hannifin Corporation Veriflo Division Chemical Delivery Products 7075 East Southpoint Road Tucson, Arizona 85756 phone 520 574 2600 fax 520 574 2700 www.parker.com/veriflo Mobile App: m.parker.com/veriflo... -
Page 2: Table Of Contents
WARNING: Indicates that improper use or operation may result in serious injury. CAUTION: Indicates that improper use or operation may result in injury or property damage. NOTE: Indicates information and procedures beneficial to proper operation. Safety Guide and Installation and Operating Instructions available at www.parker.com/veriflo... -
Page 3: Introduction
Introduction This manual is designed to provide guidance to install and operate the PFM1 Ultrasonic Flowmeter and Converter. The PFM1 system detailed in this manual consists of a PAFC-100 Converter and the PFD1 family of Detectors. General Description PFM1 is a measurement device designed to accurately measure liquid flow using ultrasonic waves. Standard Specifications Detector Specifications Item... - Page 4 Standard Specifications Convertor Specifications Item Specifications Frequency pulse output or FAULT output is selectable • Frequency pulse output Open collector Max. Load rating: 30V DC, 10mA or less P-OUT (Pulse Output) Pulse rate: 0 to 1000Hz (Full scale) • FAULT output (Outputted at converter or detector error) Open collector: NO or NC is selectable Output...
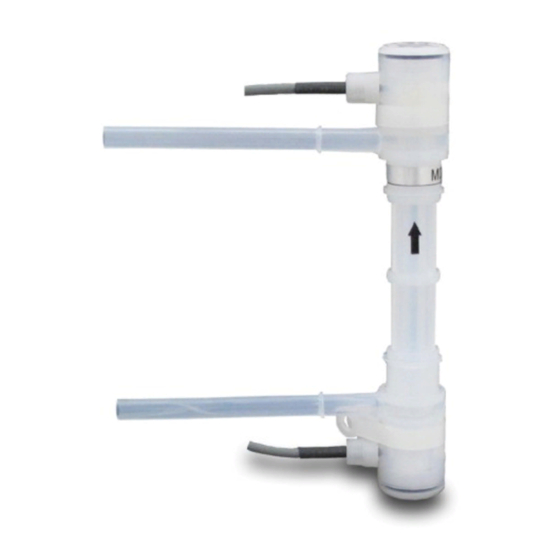
- Page 5 Standard Specifications Convertor HOUSING LOCK ARM TERMINAL BLOCK 35.4 for DIN rail mounting Coaxial Polarity Contents Cable Inlet Input signal from detector Outlet Terminal Terminal Description Description Spec. & Name Spec. & Name Alarm output 2 RS485(+) RS485 Communication (+) Alarm output 1 P.OUT(+) Pulse output (+)
-
Page 6: Installation
Installation Requirements for Installation Site of the Flow Detector: • Indoor use only • Temperature range 0 - 60°C (32 - 140°F) • Do not use in direct sunlight • Install unit in an area free of electromagnetic interference. Isolate power to unit from circuits containing devices that draw large current or create line noise. • Keep unit free from water splashes and corrosive gases • The location should have ease of access for maintenance Mounting of Flow Detector Use the following guidelines for installation of the flow detector: • Flow detector can be installed at any angle - vertical, horizontal or inclined pipe. -
Page 7: Cable
Installation Requirements for Installation Site of the Signal Converter: • Temperature range 0 - 50°C (32 - 122°F) • Do not use in direct sunlight • Humidity: 95% R.H. or less non-condensing • Install unit in an area free of electromagnetic interference. Isolate power to unit from circuits containing devices that draw large current or create line noise. • Converter should not come in contact with fluids Mounting and Removal: Step 1 Connect flow detector coaxial cables with BNC connectors to converter. Step 2 Confirm that the converter body and the terminal-block plug socket are firmly fixed with the lock arm of the main body. -
Page 8: Rs485
Installation Requirements for Installation Site of the Signal Converter: Cont. Wiring of Converter terminal block • Use the correct DIN rail type terminal block shown below. • Terminals connections for DIN type • Pin out for connections for PAFC-100 DIN type terminals Connection Connection (+): RS485 (+): P-OUT COM: (For AL1/AL2) (+): A-OUT FG: Grounding terminals (-): RS-485 Power Supply: 0V... -
Page 9: Operation
Operation After the proper wiring and installation of this device is completed you will be able to apply power and acquire a flow rate signal. Preparation for Operation • Check items before power-on. When installation and wiring are completed, be sure to check the following points before power on. Wiring: Step 1 The power supply and the output terminals are properly connected. Step 2 Check the grounding. -
Page 10: Parameter Setting
Parameter Setting Contents of Parameters Parameters Contents Description of Setting Detector size Connection size Size of detector connection (type) Inherent constant of each detector (Deviation correction K Factor K Factor factor). Flow rate unit Flow rate unit Unit of flow rate at full scale. Full scale Full scale Full scale flow rate value... -
Page 11: Out
Parameter Setting Setting Examples PAFC-100 PARAMETER SETTING DATA Date 2010/*/* MFG. No. DEVICE SETTING F08-XXXXX-XX TAG. No. FLUID Mode FULL SCALE FLOW Baud Rate 57.6 kbps 300mL/min RANGE Parity bit Even SER. No.(DETECTOR) 0406XXXXXX Stop bit SER. No.(CONVERTER) 06XXXXXXXX SETTING PARAMETER FACTORY SETTING SETTING PARAMETER FACTORY SETTING... -
Page 12: Communication
Communication You can monitor flow rate with the PAFC-100 through the communication protocol. You may also access and define the parameters using the communication protocol. Refer to the following sections for details. Mode and Byte Composition COMMUNICATION PROTOCOL IS BY RS485/MODBUS Item Specification Transmission code... - Page 13 Communication PARITY AND STOP BIT Address switch Contents Even number (Stop bit 1) Odd number (Stop bit 1) None (Stop bit 2) None (Stop bit 1) Other settings not defined SETTING OF SILENT INTERVAL SIT Address switch Contents 0 ms 5 ms 10 ms 20 ms...
-
Page 14: Daily Checks
Communication Checking Methods after Setting If Address SW is set to an already selected or used number, three LED lamps will light up. This function is effective only for address switch positions in the 50s, 60s, 70s and 80s. The flow measurement signal is not accessible during the setting and checking of communication parameters. -
Page 15: Troubleshooting
Troubleshooting If the flowmeter is not functioning properly the primary causes are related to: wiring, installation, measuring fluid, and the meter itself. The following section gives the user a chance to diagnose and correct any issues contributing to the malfunction. Possible causes are listed below for each trouble phenomenon. LED Indication LED Indication Cause and Corrective Action... - Page 16 Troubleshooting A: If LED display is not correct. *1 ERROR LED turns off when the detector is not connected to the converter, and when it is not fully filled with liquid even when connected. *2 ERROR LED turns on when the detector is connected to converter and fully filled with liquid. START A Check power supply...
- Page 17 Troubleshooting B: When zero adjustment is not working properly. START B Power on Zero adjustment not working What status of AGG/ZERO LED? LED “Off” LED “On” Bubbles included in Detector comes off? liquid? Air bubbles adhered to the partition of the upper part of the sensor? Connect detector properly.
- Page 18 Troubleshooting C: When no signal is present while running the fluid. START C 4-20mA output Disconnect receiving instrument. Connect an ampere meter directly to the output terminals. Either: -Wiring broken Can you read current -Malfunctioning of output? receiving instrument -Non conformity of input and output Output circuit failure...
- Page 19 Troubleshooting Are BNC connectors Connect securely connected securely? Do foreign materials Remove the foreign adhere to detector? materials Check detector visually Contact Technical Support Specialist Is detector working? when causes are not determined Turn off mains and turn it on again after 10 second break.
- Page 20 Troubleshooting D: When the zero point is unstable. START D Arrange the pipe to be fully filled with the Measuring pipe fully liquid. Bottom to top flow direction is filled with liquid? preferable. Pay attention for top to bottom flow and horizontal piping. Stop leak or Valve leaking? change valve...
-
Page 21: Grounding
Troubleshooting E: When the output is unstable. START E Check causes of unstable zero indication and indication fluctuation Is zero-point stable? found during running flow. Follow the procedure at Category D for this. Arrange the pipe to be fully filled with the Is detector filled with liquid. - Page 22 Troubleshooting F: When the actual flow rate does not conform to the indication. START F Is 4-20mA output Is displayed flow rate Check output value by performing correct? correct? procedure at Category C. Is flow range Decrease flow rate within set? flow range Stop the liquid flow and...
- Page 23 Notes...
- Page 24 © 2009 Parker Hannifin Corporation LitPN: 25000285 Date of Issue 06/2013 Parker Hannifin Corporation Veriflo Division Chemical Delivery Products 7075 East Southpoint Road Tucson, Arizona 85756 phone 520 574 2600 Veriflo fax 520 574 2700 www.parker.com/veriflo...
Need help?
Do you have a question about the PFM1 Series and is the answer not in the manual?
Questions and answers