
Related Manuals for Parker SensoControl


Summary of Contents for Parker SensoControl
- Page 1 Parker Hannifin GmbH & Co. KG Tube Fittings Division Europe ® SensoControl Am Metallwerk 9, 33659 Bielefeld Phone +49-521-4048-0 +49-521-4048-4280 Operating Instruction ServiceJunior wireless Please read carefully before use!
-
Page 2: Table Of Contents
Contents 1 Introduction ........................1 Notes on safety/production selection ................1 Device versions and range of delivery ................. 1 Send and receive with wireless radio interface ............1 Scanning rate and memory principle................2 2 Commissioning ......................3 Replacing the batteries ....................3 3 Functions and keys....................4 Display Mode ....................... -
Page 3: Introduction
For repairs or calibration of the measurement instruments, please contact a Parker sales branch. 1.2 Device versions and range of delivery Device versions/range of delivery Basic setting to unit ‘bar’... -
Page 4: Scanning Rate And Memory Principle
1.4 Scanning rate and memory principle The ServiceJunior wireless is running with a fast scanning rate (10 ms) in order to capture all peaks. Based on all scanned values, the highest reading will be sorted and saved into the data memory. The user is able to set up two different memory functions: REC time (time based data recording) -
Page 5: Commissioning
2 Commissioning The ServiceJunior wireless is supplied with batteries fitted. The device is operational as soon as it is turned on. 2.1 Replacing the batteries Caution! Turn off the device before replacing the batteries. Open the battery compartment. Insert the new batteries as depicted. Ensure correct polarity of the batteries. -
Page 6: Functions And Keys
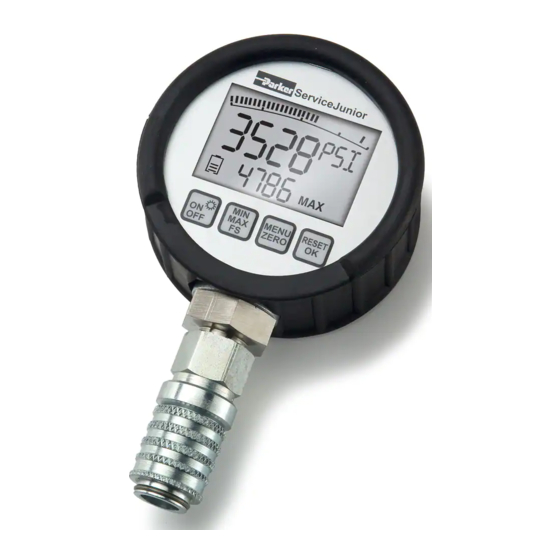
3 Functions and keys Display 4 ½ digit LCD with back light function Displays measurement values ServiceJunior and menu functions ‘Bar Graph’ with peak & hold function Actual value display (15 mm) MIN/MAX or Full Scale (FS) (8 mm) ... -
Page 7: Display Mode
3.1 Display Mode The actual pressure (ACT) is indicated in the display mode. The ACT measured value is displayed in the corresponding unit. The MIN, MAX or FS values is indicated in the lower part of the display. Display Description Graphic indication of the actual pressure. - Page 8 MENU ZERO MENU MENU MENU ZERO ZERO ZERO RESET RESET RESET RESET RESET RESET MENU MENU MENU ZERO ZERO ZERO RESET RESET RESET MENU MENU MENU ZERO ZERO ZERO RESET RESET RESET MENU MENU MENU ZERO ZERO ZERO RESET RESET RESET MENU MENU...
-
Page 9: Connection To The Hydraulics
4 Connection to the hydraulics The ServiceJunior wireless is available with male thread G1/4 (BSPP) or 7/16-20 UNF for the corresponding versions (bar/PSI). Please do not do the assembly while the ServiceJunior wireless is pressurized! Model SCJNP-xxx-01-RC Pressure port ¼ BSPP Adapter (M16x2) SCA-1/4-EMA-3 (hex size 24 = 600 bar) -
Page 10: Operating Servicejunior Wireless
5 Operating ServiceJunior wireless 5.1 Turning on (ON) Self test running Press MIN FS Indication of full-scale range (FS) Unit (bar) SCJNP-xxx-01-RC Auto Power Off function is active. Power Off activates automatically switch off after 5 min. This function can be altered in MENU. -
Page 11: Turn Off (Off)
Erases MIN/MAX values 5.7 OFL Display This indicates that the applied pressure is outside given full scale range. If the message will remain displayed, while the ServiceJunior wireless is pressure less, please consult a Parker Hannifin Sales Office. page 9 of 21... -
Page 12: Zero Point Correction (Zero)
5.8 Zero Point correction (ZERO) The zero point can be corrected manually should undesired deviations occur when no system pressure is being applied (atmospheric pressure). The zero point correction sets the current ACT value to zero. In order exclude erroneous measurements, ensure no system pressure is being applied when carrying out this function. -
Page 13: Automatic Switch Off
5.10 Automatic Switch Off MENU ZERO Press for 2 s According to the ServiceJunior wireless configuration two different setups are possible. Auto Power Off Continuous operations PO On PO OFF RESET RESET When is pressed, the When is pressed, the device Auto Power Off is enabled. -
Page 14: Changing The Unit
5.11 Changing the Unit MENU ZERO Press for 2 s MENU ZERO Press to skip MENU ZERO Press once (briefly) The next unit is indicated. RESET Confirm unit selection page 12 of 21... -
Page 15: Filter Settings
5.12 Filter Settings MENU ZERO Press 2 s MENU ZERO Press MENU ZERO Press MENU ZERO Press once (briefly) Filter selection is indicated. RESET Confirm filter configuration 5.13 Display device address In order to set up the devices manually in the PC Software „JuniorWin“ the device’s address will be need. -
Page 16: Data Memory Function
5.14 Data Memory Function Two different data memory functions can be used: rEC tiME rEC Auto. rEC tiME time based data recording rEC MAnu can be started manually by rEC tp operated by a given trigger point Depending on the recording time the memory interval will be processed automatically (5,000 Intervals). -
Page 17: Set Up Rec Time Function
5.15 Set up REC time Function RESET confirm MENU ZERO select 3/10/30/60 min RESET confirm rEC tp rEC MAnu or manually Select Start with Trigger point MENU ZERO RESET MENU ZERO Setup Start data recording 0…FS (Full Scale range) MENU ZERO select upwards select downwards... -
Page 18: Delete Data Memory
5.16 Delete Data Memory When the data memory is full it must be deleted before data recording can be started. RESET Delete data memory Deleting data memory content RESET Start data recording with selected trigger point (e.g. 103 bar) REC appears in the display and flashes RESET cancel data recording REC disappears in the display... -
Page 19: Setup Function Rec Auto
5.17 Setup Function REC AUTO RESET confirm MENU ZERO Select 0.1/1/10/60 s RESET confirm MENU ZERO select upwards select downwards Deleting data memory see chapter 5.13. RESET Start data recording with selected trigger point (e.g. 157.7 bar) REC appears in the display and flashes RESET cancel data recording REC disappears in the display... -
Page 20: Technical Data
6 Technical Data Digital pressure gauge with ACT - MIN and MAX Display bar graph display (33 segments) with peak and hold function 4 ½ digit LC display (15 mm) with back light illumination Battery powered with low power electronic system Version ... - Page 21 Digital Pressure Gauge ServiceJunior wireless Range Display Display Display Display Display mbar -1…16 -1,00...16,00 -14,5...200,0 -999...16000 -100...1600 0…100 0...100,0 0...1500 0...10000 0...10,00 0…400 0...400,0 0...5800 0...4000 (x10) 0...40,00 0…600 0...600,0 0...8700 0...6000 (x10) 0...60,00 0…1000 0...1000 0...15000 0...100,0 Range (bar) -1…16 0…100 0…400...
Need help?
Do you have a question about the SensoControl and is the answer not in the manual?
Questions and answers