Advertisement
Quick Links
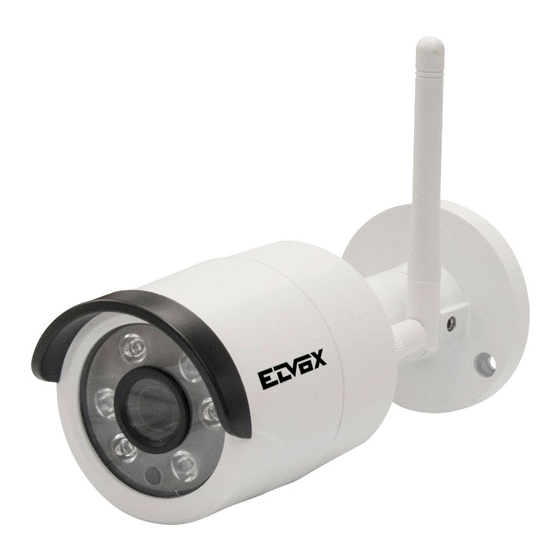
46237.KIT
'Telecamera Bullet IP Wi-Fi, dedicata al kit Wi-Fi 46KIT.436WF a colori Day & Night,
sensore CMOS 1/2,7", risoluzione 2 Mpx (1920x1080), obiettivo fuoco fisso 3,6 mm,
filtro IR meccanico, Compressione H.265 e H.264, alimentazione 12 Vdc, IR 20 m,
grado di protezione IP66. Dimensioni: Ø 64x154 mm. Peso 365 g.
Nota: la telecamera funziona solo in abbinamento al kit Wi-Fi 46KIT.436WF
Contenuto della confezione
Una volta ricevuto il dispositivo, controllare gli accessori indicati di seguito. Le illu-
strazioni sotto riportate hanno solo funzione di riferimento. Far riferimento all'appa-
recchiatura in dotazione.
Telecamera
Camera
Introduzione
Questa telecamera IP Wi-Fi è stata progettata per fornire soluzioni TVCC ad elevate
prestazioni. Utilizza le tecnologie più avanzate, di codifica e decodifica video ed è
conforme al protocollo Wi-Fi IEEE802.11b/g/n.
Connessioni
Di seguito sono riportate le principali connessioni della telecamera.
Cavo di rete / Network Cable
1
(solo per aggiungere una nuova telecamera all'NVR/ only to add a new camera to NVR)
2 Cavo alimentazione / Power Cable
0°~360°
Regole di installazione
L'installazione deve essere effettuata da personale qualificato con l'osservanza
delle disposizioni regolanti l'installazione del materiale elettrico in vigore nel paese
dove i prodotti sono installati.
Installazione
Prima di iniziare, assicurarsi che la parete o il soffitto o l'appoggio siano sufficiente-
mente solidi per sopportare tre volte il peso della telecamera. Installare e utilizzare
la telecamera in ambiente asciutto. La procedura di montaggio è la seguente:
1 - Praticare i fori per le viti e per il cavo sulla parete utilizzando la dima di foratura.
2 - Passare i cavi e collegare il cavo di alimentazione.
3 - Fissare la base di montaggio della telecamera alla parete con le viti.
4 - Allentare le viti di fissaggio per regolare l'angolo di visuale della telecamera.
5 - Le telecamere sono già configurate per connettersi via Wi-Fi all'NVR.
44 mm
120°
13 mm
120°
25 mm
Ø 63 mm
49401352A0 00 1812
Istruzioni per l'uso
Quick and start guide
2
2
1
3
Cavo di rete
Network cable
0°~360°
0°~90°
Ø 3 mm
Soffitto
Ø 25 mm
Ceiling
Viti di fissaggio
Install screws
IP Wi-Fi Day&Night colour Bullet camera, dedicated to the Wi-Fi kit 46KIT.436WF,
CMOS 1/2,7" sensor, 2 Mpx (1920x1080) resolution, 3,6 mm fixed lens, mechanical
IR filter H.265 and H.264 video compression, power supply 12 Vdc, IR 20 m, IP66
protection degree. Dimensions: Ø 64x154 mm. Weight 365 g.
Note: the camera works only in conjunctions with the kit Wi-Fi 46KIT.436WF
Package content
After you receive your device, please check the following accessories. The pictures
here are for reference only.
Dima di foratura
Drill template
Introduction
This camera is designed to provide high-performance CCTV solutions.
It uses the most advanced video encoding and decoding technologies and complies
with the protocol Wi-Fi IEEE 802.11b/g/n
Connections
Here below the main connections of the camera.
12 Vdc
AUDIO OUT
HDMI
VGA
Installation rules
Installation should be carried out by qualified staff in compliance with the current
regulations regarding the installation of electrical equipment in the country where
the products are installed.
Installation
Before start, please make sure that the wall or ceiling or desktop is strong enough
to withstand 3 times the weight of the camera. Please install and use the camera in
the dry environment. The mounting steps are as follows:
1 - Drill the holes for the screws and the cable on the wall, using the drill template.
2 - Pass the cables and connect the power cord.
3 - Fix the mounting base of the camera to the wall with the screws.
4 - Loosen the fixing screws to adjust the viewing angle of the camera.
5 - The cameras are already configured to connect to the NVR via Wi-Fi.
IT
EN
13 mm
13 mm
Viti
Screws & spiles
1
0°~360°
0°~360°
Viti regolabili
Adjustable
screws
0°~90°
0°~90°
44 mm
44 mm
36063 Marostica VI - Italy
120°
120°
Ø 3 mm
Ø 3 mm
0°~360°
0°~360°
Viale Vicenza, 14
www.vimar.com
Advertisement

Related Manuals for Vimar ELVOX TVCC 46237.KIT


Summary of Contents for Vimar ELVOX TVCC 46237.KIT
- Page 1 25 mm Viti di fissaggio 0°~90° 0°~90° Install screws Ø 63 mm 44 mm 44 mm Viale Vicenza, 14 36063 Marostica VI - Italy 120° www.vimar.com 49401352A0 00 1812 120° 13 mm 13 mm Ø 3 mm Ø 3 mm...
- Page 2 - At the end of pairing, the message OK will be displayed and the image will appe- della telecamera apparirà sullo schermo. Disconnettere quindi il cavo di rete. ar on the screen. Then, disconnect the network cable. Viale Vicenza, 14 36063 Marostica VI - Italy www.vimar.com 49401352A0 00 1812...
- Page 3 -20°C + 60°C con umidità/ with humidity 10% ~ 90% Operating temperature Altro Others Alimentazione 12 Vdc - 300 mA Power supply Consumi 3,6 W Consumption Dimensioni Ø 64x154 mm Dimensions Peso 365 g Weight Viale Vicenza, 14 36063 Marostica VI - Italy www.vimar.com 49401352A0 00 1812...
- Page 4 EN 301 489-17, EN 300 328, EN 62311, EN 60950-1 Standards Norme EN 301 489-17, EN 300 328, EN 62311, EN 60950-1 Vimar SpA dichiara che l’apparecchiatura radio è conforme alla direttiva 2014/53/UE. Vimar SpA declares that this radio device complies the 2014/53/UE Directive.
Need help?
Do you have a question about the ELVOX TVCC 46237.KIT and is the answer not in the manual?
Questions and answers