Table of Contents
Advertisement
Available languages
Available languages
Quick Links
Advertisement
Table of Contents

Subscribe to Our Youtube Channel
Related Manuals for SoundMax SM-CCR3064F


Summary of Contents for SoundMax SM-CCR3064F
- Page 1 SM-CCR3064F SM-CCR3064F 4 x 40W CLK/AMS/...
- Page 3 This device is intended for installation in a vehicle with onboard voltage 12 V. Designed to receive radio FM and playing MP3 from media USB and microSD (TF).
-
Page 4: Important Safeguards
Important safeguards • Read carefully through this manual to familiarize yourself with this high-quality sound system. • The beginning of operation is the moment of the unit installation. Before use the device in winter it is recommended to heat up the passenger compartment during 20 seconds or to the operation temperature. •... - Page 5 Accessories 1. Reсeiver 1 рс 2. 12-pin connector cable 1 рс 3. Mounting parts: 2 pсs Release key 1 рс Mounting сollar 1 рс 4. Instruction manual...
- Page 6 Installation/Connection General notes • Choose the mounting location where the unit will not interfere with the normal driving function of the driver. • Before finally installing the unit, connect the wiring and make sure that the unit works properly. • Consult with your nearest dealer if installation requires the drilling of holes or other modifications of the vehicle.
- Page 7 , for this you need to break the plastic plugs.
- Page 8 Antenna Terminal 1-FL+ 2-FL- 3-RL+ 4-RL- 8-FR- 7-FR+ 6-GND 5-B+ 9-RR+ 12-ACC 11-ANT 10-RR- The negative electrode of the speaker mustn't be grounded, or else it may burn the player! Attention, the 12-pin connector cable must be carefully matched with description on RL, connection of any wrong cables (WHITE-BLACK/ GREEN-BLACK/ PURPLE-BLACK/ GRAY-BLACK) with the Black cable (Ground) can be the reason of a malfunction of the built-in amplifier.
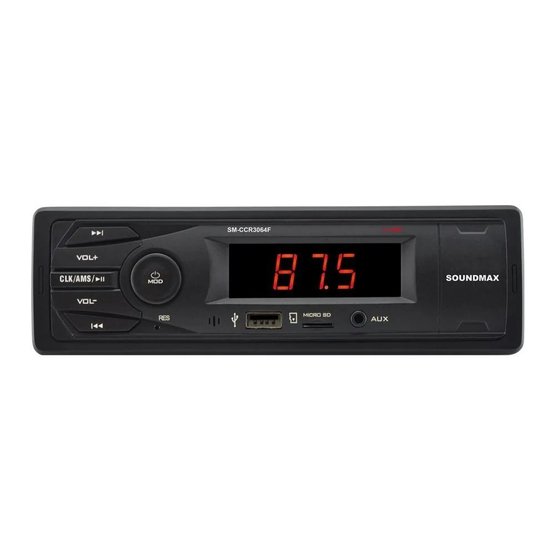
- Page 9 1. CLK/AMS/ button 2. VOL+ button button SM-CCR3064F 4 x 40W /MOD button 5. LCD display 6. Aux-in port CLK/AMS/ 7. Micro SD card slot 8. USB port 9. Reset button (hole) button 11. VOL- button...
- Page 10 Press and hold this button again to turn the unit off. Adjust the volume by pressing the VOL+ and VOL- buttons. CLK button button until the clock starts to blink, then press the VOL-/VOL+ buttons to set the current hour. Then press the CLK button again and use the VOL-/VOL+ buttons to set the current minutes.
- Page 11 AUX input AUX-in jack is intended fог connecting an external audio equipment to amplify the sound. If connection is made correctly, the audio signal from the external source will Ье transmitted through the acoustics of the head unit. This enaЫes to adjust the volume and quality of the sounding. Fог example, you сап connect an МРЗрlауег to listen to tracks using the саг...
-
Page 12: Radio Operations
Radio operations Manual/automatic tuning • In radio mode press the AMS button to automatically search and save available radio channels. After searching, the first preset channel will start to play automatically. • Press shortly button. The radio will automatically search for the next frequency with a strong and clear signal. -
Page 13: Usb/Micro Sd Operations
USB/micro SD operations Micro SD card slot Carefully insert the micro SD card into the card slot on the front panel. Unit starts playback automatically. To disconnect the memory card, press it until a click, and then carefully pull it out from the slot. USB port Carefully connect a USB driver to the USB port on the front panel. -
Page 14: Troubleshooting Guide
Troubleshooting guide Below is a table describing simple measures that can help you eliminate most problems likely to emerge when this unit is in use. If below measures do not help, turn to a service center or to the nearest dealer. Symptom Solution Cause... - Page 15 Working temperature range from -20 degree to +60 degree Frequency step 0,1 MHz Support formats Line-in (AUX) Mini Jack 3.5mm Power supply Supply voltage DC 12V...
- Page 16 Данное устройство предназначено для установки в транспортное средство с бортовым напряжением 12 В. Предназначено для приёма радио в FM-диапазоне и в воспроизведении файлов MP3 с носителей USB и microSD (TF). Б ЕЗОПАСНАЯ УТИЛИЗАЦИЯ................................28 АДРЕСА СЕРВИСНЫХ ЦЕНТРОВ..............................29 ГАРАНТИЙНЫЙ ТАЛОН ..................................31...
- Page 17 Mepbl npeAOCTOPO>l<HOCTM • T1J..1aTeJ1bHO 1-13y41-1Te HaCTOHIJ..lYIO l-1HCTPYKLll-1IO, 4T06b1 03HaKOMl-1TbC51 c ycTp0IIICTBOM. • Ha4aJlOM 3KcnnyaTaLll-11-1 YCTPOIIICTBa C41-1TaeTC51 MOMeHT ero ycraHOBKl-1 B aBTOM061-1Jlb. nepe,D, Ha4aJl0M l-1Cn0Jlb30BaHl-151 yCTpOIIICTBa B 31-1MHl-1111 nepl-10,[I peKOMeH,llyeTC51 nporpeTb CaJlOH aBTOM061-1Jl51 B Te4eH1-1e 20 Ml-1HYT 1-1n1-1 AO A0CT1-1>KeH1-1s:1 3KcnnyaTa1..-11-10HHOro P,1-1ana30Ha TeMnepaTypb1 ycrpo111cTBa. •...
-
Page 18: Комплект Поставки
Комплект поставки 1. Ресивер 1 шт 1 шт 2. Кабель с 12-pin коннектором 3. Детали для установки: 2 шт Ключ-съемник 1 шт Монтажный кожух 1 шт 4. Инструкция по эксплуатации... - Page 20 1. Убедитесь, что зажигание отключено, затем отсоедините провод от отрицательной (-) клеммы аккумулятора. 2. Вставьте оба ключа-съемника в прорези (предварительно выломав пластиковые заглушки) на правой и левой сторонах фронтальной части декоративной рамки устройства, затем, держась за ключи, вытяните устройство на себя из приборной панели.
- Page 21 1. Фронтальный левый динамик + Антенный вход 2. Фронтальный левый динамик - 3. Тыловой левый динамик + 4. Тыловой левый динамик - 5. Аккумулятор + 6. Аккумулятор - (корпус) 7. Фронтальный правый динамик + 8. Фронтальный правый динамик - 9. Тыловой правый динамик + 10.
- Page 22 1. Кнопка CLK/AMS/ 2. Кнопка VOL+ 3. Кнопка SM-CCR3064F 4 x 40W 4. Кнопка /MOD 5. Дисплей 6. Линейный вход AUX CLK/AMS/ 7. Разъем MicroSD 8. USB-порт 9. Кнопка (отверстие) RESET 10. Кнопка 11. Кнопка VOL-...
- Page 23 Нажмите и удерживайте эту кнопку, чтобы отключить устройство. Вы можете отрегулировать уровень громкости звука нажатием кнопок VOL- и VOL+. Нажмите и удерживайте кнопку CLK до мигания индикации часов, с помощью кнопок VOL- и VOL+ установите нужное количество часов, затем коротким нажатием на кнопку CLK перейдите к установке минут...
-
Page 25: Поиск Радиостанций
Поиск радиостанций • станций с наиболее сильным сигналом. По завершении поиска начнется проигрывание первой найденной станции. • Нажмите кнопку или Приемник автоматически настроится на ближайшую станцию с сильным сигналом вниз или вверх по диапазону. • Нажмите и удерживайте кнопку или ;... -
Page 26: Выбор Трека
Операции с USB/картами памяти micro SD Загрузка карт памяти micro SD Вставьте micro SD-карту в соответствующий слот, расположенный на передней панели. Начнется воспроизведение первого трека. Для отсоединения карты памяти нажмите на нее до щелчка, затем извлеките карту из слота. USB-порт Вставьте... - Page 28 Диапазон рабочих температур от -20 до +60 градусов Шаг 0,1 Мгц Поддерживаемые форматы Воспроизведение MP3 файлов с USB/TF (microSD) носителей Линейный вход (AUX) Мини Jack 3.5мм Питание Напряжение питания Постоянный ток 12 B +86 750-3189563 Уполномоченный представитель изготовителя: Изготовитель: Техно Электрик Лимитед ООО...
- Page 29 Хранение и транспортировка: Упакованные изделия допускается транспортировать всеми видами транспорта в условиях 5 ГОСТ 15150 при температуре не ниже минус 10 °С и при защите их от прямого воздействия атмосферных осадков и механических повреждений. Изделия следует хранить в условиях 1 по ГОСТ 15150 при отсутствии в воздухе кислотных, щелочных...
- Page 33 - Условия эксплуатации изделия не для бытовых нужд и/или круглосуточного использования.
-
Page 34: Гарантийный Талон
SOUNDMAX ГАРАНТИЙНЫЙ ТАЛОН Срок гарантии -12 месяцев Дата производства Серийный номер Печать продавца Модель Дата продажи Подпись продавца С условиями гарантийного обслуживания согласен, претензий по комплектности, внешнему виду и работоспособности не имею. Сведения о ремонте Подпись покупателя Подпись Дата приема...
Need help?
Do you have a question about the SM-CCR3064F and is the answer not in the manual?
Questions and answers