Table of Contents
Advertisement
Over 100 years cumulative experience
24 hour rush turnaround / technical support service
Established in 1993
The leading independent repairer of servo motors and drives in North America.
Scroll down to view your document!
For 24/7 repair services :
USA: 1 (888) 932 - 9183
Canada: 1 (905) 829 -2505
Emergency After hours: 1 (416) 624 0386
Servicing USA and Canada
Visit us on the web:
www.servo-repair.com
www.servorepair.ca
www.ferrocontrol.com
www.sandvikrepair.com
www.accuelectric.com
Advertisement
Table of Contents

Related Manuals for Baldor MintDrive


Summary of Contents for Baldor MintDrive
- Page 1 Over 100 years cumulative experience 24 hour rush turnaround / technical support service Established in 1993 The leading independent repairer of servo motors and drives in North America. Visit us on the web: www.servo-repair.com www.servorepair.ca www.ferrocontrol.com www.sandvikrepair.com www.accuelectric.com Scroll down to view your document! For 24/7 repair services : USA: 1 (888) 932 - 9183 Canada: 1 (905) 829 -2505...
- Page 2 Installation Installation Manual Manual MN1274 06/2001...
- Page 4 Microsoft Corporation. Limited Warranty For a period of two (2) years from the date of original purchase, Baldor will repair or replace without charge controls and accessories which our examination proves to be defective in material or workmanship. This warranty is valid if the unit has not been tampered with by unauthorized persons, misused, abused, or improperly installed and has been used in accordance with the instructions and/or ratings supplied.
- Page 5 Safety Notice Only qualified personnel should attempt the start-up procedure or troubleshoot this equipment. This equipment may be connected to other machines that have rotating parts or parts that are controlled by this equipment. Improper use can cause serious or fatal injury. Only qualified personnel should attempt to start-up, program or troubleshoot this equipment.
- Page 6 Do not connect AC power to the drive terminals U, V and W. Connecting AC power to these terminals may result in damage to the drive. CAUTION: Baldor does not recommend using “Grounded Leg Delta” transformer power leads that may create ground loops and degrade system performance. Instead, we recommend using a four wire Wye.
- Page 7 CAUTION: Ensure that resolver or encoder wires are properly connected. Incorrect installation may result in improper rotation or incorrect commutation. CAUTION: The threaded holes in the top and bottom of the enclosure are for cable clamps. Be sure to use a M4 bolt no longer than 12mm in length. Longer bolts might short circuit the electrical components inside the drive.
-
Page 8: Table Of Contents
..........MintDrive features . - Page 9 ..............4.1.1 Connecting the MintDrive to the PC .
- Page 10 Mint WorkBench ......... Outline .
- Page 11 ..........B.3.4 Connecting the PC, MintDrive and CAN peripheral .
- Page 12 CE Guidelines ......... . . Outline .
-
Page 14: Introduction
MintDrive will operate with a large number of brushless servo motors. For information on selecting Baldor servo motors, please see the sales catalog BR1202. This manual is intended to guide you through the installation of MintDrive, whether you are a novice in the field of motion control or an experienced engineer. -
Page 15: Receiving And Inspection
4. Inspect the MintDrive for external damage during shipment and report any damage to the carrier that delivered your MintDrive. 5. If MintDrive is to be stored for several weeks before use, be sure that it is stored in a location that conforms to the storage humidity and temperature specifications shown on page 83. -
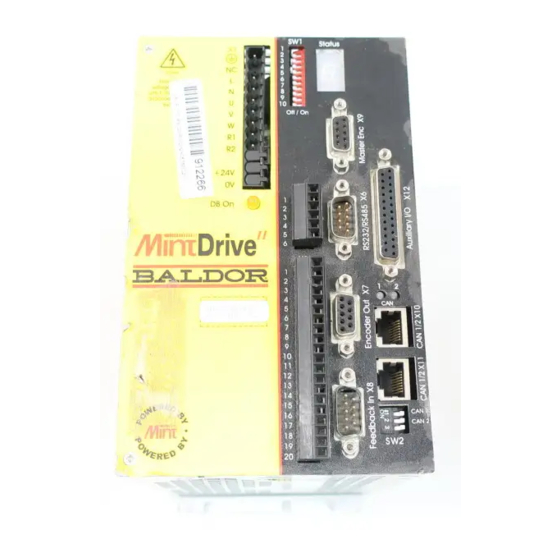
Page 16: Mintdrive Indicators
The bus is OFF (see page 94) No primary power to the MintDrive 1.3.3 Ready LED The front panel Ready LED indicates the general status of the MintDrive. Green The MintDrive is operating normally An error condition exists (see page 91) No primary power to the MintDrive 1.3.4... -
Page 17: Units And Abbreviations
Units and abbreviations The following units and abbreviations are used in this manual: ... . Volt (also VAC and VDC) ... . Watt . -
Page 18: Basic Installation
Outline You must read all the sections in Basic Installation. It is important that the correct steps are followed when installing the MintDrive. This section covers the mechanical and electrical installation of the MintDrive, including the following steps: H Location considerations... - Page 19 Motor power cables are also available without connectors, in which case the last two letters (HM in the example above) are not used. H A resolver 9-core cable, 15-core if the MintDrive is fitted with the encoder option. A description of a feedback cable catalog number is shown below, using the example number CBL030SF-ALM.
-
Page 20: Rs485 / Rs422 Systems
RS485 / RS422 communications. Appropriate converters are available from KK Systems Ltd (www.kksystems.com). Note: If this is the first time you are installing a MintDrive then it is strongly recommended that you use RS232 to get started and use RS485 later. This will avoid any potential problems involving the RS232-RS485 converter. -
Page 21: Mechanical Installation And Location Requirements
H There shall not be abnormal levels of nuclear radiation or X-rays. H The MintDrive must be secured by the slots in the flange, with the protective earth stud bonded to a safety earth by either a 25A conductor or a conductor of three times the peak current rating - whichever is the greater. -
Page 22: Dimensions And Mounting
2.2.1 Dimensions and mounting Ensure you have read and understood page 8. Mount the MintDrive on its rear side, the side opposite to the front panel. The MintDrive must be mounted upright to ensure adequate cooling (you can check this by ensuring that the Hazardous Voltages warning information is clearly readable to you). M5 bolts or screws should be used to mount the unit. -
Page 23: Power Connections
A power disconnect should be installed between the mains supply and the input of the MintDrive for a fail safe method to disconnect power. The MintDrive will remain in a powered condition until all input power is removed from the MintDrive and the internal bus voltage is depleted. -
Page 24: Grounding
Note: For CE compliance, a 3-phase mains filter must be connected between the mains supply and the MintDrive. The MintDrive and motor earths should be connected to the enclosure backplane. (The enclosure backplane should be connected to the earth at the mains source. -
Page 25: Input Power Conditioning
MintDrive. H If the feeder or branch circuit that provides power to the MintDrive has power factor correction capacitors that are switched on line and off line, the capacitors must not be switched while the drive is connected to the AC power line. - Page 26 Fuse Earth Connection Circuit Breaker MintDrive Circuit breaker and fuse not supplied. For CE Compliance, see Appendix C. Figure 5 - Circuit breaker and fuse, single phase, package size C Earth Fuse Connection Circuit Breaker MintDrive Circuit breaker and fuse not supplied.
-
Page 27: Wire Sizes
2.3.4 Wire sizes Input and output wire size is based on the use of copper conductor wire rated at 167°F (75°C). The following tables describe the wire size to be used for power connections and the ratings of the protection devices. Catalog Number Incoming Power Input... -
Page 28: Single Phase Connection To Package Size A Or B
Note: For single phase connection, the voltage ripple on the DC-bus is 25Vp-p for 5A (the peak current for a 2.5A MintDrive) and 50Vp-p for 10A (the peak current for a 5A MintDrive). This can limit the maximum speed of the motor. -
Page 29: Three Phase Connection To Package Size C
The threaded holes in the top and bottom of the enclosure are for cable clamps (provided). The holes are threaded for M4 bolts no longer than 0.47” (12mm) in length. Longer bolts may short circuit the electrical components inside the MintDrive. 2.3.8... -
Page 30: Dc Bus Power Connections From Package Size C
Vcc inputs The MintDrive 10A and 15A variants are available with a DC bus supply output for powering other drives that do not have their own internal mains power supplies. This power is available on the X1 connector pins Vcc+ and Vcc-. -
Page 31: 2.3.10 Power Supply Filters
This will ensure that the unit complies with the CE specifications for which it has been tested. If the MintDrive has the 24VDC input power supply option then a further filter will be necessary to comply with CE specifications. Schaffner filters are recommended, with part numbers shown below: Voltage 230VAC, 1φ... -
Page 32: Motor Connections
All cables must be shielded. The maximum allowable cable length is 82ft (25m). Note: For CE compliance the MintDrive and motor earth should be connected to the enclosure backplane. (The enclosure backplane should be connected to the earth at the mains source. -
Page 33: Motor Circuit Contactors
If required by local codes or for safety reasons, an M-Contactor (motor circuit contactor) may be installed to provide a physical disconnection of the motor windings from the MintDrive (see page 19). Opening the M-Contactor ensures that the MintDrive cannot drive the motor, which may be necessary during equipment maintenance or similar operations. -
Page 34: Regeneration Resistor (Dynamic Brake Resistor)
The regeneration resistor should be mounted near the top of an enclosure to maximize heat dissipation. When the motor regenerates, the yellow DB On LED on the front panel of the MintDrive will illuminate while the voltage is exceeding the safe limit. See section D.1.4 on page 139. -
Page 35: Feedback Connections
Feedback connections Two feedback options are available; a commutating encoder or a resolver, both using connector X2. Check with the catalog number (see page 2) to ensure you are wiring the correct feedback device. Resolver based MintDrives provide a simulated encoder output signal available on connector X3 for master/slave type applications. -
Page 36: Resolver Option
3 REF+ (not connected) 6 SIN- 7 COS- 8 REF- 9~10 (not connected) 11 External index (not connected) 13 Analog ground 14~15 (not connected) Baldor Motor Twisted pairs SIN+ SIN- COS+ COS- REF+ REF- (Common) AGND Connector backshell Figure 7 - Resolver cable connections... - Page 37 2.5.1.1 Resolver cable pin configuration The table and diagram below show the pin configuration for a typical Baldor Resolver Feedback cable, part number CBL030SF-ALM. Signal name Motor / cable Resolver cable wire color REF+ REF- Blue COS+ Green COS- Yellow...
-
Page 38: Encoder Option
2.5.2 Encoder option The encoder connections are made using the 15-pin D-type female connector X2. This provides the ABZ channels and Hall signals. Twisted pair cables must be used for the complementary signal pairs e.g. CHA+ and CHA-. The overall cable screen/shield must be connected to the metallic shell of the D-type connector. -
Page 39: Drive Enable
Drive enable To operate the MintDrive, the drive stage must be active and enabled. This requires an externally generated 24VDC supply to be connected between pins 1 and 12. This connection can be wired directly or through an intermediate switch; if a switch is used it should always be used to switch the signal to pin 1, with the signal to pin 12 being hard-wired. -
Page 40: Input / Output
Input / Output Outline This section describes the various digital and analog input and output capabilities of the MintDrive, together with descriptions of each of the associated connectors on the front panel. The following conventions will be used to refer to the inputs and outputs: . -
Page 41: Analog Input, Single Ended - X11
3.2.1 Analog Input, Single Ended - X11 Location Connector X11, pins 1 & 2 Name AIN2 Mint keyword ADC.2 Description Single ended input. Range: 0 - ±10VDC. Resolution: 9-bit with sign. Input impedance: >4kΩ. Sampling interval: 5ms. Note: There is a +15V reference voltage supplied on X11 pin 3 from a 1.96kΩ resistor. A linear command potentiometer of 5kΩ... -
Page 42: Analog Input, Differential - X11
12-bit with sign (<1V DC input) 9-bit with sign (>1V DC input) Common mode rejection: 40dB Input impedance: >5kΩ Sampling interval: 5ms Optional 4-20mA current mode (contact Baldor). A typical input circuit is shown below: +24VDC 1.5kΩ, 0.25W Input+ 1kΩ, 0.25W... -
Page 43: Analog Inputs, Differential - X5
3.2.3 Analog Inputs, Differential - X5 Location Connector X5 Pins 8 (+) and 21 (-) 9 (+) and 22 (-) Name AIN0 AIN1 Mint keyword ADC.0 ADC.1 Description Two independent differential inputs. Common mode voltage range: ±10VDC. Resolution: 12-bit with sign. Common mode rejection: 40dB Input impedance: >22kΩ... - Page 44 If an input is unused, then it is advisable to connect it to the AGND pin. Do not leave the input unconnected (floating). The analog inputs can be read in Mint using the keywords ADC.0 and ADC.1. Mint will return the value as a percentage where 0V=0%, -10V= -100% and +10V = 100%.
-
Page 45: Analog Outputs, Bipolar - X11
3.2.4 Analog Outputs, Bipolar - X11 Location Connector X11 Pins 6 Name AOUT2 AOUT3 Mint keyword AUXDAC.2 AUXDAC.3 Description Two independent assignable outputs. Output range: ±10VDC. Resolution: 8-bit with sign. Output current: 1mA maximum. Update interval: 2ms. Two programmable analog outputs that can be used to provide real time status of various control conditions. -
Page 46: Analog Outputs, Bipolar - X5
They are derived from a high-frequency PWM pulse train from the main processor, which is subsequently filtered. These signals are buffered by an operational amplifier in the MintDrive and are capable of sinking or sourcing up to ±4mA. The outputs are protected by fast Schottky diodes against excessively high transitional voltages of either polarity. -
Page 47: Digital I/O
Digital I/O The MintDrive provides: H 8 general purpose inputs on block connector X13 H 4 general purpose outputs on block connector X13 H 10 general purpose inputs on 25-pin connector X5 H 5 general purpose outputs on 25-pin connector X5... -
Page 48: Digital Inputs - X13
3.3.1 Digital Inputs - X13 Location Connector X13 Pin Name Mint keyword 1 Drive Enable 2 DIN10 IN.10 3 DIN11 IN.11 4 DIN12 IN.12 5 DIN13 IN.13 6 DIN14 IN.14 7 DIN15 IN.15 8 DIN16 IN.16 9 DIN17 IN.17 Description Eight general purpose optically isolated AC digital inputs (DIN10 to DIN17). - Page 49 Pin 12 (CREF) controls the sense of all the digital inputs (X13 pins 1 to 9) and should be permanently wired, dependent on the user requirements, as described below: Active high: connect +24VDC to pin1 and 0V to pin 12. The digital inputs will be active when a voltage of +24VDC (±20%) is applied to them and will sink a maximum of 20mA.
-
Page 50: Digital Inputs - X5
3.3.2 Digital Inputs - X5 Location Connector X5 Pin Name Mint keyword 1 DIN0 IN.0 2 DIN2 IN.2 3 DIN4 IN.4 4 DIN6 IN.6 5 DIN8 IN.8 14 DIN1 IN.1 15 DIN3 IN.3 16 DIN5 IN.5 17 DIN7 IN.7 18 DIN9 IN.9 Description Ten general purpose optically isolated AC digital inputs (DIN0 to DIN9). - Page 51 Fitted with a Schmitt Trigger device. 3.3.2.2 Breakout board Connector X5 can also be connected to an I/O supporting break-out board (giving screw-terminal type connections and local filtering). The Baldor catalog number for this item is OPT017-501. See page 48.
-
Page 52: Digital Outputs - X13
3.3.3 Digital Outputs - X13 Location Connector X13 Pin Name Mint keyword 13 DOUT5- OUT.5 14 DOUT5+ OUT.5 15 DOUT6- OUT.6 16 DOUT6+ OUT.6 17 DOUT7- OUT.7 18 DOUT7+ OUT.7 19 DOUT8- OUT.8 20 DOUT8+ OUT.8 Description Four general purpose optically isolated digital outputs (DOUT5 to DOUT8). -
Page 53: Digital Outputs - X5
3.3.4 Digital Outputs - X5 Location Connector X5 Pin Name Mint keyword 10 DOUT4 OUT.4 11 DOUT2 OUT.2 12 DOUT0 OUT.0 23 DOUT3 OUT.3 24 DOUT1 OUT.1 Description Five general purpose optically isolated digital outputs (DOUT0 to DOUT4). These general purpose optically isolated outputs can only be used to source current from the USR V+ rail (pin 25). -
Page 54: Other I/O
RS422 electrical specification. Shielded twisted pair cable is recommended. If a resolver is fitted to the MintDrive, the output resolution is 1024 ppr (pulses per revolution). This is equivalent to a 1024 line encoder, giving 4096 quadrature counts per rev. The simulated encoder also supports an index or marker pulse. -
Page 55: Master (Auxiliary) Encoder Input - X6
Description Optically isolated encoder input on a 9-pin female D-type connector The MintDrive provides an auxiliary (master or handwheel) encoder input which allows following of a master encoder. An interface for a three channel, incremental encoder (CHA, CHB, CHZ) is provided. - Page 56 Figure 22 - Auxiliary encoder circuit...
-
Page 57: Serial Port - X7
Description RS232 and RS485 / RS422 connections on a single 9-pin female D-type connector X7 is a 9-pin male D-type connector, for the single MintDrive serial port. The four-wire RS485 connections are also available on the this connector. See pages 45 and 46. -
Page 58: Using Rs232 Cable
RS485 / RS422 signals are also taken to the unused pins). The RS232 port is configured as a DTE (Data Terminal Equipment) unit so it is possible to operate the MintDrive with any DCE (Data Communications Equipment) or DTE equipment. Both the output and input circuitry are single ended and operate between ±12V. -
Page 59: Multidrop Using Rs485 / Rs422 Cable
The MintDrive at the furthest end of the network from the transmitter should have its RS485 DIP switch (located on the front panel of the MintDrive) set to the ’On’ position. This will connect a termination resistor, used to match the impedance of the load to the impedance of the transmission line (cable). -
Page 60: Connecting Baldor Hmi Operator Panels
Connecting Baldor HMI Operator Panels Baldor HMI Operator Panels use a 15-pin male D-type connector (marked PLC PORT), but the MintDrive connector X7 is a 9-pin D-type connector. If you do not require hardware handshaking then the following connections should be made:... -
Page 61: Optional Breakout Board For Connector X5
’card’, mounts on a 35mm DIN rail. The board has two-part screw terminals for all of the digital inputs, digital outputs, analog inputs and analog outputs of the MintDrive’s X5 connector, together with indicator LEDs. Figure 27 - Optional breakout board The catalog number for the breakout board is OPT017-501. -
Page 62: Tuning And Configuration
Tuning and Configuration Outline Before powering the MintDrive you will need to connect the PC to the MintDrive using a serial cable and install the supplied software on the PC. The software provided includes a number of applications and utilities to allow you to configure, tune and program the MintDrive. If you do not have experience of software installation or Windows applications you will need to seek further assistance for this stage of the installation. -
Page 63: Starting The Mintdrive
( ). If no LEDs are lit then re-check the power supply connections. Both CAN LEDs should be green, but if your MintDrive is configured as node 1 and no CANopen devices are attached, the CAN1 LED will be red. -
Page 64: Mint Configuration Tool Startup Wizard - Coarse Tuning
Mint Configuration Tool Startup Wizard - coarse tuning Each type of motor and drive combination has a slightly different response. Before the MintDrive can be used to control the motor accurately, the MintDrive must be “tuned”. This is the process where the MintDrive powers the motor using a pre-defined set of moves. - Page 65 3. Click Next > . MCT will search the serial ports on the PC until the MintDrive is detected. If the MintDrive is not found, check the serial connection and click Rescan. 4. Click Next > . Check that Axis-0 is highlighted.
- Page 66 6. Click Next > . The Axis Configuration Test Select frame provides two options. Click PERFORM AXES CONFIGURATION TESTS. The axis configuration tests allows MCT to tune the MintDrive for use with the attached motor. 7. Using the drop-down boxes, select the exact motor type.
-
Page 67: Mct Startup Wizard - Fine-Tuning
Demand. You’re not going to race Demand though - your job as the controller (MintDrive) is to stay exactly level with Demand, looking out of the window to measure your position ]. - Page 68 In summary, the following rules can be used as a guide: H KPROP: Increasing KPROP will speed up the response and reduce the effect of disturbances and load variations. The side effect of increasing KPROP is that it also increases the overshoot, and if set too high it will cause the system to become unstable.
-
Page 69: Fine-Tuning The Speed Loop
The value for Speed Integral gain (KVINT) is set to a default value of 1 and should not be adjusted unless you are an experienced user. The value for Speed Differential gain (KVDIFF) has no effect on the MintDrive. -
Page 70: Fine-Tuning The Position Loop
4.3.3 Fine-tuning the position loop The following tuning methods involve adjusting the servo loop terms KVELFF, KPROP, KVEL and KDERIV, which all have a default value of zero. 1. Click the Position Loop Tuning tab 2. The Tuning Parameters frame shows the values of the terms. - Page 71 The motor will now attempt to rotate 0.2 revolutions. MCT will upload the recorded (captured) data from the MintDrive and the Tuning Graph tab will be shown. Below the graph, make sure that only the Actual Position and Demand Position boxes are checked.
-
Page 72: Jog Test
If KPROP is increased too far, Measured position overshoot or ringing will occur. The plot opposite shows the effect of setting KPROP to a value of 7. This overshoot and/or ringing can Demand position be reduced by introducing a damping term - either KVEL or KDERIV... -
Page 73: Completing The Startup Wizard
4.3.5 Completing the Startup Wizard The Startup Wizard is now complete. The next step is to continue with the configuration of other parameters such as inputs and outputs. If you have not used the MCT before, it is recommended that you continue using the Wizard mode to guide you through all the stages of configuration. -
Page 74: Mct Wizard - Hardware Configuration
MCT Wizard - hardware configuration The next part of the Mint Configuration Tool allows you to setup the digital inputs and outputs, perform further fine-tuning and configure many other parameters. At the bottom of the window, the help bar shows guidance about the current options. 4.4.1 Digital input configuration The Digital Input Configuration tab allows you to define how each digital input will be triggered and,... -
Page 75: Digital Output Configuration
Next > to continue. Note: The purpose of the Drive Enable Output is to provide an indication of the MintDrive’s enabled status. Its use is optional and it does not have to be assigned to an output for the MintDrive to be operational. -
Page 76: Axis0 Parameter Configuration
4.4.3 Axis0 parameter configuration The Axis0 Parameter Configuration tab allows you to setup various axis parameters. If you do not wish to make any changes, click Next > and go to section 4.4.4. 1. Click in the appropriate boxes and type the required values. If you do not understand an item, click in its box and read the information shown in the help... -
Page 77: Axis0 Tuning Configuration
4.4.5 Axis0 tuning configuration The Axis0 Tuning Configuration tab provides a further opportunity to make adjustments to the drive tuning. The previous values that you set will already be entered in the boxes. If you do not wish to make any changes, click Next >... -
Page 78: Completing The Configuration Wizard
4.4.7 Completing the configuration wizard The configuration must now be saved. (If you wish to go back and make any further changes, click < Back . 1. Check that the drop down box is showing Mint Configuration File Format. If it is not, then select this option. Click Next >... - Page 79 Click Save . 5. The second file to save is the configuration file. This is the file that can be loaded into Mint Workbench and sent to the MintDrive. Select a folder and enter a filename for the configuration file.
-
Page 80: Mint Workbench
Mint WorkBench is the main application for programming and controlling the MintDrive. The Terminal window allows you control the MintDrive in real-time, while the Program window allows you to construct complex programs using the Mintt programming language. The Configuration window allows you to view and alter the configuration file. -
Page 81: Using Workbench
5.2.1 Selecting the controller Before WorkBench can communicate with the MintDrive, it must scan the PC’s serial ports to find where it is connected. To do this, click Tools on the main menu and choose Select Controller..The Select Controller dialog box will appear and WorkBench will scan the serial ports until it finds the MintDrive. - Page 82 CAN window The CAN window shows the current status of the CAN ports. If the MintDrive is not connected to a CAN network you can turn this window off by choosing View, CAN Window on the main menu or by clicking the CAN window button on the standard toolbar.
-
Page 83: Watch Window
Watch window The Watch window contains four tabs, providing real-time information and allowing tuning of the motor. If a tab is not visible, click the buttons at the bottom of the window. 5.3.1 Quick Watch tab The Quick Watch tab provides real-time information about various WorkBench and motor parameters. -
Page 84: Speed Loop Tab
If KVPROP and KVINT are set too high, an overshoot condition can also occur. Speed differential gain (KVDIFF) Theoretically this gain has a damping effect, although it is not implemented in the MintDrive. For a full description of the tuning parameters, see Appendix A. -
Page 85: Position Loop Tab
Click Start Move to perform the move. The motor will now rotate, WorkBench will upload the recorded (captured) data from the MintDrive and the Capture tab will be shown. Note: If an error occurs, the Error: button on the Motion toolbar will show the error number. -
Page 86: Capture Tab
5.3.4 Capture tab Each time a speed or position test move is performed using WorkBench, the data from the move is automatically captured and uploaded in to WorkBench. The Capture tab allows you to select the type of plot produced from the captured data. -
Page 87: Editor Windows
Window, Program from the main menu. The program window is used for writing and editing programs. Any file downloaded from this window to the MintDrive will be sent as the program file. To view the current program stored in the MintDrive, click the upload button on the standard toolbar. -
Page 88: Terminal Window
Useful commands for testing The Terminal window can be a useful tool for performing simple tests. Before testing can begin, check that the enable button on the motion toolbar is pressed; the MintDrive Monitor LED display should be showing the symbol. - Page 89 To turn a distance of 5 turns, type... followed by the Enter key. Then type: MOVER=5 followed by the Enter key. The keyword MOVER means “MOVE Relative”. In this example the motor will turn 5 units. If you have followed all the previous examples, this means the motor will rotate five revolutions. To change the speed, type...
-
Page 90: Firmware Update
5.4.5 Firmware update Occasionally there may be updates to Mint to either fix problems or to add new features. The Mint firmware is stored in Flash memory and can be updated using the RS232 serial port. The RS485 port cannot be used for firmware update. CAUTION: The state of the analog and digital outputs cannot be guaranteed while firmware is being updated. -
Page 92: Specifications
This section provides technical specifications of the MintDrive variants 6.1.1 General specifications The MintDrive is an integrated motion controller and brushless AC servo drive with internal power supply. H Five current output ratings are available: 2.5A, 5A, 7.5A, 10A and 15A... -
Page 93: Power
6.1.2 Power Mains and motor output Unit 2.5A 7.5A Nominal input voltage (V =230VAC) Minimum input voltage Maximum input voltage Nominal DC-Bus voltage Minimum DC-Bus voltage Maximum DC-Bus voltage Nominal input voltage (V =115VAC) Minimum input voltage Maximum input voltage Nominal DC-Bus voltage Minimum DC-Bus voltage Maximum DC-Bus voltage... -
Page 94: Rectifier And Regeneration
Resolver feedback Unit All models Resolution Velocity <6100RPM: 14 bits bits set automatically by software Velocity >6100RPM: 12 bits Pole pairs Resolver winding ratio MintDrive resolver input accuracy counts ±2 Typical combined accuracy using counts ±4 Baldor BSM series resolver motor... -
Page 95: Encoder Feedback
Unit All models Signal RS422 Encoder resolution Resolver 1024ppr, simulated Encoder 1024ppr / 2500ppr (actual encoder lines) (Baldor BSM series motor) Master (auxiliary) encoder input Unit All models Signal RS422 Operating mode A/B quadrature Maximum input frequency (quadrature) Sample time Selectable: 0.5, 1, 2... -
Page 96: Environmental
2-wire, isolated Channels Bit rate Kbit/s 10, 20, 50, 125, 250, 500, 1000 (800 also available on CAN bus 1 only) Protocols CAN bus 1: CANopen CAN bus 2: Baldor CAN 6.1.7 Environmental Unit All models Operating temperature range °C °F... -
Page 98: Troubleshooting
Depending upon the nature of your problem you may be asked for some or all of the above information. The term “Power-cycle the MintDrive” is used in the following sections. This means turn the MintDrive off, wait for it to power down completely, then turn it on again. -
Page 99: Communication
Check that the focus is on the Terminal window of the Mint WorkBench (click in the Terminal window). Check that there is not a program already running on the MintDrive (press CTRL+E to abort the running program). Check that a program hasn’t disabled the RS232 terminal using the TERMINAL keyword (pressing CTRL+E will re-enable the RS232 serial port). -
Page 100: Power Up
Use RELEASE. is shown at power-up. If the problem persists then this indicates a battery problem. Trickle charge the MintDrive’s battery by leaving the unit powered for 24~48 hours. If the problem still persists contact Baldor Technical Support. The message Memory Type NEW at the Configuration prompt (type CON to display C>). - Page 101 The message Lost User If this message is followed by You must now re-tune your motor retune the MintDrive by either re-entering the gain settings Data: Defaulting to set earlier or by following the tuning setup (see section 4.2 on Factory settings - please wait...
-
Page 102: Tuning
If the Ready LED is red during any of the tests see section 7.1.6 on page 91. Check that the software can communicate with the MintDrive by typing PRINT DRIVEFAULT in the Terminal window. If no error is reported then communication can be achieved. -
Page 103: Mint Gains
Check the drive enable input on connector X13-1 and X13-12 is because AXISERROR has bit connected and that the input is enabled. 13 set Check that you have configured the MintDrive, for example: CONFIG = _cfSERVO CONFIG = _cfCURRENT_AMPLIFIER When the MintDrive is enabled If a “Lost User Data”... -
Page 104: Ready Led Is Red
This will return one of the codes listed below. Alternatively, click on the error button on the motion toolbar, which will also display the drive fault. If the code is not listed below please contact Baldor Technical Support. Code Problem... - Page 105 MintDrive. Check for power input line disturbances (mains spikes) and fit a mains filter. Measure the actual input voltage being supplied to the MintDrive and check that it is within the specification. If the problem persists, contact Baldor Technical Support.
- Page 106 Lost User Data Battery backed RAM parameters have been lost or corrupted. If the fault did not clear automatically after power-up, enter the “Drive Setup” dialog and retune the MintDrive by following the tuning setup (see section 4.2 on page 51). Microprocessor...
-
Page 107: Can
Check that each node has been assigned a unique NodeID. Check that the network has been terminated at each end. If the MintDrive is at the end of the network, check that the CAN1 switch on the front panel is in the ON position. - Page 108 Check that each node has been assigned a unique NodeID. Check that the network has been terminated at each end. If the MintDrive is at the end of the network, check that the CAN2 switch on the front panel is in the ON position.
-
Page 110: A Tuning
The corrective signal is calculated by a PIDVF (Proportional, Integral, Derivative and Velocity Feed Forward) algorithm. On the following page, Figure A.1 shows the MintDrive’s positional, speed and current control loops. These are internal MintDrive control loops which can be tuned using the following keywords:... -
Page 112: Closed Loop Control
With Proportional gain and velocity feedback (or derivative action) it is possible for a motor at rest at a set point to exhibit a small positional error (called following error). The MintDrive multiplies the error by the proportional term to produce an applied corrective torque (in current control), but for very small errors the torque may not be large enough to overcome static friction. -
Page 113: Position Loop
In systems where precise positioning accuracy is required, it is often necessary to position within one encoder count. The Proportional gain is not normally able to achieve this because a very small following error will only produce a small demand for the amplifier which may not be enough to overcome mechanical friction (this is particularly so for current controlled systems). -
Page 114: Speed Loop
Current error A.1.5 MintDrive operational modes The MintDrive can be configured to operate in 3 different modes: H as a servo drive, where speed and position loops are active and the motion profiler produces a speed demand (CONFIG=1); H as a velocity servo drive, similar to the servo drive configuration above (CONFIG=1) but only the Velocity Feedforward term KVELFF is used in the position loop;... -
Page 115: Tuning The Position Loop For A Velocity Servo Drive
Tuning the position loop for a velocity servo drive The MintDrive can be tuned as a velocity servo drive, passing the profiled demand components through the speed and current loops only. To do this the MintDrive keyword CONFIG should be set to 1 by typing:... - Page 116 where: Servo Frequency is the reciprocal of the time period set using the Mint keyword LOOPTIME; MotorEncoderLines is 1024 for a resolver motor; MaxMotorSpeed is found from the motor specifications. Click on the Position Loop tab and enter the calculated value for KVELFF. KPROP - Proportional gain This is applied to the Following Error.
- Page 117 A.1.7.2 Position Loop Tuning using a step move In the Move Type box select Position Step and select a reasonably small step change. For example start with a position step change equivalent to 100 counts. Remember that the value entered here is in ”user units”...
-
Page 118: Tuning The Position Loop For A Torque Servo Drive
Tuning the position loop for a torque servo drive The MintDrive can be tuned as a torque servo drive, passing the profiled demand components through the position and current loops only. To do this the MintDrive keyword CONFIG should be set to 6 by typing:... -
Page 120: Bcan
CAN bus channel 1 (CANopen) and a shielded RJ45 type connector for CAN bus channel 2 (Baldor CAN). Both CAN channels are isolated. When MintDrive is at the end of a CAN network, the terminator for that channel must be activated. The terminators are activated by setting the DIP switch on the front panel to ON. - Page 121 H The 0V rails of all of the nodes on the network must be tied together through the CAN cabling. This ensures that the CAN signal levels transmitted by MintDrive or CAN peripheral devices are within the common mode range of the receiver circuitry of other nodes on the network.
-
Page 122: Can 1 (Canopen)
If the MintDrive is at the end of the network then ensure that the CAN1 DIP switch (located on the front panel) is in the ON position, which will connect an internal terminating resistor. A convenient way of wiring a chain of devices is by using a T-connector. -
Page 123: What Is Canopen
If the I/O nodes have a reduced function set then a greater number of nodes may be supported. If support for a greater number of nodes is required on the CAN 1 Bus, please contact Baldor Technical Support for more information. -
Page 124: Configuring Nodes
Note: Note that third-party I/O nodes will have a specific method for setting their node number and CAN baud rate. Please refer to the manufacturer’s instructions. The MintDrive stores its node number and CAN baud rate in non-volatile memory so that each time it is powered, the basic CAN configuration is automatically setup. -
Page 125: Connecting To Nodes
Making the connection puts the I/O node into its operational state. Once the I/O node has been connected to a Baldor controller node it will not be possible to connect it to another node at the same time. -
Page 126: Monitoring Can Events
B.2.7 Monitoring CAN events When a node’s status changes (live or dead for example), it will generate a CAN message to inform the network manager of the change. The network manager will then generate a Mint event. The type of events that are supported on the CAN bus 1 are listed below: Event Number Mint Constant... -
Page 127: Controller Nodes
B.2.8 Controller nodes Each controller node on the network contains its own comms array, which provides a convenient method of transferring data between controller nodes on the bus. The meaning of the data, which is passed between the controllers is determined by the application (Mint) program. For further details on the comms array please refer to the Mint v4 Programming Guide. -
Page 128: I/O Nodes
I/O modules connected via a bus coupler). Provided the node conforms to the CANopen Device Profile for Generic I/O Modules (DS-401), it should be fully compatible with the Baldor range of controllers. The following sections describe the Mint keywords that can be used to read and write data to these devices. - Page 129 Similarly: will set the state of all of the outputs on node 2 to 255 decimal. REMOTEOUT.1.2 = 255 The second method uses the REMOTEINX and REMOTEOUTX keywords and accesses individual inputs or outputs. Each input/output can either be ON (1), or OFF (0). For example: will read the state of input 0 on node 2.
-
Page 130: B.2.10 Hmi Operator Panels
All of the HMI operator panels use the same CANopen interface for communications which is very similar to the singlecast communication described for Baldor controllers. Communication between a Baldor controller and a HMI operator panel is achieved via the comms array in the HMI. This comms array consists of the following: H 254 x 32-bit integer variables H 254 x IEEE floating point variables. - Page 131 In addition to being able to set data on the HMI from a Baldor controller, the HMI panel can set its own data, the nature of which is determined when the user designs their own HMI project using the HMI Operator Panel design software.
-
Page 132: Can 2 (Baldor Can)
CAN2 must be terminated with a 120Ω resistor connected between CAN2+ and CAN2- at both ends of the network and nowhere else. If the MintDrive is at the end of the network then ensure that the CAN2 DIP switch (located on the front panel), is in the ‘ON’ position, which will connect an internal terminating resistor. -
Page 133: Preparing The Mintdrive
Termination resistors must be fitted at each end of the network to reduce signal reflection. The MintDrive is fitted with a termination resistor for this purpose. On the front panel of your MintDrive the termination resistor should be selected by setting the CAN2 DIP into the ON position. -
Page 134: Node Ids
Static configuration To perform static configuration of a CAN peripheral, it is essential that no other nodes are connected to the CAN network. Only the MintDrive and the peripheral to be configured should be connected. In addition to jumpers JP1, JP2 and JP3, jumpers JP4 and JP5 must be fitted for configuration. -
Page 135: Adding The Node To The Network
Type a number between 1 and 63, followed by the Enter key. This will tell the node its new node number. Remember to choose a number that no other node will be using. A prompt for the CAN Baud rate will be shown. New CAN Baud ? Type a valid Baud rate (in Kbaud), for example 125. -
Page 136: Monitoring Can Bus Communications
All events and errors on the CAN Bus will be reported. To stop monitoring CAN events, press CTRL+E. To confirm that the MintDrive is able to communicate with RelayNode8, you can test to see if the node is “live”. Press CTRL+E to stop CAN Bus monitoring, then type: ? NODELIVE.7... -
Page 137: B.3.11 Keypadnode
NODETYPE keyword (see sections B.3.6 on page 121 and B.3.7 on page 122). However, because MintDrive allows up to 4 KeypadNodes to be connected to the bus, the KEYPADNODE keyword must also be used to inform Mint of the terminal channel to be used. -
Page 138: Ionode 24/24
The keyword TERMINAL is used to set the terminal input/output channels for the MintDrive. By default the MintDrive is assigned to communicate with only the RS232, RS485 and CAN1 channels, so it must be set to communicate with a KeypadNode. -
Page 139: B.3.13 Example Can Network
H Statically configure the KeypadNode node with Node ID 7. H Terminate the network. On the MintDrive, the terminator should be selected by setting the CAN2 DIP switch into the ON position. On the KeypadNode, the terminator should be selected by fitting jumper JP3. -
Page 140: B.3.14 Mint Can Related Keywords
Note: If the BUS keyword has been used to set the default CAN Bus to 2, there is no need to type the .2 extension. The baud rate is stored on the MintDrive and will be recalled each time the... -
Page 142: Cce Guidelines
It is not intended as an exhaustive guide to good practice and wiring techniques. It is assumed that the installer of the MintDrive is sufficiently qualified to perform the task, and is aware of local regulations and requirements. Baldor products which meet the EMC directive requirements are indicated with a “CE”... -
Page 143: Emc Conformity And Ce Marking
C.1.2 EMC Conformity and CE marking The information contained herein is for your guidance only and does not guarantee that the installation will meet the requirements of the council directive 89/336/EEC. The purpose of the EEC directives is to state a minimum technical requirement common to all the member states within the European Union. -
Page 144: Emc Installation Suggestions
An exception to this is the analog command signal. Grounding (Earth) For safety reasons (VDE0160), all Baldor components must be connected to ground with a separate wire. Ground connections must be made from the central ground to the regen resistor enclosure and from the central ground to the Shared Power Supply. -
Page 145: Wiring Of Shielded (Screened) Cables
Wiring of shielded (screened) cables Conductive Remove the outer insulation Clamp to expose the overall screen. Cable MintDrive Twisted pairs Conductive Clamp - Must contact bare cable shield and be secured to metal backplane. Figure C.2 Grounding cable screens MintDrive... - Page 146 MintDrive Handwheel / Encoder Cable Housing Twisted pairs Connection of shields to analog ground is optional. Connector backshell Connector backshell Figure C.4 Handwheel (Encoder) cable grounding MintDrive Encoder Connector Cable Housing Twisted pairs Connection of shields to digital ground is optional.
-
Page 148: Accessories And Options
Accessories and options Outline This section describes common accessories and options that you may need to use with your MintDrive. D.1.1 Cables Shielded (screened) cables provide EMI / RFI shielding and are required for compliance with CE regulations. All connectors and other components used must be compatible with this shielded cable. -
Page 149: Resolver Feedback Cable
D.1.2 Resolver feedback cable The following table lists the part numbers of resolver feedback cables for use with the MintDrive. Length Cable assembly Cable assembly Baldor catalog Baldor catalog Motor type Motor type description number Resolver Feedback CBL015SF-ALM Cable Assembly... -
Page 150: Emc Mains Filters
D.1.3 EMC mains filters AC filters remove high frequency noise from the mains supply, protecting the MintDrive. These filters also prevent high frequency signals from being transmitted back onto the power lines and help meet CE requirements. To select the correct filter, see section 2.3.10. - Page 151 D.1.3.3 Filter dimensions - types FN2070-6-06, FN2070-10-06, FN2070-12-06 Dimensions inches (mm) Dimension FN2070-6-06 FN2070-10-06 FN2070-12-06 4.47 (113.5) 6.14 (156) 2.26 (57.5) 1.83 (46.6) 3.70 (94) 5.14 (130.5) 4.06 (103) 5.63 (143) 0.98 (25) 0.49 (12.4) 1.28 (32.4) 0.17 (4.4) 0.21 (5.3) 0.24 (6) 0.61 (15.5)
-
Page 152: Regeneration Resistors
Some drives are shipped with an internal regeneration resistor (see page 2). If an internal resistor is not present, a regeneration resistor should be installed to dissipate energy during braking if a fault “1” (over-voltage) occurs. Baldor catalog number 115VAC drives 230VAC drives... -
Page 153: Breakout Board - X5
’card’, mounts on a 35mm DIN rail. The board has two-part screw terminals for all of the digital inputs, digital outputs, analog inputs and analog outputs of the MintDrive’s X5 connector, together with indicator LEDs. Figure D.1 MintDrive X5 breakout board... - Page 155 TEL: +39 11 562 4440 TEL: +61 29674 5455 TEL: +65 744 2572 TEL: +52 47 61 2030 FAX:+39 11 562 5660 FAX:+61 29674 2495 FAX:+65 747 1708 FAX:+52 47 61 2010 © Baldor Electric Company Printed in USA MN1274 6/00...
Need help?
Do you have a question about the MintDrive and is the answer not in the manual?
Questions and answers