
Related Manuals for Baldor DBSC105-AAA-1


Summary of Contents for Baldor DBSC105-AAA-1
- Page 1 $25.00 AC Servo Drive DBSC 100 Series AC Servo Control Installation and Operating Manual 9/96 MN1229...
-
Page 2: Table Of Contents
Table of Contents Section 1 Introduction and Conformity ....... 1–1 Introduction . - Page 3 Section REGEN Resistor ......... 3–8 Resolver Wiring .
-
Page 4: Introduction And Conformity
The user programmable parameters available in every control provides the ability to customize the control to most any application. Baldor has tried to ensure that the information in this manual is correct at the time of printing. The information is subject to change without prior notice. -
Page 5: Limited Warranty
Section Limited Warranty For a period of one (1) year from the date of original purchase, BALDOR will repair or replace without charge controls which our examination proves to be defective in material or workmanship. This warranty is valid if the unit has not been tampered with by unauthorized persons, misused, abused, or improperly installed and has been used in accordance with the instructions and/or ratings supplied. -
Page 6: Safety Notice
Section Safety Notice This equipment contains high voltage. Electrical shock can cause serious or fatal injury. Only qualified personnel should attempt the start-up procedure or troubleshoot this equipment. This equipment may be connected to other machines that have rotating parts or parts that are driven by this equipment. - Page 7 Section WARNING: Do not remove cover for at least five (5) minutes after AC power is disconnected to allow capacitors to discharge. Dangerous voltages are present inside the equipment. Electrical shock can cause serious or fatal injury. WARNING: Improper operation of control may cause violent motion of the motor shaft and driven equipment.
-
Page 8: Specifications
Section 2 Specifications Identification DBSC 1XX - XXX - X Code Current Digital Baldor Series Servo Control 2.5 Amps 5 Amps Code Input Control Options Pulse & Direction with RS-232 Pulse & Direction with RS-422/RS485 Electronic Handwheel (Pulse Follower) with RS-232... -
Page 9: General Specifications
Section General Specifications - 230VAC Description Unit DBSC102-AAA DBSC105-AAA Input Voltage Range 220 - 250 (230VAC 1 Nominal) Input Frequency 50/60 5% Nominal Output Bus (Range) 320 (50-350) Nominal Current ( 10%) Peak Phase Current ( 10%); 2.5s Nominal Output Power 1.01 2.17 Efficiency... - Page 10 Section General Specifications - 115VAC Description Unit DBSC102-AAA-1 DBSC105-AAA-1 Input Voltage Range 97 - 125 (115VAC 1 Nominal) Input Frequency 50/60 5% Nominal Output Bus (Range) 320 (50-350) Nominal Current ( 10%) Peak Phase Current ( 10%); 2.5s Nominal Output Power 1.01...
-
Page 11: Signal Levels
Section Signal Levels Description Unit DBSC 102 DBSC 105 Command Input Command Signal Resolution bits A/D Conversion Rate Control Inputs - X3-6, X3-7, X3-9, X3-10, +12 to +29 X3-11, X3-12, X3-13, X3-16, X3-17 Feedback System – Resolver Feedback Resolution Velocity 1500 RPM bits Velocity 6000 RPM Velocity >... -
Page 12: Regeneration
Section Regeneration Description Unit DBSC 102 DBSC 105 Maximum REGEN Switching Current Maximum Load Inductance REGEN Resistor for – RG56 DBSC 10X-AAA (230VAC) REGEN Resistor for – RG27 DBSC 10X-AAA-1 (115VAC) Continuous REGEN Power with Watts 230VAC (115VAC) Input Voltage REGEN Power Watt-Sec Operating Conditions... -
Page 13: Installation
Section 3 Installation Overview This section describes the proper mounting and wiring procedure for the Baldor Series DBSC 100 AC Servo Control. If problems arise after installation, please refer to the Diagnostics and Troubleshooting section of this manual. Location and Mounting... -
Page 14: Overload Protection
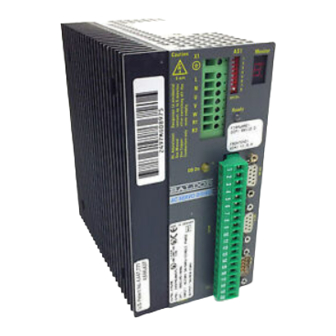
Section Overload Protection Baldor Controls feature UL approved motor overload protection suitable for motors that consume at least 50% of the output rating of the control. Other governing agencies such as NEC (National Electric Code) may require separate over current protection. The installer of this equipment is responsible for... - Page 15 Section Figure 3-1 DBSC 100 Connector Locations Monitor Power Connector Off/On Ready Ç Ç Ç Ç DB– 24VDC Supply Input Encoder Input Ç Ç Ç Ç Ç Ç DB On Serial Interface Encoder Output Resolver Input = Optional Hardware MN1229 3–3...
-
Page 16: Motor Wiring
Section Motor Wiring Connect the motor leads as follows: Connect motor phase U to X1-U. Connect motor phase V to X1-V. Connect motor phase W to X1-W. Control Signal Wiring All wiring from external devices to the control are made at the connectors shown in Figure 3-1. - Page 17 Section Control Signal Wiring Continued Figure 3-2 Active HIGH/LOW Relationship Active Low Active High (Sink) (Source) +24VDC Pin 7 - CREF Pin 9 - Enable +24VDC Pin 10 - CW Pin 11 - CCW Pin 12 - Hold Pin 13 - Reset Pin 16 - Machine Input 1 Pin 17 - Machine Input 2 Note:...
- Page 18 Section Control Signal Wiring Continued Figure 3-3 Wiring Control Diagram (X3) CMD (+) CMD (–) AGND Fault (+) Note: Shown as Active High. Fault (–) Optional External Power Source CREF +24VDC Ground Return Enable CW Limit CCW Limit Hold Reset Pulse Input Direction Input Machine Input 1...
-
Page 19: Command Input
Section Control Signal Wiring Continued Command Input The Analog Input at X3 pins 1, 2, and 3 can be wired for single ended or differential input operation. Figure 3-4 shows these configurations. Figure 3-4 Command Input Mode CMD (+) CMD (–) AGND AGND Differential Input... -
Page 20: Regen Resistor
Section REGEN Resistor If the motor is connected to a large inertia load that may require rapid deceleration, an external REGEN resistor must be installed as follows: Connect one wire from the REGEN Resistor to connector X1-7. Connect the other wire from the REGEN Resistor to connector X1-8. Resolver Wiring The Resolver interface DB-9 connector is X8 on the DBSC control. -
Page 21: Encoder Output
Section Encoder Output The encoder output provides position information to the host position controller. Use twisted pair shielded cable with an insulated overall shield. Connect the Encoder Output signals to the positioner as follows: (See Figure 3-6). Figure 3-6 Encoder Output Channel A Channel B Channel C... -
Page 22: Serial Interface Wiring
Section Serial Interface Wiring Serial Interface The Serial interface (DB9 connector X6) is used for communication with a PC (Personal Computer) or other equipment. RS232 - Not available in model DBSC 10X-BXX. For the RS232 interface, a standard shielded modem cable can be used for connection to a PC. -
Page 23: Optional Control Signal Wiring
Section Optional Control Signal Wiring Fault Relay Output (Optional) A normally closed relay contact is provided at X3-4 and X3-5. This contact can be used to drive an external fault indicator circuit to indicate a fault condition has occurred. If a fault occurs the fault must be reset (X3-13). Wire the optional external fault indicator circuit as follows: (see Figure 3-8). -
Page 24: Control Inputs
Section Optional Control Signal Wiring Continued Control Inputs (Optional) These control inputs are optional. Their reference (common) is CREF at X3-7 (see Figure 3-3). The voltage range is +12VDC to +29VDC for these inputs. They may be used by a PLC or other signal source within your application. Connect the Machine Input 1 (MAI1) signal to X3-16. -
Page 25: Electronic Handwheel (Optional)
Section Electronic Handwheel (Optional) The electronic handwheel (pulse follower) is an optional connection that allows the control to follow the pulses from an encoder input. This is a factory installed option and must be ordered with the control. This wiring must be separated from power wiring. -
Page 26: Cable Connection
Section Electronic Handwheel Continued Cable Connection Differential Connections Only Connect the cable Braided Shield to DBSC control connector X9-13. Signal Name X9 Connector Channel A X9-1 (A) Channel A X9-6 (A) Channel B X9-2 (B) Channel B X9-7 (B) Channel C X9-3 C Channel C X9-8 C... -
Page 27: System Setup
Section 4 System Setup Overview The system setup section assumes that all wiring has been completed. If not, refer to Section 3 of this manual and complete all wiring for the options you have. It is also assumed that all power is still OFF. Be sure the DIP switch AS1 located on the DBSC panel (Figure 3-1) is properly set. - Page 28 Section DIP Switch Settings Continued The top 4 switches allow communications with up to 16 different DBSC controls. The PC software program allows selection of each individual control for monitoring or configuration changes. The bottom 4 switches (5-8) have the purpose shown in Table 4-2. Table 4-2 Control Configuration Switch Function...
-
Page 29: Jumper Settings
Section Jumper Settings Note: RS-232 is not available for model DBSC 10X-BXX. Note: RS422/485 is not available for model DBSC 10X-AXX. Determine the desired mode of operation. Refer to Table 4-3 and determine the correct jumper positions for that mode. Table 4-3 Jumper Setting Configuration Jumpers Function... -
Page 30: Power Up
Section Power Up Several assumptions are made. These assumptions are: The system setup section assumes that all wiring has been completed. All power is still OFF. The DIP switch AS1 located on the DBSC panel (Figure 3-1) is properly set. The jumper at SB 601-609 is correctly set. - Page 31 Section Power Up Continued When power is applied, the “Monitor” 7 segment display will display a five (5) character succession: Blank DBSC 10X-AAA DBSC 10X-BAA DBSC 10X-EAA or FAA (Indicates the control is disabled). (Decimal point must be off to indicate control is disabled). This indicates normal microprocessor test sequence.
-
Page 32: Troubleshooting
Section 5 Troubleshooting Overview The system troubleshooting procedures involves observing the status of the “Ready” LED, the “DB On” LED and the “Monitor” 7 segment display. The tables in this section provide information related to the indications provided by these devices. Note: The “Ready”... -
Page 33: Db Led
Section Table 5–1 Operating Mode Indications Continued Ready Monitor Status Cause Both limit switches active. Defective or missing limit switch or wiring. Green Hold-Position mode. Hold mode activated by hardware or software. Green Control Disabled. Disable mode activated by hardware or software. EEPROM fault. -
Page 34: Drawings
Section 6 Drawings DBSC Dimensions Ç Ç Ç Ç Ç Ç MN1229 6–1... -
Page 35: Dbsc 100 Connector Descriptions
Section DBSC 100 Connector Descriptions X9 - Optional Encoder Feedback CHA - Channel A X1 - Power Connector CHB - Channel B Earth CHC - Channel C SYNC - U Input Power SYNC - U/ CHA/ CHB/ Motor CHC/ Ç SYNC - W REGEN Resistor DB–... -
Page 36: Mounting Hole Location
Section Mounting Hole Location Heat Sink .2 (5.2mm) Location of mounting hole. Locate and drill hole in enclosure. Mount control to enclosure. 6.028 (153mm) Alternate mounting using two (2) tabs and four (4) screws provided. Rear View MN1229 6–3... - Page 37 BALDOR ELECTRIC COMPANY P.O. Box 2400 Fort Smith, AR 72902–2400 (501) 646–4711 Fax (501) 648–5792 Baldor Electric Company Printed in USA 9/96 C&J2500 MN1229...
Need help?
Do you have a question about the DBSC105-AAA-1 and is the answer not in the manual?
Questions and answers