Advertisement
Scan for full manual
Step 1: Check what's in the box
KIT-500
including:
KIT-500T 4K HDMI/USB-C Auto Transmitter
KIT-500R 4K HDBT/HDMI Receiver/Scaler
1 Multi-signal USB-C cable (1m)
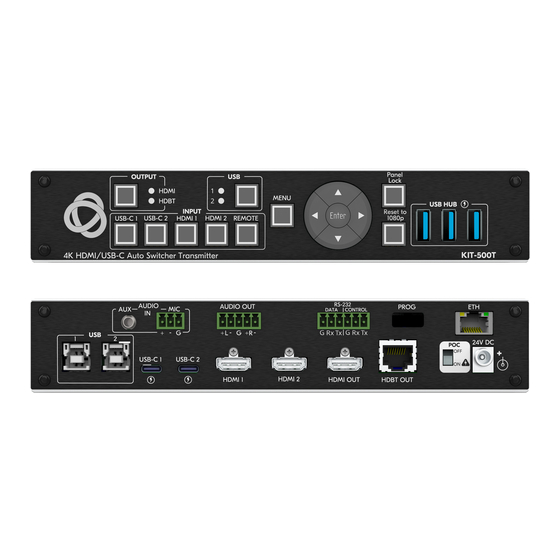
Step 2: Get to know your KIT-500
KIT-500T
#
Feature
1
OUTPUT
Select Button
HDMI/HDBT LEDs
2
INPUT
USB-C (1 and 2)
Buttons
HDMI (1 and 2)
REMOTE
3
USB
Select Button
1/2 LEDs
4
MENU Button
5
Navigation
Buttons
ENTER
6
RESET TO 1080p Button
7
PANEL LOCK Button
8
USB HUB USB 3.0 Type A
Ports (3)
9
USB 3.0 Host Port (1 and 2)
KIT-500 Quick Start
KIT-500 Quick Start Guide
This guide helps you install and use your
Go to
www.kramerav.com/downloads/KIT-500
upgrades are available.
Function
Press to select the output to be switched when a selected input button is pressed.
LED lights green when selected.
Press to select a USB-C input. Button illuminates when that input is selected.
Press to select an HDMI input. Button illuminates when that input is selected.
Press to select the HDMI (REMOTE) input as the input to KIT-500R. Button
illuminates when that input is selected.
Note that this button is only operational if HDBT is selected via the OUTPUT button.
Press to select the USB HOST port to connect to the USB HUB devices.
Lights green when selected.
Press to display the
The OSD menu can be viewed on the acceptor that is connected to the
KIT-500R.
Press to decrease numerical values or select from several definitions.
When not in the OSD menu, press to reduce the output volume.
Press to move up the menu list values.
Press to increase numerical values or select from several definitions.
When not in the OSD menu, press to increase the output volume.
Press to move down the menu list.
Press to accept changes and change the SETUP parameters.
Press and hold for about 5 seconds to reset the output resolution. The first press
resets the resolution to 720p and the next press resets to 1080p.
Press to lock/unlock the front panel buttons.
Connect to USB devices. The user can select which USB host (USB 1 or USB 2 on
the transmitter) is connected to the USB devices.
Connect to USB hosts.
KIT-500
for the first time.
to download the latest user manual and check if firmware
2 Bracket sets
1 Power adapter
1 EU power cord
KIT-500
OSD menu.
P/N: 2 9 0 0 - 3 0 1 6 1 7 QS
8 Rubber feet
1 Quick start guide
1 US power cord
Rev: 4
Advertisement
Table of Contents

Related Manuals for Kramer KIT-500


Summary of Contents for Kramer KIT-500
- Page 1 1 Power adapter 1 Quick start guide KIT-500R 4K HDBT/HDMI Receiver/Scaler 1 Multi-signal USB-C cable (1m) 1 EU power cord 1 US power cord Step 2: Get to know your KIT-500 KIT-500T Feature Function OUTPUT Select Button Press to select the output to be switched when a selected input button is pressed.
- Page 2 DATA 3-pin Terminal Connect to a serial data source or acceptor to extend RS-232 between KIT-500T Block Connector KIT-500R. CONTROL 3-pin Connect to a serial controller or PC to control KIT-500 or for KIT-500 to control an Terminal Block external device. Connector PROGRAM USB Connector Connect to a PC to perform a firmware upgrade.
- Page 3 Connect to the supplied power adapter, unless the power adapter is connected to KIT-500T. Step 3: Mount KIT-500 Install KIT-500 using one of the following methods: • Attach the rubber feet and place the unit on a flat surface. •...
- Page 4 Green shield. Brown / White Brown To achieve specified extension distances, use the recommended Kramer cables available at www.kramerav.com/product/KIT-400. Using third-party cables may cause damage! Step 5: Connect power Safety Instructions (See www.kramerav.com for updated safety...
Need help?
Do you have a question about the KIT-500 and is the answer not in the manual?
Questions and answers