Advertisement
Quick Links
Start Here
Installing your Microtek ArtixScan DI 2015c
Step 1:
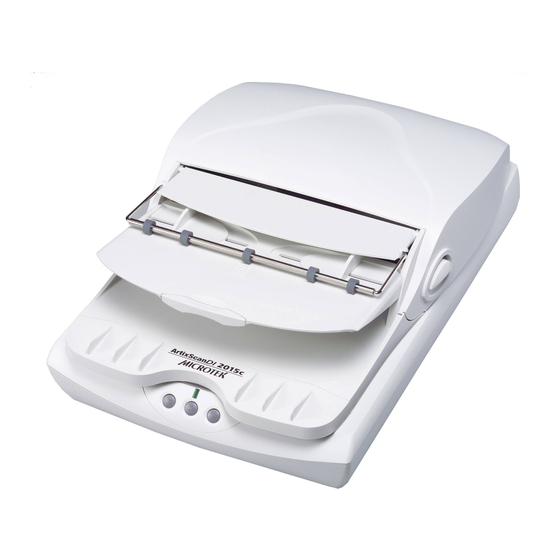
Unpack your scanner package and check
for major components.
1. ArtixScan DI 2015c scanner
2. Power adapter
3. Power cord
4. Hi-Speed USB cable
5. Software CDs/DVDs
Step 2:
Important: Do not remove the yellow
stickers from your scanner until you are
told to do so. You must install software
before connecting your scanner.
Always close any open programs and turn
off Anti-virus utilities before installing
software.
A. Turn on your computer.
B. Place the Microtek Software CD/DVD into a drive, and follow the on-screen
instructions to install the scanner driver and software.
C. Restart your computer at the end of all software installation.
NOTE: If the Microtek Software Installer screen does not come up automatically, double-click the
following in succession: "My Computer"; the CD/DVD-ROM icon; then cdsetup.exe to start the
installer program.
Copyright © 2013 Microtek International, Inc. http://www.microtek.com
I49-004530 B, September 2013
Unpack Contents
Install Software
1
5
1
2
3
4
Advertisement

Subscribe to Our Youtube Channel
Related Manuals for Microtek ArtixScan DI 2015c


Summary of Contents for Microtek ArtixScan DI 2015c
- Page 1 C. Restart your computer at the end of all software installation. NOTE: If the Microtek Software Installer screen does not come up automatically, double-click the following in succession: “My Computer”; the CD/DVD-ROM icon; then cdsetup.exe to start the installer program.
-
Page 2: Unlock Scanner
D. Push the locking switch to the position as indicated in the graphic above, with the icon on the lock showing as “unlocked”. NOTE: To lock the scanner (for shipping and other reasons), refer to the ArtixScan DI 2015c User’s Manual. - Page 3 Customize the Function Buttons The ArtixScan DI 2015c is equipped with 3 programmable function buttons (F1, F2, and F3) that can be customized to automate a number of predefined operations, such as scanning to a file, sending an image to your printer, scanning for OCR, etc. Customizing is done through the Save Settings to Function Button command in the ScanWizard DI, refer to the ArtixScan DI 2015c User’s Manual for more details.
- Page 4 8.5 inches. the feeder rollers. Guide Arms Tray Flap WARNING: The document feeder is not designed for scanning photos; doing so may damage your originals. Microtek accepts no responsibility for damage that may arise from misuse of equipment.
- Page 5 Scan a Stack of Documents 1. Place the stack of documents to be scanned on the Document Feed Tray of the Auto Document Feeder (ADF). WARNING: Do not place photo paper or fragile sheets of paper on the feed tray, as doing this will damage the original photo or frail papers during the feeding process.
- Page 6 “Main”) Preview image (the enclosed frame bordered in red) Image type Preview window Image correction settings NOTE: For details on other scanning scenarios applicable to the ArtixScan DI 2015c, refer to the ArtixScan DI 2015c User’s Manual.
-
Page 7: Fixing Paper Jams
Fixing Paper Jams Earlobe Levers 1. Open the ADF cover by lifting the two Earlobe Levers located on each side of the cover. 2. With the cover fully opened, pull out the jammed document from the feeder. If the paper is jammed in the first-stage (paper feed) rollers, pull the paper in a forward direction. - Page 8 Hi-Speed USB cable from the back of your computer, and refer to the installation instructions in this guide or the ArtixScan DI 2015c User’s Manual. 3. When trying to scan, an error message appears on your screen that reads, “Can’t Find Scanners”.
- Page 9 Finally, select and click the title of the manual you wish to view. Missing Items If your package is missing items, please call the Microtek Customer Service Department. Drivers & Software Upgrades After you finish the installation of software, if you found that the installed drivers and software cannot run your product or your computer system properly later, please go to the Microtek Download Service site at ww7.microtek.com.tw/service.php to download...
Need help?
Do you have a question about the ArtixScan DI 2015c and is the answer not in the manual?
Questions and answers