Table of Contents
Advertisement
•
•
•
•
Please read this Owner's Manual before installing,
setting up and using your new phone.
www.radioshack.com
UC050ZH_43-164_OM3.indd 1
Caller ID • Digital Answering System
What's.Included
Handset (1)
Handset (1)
Base (1)
Quick Start Guide (1)
Owner's Manual (1)
5.8GHz Cordless Phone
•
Ni-Cd Battery Pack (1)
Ni-Cd Battery Pack (1)
(inside handset)
•
Modular Cord (1)
•
AC Adapters (1)
•
Belt Clip (1)
43-164
1/9/2007 3:45:39 PM
Advertisement
Table of Contents

Subscribe to Our Youtube Channel
Related Manuals for Radio Shack 43-164


Summary of Contents for Radio Shack 43-164
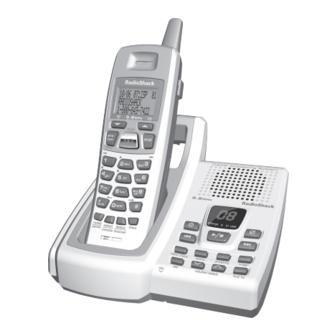
- Page 1 43-164 Caller ID • Digital Answering System 5.8GHz Cordless Phone What’s.Included • Handset (1) Handset (1) • Ni-Cd Battery Pack (1) Ni-Cd Battery Pack (1) • Base (1) (inside handset) • Quick Start Guide (1) • Modular Cord (1) •...
-
Page 2: Table Of Contents
Contents Features............4 Introduction..........5 Important.Information......... 6 FCC Statement ............6 Surge Protection ............7 Important.Safety.Instructions...... 8 Important.Caller.ID.Information....9 Controls.&.Functions........10 Handset ..............10 Main Base Unit ............11 Installation..........12 Selecting a Location ..........12 On a Desk Top ............ - Page 3 Contents Editing a Stored Name and/or Phone Number ..30 Deleting Stored Names and Phone Numbers ... 31 Testing Stored Emergency Numbers ......31 Caller.ID............. 32 When the Telephone Rings ........32 Viewing the Caller ID Message List ......33 Deleting Caller ID Information ........
-
Page 4: Features
The.Basics Features Ten-Number Memory Dialing — Stores up to ten numbers in memory for easy dialing. (See “Memory Dialing” on page 25.) Ample Talk and Standby Time — When fully charged, provides about six hours of talk time or ten days of standby time. Headset Jack —... -
Page 5: Introduction
The.Basics Introduction Thank you for purchasing a RadioShack 5.8 GHz Cordless Telephone. Your phone’s advanced technology gives you superior audio quality and extended range. Your telephone provides excellent clarity and range and integrates Caller ID, Caller ID on Call Waiting, and a digital answering system into one space-saving device. -
Page 6: Important.information
The.Basics Important.Information This telephone has been tested and found to comply with all applicable UL and FCC standards. FCC.Statement This equipment complies with Part 68 of the FCC rules and the requirements adopted by the ACTA. On the base of this equipment is a label that contains, among other information, a product identifier in the format US:AAAEQ##TXXXX. -
Page 7: Surge Protection
The.Basics In the unlikely event that your phone causes problems on the phone line, the phone company can temporarily discontinue your service. If this happens, the phone company attempts to notify you in advance. If advance notice is not practical, the phone company notifies you as soon as possible and advises you of your right to file a complaint with the FCC. -
Page 8: Important.safety.instructions
The.Basics Important.Safety.Instructions When using your telephone equipment, basic safety precautions should always be followed to reduce the risk of fire, electric shock and injury to persons, including the following: Do not use this product near water, for example, near a bathtub, wash bowl, kitchen sink, or laundry tub, in a wet basement or near a swimming pool. -
Page 9: Important.caller.id.information
The.Basics Important.Caller.ID.Information To use Caller ID and Call Waiting, you must be in an area where those services are available and you must subscribe to those services through your local phone company. Where Caller ID is offered, one or more options are generally available: •... -
Page 10: Controls.&.Functions
The.Basics Controls.&.Functions Handset Handset Antenna /tone/ key (left cursor) Belt Clip Hole 11. redial/pause key Jack for Optional Headset 12. select/remote key Handset Ringer Speaker (volume and scroll up) Handset Battery Compartment 14. talk/flash key Handset Earpiece 15. end key LCD Display 16. -
Page 11: Main Base Unit
The.Basics Main.Base.Unit 19 20 Base Antenna 12. greeting key Base Charging Contacts 13. volume/select/ key (up) and volume/select/ Base Speaker (down) Message Counter LED key (repeat/rewind) key (answer on/off) 15. menu/clock key charge/in use LED 16. set key key (delete) 17. -
Page 12: Installation
The.Basics Installation Before using your phone, carefully peel the protective film off the display. The film protects the handset window during shipment and is not necessary for use. Selecting.a.Location You can place the phone’s base on a desk or table, or mount it on a standard wall plate or directly on a wall. -
Page 13: On A Desk Top
The.Basics On.a.Desk.Top Plug one end of the supplied long modular cord into the TEL LINE jack on the back of the base. Insert the supplied AC adapter’s barrel plug into the DC IN 9V jack on the back of the base and route the adapter’s cord through the strain relief slot on the base. -
Page 14: On A Wall Plate Or Wall
The.Basics On.a.Wall.Plate.or.Wall To mount the phone directly on a wall, you need two screws (not supplied) with heads that fit into the keyhole slots on the base. Drill two holes 3 inches apart. Thread a screw into each hole, letting the heads extend about inch. -
Page 15: Connecting/Charging The Battery Pack
The.Basics Connecting/Charging.the.Battery.Pack The phone comes with a rechargeable nickel-cadmium battery pack in the handset, but not connected. Before using your phone, you must connect the battery pack. Then charge it for about 15–20 hours. IMPORTANT: The EPA certified RBRC ® Battery Recycling Seal on the nickel- cadmium (Ni-Cd) battery indicates RadioShack is voluntarily participating in... - Page 16 The.Basics IMPORTANT: Be sure the battery pack is properly connected before you try to charge it. The charge/ in use indicator lights when the handset is on the cradle, even if the battery pack is not connected. Recharge the battery pack when “Low BATTERy” flashes on the display.
- Page 17 The.Basics The supplied battery pack should last about a year. If the battery pack does not hold a charge for more than two hours after an overnight charge, replace it with a new 3.6V, 600 mAh battery pack with a connector that fits the socket in the battery compartment.
-
Page 18: Operation
Beyond.the.Basics Operation Making.and.Receiving.Calls Action Handset On Cradle Handset Off Cradle Pick up the handset (Auto Press talk/flash, any Talk: on) or pick up the number, /tone/ answer a handset and press talk/ (Auto Talk: on) or call flash (Auto Talk: off). press talk/flash (Auto Talk: off). -
Page 19: Adjusting The Handset Ringer And Earpiece Volume
Beyond.the.Basics Adjusting.the.Handset.Ringer.and. Earpiece.Volume Handset.Ringer.Tone.and.Volume Press the volume up key or volume down key (labeled as, key) in standby mode to select one of five ringer tone and volume combinations. RING TYPE A HIGH, RING TYPE A LOW, RINg TyPE B HIgH, RINg TyPE B LOW, or RINGER OFF. Earpiece.Volume Press the volume up key or volume down key (labeled as, key) during a call to change the earpiece volume of the... -
Page 20: Tone Dialing Switch-Over
Beyond.the.Basics Tone.Dialing.Switch-over Some telephone companies use equipment that requires pulse dialing (sometimes referred to as rotary dialing). If you need to enter tone dialing digits, you can switch over to tone dialing during the call. For example, entering your bank account number after you have called your bank. -
Page 21: Flash And Call Waiting
Beyond.the.Basics Page To locate the handset (while it’s off the base), press find hs on the base. The handset beeps for 60 seconds. Paging is canceled when pressing find hs on the base or any handset key, or the handset is returned to the base. Paging is also canceled when the phone receives an NOTE incoming call. - Page 22 Beyond.the.Basics Changing.the.Auto.Talk.and.CIDCW When the phone is in standby mode, press and hold cid/ menu. key to move the pointer to the selection that you would like to change. Press select/remote to toggle between “ON” and “OFF” for Auto Talk and CIDCW. Press end and return the handset to the base charging cradle to complete the setting.
- Page 23 Beyond.the.Basics Use the number keys (0 - 9), or delete/channel to enter the three-digit area code. Press select/remote. A confirmation tone sounds and the displayed area code is entered. Press end or return the handset to the charging cradle to complete the setting.
- Page 24 Beyond.the.Basics Setting.the.Language When the phone is in standby mode, press and hold cid/ menu. Press key to move the pointer down to select “LANgUAgE”. Press select/remote to toggle between “ENg”(English), “FR.”(French) and “ESP”(Spanish) for each setting. There are three languages to choose from; English, NOTE French and Spanish.
-
Page 25: Memory.dialing
Beyond.the.Basics Memory.Dialing Storing.Phone.Numbers.and.Names Memory Dialing allows you to dial a number using just a few key presses. Your cordless telephone stores up to ten names/ numbers in the handset. In memory dialing operation, you must press a NOTE key within 30 seconds or the phone will return to standby mode. - Page 26 Beyond.the.Basics Press mem or select/remote. “SToRE NUMBER” is displayed. The cursor flashes indicating that the display is ready for the number to be entered. Use the number keys, /tone/ or #/ to enter the phone number. • The phone number cannot exceed 20 digits. •...
-
Page 27: Steps For Entering Names And Special Characters
Beyond.the.Basics Steps.for.Entering.Names.and.Special. Characters Refer to the letters on the number keys to select the desired characters. With each press of a number key, the displayed character appears in the following order: upper case letters first, lower case letters next and finally the number corresponding to the key. If the next character uses the same number key, you must press #/ to move the cursor over. -
Page 28: Making Calls With Memory Dialing
Beyond.the.Basics Press 6 six times. Press 8 six times. Press 4 six times. Press 3 five times. 10. Press 7 eight times. 11. when finished, press mem or select/remote. To continue to store the telephone number, proceed to step 7 on “Storing Phone Numbers and Names“... -
Page 29: Chain Dialing
Beyond.the.Basics Memory.Dialing.from.Talk.Mode Press talk/flash. “Talk” and the volume setting appear. Press mem. Press key or enter a number (0 - 9) to select the memory location of the desired phone number. The selected name is displayed. The phone number in the memory will be dialed when select/remote is pressed. -
Page 30: Editing A Stored Name And/Or Phone Number
Beyond.the.Basics Editing.a.Stored.Name.and/or.Phone. Number Press mem, “SELECT MEMoRy” is displayed. Press key, or enter a number (0 - 9) to select the memory location you would like to edit, and press mem or select/remote. The screen appears with the memory location number that you have selected in the display. -
Page 31: Deleting Stored Names And Phone Numbers
Beyond.the.Basics To return to standby mode, press end or return the handset to the charging cradle. Deleting.Stored.Names.and.Phone. Numbers Press mem, “SELECT MEMoRy” is displayed. Press key, or enter a number (0 - 9) to select the memory location you would like to erase. Press mem or select/remote. -
Page 32: Caller.id
Beyond.the.Basics Caller.ID You must subscribe to Caller ID service to use this feature. When the telephone rings, the Caller ID feature allows you to view the caller’s name and phone number on the display before you answer the phone. The handset displays the phone number of the incoming call, the name, and time. -
Page 33: Viewing The Caller Id Message List
Beyond.the.Basics you may receive any one of the following messages: Message Display When invalid data is received “Incomplete Data” When a private name is received “Private Name” When a private number is received “Private Number” When an unknown name is received “Unknown Name”... -
Page 34: Deleting Caller Id Information
Beyond.the.Basics Deleting.Caller.ID.Information The cordless phone stores up to 30 messages. If the phone receives the 31st message, the oldest one in the list is automatically deleted and the newest is stored. Caller ID message can also be deleted manually. If you get an incoming call or page, the deleting NOTE operation is canceled and you can answer the call or page. -
Page 35: Using The Caller Id List
Beyond.the.Basics While using the “DELETE ALL?” or “DELETE NOTE MESSAGE?” screen if no key is pressed for more than 30 seconds, an error tone sounds and the telephone returns to standby mode. Using.the.Caller.ID.List Calling.a.Party.from.the.Caller.ID.List You can place a call from the Caller ID list. The cordless phone stores up to 30 messages. - Page 36 Beyond.the.Basics Storing.Caller.ID.Messages.in.Memory.Dialing Messages shown in the Caller ID list can be stored in memory dialing. Using the incoming call information (i.e., Caller ID list), the phone number of the party on the Caller ID list can be stored in memory. Press cid/menu.
-
Page 37: The.integrated.answering.system
Beyond.the.Basics The.Integrated.Answering.System The phone has a built-in answering system that answers and records incoming calls. You can also use your answering system to record a conversation, to leave a voice memo message, or to announce a special outgoing message to callers when you’re away from your phone. -
Page 38: Setting Up Your Answering System
Beyond.the.Basics Setting.Up.Your.Answering.System Using.the.Menu.Mode The Menu mode allows you to set the following Answering System functions. • For your convenience, voice prompts will guide NOTES you through the menu mode. • After the setting, press (play/stop) to exit the menu mode, or menu/clock to move to the next menu option. - Page 39 Beyond.the.Basics Setting.the.Time The clock on the answering system starts when power is supplied to the base. Follow these steps to set the clock to the correct time. • Normally the idle time for the menu mode is ten NOTES seconds before the system returns to standby. However for setting the time, the idle time is extended to two minutes.
- Page 40 Beyond.the.Basics you hear a confirmation tone. Then the announcement “Time” and the day and time are announced for your review. After a few seconds, the system announces “To set security code, press menu again”. Setting.a.Personal.Security.Code.(PIN) To play your messages from a remote location, you need to enter a two-digit Personal Identification Number (PIN) code (01-99).
- Page 41 Beyond.the.Basics Press menu/clock three times in standby mode. You hear “Ring time” and the current ring time ([ ] two, [ ] four, [ ] six, [ ] Toll saver), and it is displayed on the base. Then you hear the guidance for setting the ring time. Press volume/select/ or volume/select/ until the...
- Page 42 Beyond.the.Basics To scroll between the prerecorded message and your own personal greeting, press greeting when the outgoing message is played. If you want to use your own greeting, or want to change your greeting, refer to “Recording a personal outgoing message (Greeting)”...
- Page 43 Beyond.the.Basics Turning Message Alert tone off when you’re away from your phone • When all new messages are played back using the remote playback feature (see “Remote Operation” on page 50) the Message Alert tone will automatically deactivate. The tone will not deactivate until all messages are played back.
- Page 44 Beyond.the.Basics Recording a personal outgoing message (Greeting) Press and hold greeting in standby mode. You hear the announcement “Record Greeting” and a confirmation tone. [ ] flashes on the message counter. Start recording your message. You have 30 seconds, and the message counter starts to count down [ ] to [ ] every second.
- Page 45 Beyond.the.Basics Press ringer. You hear the ringer at the current volume level ([ ] High, ] Low, [ ] Off) (if you set the base ringer volume to off, “Ringer off” is announced in standby mode.) and it is displayed on the base. Press ringer repeatedly until the desired ringer option appears.
-
Page 46: Using Your Answering System
Beyond.the.Basics Using.Your.Answering.System The message counter displays the number of messages stored in memory. If the display flashes, there are new messages waiting for you. The flashing number represents the number of new messages, not total messages. This phone is designed to play your new messages first. - Page 47 Beyond.the.Basics Repeating a message Press (play/stop) to review your messages. The number of stored messages are announced. To repeat the current message, press after a few seconds of beginning the message. To repeat the previous message, press within a few seconds (about four seconds during remote operation) after a message begins playing.
- Page 48 Beyond.the.Basics Deleting a message To maintain maximum record time, delete the old messages. Press (play/stop) to review your messages. Press (delete) anytime during the message to delete. You hear a confirmation tone and the message is deleted. When you press (delete), you are permanently NOTE deleting the message.
- Page 49 Beyond.the.Basics • The voice memo recorded is completely NOTES independent of the greeting message. • The voice memo messages are recorded as incoming messages. Recording a conversation You can record up to ten minutes of conversation while you are using your phone. Any conversation that lasts less than two seconds will not be recorded.
-
Page 50: Remote Operation
Beyond.the.Basics Remote.Operation Remote access away from home You can operate your answering system from a remote location using any touch-tone telephone. Use this function to check for recorded messages, to play or to delete message. When using any touch-tone telephone, you can even record a new greeting message. - Page 51 Beyond.the.Basics After you enter the remote access menu, you NOTE must enter a command within 15 seconds, or the answering system automatically hangs up and returns to standby. After all of the Voice Prompts have played, you hear intermittent beeps indicating that the system is in the command waiting mode.
- Page 52 Beyond.the.Basics You hear “To play incoming message, press 2. For help, press 0.” You hear intermittent beeps. Enter a command within 15 seconds. you may select a command from the following chart: Command Function Repeat a Message Play Incoming Messages Skip a Message Delete a Message Stop Operation...
-
Page 53: Additional.information
Beyond.the.Basics Additional.Information Installing.the.Belt.Clip To.attach.the.belt.clip. Insert the belt clip into the holes on each side of the handset. Press down until it clicks. To.remove.the.belt.clip Pull both sides of the belt clip to release the tabs from the holes. Installing.the.Optional.Headset You can connect an optional headset with a -inch (2.5-mm) plug. -
Page 54: Troubleshooting
Beyond.the.Basics Troubleshooting If your phone is not performing to your expectations, please try these simple steps first. Problem Solution • Make sure the AC adapter is plugged The charge/in use into the cradle and wall outlet. indicator won’t • Make sure the handset is properly illuminate when the seated in the cradle. - Page 55 Beyond.the.Basics Problem Solution • The battery pack may be weak. Charge the battery for 15-20 hours. • The handset may be too far away from the base unit. The handset doesn’t • Place the base unit away from ring or receive a appliances or metal objects.
- Page 56 Beyond.the.Basics Problem Solution • Make sure the AC adapter is plugged The answering into the base and wall outlet. system does not • Make sure the answering system is work. turned on. • Set the record time to either the one- Cannot record any minute or four-minute option.
-
Page 57: Care
Beyond.the.Basics Care keep the phone dry; if it gets wet, wipe it dry immediately. Use and store the phone only in “room” temperature environments. Handle the phone carefully; do not drop it. keep the phone away from dust and dirt, and wipe it with a damp cloth occasionally to keep it looking new. -
Page 58: Index
Index Index Earpiece volume Answering a call FCC Statement Answering system Finding handset Deleting a message Message alert Greeting Playing a message Choosing Recording a Recording conversation Repeating a message Screening a call Hanging up Setting up Headset Skipping a message Turning on and off Installation When away from home 50... - Page 59 Index Speaker volume (base) Making a call Memory dialing Tone dialing switch over Editing Traveling out of range Erasing Troubleshooting Making a call Storing a Caller ID Voice memo record Volume control Storing new entry Base Message alert Handset Muting the ringer Base Handset Wall mounting the base...
-
Page 60: Limited.one-Year.warranty
This warranty gives you specifi c legal rights, and you may also have other rights which vary from state to state. RadioShack Customer Relations, 300 RadioShack Circle, Fort worth, TX 76102-1964 UCZZ01050ZZ(0) 43-164 02A07 Printed in China ©2007. RadioShack Corporation.
Need help?
Do you have a question about the 43-164 and is the answer not in the manual?
Questions and answers