Twin needle lock stitcher, twin needle split needle bar lock stitcher, twin needle lock stitcher with large hook, twin needle split needle bar lock stitcher with large hook (44 pages)
Dos agujas con canilla, dos agujas desembragables con canilla, dos agujas con canilla y garfio grande, dos agujas desembragables con garfio grande (44 pages)
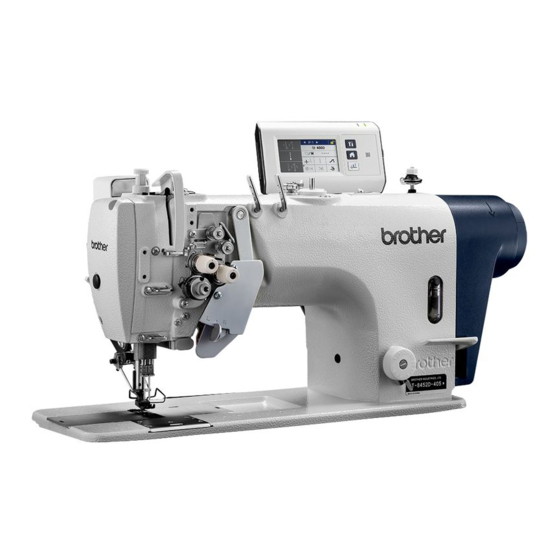
Twin needle direct drive lock stitcher, twin needle direct drive lock stitcher with thread trimmer, twin needle direct drive split needle bar lock stitcher with thread trimmer, twin needle direct drive lock stitcher with large hook and thread trimmer, twi (57 pages)
Dos agujas con motor incorporado, dos agujas con motor incorporado y cortahilos, dos agujas desembragables con motor incorporado y cortahilos, dos agujas con motor incorporado, garfio grande y cortahilos, dos agujas desembragables con motor incorporado, c (57 pages)
Dos agujas con motor incorporado, dos agujas con motor incorporado y cortahilos, dos agujas desembragables con motor incorporado y cortahilos, dos agujas con motor incorporado, garfio grande y cortahilos, dos agujas desembragables con motor incorporado, c (59 pages)
Twin needle direct drive split needle bar lock stitcher (74 pages)
Summary of Contents for Brother T-8421D
Page 1
Instruction Manual TWIN NEEDLE DIRECT DRIVE LOCK STITCHER T-8421D T-8422D T-8452D T-8722D T-8752D Please read this manual before using the machine. Please keep this manual within easy reach for quick reference.
Page 2
Safety Instructions Thank you very much for buying a BROTHER sewing machine. Before using your new machine, please read the safety instructions and the explanations given in the instruction manual. With industrial sewing machines, it is normal to carry out work while positioned directly in front of moving parts such as the needle and thread take-up, and consequently there is always a danger of injury that can be caused by these parts.
Page 3
Notes on safety Notes during use DANGER • Wait at least 5 minutes after turning off the power switch and disconnecting the power cord from the wall outlet before opening the control box cover. Touching areas where high voltages are present can result in severe injury.
Page 4
Diarrhea or vomiting may result. Keep the oil and grease out of the reach of children. • Contact your Brother dealer or a qualified electrician for any electrical work that may need to be done.
Page 5
• Always be sure to turn off the power switch and then wait one minute before opening the motor cover. If you touch the surface of the motor, it may cause burns. • Ask your Brother dealer or a qualified electrician to carry out any maintenance and inspection of the electrical system.
Page 6
The following warning labels appear on the sewing machine. Please follow the instructions on the labels at all times when using the machine. If the labels have been removed or are difficult to read, please contact your nearest Brother dealer.
Page 7
1 Moving parts may cause injury. 2 Operate with safety devices installed. 3 Turn off the power before carrying out operations such as threading, changing the needle, bobbin, knives or hook, cleaning and adjusting. Be sure to connect the ground. If the ground connection is not secure, you run a high risk of receiving a serious electric shock, and problems with correct operation may also occur.
Page 8
Names of major parts <T-8452D,8752D> (1) Bobbin winder (2) Thread wiper(T-8422D/T-8452D/T-8722D/ T-8752D) (3) Lifting lever (4) Quick reverse (Hand switch) (5) Presser foot (6) Control box (7) Knee lifter assembly (8) Power switch (9) Stitch length dial (10) Reverse lever (11) Oil gauge window (12) Machine pulley (13) Operation panel...
Page 9
Minimum lubrication Semi dry Light-weight and Heavy-weight Heavy-weight Foundation medium-weight materials (For materials materials extra thick thread) T-8421D -T3F -T0F -T03 Max. sewing speed 3,000 sti/min 4,000 sti/min 4,000 sti/min Start backtacking and 250 to 1,800 sti/min continuous backtacking speed...
Page 10
T-8422D -403 -405 Max. sewing speed 4,000 sti/min 3,000 sti/min Start backtacking and continuous 250 to 1,800 sti/min backtacking speed End backtacking speed 1,000 sti/min Max. stitch length Lifting lever Presser foot height Knee lifter 10mm Feed dog height Needle (DP×5) #11 to #16 #14 to #22 Motor...
Page 11
Motor AC servo motor (4-pole, 550W) Single-phase 200V-230V, 3-phase 200V-230V, Power consumption Power supply 500 VA Control circuit Microprocessor...
Table of Contents Installation ............................. 1 Points to note before installation ......................1 Table processing diagram......................2 Installing the sewing machine...................... 3 Lubrication ........................... 7 Connecting the cords......................... 10 Turning on the sewing machine power ..................15 Carrying out test sewing ......................15 Adjusting the treadle operation ....................
Page 13
Copying programs ..........................45 Initializing the currently-selected program ................... 46 Setting the working pace ........................46 Setting memory switches (standard) ....................47 List of memory switches ........................48 Hand switch ............................53 Setting hand switch functions ....................55 Reading and writing data using USB media ..................56 Data read/write items in USB media mode and media folder structure ........
• Machine installation should only be carried out by a qualified technician. • Contact your Brother dealer or a qualified electrician for any electrical work that may need to be done. • The sewing machine weighs approximately 50 kg (110 lb).The installation should be carried out by two or more people.
Page 15
Tilting back the machine head • Hold section (B) with your foot so that the table does not move, and then push the arm with both hands to tilt back the machine head. • Do not hold the operation panel. Returning the machine head to its original position 1.
Installing the sewing machine Install the control box and the connecting rod. (1) Control box (2) Bolt [4 pcs.] (3) Nut [8 pcs.] (4) Spring washer [4 pcs.] (5) Washer [4 pcs.] (6) Connecting rod (7) Nut Install the oil pan. (1) Head cushion(left) [2 pcs] (2) Head cushion(right) [2 pcs] (3) Oil pan...
Page 17
Install the rubber cushions and the knee lifter complying bar. (1) Rubber cushion [2 pcs.] (2) Knee lifter complying bar Install the machine head. (1) Hinge [2 pcs.] (2) Machine head (3) Head rest CAUTION Tap the head rest securely into the table as far as it will go.
Page 18
Install the cotton stand. (1) Cotton stand (2) Rubber cushion [2 pcs.] (3) Washer (4) Nut Securely tighten the nut so that the two rubber cushions and the washer are securely clamped and so that the cotton stand does not move. Adjusting the knee lifter Turn the machine pulley so that the feed dog is below the top of the...
Page 19
Turn the adjusting screw (7) to adjust so that the presser foot (2) is at the desired position within a distance of 13 mm from the needle plate when the knee lifter plate is fully pressed. After adjustment is completed, securely tighten the nut (6).
Use only the lubricating oil <JXTG Nippon Oil & Energy Corporation Sewing Lube 10N; VG10> specified by Brother.If this type of lubricating oil is difficult to obtain, the recommended oil to use is <Exxon Mobil Essotex SM10; VG10>.
Page 21
NOTE If the lubricating oil level drops below the bottom (6) of the oil gauge window (5), be sure to add more oil. Adding oil to the oil tank Remove the rubber cap (1). Use the accessory oil tank (2) to pour in lubricating oil until the oil level reaches the top reference line (4) of the oil gauge window (3).
Page 22
<Semi dry type and minimum lubrication type> Related Information • Lubrication on page 68 • Lubricating the oil cover (every 6 months) on page 69 • Adding grease (when the grease up warning screen is displayed) on page 70...
• When securing the cords, do not bend the cords excessively or fasten them too hard with staples. Otherwise, fire or electric shocks may occur. • Contact your Brother dealer or a qualified electrician for any electrical work that may need to be done.
Page 24
Connecting the cords Connect the ground wire (8). Connect the cords. Connector P.C. board indication Repeat cable tie Machine motor connector 4-pin Outside control box Head detector unit connector 6- P3 HEAD Solenoid connector 14-pin CN8 SOL Encoder connector 10-pin CN16 ENC Operation panel connector 8-pin CN6 PANEL...
Page 25
Closing the cord presser plate Loosen the cables outside the control box without stretching them too much inside the control box. Close the cord presser plate (1). NOTE If the cord presser plate (1) is not closed firmly, dust will get inside the control box and may cause problems. Connect cords that match the voltage specifications.
Page 26
Connect the power cord. 1. Install the power switch (1) 2. Attach an appropriate plug to the power cord (3). 3. Insert the plug into a properly-grounded AC power supply. (1) Power switch (2) Screw [2 pcs] (3) Power cord (4) Ground wire (green/yellow cord) (5) Power supply connector...
Page 27
Ground wire Connect the ground wires. (1) Ground wire (2) Screw with washer [2 pcs.] (3) Ground symbol [2 places] (4) Oil pan...
Turning on the sewing machine Carrying out test sewing power CAUTION Turn on the POWER switch (1). • Do not touch any of the moving parts or press any objects against the sewing The power indicator (2) will illuminate. machine while it is operating. Otherwise, it may result in injury or damage to the sewing machine.
With the machine head tilted back, depress the Remove the nut (5), and then move the treadle (1) and check that the sewing machine connecting rod joint (6) from the position in figure does not operate. A to the position in figure B. NOTE If the sewing machine operates when the treadle (1) is depressed while the machine head is tilted back, the...
Insert the needle (2) straight in as far as it will go so that the long groove (3) is facing inward, and then securely tighten the set screws (1). CAUTION T-8421D/T-8422D/T-8722D • Turn off the power switch before installing the needle. The machine may operate if the treadle is depressed by mistake, which could result in injury.
Removing the bobbins Winding the lower thread CAUTION CAUTION • Turn off the power switch before • Do not touch any of the moving parts or removing the bobbin. The machine may press any objects against the machine operate if the treadle is depressed by while winding lower...
Installing the bobbin cases Depress the treadle. Lower thread winding will then start. Once winding of the lower thread is completed, NOTE the bobbin presser arm (3) will return automatically. • Turn off the power switch before installing the bobbin. The machine may After the thread has been wound on, remove the operate if the treadle is depressed by bobbin and cut the thread with the knife (4).
Page 33
• The anti-spin spring (6) prevents the bobbin from racing at times such as during thread trimming. • Use bobbins (1) made of light alloy as specified by BROTHER. Bobbin case type 1. Pass the thread through slot (3) and hook it under the tension spring (4).
Page 34
Close the slide plates. • The anti-spin spring (10) prevents the bobbin from racing at times such as during thread trimming. • Use bobbins (1) made of light alloy as specified by BROTHER.
Threading the upper thread Models Push the tension release plate (2) without or use the lifting lever or the knee thread lifter to raise the presser foot. trimme CAUTION • Turn off the power switch before 2. Pass the thread securely in between the threading the thread.
Page 36
NOTE Specifications indicated by the * mark include arm thread guide D (7) and felt (8). When using polyester thread, install these components and thread the thread as shown in the illustration. Related Information • Adjusting the thread take-up amount on page 66 •...
Adjusting the stitch length Using the knee lifter plate • The presser foot (2) can be raised by pressing the knee lifter plate (1). Unlock the stitch length dial (2) by turning the dial lock lever (1) to the right until a click is heard. Turn the stitch length dial (2) clockwise or counter-clockwise so that the desired stitch length is at the uppermost position on the dial.
The thread wiper (2) will operate after the thread Stopping the needle bars (left and is trimmed. right) • Operate the stop lever after the needle has penetrated the material and has stopped moving. • Do not sew at speeds of over 1,000 sti/min while one of the needle bars has been stopped.
Number of stitches: quick-reference guide Sewing angle (A) 30° 40° 50° 60° 70° 80° 90° 100° 110° 120° 130° 140° No. of stitches (N) For 1/4” needle width Determine the stitch length from the chart above to make beautiful corner stitching. In addition, the number of stitches for the outer needle varies according to the combination of sewing angle and stitch length.
Using the operation panel (Basic operations) Name and function of each About the home screens operation panel item • The home screen is displayed when the power is turned on. • Sewing operations are normally carried out while the home screen is displayed. •...
About the detailed home screen (8) Needle up/down key Press this key to switch the stop position after sewing (needle up/needle down). (9) Thread trimming lock key Press this key to switch thread trimming locking (disabled/enabled) when the treadle is depressed backward.
About the quick home screen (7) End backtack key Press this key to switch the end backtack sewing operation (off/on). If you keep pressing this key, the display switches to the end backtack setting screen. (8) RESET key Press this key to reset the currently-displayed counter value.
Types of icons The icons which appear in the display can be broadly classified into the following three types. Type A: Simple symbols Example Warning symbol USB media Current program No. Type B: Plain touch keys (symbol is always fixed) Example Return key (Returns to the previous + key (Increases a value)
Program setting method It is recommended that you register patterns that are sewn frequently as programs. After programs have been registered, you can retrieve the desired sewing patterns simply by selecting a program number, which eliminates the need to set the pattern each time. •...
Page 45
Setting value No. of stitches B 1 to 19 stitches Main sewing parameters Setting value Main sewing pattern Normal sewing/fixed stitch sewing/reverse fixed stitch sewing/pleat presser stitch sewing/continuous backtack stitch sewing Setting value Sewing speed 220 to 5000 sti/min No. of stitches E 1 to 255 stitches No.
Page 46
Setting value Automatic sewing Automatic sewing with thread trimming Slow start Slow start disabled at the sewing start Slow start enabled at the sewing start Slow start enabled at the sewing start Slow start enabled at the sewing start Slow start enabled at the sewing start...
Setting end backtacking Setting value Setting Default unit value No. of 0 to 19 stitches 1 stitch 1 stitch stitches Press [ ] > [End BT setting]. No. of 1 to 19 stitches 1 stitch 1 stitch stitches No. of 0 to 19 stitches 1 stitch 1 stitch...
Using program individual functions and program common functions • In addition to start backtack sewing, main sewing and end backtack sewing, the following 6 types of functions are also included in the parameters which are necessary for sewing. Needle up/down, thread trimming lock, thread wiping (T-8422D/T-8452D/T-8722D/T-8752D), correction sewing, AUTO, slow start.
Page 50
Setting details However, the needle will stop in the up position when the treadle is depressed backward, and after thread trimming (needle raised) during automatic sewing. Needle stops in the up position. Thread trimming lock This sets the thread trimming operation when the treadle is depressed backward. Setting details Thread trimming operation is carried out when the treadle is depressed backward.
Page 51
Setting details Automatic sewing is not carried out, and sewing stops when the treadle is returned to the neutral position. Sewing is carried out automatically for the number of stitches which have been set (start and end backtacking and fixed stitch sewing) simply by depressing the treadle once.
Page 52
Slow start The slow start pattern at the sewing start after thread trimming can be set. Setting details Sewing is carried out without slow start operation. Sewing is carried out according to slow start pattern 1. 1st stitch: 400 sti/min 2nd stitch: 400 sti/min 3rd stitch: 400 sti/min 4th stitch: 4000 sti/min...
Using the production counter Using the lower thread counter The production counter can be used to let you know The lower thread counter can be used to let you know how many items have been sewn. approximately how much lower thread is remaining. The production counter increases by 1 each time •...
Lower thread counter operation Press The lower thread counter value will remain When sewing is carried out, the value shown in the unchanged. lower thread counter display is reduced by 1 for every 10 stitches sewn. However, the display is only updated The display will return to the screen which was being when the treadle is returned to the neutral position.
Press [ ] > [Home screen mode • If you press , the setting value will decrease down to -10 and the needle up stop setting]. position will become higher. • The default setting value is "0". If the value that is displayed is different from the value that is currently set, the value in the display will flash.
Using the operation panel (Advanced operations) Adding and deleting steps When deleting a step You can put together programs, such as the one shown Press in the illustration for pocket sewing or name label sewing, by registering multiple steps in the main The step at the cursor position will be deleted.
Editing steps Setting main sewing parameters when several steps exist The number of stitches can be changed separately for each step. Setting value Setting Default unit value The setting is made from the detail home screen. Main - sewing pattern Press to select the step number to...
Setting the sewing start step Copying programs If sewing is interrupted by a problem such as a thread To create a program with parameters that are almost breakage occurring and you need to resume sewing exactly the same as those of another program, you can from the point where sewing was interrupted, you can copy the original program and change just the parts start sewing from the middle of a step.
Initializing the currently- Setting the working pace selected program The target counter can be used to let you know the state of work progress. If you would like to recreate the program which is currently selected from the beginning, you can The target counter increases by 1 each time the time reinitialize the program instead of deleting each step set as the working pace has elapsed.
Setting memory switches Press (standard) The value will be confirmed and the mode will return to production counter editing mode. The settings for the memory switches are valid for all programs. Press [ ] > [Memory switch setting]. Press to select the memory switch number (1).
List of memory switches Presser foot lifter and treadle settings (001 to 099) Setting Default value Setting Setting details range unit ON/OFF When treadle is returned to neutral after thread trimming, - presser foot is raised up ON: Presser foot is raised OFF: Presser foot is not raised Rises when memory switch No.
Page 62
Setting Default value Setting Setting details range unit 0 to 500 80 (ms) 10 (ms) Delay time from standing operation pedal turning on until (ms) motor starts operating ON/OFF When AUTO function is set ON, pauses when presser - foot pedal is ON. ON: Sewing is interrupted when presser foot lifter pedal turns on (pause operation) OFF: No operation...
Page 63
Panel operation settings (300 to 399) Setting Default value Setting Setting details range unit 1 to 3 Movement when bobbin counter warning. 1: Sewing can continue by pressing the return key 2: Sewing is only possible when lower thread counter is reset after replacing the bobbin.
Page 64
Setting Default value Setting Setting details range unit OFF, ON Panel auto lock when power is turned on - OFF: Disabled ON : Enabled Sewing program settings (400 to 499) Setting Default value Setting Setting details range unit ON/OFF Stopping and sewing speed during start backtacking -...
Page 65
Setting Default value Setting Setting details range unit 2: C-D 3: C-D-C 4: C-D-C-D 5: C-D-C-D-C 6: C-D-C-D-C-D 0 to 1 Operation mode for manual production counter increment function using hand switch 0 : Counter can be incremented at any time 1 : Counter can only be incremented after sewing stops and thread has been trimmed Standard device settings (500 to 599)
Hand switch The following functions can be assigned to the hand switch. (The operation of the hand switches will vary depending on the status of the correction sewing icon.) Settings when using as correction sewing switch Settings (Initial Operation when hand switch is pressed setting is “1”.) OFF: <Disabled>...
Page 67
* These settings are enabled when the correction sewing icon is turned off (...
Setting hand switch functions Press [ ] > [Hand switch setting]. Select the desired menu. Example: Setting the hand switch so that it functions as a correction sewing switch 1. Press [Correction sewing function]. Press to select the desired setting item. Press Press this to return to the Home screen.
Creating folders for USB media Data type Filename Folder name Use the keys to change the read/write Program ISMUPG.SEW \BROTHER\ISM item. \ISMDE**\ (** is the value for memory switch Press No. 750.) The selected read/write item will be run. The (Refer to the read/write in progress screen will be displayed.
Page 70
Data type Filename Folder name Error log E*******.LDT \BROTHER\ISM \ISMLDT\ M*******.LDT Production P*******.LDT Same as above data...
Initialization If the sewing machine stops operating normally, the cause may be that an incorrect setting may have been made for the memory data by means of memory switches, for instance. In such cases, it may be possible to restore normal operation by initializing the stored data.
Sewing Points to note before sewing CAUTION • Attach all safety devices before using the sewing machine. If the machine is used without these devices attached, injury may result. • Turn off the power switch while threading and replacing the bobbin, and when not using or going away from the sewing machine.
Backtacking • When the hand switch (1) or the reverse lever (2) is pressed during sewing, the feed direction will be reversed, and when it is released, the feed direction will return to normal. Hand switch rotation function • The hand switch can be rotated 90 degrees as shown in the illustration.
Page 74
Setting condensed stitches Unlock the stitch length dial (4) by turning the dial lock lever (3) to the right. Turn the stitch length dial (4) to the stitch length to be used for condensed stitches. Loosen the screw (5) and lift up the stopper (6) until it touches the reverse stitching lever plate (7).
Adjusting the stitch tension Adjusting the thread tension After the lower thread tension has been adjusted, adjust the upper thread tension so that a good, even stitch is obtained. CAUTION • Turn off the power switch before adjusting the lower thread tension. The machine may operate if the treadle is depressed by mistake, which could result in injury.
Adjusting the upper roller Application Presser foot adjustment screw height pressure For light-weight and Approx. 34 mm medium-weight materials The presser foot pressure should be as weak as For heavy-weight Approx. 29mm possible, but strong enough so that the material does materials not slip.
Adjusting the presser foot After making the adjustment, sew a piece of material to check the floating amount. floating amount (minute Guide to adjustments when sewing curves lifting amount) When the material is placed under the presser foot (1) and the feed dog (2) is moved to its lowest When sewing stretch materials and materials with long position and the material is moved, there should pile, you can make minute adjustments to the floating...
Adjusting the upper thread trailing length after thread trimming Related Models: T-8422D/T-8452D/T-8722D/T-8752D • At the time of thread trimming, the thread tension is loosened and tension is applied by the pretension (1) only. The normal trailing length for the upper thread is 35 mm or more.
Adjusting the thread take-up • When the thread has been passed through the thread amount adjuster (1), the thread take-up amount amount becomes less when the thread amount adjuster (1) is moved to the right. The thread take-up amount is adjusted by how the It is better not to pass the thread through the thread is passed through the thread amount adjuster thread amount adjuster (1):...
Page 80
The thread take-up amount required will vary depending on the type of thread, the thickness of the material and the stitch length, so adjust the thread take-up amount to suit the sewing conditions. Related Information • Threading the upper thread on page 22...
If Energy Corporation Sewing Lube 10N; VG10> the table moves, it may crush your feet specified by Brother. or cause other injuries. If this type of lubricating oil is difficult to obtain, the • Use both hands to hold the machine recommended oil to use is <Exxon Mobil Essotex...
Replace the needle if it is bent or if the tip is Energy Corporation Sewing Lube 10N; VG10> broken. specified by Brother. If this type of lubricating oil is difficult to obtain, the recommended oil to use is <Exxon Mobil Essotex SM10;...
5. Apply grease without letting it spill out. • If you continue to use the sewing machine after carrying out the reset procedure but without applying grease, problems with the sewing machine may result. Applying grease NOTE Use Brother-specified “Grease unit (SB6659-101)”. Using the tube...
Page 84
6. Tighten the screw to push in the grease. Clearing the cumulative time between grease applications While pressing , turn on the power switch. 7. Use a cloth to wipe away any excess grease from around the screws. Select [Grease up]. 8.
• Maintenance and inspection of the sewing machine should only be carried out by a qualified technician. • Ask your Brother dealer or a qualified electrician to carry out any maintenance and inspection of the electrical system. • If any safety devices have been removed, be absolutely sure to re-install them to their original positions and check that they operate correctly before using the machine.
Adjusting the safety switch (2) Safety switch position (3) Screw The standard installation position for the safety switch (2) is shown in the illustration. At the time of shipment Loosen the screw (3). from the factory, dimension (A) is adjusted to 3 mm, and normally this does not need to be readjusted.
Adjusting the thread take-up Tighten the screw (6). amounts of the thread tension springs Adjusting the height of the stopper [left] (4) [for left thread] The standard thread take-up length for thread take-up Loosen the screw (7), and then slide the thread springs R (1) and L (2) is 7 mm.
(2) is adjusted according to the values in the table below at the time of shipment from the factory. Model Dimension (A) T-8421D 0.9 to 1.2mm T-8422D/T-8452D/T-8722D/ 1.4 to 1.7mm T-8752D • Check the clearance (A) after replacing parts such as the rotary hook (1) and the needle plate (2) which have an effect on the clearance (A).
Adjusting the clearance between the rotary hook and the opener Loosen the set screw (3) and move the opener (1) to the left or right to adjust so that the clearance between the rotary hook (2) and the opener (1) is 0.1 to 0.3 mm when the opener (1) is pulled all the way in the direction of the arrow.
Adjusting the height of the presser foot Remove the face plate (1), or remove the rubber cap (2). Loosen the nut (3), and then loosen the presser adjustment screw (4). Raise the presser foot (6) by using the lifting lever (5).
Adjusting the needle and rotary hook timing Set the stitch length dial to the actual length of the stitches to be sewn. Standard stitch length Specifications Stitch length dial -T[]F -[][]3 -405, -407 Remove the rubber cap (1). Loosen the screw (5) and move the needle bar (2) up or down to adjust so that the top reference line (3) on the needle bar (2) is aligned with the bottom edge of the needle bar bracket (4) when the...
Page 92
1 to 1.5 mm. <T-8421D/T-8422D/T-8722D> • If the distance is not 1 to 1.5 mm, loosen the screw (5) again and adjust the height of the needle bar.
Page 93
(C) as follows to make it easier for the rotary hook tip (15) to catch the upper thread loop. Specifications Distance C T-8421D/T-8422D/T-8722D 0.7 to 1.2mm T-8452D/T-8752D 0.7 to 0.8mm NOTE • When the stitch length is changed, distance (C) will also change, so re-check distance (C) at such times.
Installing the feed dog Install the feed dog (1) to the feed bar (2) with the two screws (3). Tighten the feed dog support set screw (4) so that the tip of the set screw (4) touches the bottom of the feed dog (1).
Adjusting the position of the feed dog Adjusting the forward/back position of the feed dog Carry out this adjustment if the needle and the needle hole in the feed dog are not positioned correctly even though the clearance between the needle bar and the presser bar (13.3 to 13.7 mm) is correct.
Adjusting the height of the feed dog Turn the machine pulley forward until the feed dog (1) is at its highest position, and then adjust so that the feed dog (1) protrudes 0.9 to 1.1 mm from the top of the needle plate (2).
Adjusting the feed dog angle The standard angle for the feed dog is when the mark (2) on the feed bar shaft (1) is aligned with the reference line (4) on the feed rocker base arm (3). Tilt back the machine head. Loosen the set screw (5).
Adjusting the rotary hook Turn on the power switch. lubrication amount Run the machine at the normal sewing speed for Use the following procedure to check the amount of oil approximately 1 minute without sewing any being supplied to the rotary hook when replacing the material (following the same start/stop pattern as rotary hook or when changing the sewing speed.
Page 99
• If the oil adjustment screw (1) is turned clockwise, the lubrication amount becomes greater. • If the oil adjustment screw (1) is turned counterclockwise, the lubrication amount becomes smaller. Check the lubrication amount. Turn the oil adjustment screw (1) and check the lubrication amount repeatedly until the lubrication amount is correct.
Troubleshooting • Please check the following points before calling for repairs or service. • Simplified details can be checked on the panel. • If the following remedies do not fix the problem, turn off the power switch and consult a qualified technician or the place of purchase.
Page 101
Problem Possible cause Page Loops appear in seam. Pull out the lower thread to check that there is no slackness in the thread tension, or replace the bobbin or bobbin case. • Is the thread take-up amount too large? See Adjusting the thread take-up amount on Adjust the thread take-up amount.
Page 102
Problem Possible cause Page Skipped stitches at sewing • Is the needle up stop position too high? See Adjusting the needle start up stop position on Adjust the needle up stop position. page 42. Thread unraveling at sewing start. • Is the sewing speed too fast at the sewing start? See Using the operation panel (Basic operations) Use the slow start key.
Page 103
If the bobbin is not turning smoothly, replace the bobbin. • Is a bobbin other than the light-alloy bobbin specified See Installing the bobbin by Brother being used? cases on page 19. Use only bobbins which are specified by Brother.
Page 104
Problem Possible cause Page Upper and lower threads • Is the needle tip bent? Is the needle tip blunt? See Installing the needle are breaking. on page 17. If the needle tip is bent or blunt, replace the needle. • Is the needle properly installed? See Installing the needle on page 17.
Page 105
Problem Possible cause Page NOTE Broken needle • It is extremely dangerous to leave any pieces of broken needle sticking in the material. If the needle breaks, search for all pieces until the whole of the needle is found again. •...
Page 106
Problem Possible cause Page Nothing appears on the operation panel display. • Is the 8-pin operation panel connector inside the See Connecting the cords control box disconnected? on page 10. Insert the connectors securely. The panel display switches • This display is to notify you that it is time to apply See Adding grease (when to the grease-up warning grease.
List of error codes List of error codes If an error code appears on the touch panel display Connector layout diagram...
Page 108
Main P.C. board Switch-related errors Code Cause Remedy E050 Machine head is detected as being tilted back • Turn off the power, and then return the when sewing starts. machine head to its original position. • Turn off the power and check the connection of connector CN8.
Page 109
Code Cause Remedy E090 Connection of treadle was not detected when Turn off the power and check the connection of power was turned on. connector CN11. E095 Treadle or standing operation pedal was being Return the treadle or the standing operation pedal depressed when power was turned on.
Page 110
Code Cause Remedy E410 Communication error with panel occurred when Turn off the power and check the connection of power was turned on. connector CN6. E422 An error occurred while reading from USB • Press the RESET key. media. • Check the files in the USB media. E424 Not enough free space in the USB media.
Page 111
Code Cause Remedy E791 Abnormal solenoid mechanism current detected Turn off the power and check the connection of when solenoid was activated. connector CN8. Version updating errors Code Cause Remedy E880 Version update request could not be received Turn off the power and check the connection of when power was turned on.
Need help?
Do you have a question about the T-8421D and is the answer not in the manual?
Questions and answers