
Related Manuals for Elko 7180


Summary of Contents for Elko 7180
- Page 1 ELKO Smart Sound MODEL:7180/7181 Instruction Manual MODEL NO.: 7180 MODEL NO.: 7181...
- Page 3 Safety Warnings Touch Panel Connections for Audio Source Inputs Connections for Audio Source Outputs Connections to the Mains Supply Full Units Setup General Operations Panel Display Maintenance Hits and Tips...
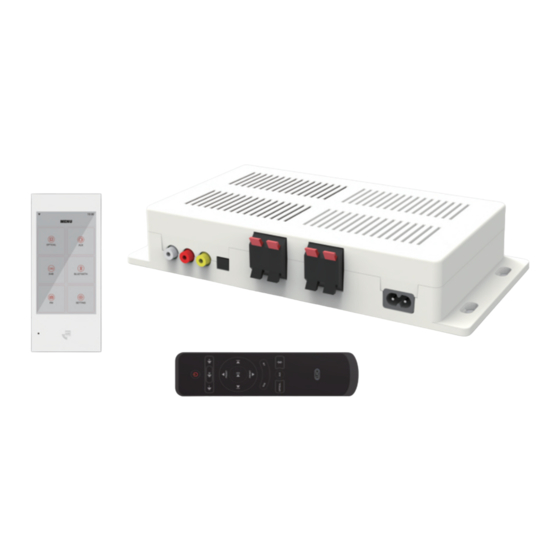
- Page 6 ELKO Smart Sound MODEL:7180/7181 Instruction Manual PRESET PRESET MODEL NO.: 7180 OPTICAL MODEL NO.: 7181 Touch Panel x 1 Instruction manual Antenna x 1 Model No.: 7181 Screw x 4 Main unit x 1 Power canle x 1 PA4 x 12mm Model No.: 7180...
- Page 7 Front View RJ45 Optical input Aux-in Line-in RJ45 AUX-in Socket Ethernet port for connecting to router Optical Input Socket Line-in(L/R) Socket Side View Antenna Antenna Socket Rear View R1 L2 Subwoofer Optical out Use just 8ohm speakers Line-out AC 100-240V~ RCA Output Socket Optical Output Socket Speaker Connection Socket...
-
Page 8: Touch Panel
Touch Panel... - Page 9 Standby If main unit is in standby mode, press it to wake up. Short press this button to enter MUTE on mode, press again to mute off mode. PRESET Short press for volume down, hold on this button to continue volume down. You can cancel mute mode while the device was in mute mode.
- Page 10 Max.10m PRESET PRESET OPTICAL...
- Page 11 main unit 245mm 70mm...
- Page 12 not included not included...
- Page 13 Connections RJ45 Optical input Aux-in Line-in RJ45 Optical input Aux-in Line-in HEADPHONE...
-
Page 14: Optical Connection
Optical connection Use an optical cable(not included)to connect the main unit’s optical input socket with optical output socket of other devices. After connection, press optical icon on the touch panel or the button on remote control to select optical audio to play. RJ45 Optical input Aux-in Line-in... - Page 15 DAB/FM connection DAB/FM audio source requires external antenna(included) for better signal receiving. the connection. The antenna extension can be adjusted to a proper length and angle. After connection, press DAB/FM on the touch Panel or the remote control to select DAB/FM audio to play RJ45 Optical input Aux-in...
-
Page 16: Main Unit
The main cables are designed for Elko speaker system only. DO NOT use the main cable for other purposes. Main unit Unwind the mains cable to its full length. Connect main cable to the AC 100V-240V socket on the main unit, and a mains socket at the other end directly. - Page 17 Full units Setup WIFI WIFI WIFI PRESET PRESET OPTICAL Step 1 Connecting main unit to wireless router...
-
Page 18: General Operations
After remote control is powered with two AAA batteries and the main unit powered on, long press on/off together with play/pause ,led indicator will flashing, then entering to pairing mode, led indicator goes off when paired successfully. General operations Standby/ON for main unit... - Page 20 successfully, the page shows then you can choose to play or disconnect or unpair, as shown below: Choosing OPTICAL or AUX IN source, as shown below:...
- Page 21 After successful network setup, you can stream music from online music app, such as spotify, tunein, Library soundcloud and so on.
- Page 22 Speaker main unit...
-
Page 23: Product Specification
Product Specification Main Unit Power Supply AC 100-240V~ 50Hz Dimension L266*W145*H46.5mm Net Weight 611g Power Consumption WiFi 802.11 A/B/G/N/AC Bluetooth Touch Panel Power Supply AC 100-240V~ 50Hz Dimension L144*W72.5*H42.4mm Net Weight 177g Power Consumption WiFi 802.11 B/G/N Display 3.5 inch TFT touch screen 320*480...
Need help?
Do you have a question about the 7180 and is the answer not in the manual?
Questions and answers