
Related Manuals for STONEX R80


Summary of Contents for STONEX R80
- Page 1 STONEX R80 Robotic Total Station User Manual (October 2019)-Ver.1-Rev.1- Firmware Version V3.0.1.0 150228 www.stonex.it...
-
Page 2: Table Of Contents
Kit components ...............................65 Appendix I: Atmospheric correction formula and chart ..................66 Appendix II: Correction for refraction and earth curvature ..................68 Appendix III: Technical drawing ..........................69 Limited warranty standard ............................70 Environmental recycling .............................71 Stonex R80 Robotic Total Station - User Manual... -
Page 3: Precautions For Safety
The noise from the instrument When the instrument working, it is normal if you hear the noise from instrument motor, it will not affect the instrument work. Stored data responsibility Stonex R80 Robotic Total Station - User Manual... -
Page 4: Definition Of Indication
Do not put the battery in the fire or high temperature condition. Explosion, damage could result. • If use the battery which is not specified by STONEX, there is a danger of fire, electric shock or burn. • If use the power cable which is not specified by STONEX, there is a danger of fire. -
Page 5: Safety Standards For Laser
CDRH.21CFR Part 1040.10 and 1040.11) and “Safety of laser products – parts 1: Equipment classification, requirements and user’s guide” (IEC 60825-1:2001). According to above standards, R80 Series is class ⅢA/3R laser products. When the prism or reflective sheet is selected in Config mode as target, the output is equivalent to the safer class 1. -
Page 6: About User
The manufacturer assumes no responsibility for any damage, and loss of profits caused by usage except • for explained in the user manual. The manufacturer assumes no responsibility for damage caused by wrong transport, or action due to • connecting with other products. Stonex R80 Robotic Total Station - User Manual... -
Page 7: Nomenclature
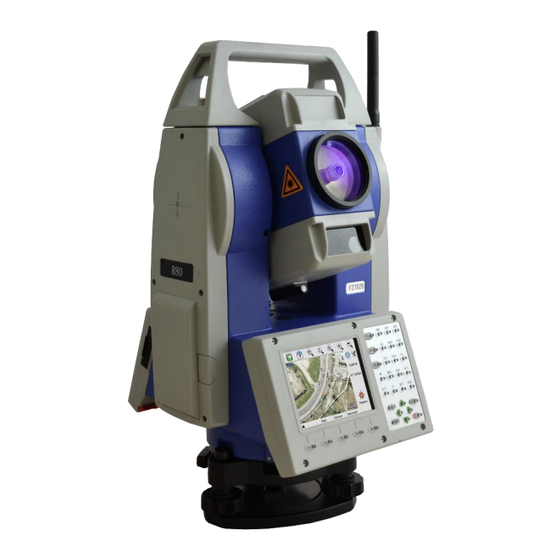
2. Nomenclature 2.1. Parts of the instrument Handle Antenna for long range Bluetooth Instrument Serial number model USB port Keypad Touch pen Battery Display Tribrach Stonex R80 Robotic Total Station - User Manual... - Page 8 Handle screw Guide light Instrument height mark Objective Vertical motion Optical sigh screw Horizontal motion screw Tribrach clamp Leveling screw Stonex R80 Robotic Total Station - User Manual...
-
Page 9: Keyboard
2.2. Keyboard R80 series is equipped with two color touch screens and alphanumeric keypad, operation by both touching screen and pressing keyboard is possible. Do not touch the screen with ball-pen, pencil or other sharp thing to avoid damage on instrument. -
Page 10: Preparation Before Measurement
The symbol only indicates the supply power but not the instantaneous power change. And if the • measurement mode changes, the symbol will not show the power’s decrease or increase immediately. It is suggested that user should check every battery power before field work • Stonex R80 Robotic Total Station - User Manual... -
Page 11: Setting Up The Instrument
Set the tripod so that the head is positioned over the surveying point. Make sure the tripod shoes are firmly fixed in the ground. Stonex R80 Robotic Total Station - User Manual... - Page 12 Mount the instrument on the tripod head. Supporting it with one hand, tighten the centering screw on the bottom of the unit to make sure it is secured to the tripod. Stonex R80 Robotic Total Station - User Manual...
-
Page 13: Centering And Levelling-Up
Turn the instrument approximately 90°. Adjust screw C, till the bubble in the center of the level. Repeat above steps until the bubble remains in the center of the plate level while the instrument is rotated to any position. Stonex R80 Robotic Total Station - User Manual... - Page 14 Accurate levelling-up with electronic level on screen It is convenient for R80 Series to level up with electronic level, especially when it is difficult to observe the circular level and plate level. Firstly, press the [★] key to turn on the electronic bubble as shown in left figure.
-
Page 15: Assembling And Disassembling For Three-Jaws Tribrach
NOTE: Fix the tribrach clamp: if the instrument doesn’t need assembly or disassembly from tribrach frequently, it is necessary to fix the tribrach clamp by fixed screw to avoid the disassembly by accident. Screw out the fixed screw by driver to fix the clamp. Stonex R80 Robotic Total Station - User Manual... -
Page 16: Basic Functions
4. Basic functions 4.1. Comprehensive understanding After initiating the instrument, the screen will go to present “Welcome Interface”. STONEX AIOSurvey consists of several functions: “BSC Measure” (Basic Measurement) is used for surveying and calculating, including some modes, that is, •... - Page 17 “INST Setup” (Instrument Setup) Instrument setup function is mainly applied for instrument settings. • “About” (Relevant Information) Offers information of manufacturer and software version. • “Exit” • Stonex R80 Robotic Total Station - User Manual...
-
Page 18: Bsc Measure Screen Introduction
ElapsedT: elapsed total time in “Loop fine” mode CurIndex: current index number, means the ID number corresponding to the current measure CutT: current time, means the spent time corresponding to the CUrIndex Stonex R80 Robotic Total Station - User Manual... - Page 19 Stop: stops distance measurement; Exit exits basic measurement program. 4.2.3. Function keys They vary from one measurement mode to another. There are some function keys under every measurement mode being listed in the following table. Stonex R80 Robotic Total Station - User Manual...
- Page 20 Set displayed coordinate order as NEZ or ENZ Save Coor Save coordinate of instrument station or not Ang.Unit Set Ang.Unit as DMS, GON, MIL, rad, deg Dist Unit Set Dist Unit as m, UsFeet, IntFeet Stonex R80 Robotic Total Station - User Manual...
-
Page 21: Shortcut Key
Increase backlight brightness of LCD ▲ FUNC+ Decrease backlight brightness of LCD ▼ FUNC+ Turn on/off LCD display in face left position ◄ FUNC+ Turn on/off LCD display in face right position ► Stonex R80 Robotic Total Station - User Manual... -
Page 22: System Information
4.5. How to input number and alphabet Press [α] key: current character entry method will be changed. On the lower right corner, the inputting method will display for a moment. Numbers, capital and small letters are available. Stonex R80 Robotic Total Station - User Manual... - Page 23 It is possible to highlight all the content, double clicking on the cell. Use [B.S] if you want to delete one character or [S.P] to add a white space. Stonex R80 Robotic Total Station - User Manual...
-
Page 24: Instrument Settings
Repeat as the target moves around the screen. After all the targets are clicked, the screen will display as left, tap the screen to register saved data. The screen goes back to Stylus Properties menu. Stonex R80 Robotic Total Station - User Manual... -
Page 25: Inst Setup
The distance is measured once and, for some EDM, a frequency is added to have an higher accurancy. Average Fine The measuring is continuous and the number of measures is choosen by the operator (see 6.2. Distance measurement). Tracking The distance is measured continuely untill [STOP] is pressed. Stonex R80 Robotic Total Station - User Manual... - Page 26 0.5 second. • Distance Unit: set the distance unit between Meter, US Feet, Feet. Distance precision: the displayed minimum angle format can be selected in the following way: 1mm; • 0.1 mm. • Stonex R80 Robotic Total Station - User Manual...
- Page 27 They determine the limits within which the target is tracked. The corresponding unit is 0.1”, so if 500 has been set, the instrument will search the point up to 50 seconds. Stonex R80 Robotic Total Station - User Manual...
- Page 28 Bluetooth port: • choose between Geocom and Basic Physical port (to connect a serial port cable RS232C) • Select the Baudrate and the profile, according to the device you want to connect. Stonex R80 Robotic Total Station - User Manual...
-
Page 29: Star Settings
TIP_SOUND: ticking it, the sound is on while • measuring; AIM: these settings can be defined if target type is not • “No Prism”. You can choose Mechanical Aim (to aim it Stonex R80 Robotic Total Station - User Manual... - Page 30 The guide light could be seen within 100 meters, even if the distance may be affected by atmospheric conditions and others. Stonex R80 Robotic Total Station - User Manual...
- Page 31 Open Port: tick the port you want to use: “BT Port” is the Bluetooth connection; “PHY Port” is the • physical port service of system. Exit: exit the electronic bubble screen. Stonex R80 Robotic Total Station - User Manual...
-
Page 32: Setup Parameters
The angle Unit as DMS (degree-minutes-seconds), • GON, MIL (milliradians), rad (radians), degree; The Distance Unit as m, UsFeet, IntFeet. • Stonex R80 Robotic Total Station - User Manual... -
Page 33: Measurement
Set horizontal angle as zero for the first target, clicking the [S.Zero] button, and choose “Yes” in the popup dialog box. Collimate the second target, and the horizontal angle and vertical angle will display on the screen of instrument. Stonex R80 Robotic Total Station - User Manual... - Page 34 6.1.3. Setting horizontal angle to a required position Make sure the operation is under angle measurement mode. Sight the needed direction. Click [L.Angle] key to activate the function of locking horizontal angle. Collimate target point used for orientation. Stonex R80 Robotic Total Station - User Manual...
- Page 35 Input horizontal angle you need (such as: 232°26'26"). Data entry should be referred to the format shown in the dialog box. Click [Enter] key, and angle measurement after orientation will go on. Stonex R80 Robotic Total Station - User Manual...
- Page 36 6.1.6. Carrying out angle retesting This program is applied for adding up angle retesting values, displaying the sum and the average of all observed values, and meantime recording the number of observations. Stonex R80 Robotic Total Station - User Manual...
- Page 37 Collimate the second target B and click [L.Angle] key. “Count” stands out the number of angle measures (1 in this step). Collimate the first target A again using horizontal clamp and tangent part. Click [Unlock] key. Stonex R80 Robotic Total Station - User Manual...
- Page 38 Click [L.Angle] key. And then the screen displays the sum (Ht) and the average (Hm) of all angles. Repeat the last two steps according to the requirement and carry out angle retesting. Stonex R80 Robotic Total Station - User Manual...
-
Page 39: Distance Measurement
Selecting “Relative.A” you can input the required horizontal and vertical angles to measure with respect to the current angles. You can also set the rotation way: CW: Clockwise • ACW: Anticlockwise • Stonex R80 Robotic Total Station - User Manual... - Page 40 While turning the face, angle measures are shown. When it reaches the designated position, it will automatically stop, and you can also click the displayed angle windows to abort it. At the end, you see results on the screen. Stonex R80 Robotic Total Station - User Manual...
- Page 41 • Loop Fine: continuous measure • Track: tracking measure. It takes less time than • accurate measurement. It is mainly applied for setting-out survey and useful for tracking moving target. Select [Enter]. Stonex R80 Robotic Total Station - User Manual...
- Page 42 When you preset the measuring times, the instrument will carry out distance measurement and display the average distance according to the setting times. If you preset single observation (Fine mode), the average distance won’t be displayed, but the distance comes out from a single measure. Stonex R80 Robotic Total Station - User Manual...
-
Page 43: Coordinate Measurement
After inputting coordinate of occupied point (instrument location), unknown point coordinate will be measured and displayed with this program. Click [OCC PT] key. Input coordinate of occupied point from N to Z and click [Enter] to return to the coordinate measurement interface. Stonex R80 Robotic Total Station - User Manual... - Page 44 A dialog box is ejected as figure shows. Collimate backsight point, click [Yes] key. And then the system will define backsight azimuth angle which displays in the upper left corner of coordinate measurement screen. Stonex R80 Robotic Total Station - User Manual...
- Page 45 Coordinate measurement must be based on instrument height and prism height, thus coordinate of unknown point can be calculated easily and directly. Click [Setup] key. Input instrument height (IH) and prism height (PH). Finishing data entry, click “Enter” key to return to coordinate measurement screen. Stonex R80 Robotic Total Station - User Manual...
- Page 46 Measure the coordinate of foresight point and save it in the list, this point would be taken as the occupied point after transferring to point 2, and the previous occupied point will be taken as the backsight point, the azimuth angle will be calculated and set. Stonex R80 Robotic Total Station - User Manual...
- Page 47 Set coordinate of occupied point P0 and azimuth angle from point P0 to known point A. Click [Line] key. Click [Save] key with stylus. Click [Setup] key to reset instrument and prism heights. And then click [Enter] key. Stonex R80 Robotic Total Station - User Manual...
- Page 48 P1 (transfer prism from P1 to P0 meantime). After instrument is established in P1, enter into traverse surveying of coordinate measurement thought the [Setup] button and select “Call” button with stylus. Stonex R80 Robotic Total Station - User Manual...
- Page 49 A0, instrument height has only to be set (prism height is set as 0). Set coordinates, referring to 6.3.1. Setting coordinate of occupied point. • Angle offset measurement Stonex R80 Robotic Total Station - User Manual...
- Page 50 Click [Offset] key and [ANG.Offset] key in ejecting dialog box. Select “Free VA” (or “Lock VA”) with stylus to start angle offset measurement (user makes a choice on the basis of own demand) Stonex R80 Robotic Total Station - User Manual...
- Page 51 Collimate prism P and click [Measure] key. Collimate target A0 with horizontal clamp and tangent part. Click [Continue] key. Then slope and horizontal distances and elevation difference from instrument to A0 and coordinate of A0 will be shown. Stonex R80 Robotic Total Station - User Manual...
- Page 52 Entry the horizontal distance of front and back (dFR) and horizontal distance of left and right (dRL). If it hasn’t already done, click [Setup] key to set instrument height and prism height. Collimate prism and click [Measure] key. Stonex R80 Robotic Total Station - User Manual...
- Page 53 (P0), the instrument calculates and displays coordinate and distance value of cross point between collimation axis and of the plane. Click [PLANE Offset] key. Stonex R80 Robotic Total Station - User Manual...
- Page 54 If the three observing points can’t determine a plane, the system will display error message. Thus observe • the first point once again. When collimation axis doesn’t intersect with determined plane, the system will display error message. • Stonex R80 Robotic Total Station - User Manual...
- Page 55 1/2 of total direction angle of circumscription points P2 and P3. Click [CYL.Offset] key. If it hasn’t already done, click [Setup] key to set instrument height and prism height. Collimate the center (P1) of column surface, and then click [Measure] key. Stonex R80 Robotic Total Station - User Manual...
- Page 56 Collimate left point (P2) of column surface, and then click [Continue] key. Collimate right point (P3) of column surface. Click [Continue] key, and relational values between instrument and the center of column (P0) can be calculated and shown. Stonex R80 Robotic Total Station - User Manual...
-
Page 57: Data Management
2) Select [Exit] icon 3) A dialog box is ejected requiring if turn off: Select [No] You can find the setup inside the USB dongle that you find in the carrying case Stonex R80 Robotic Total Station - User Manual... - Page 58 4) Double click “My device” item 5) Open the cover of USB which behind the display panel 6) Input external memory stick into USB host connector 7) The external memory stick is recognized as hard disk automatically. Stonex R80 Robotic Total Station - User Manual...
-
Page 59: Check And Adjustment
If the difference is over ±3mm after the preceding operations, it is necessary to reset the instrument constant. Adjustment If it is necessary to reset the instrument constant, please contact STONEX service representative to perform that. Stonex R80 Robotic Total Station - User Manual... -
Page 60: Plate Level
Level it accurately by the plate level. Adjust the three adj-screws to center the bubble by a wrench. NOTE: Be careful when adjusting the three screws, and the tightening tension is identical for them. Stonex R80 Robotic Total Station - User Manual... -
Page 61: The Optical Sight
1.5mm hexagon wrench to move laser spot to the cross mark, correct only one-half of the displacement in this manner. Adjusting details see figure on the right. Stonex R80 Robotic Total Station - User Manual... -
Page 62: Vertical Cross-Hair On Telescope
Repeat the checking and adjusting until there is no deviation. NOTE: After the adjustment of cross-hair, please check the collimation error and vertical index error, see 8.7. EDM optical axis and the telescope sighting axis error. Stonex R80 Robotic Total Station - User Manual... -
Page 63: Edm Optical Axis And The Telescope Sighting Axis Error
8.7. EDM optical axis and the telescope sighting axis error It is necessary to check this error after the adjustment of telescope reticle error. EDM optical axis check Install the instrument at the tripod or a stable device and level it accurately, then turn on the instrument’s power on. -
Page 64: Technical Features
Good condition: no haze, visibility about 40km, no heat shimmer, breeze. Under optimal conditions on Kodak Grey Card (90% reflective) Class 1 Class 2 Class 3R Standard deviation based on ISO 17123-4 Stonex R80 Robotic Total Station - User Manual... -
Page 65: Kit Components
10. Kit components R80 Series Total Station • Carrying case • Tribrach • Carrying strap x2 • Battery x2 • Battery charger • USB communication cable • RS232C Comunication cable • Touch pen • Lens cap • Antenna for Bluetooth long range •... -
Page 66: Appendix I: Atmospheric Correction Formula And Chart
The atmospheric value is obtained easily with the atmospheric correction chart. Find the measured temperature in horizontal axis, and pressure in vertical axis on the chart. Read the value from the diagonal line, which is the required atmospheric correction value. Stonex R80 Robotic Total Station - User Manual... - Page 67 Stonex R80 Robotic Total Station - User Manual...
-
Page 68: Appendix Ii: Correction For Refraction And Earth Curvature
���� = ���� cos �� ���� = ���� ∣ sin �� ∣ NOTE: The factory setting for the refraction coefficient K is 0.142. • Refer to the section 5.2.1. Measure condition settings. • Stonex R80 Robotic Total Station - User Manual... -
Page 69: Appendix Iii: Technical Drawing
Appendix III: Technical drawing Stonex R80 Robotic Total Station - User Manual... -
Page 70: Limited Warranty Standard
STONEX® sales document or advice that may be provided to Customer by any STONEX® representative in connection with Customer’s purchase of the Product. No change to the conditions of this Limited Warranty is valid unless it is made in written form and signed by an authorized STONEX® supervisor. STONEX® warrants that: Products are free from defects in materials or workmanship for generally 2 years except for accessories or specific parts for which different limited warranty period shall apply. -
Page 71: Environmental Recycling
STONEX®, its affiliates or suppliers be liable to customer or any third party for any damage in excess of the purchase price of the product. this limitation applies to damages of any kind whatsoever including (1) damage to, or loss or corruption of, customer’s records, programs, data or removable storage media,... - Page 72 FOR COUNTRIES OUTSIDE EUROPEAN UNION (EU) The treatment, recycling, collection and disposal of electric and electronic devices may vary in accordance with the laws in force in the Country in question. Stonex R80 Robotic Total Station - User Manual...
- Page 73 STONEX® SRL Via dell’Industria, 53 - 20037 Paderno Dugnano (MI) Tel : +390278619201 | Fax :+ 390278610299 Stonex R80 Robotic Total Station - User Manual www.stonex.it | info@stonex.it...
Need help?
Do you have a question about the R80 and is the answer not in the manual?
Questions and answers