Arjo Maxi 500 Instructions For Use Manual
Hide thumbs
Also See for Maxi 500:
- Quick reference manual (3 pages) ,
- Operating and product care instructions (30 pages)
Table of Contents
Advertisement
Advertisement
Table of Contents

Related Manuals for Arjo Maxi 500


Summary of Contents for Arjo Maxi 500
- Page 1 INSTRUCTIONS FOR USE Maxi 500 001.20815.EN Rev 17 • 08/2019...
- Page 2 Mandatory to read the Instructions for Use. Design Policy and Copyright ® and ™ are trademarks belonging to the Arjo group of companies. © Arjo 2019. As our policy is one of continuous improvement, we reserve the right to modify designs without prior notice.
-
Page 3: Table Of Contents
Homecare Environment Considerations ........................ 4 Symbols Used ..........................5 General Symbols ............................. 5 Charger Related ............................5 Product Description ........................6 How to use the Maxi 500 ......................7 Adjusting Legs Spreading ........................7 Brakes ..............................7 Emergency Stop ............................7 Boom Control ............................7 To Raise the Patient .............................. - Page 4 Loop Slings Application ......................16 Compatible Loop Slings ......................... 16 Sling Selection ............................17 Spreader Bar Compatibility ........................17 Attaching the Sling to the Spreader Bar ....................17 Positioning the Patient ............................17 Attachment Methods ............................18 ....................19 Lifting Patient from a Seated Position ......................... 19 Lowering Patient to a Seated Position ........................
-
Page 5: Foreword
Your Arjo vendor can offer support and service The information in this manual is crucial to the proper use and maintenance of the Maxi 500 reliability and value of the product. . It will help protect your product as well as ensure that it performs to your satisfaction. -
Page 6: Safety Instructions
Use and “Preventive Maintenance Schedule”. • Transferring to or from adjacent location, such as chair, wheelchair, bed, Important Safety Instructions • Before using the Maxi 500, a clinical • Assisting patient with tasks such as, assessment of the patient’s suitability for toileting. -
Page 7: Policy On Number Of Staff Members Required For Patient Transfer
If the lift is suspected to be damaged, contact your local Arjo vendor for servicing. CAUTION Maxi 500 in humid, salty, or chlorinated conditions may cause premature wear of the lift. In such cases, we recommend to perform a proactive maintenance program with more frequent inspections. -
Page 8: Battery And Battery Charger Safety Practices
Make sure the battery belongs to the device by Homecare Environment Considerations comparing the battery label with the “Technical WARNING: The Maxi 500 is not intended to be operated by children. Serious injuries assistance. could occur. -
Page 9: Symbols Used
Symbols Used General Symbols This symbols points out a risk This symbol points out the of pinching. manufacturer’s name and address. May also point out manufacturing date. SWL is the maximum load the CE marking indicating device is rated for safe usage. conformity with European Community harmonised legislation. -
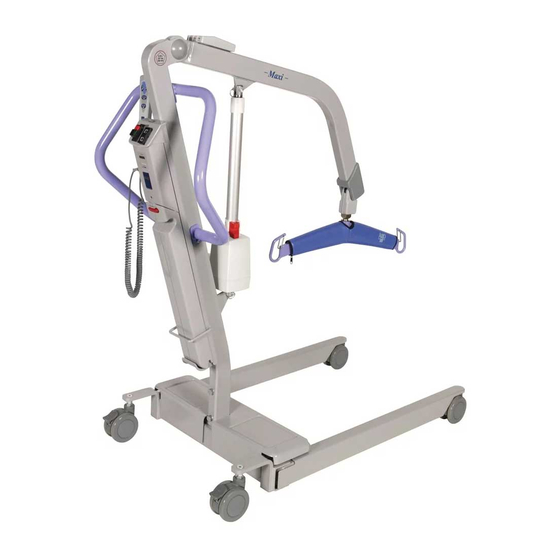
Page 10: Product Description
Product Description Fig. 2 Legend 14) Charger Status LED 1) Down Button 15) Wall-Mounted Charger 2) Reset Button 16) Charger Power Cord 3) Emergency Stop Button 17) Right Leg 18) Left Leg 5) Hand Control 19) Actuator 6) Leg Opening Button 20) Emergency Lowering Handle 7) Leg Closing Button 21) Mast... -
Page 11: How To Use The Maxi 500
How to use the Maxi 500 Adjusting Legs Spreading Boom Control The legs’ opening width The electrical actuator can be operated in both can be adjusted by using directions. It allows the operator to raise or the two bottom buttons on lower the patient without any physical effort. -
Page 12: Moving The Maxi 500
Automatic Cut-out During lifting This feature will stop the lifting motion in the event where the Maxi 500 is trying to raise a patient heavier than the SWL. During lowering Transfer Direction This feature disables the down motion when the boom is being lowered onto the patient or any other obstruction. -
Page 13: Battery Charge Indicator
IFU. before the indicator reaches the Low Battery range. To ensure that the Maxi 500 is always ready for use, it is recommended that a fully charged battery pack always be available. Do this by having additional battery packs, and keeping one battery pack charging while the other is in use. -
Page 14: Clip Slings Application
Clip Slings Application Clip Sling Compatibility This section only applies for model supplied with the DPS spreader bar. Following is a list of typical Arjo clip slings that are compatible with the Maxi 500 Four-Point Amputee Four-Pointed Padded Four-Point Hygienic... -
Page 15: Sling Selection
Flites (single patient multi-use slings) are also ® available for most sling models. If Arjo Flites slings are to be used with the MAXI 500 refer to the separate Arjo Flites slings Instruction for Use. Spreader Bar Compatibility The Maxi 500... -
Page 16: Attaching The Sling To The Dps
Attaching the Sling to the DPS Insert the clip attachment over the lug on the DPS. Secure the clip in place by pulling the sling down so that the lug is in the top portion of the clip hole. WARNING: Make sure all clips are correctly engaged. -
Page 17: Lifting Patient From A Seated Position
3) Pull each leg strap under the thigh so that it emerges on the inside of the thigh. Slings Before using the Maxi 500 ensure that: • A clinical assessment of the patient’s suitability for transfer is carried out by a... -
Page 18: Lifting Patient From A Bed
Lifting Patient from a Bed bar taking care not to lower the frame onto Before you start, make sure the bed is in correct the patient. working height. 7) Connect the sling shoulder and leg strap WARNING: Make sure that the bed safety clips to the spreader bar. -
Page 19: Lifting Patient From The Floor
Lifting Patient from the Floor 5) Adjustment of the spreader bar height may have to be made before connection is The technique described here can be used for possible. with the open part of the sling, support or fall should only be lifted after examination by frame pointing downwards towards the shoulders, connect the leg strap clips. -
Page 20: Loop Slings Application
This section only applies for lifts supplied with a 2-point spreader bar. Maxi 500. Hammock 6 Hammock Combi Hygienic (THY) Repositioning NOTE: Other sling models are available. Contact your Arjo vendor for more information about loop slings and how to use them. Loop Slings Application... -
Page 21: Sling Selection
If Arjo Flites The spreader bar that is attached to the lift slings are to be used with the Maxi 500 determines what slings can be used to transfer refer to the separate Arjo Flites slings Instruction a patient. -
Page 22: Attachment Methods
Attachment Methods the sling to both sides of the spreader bar. Attachments Points The attachment point designation shown here are only for the purpose of the explanations below. Fig. 29 Method 1 - Cross-through This method is recommended for most general transfer Fig. -
Page 23: Lifting Patient From A Seated Position
Transferring Patients Using Loop Slings Before using the Maxi 500 ensure that: • A clinical assessment of the patient’s suitability for transfer is carried out by a that, among other things, the transfer may induce substantial pressure on the patient’s body. -
Page 24: Lifting Patient From A Bed
Lifting Patient from a Bed 6) Connect the shoulder loops, and then the leg section using one of the three methods Before you start, make sure the bed is in correct previously described. working height. WARNING: Make sure that the bed safety side is installed to prevent the patient from falling. -
Page 25: Lifting Patient From The Floor
Lifting Patient from the Floor 5) Adjustment of the spreader bar height may have to be made before connection is The technique described here can be used for possible. 6) Connect the shoulder loops, and then the leg section using one of the three methods or fall should only be lifted after examination by previously described. -
Page 26: Care And Maintenance
Care and Maintenance Lift Cleaning and Care Note: It is recommended that your Maxi 500 and its accessories are cleaned and disinfected between each patient use, or daily as a minimum. If the lift and equipment needs cleaning, or is suspected of being... -
Page 27: Preventive Maintenance Schedule
Continuing to use this equipment without WARNING personnel, fully trained in servicing procedures by Arjo, and equipped with correct tools and proper documentation, including Parts List and Service Manual. Failure to meet these requirements could WARNING: Never proceed to maintenance or service while lift is in use with a patient. - Page 28 18) Make sure that the straight section of both legs is perpendicular to the base, in closed position. 19) If the product does not work as intended, immediately contact your local Arjo vendor for support. 21) Check the condition of the friction discs and bushings of the DPS within the pivot points.
-
Page 29: Troubleshooting
Battery Trouble Resolution Yellow indicator light does not go • Internal batteries need replacing. Call Arjo for replacement. off after several hours of charging time. Battery pack indicates it is fully • Replace the battery.*... -
Page 30: Labels On The Lift
Labels on the Lift Product Name Emergeny Stop S.W.L. 227 kg /Reset Button 500 lbs Safe Working Load (On Both Sides) Battery Information KM561091 KM56-XXXXX ArjoHuntleigh AB Verkstadsvägen 5 241 38 Eslöv SWEDEN 2012-12 Made in Canada Serial Number Manufacturer Data Manufactured Date Fig. - Page 31 WARNING: Portable RF communications equipment (including peripherals such as antenna cables and external antennas) should be used no closer than 30 cm to any part of the Maxi 500 manufacturer. Otherwise, performance degradation of this equipment could result. See “Electromagnetic Compatibility”...
-
Page 32: Dimensions
12 cm 2.5 cm 56 cm 114 cm CSP stands for Central Suspension Point: a reference point on the lift for measurements. On the Maxi 500 the CSP is the Accessory attachment point located at the boom end. Fig. 43... -
Page 33: Electromagnetic Compatibility
Electromagnetic Compatibility Electromagnetic Compliance The Maxi 500 has been tested for compliance with current regulatory standards regarding its capacity to block EMI (electromagnetic interference) from external sources. Nonetheless, some procedures can help reduce electromagnetic interferences: • accepted emissions standards. •... -
Page 34: Electromagnetic Immunity
Electromagnetic Immunity Guidance and Manufacturer’s Declaration - Electromagnetic Immunity - For all Equipment and Systems IEC 60601 test Electromagnetic environment - Immunity test Compliance level level guidance Electrostatic Floors should be wood, concrete or discharge ±8 kV contact ±8 kV contact (ESD) synthetic material, the relative ±15 kV air... - Page 35 (continued) Guidance and Manufacturer’s Declaration - Electromagnetic Immunity - For all Equipment and Systems Electromagnetic Immunity test IEC 60601 test level Compliance level environment - guidance 3 V outside ISM bands 3 V outside ISM bands Conducted RF IEC 61000-4-6 6 V inside ISM and 6 V inside ISM and amateur radio bands...
- Page 36 Intentionally left blank Electromagnetic Compatibility...
- Page 37 Intentionally left blank...
- Page 38 Intentionally left blank...
- Page 39 AUSTRALIA FRANCE POLSKA Arjo Australia Pty Ltd Arjo SAS Arjo Polska Sp. z o.o. 78, Forsyth Street 2 Avenue Alcide de Gasperi ul. Ks Piotra Wawrzyniaka 2 O’Connor CS 70133 PL-62-052 KOMORNIKI (Pozna ) AU-6163 Western Australia FR-59436 RONCQ CEDEX...
- Page 40 At Arjo, we are committed to improving the everyday lives of people affected by reduced mobility and age-related health challenges. With products and solutions that ensure ergonomic patient handling, personal hygiene, disinfection, diagnostics, and the effective prevention of pressure ulcers and venous thromboembolism, we help professionals across care environments to continually raise...
Need help?
Do you have a question about the Maxi 500 and is the answer not in the manual?
Questions and answers