
Subscribe to Our Youtube Channel
Related Manuals for Kramer TP-594Txr


Summary of Contents for Kramer TP-594Txr
- Page 1 USER MANUAL MODELS: TP-594Txr HDMI Line Transmitter TP-594Rxr HDMI Line Receiver P/N: 2900-301015 Rev 1 www.kramerAV.com...
-
Page 2: Table Of Contents
Connecting the TP-594Txr Connecting the Analog Audio Output to a Balanced/Unbalanced Stereo Audio Acceptor Connecting a Balanced/Unbalanced Stereo Audio Source to the Analog Audio Balanced Input Connecting to TP-594Txr / TP-594Rxr via RS-232 Wiring the RJ-45 Connectors Routing Audio Signals... -
Page 3: Introduction
Kramer Electronics Ltd. Introduction Welcome to Kramer Electronics! Since 1981, Kramer Electronics has been providing a world of unique, creative, and affordable solutions to the vast range of problems that confront the video, audio, presentation, and broadcasting professional on a daily basis. In recent years, we... -
Page 4: Overview
European Advanced Recycling Network (EARN) and will cover any costs of treatment, recycling and recovery of waste Kramer Electronics branded equipment on arrival at the EARN facility. For details of Kramer’s recycling arrangements in your particular country go to our recycling pages at www.kramerav.com/support/recycling. - Page 5 Intelligent Source Forward Audio Routing: ▪ For TP-594Txr, the balanced analog stereo audio port signal is converted into a digital signal and embedded into the transmitted HDMI signal, replacing the embedded HDMI audio input signal. This enables embedding a selectable audio source over HDMI.
-
Page 6: Typical Applications
• 4K HDR AV extension in conference rooms, boardrooms, control rooms, hotels and large church facilities. Controlling your TP-594Txr / TP-594Rxr Control your TP-594Txr: • By RS-232 serial commands transmitted by a touch screen system, PC, or other serial controller. -
Page 7: Defining The Transmitter And Receiver
RESET Recessed Button Press and hold to reset settings to factory default values. PROG USB Port Connect to a USB memory device to upgrade the firmware. 48V DC Power Terminal Connect to the supplied power adapter. Block Connector TP-594Txr, TP-594Rxr – Defining the Transmitter and Receiver... -
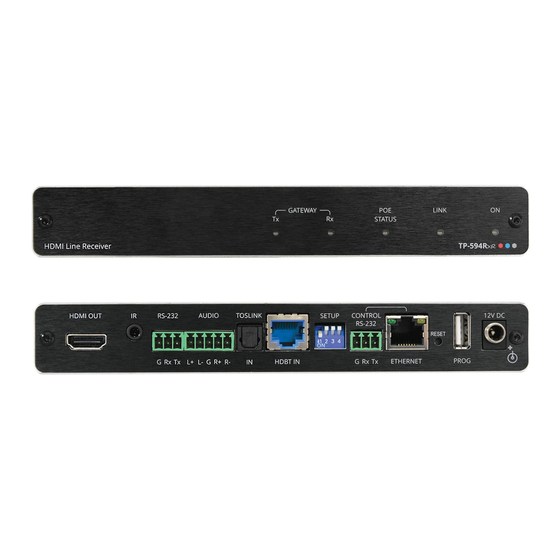
Page 8: Defining Tp-594Rxr
Connect to a USB memory device to upgrade the firmware. 12V DC Power 12V DC connector for powering the unit when unit is not powered via the Connector HDBT link by the transmitter. TP-594Txr, TP-594Rxr – Defining the Transmitter and Receiver... -
Page 9: Mounting Tp-594Txr / Tp-594Rxr
Kramer Electronics Ltd. Mounting TP-594Txr / TP-594Rxr This section provides instructions for mounting TP-594Txr/ TP-594Rxr. Before installing, verify that the environment is within the recommended range: • Operation temperature – 0 to 40C (32 to 104F). • Storage temperature – -40 to +70C (-40 to +158F). -
Page 10: Connecting The Tp-594Txr
Connect the AUDIO 5-pin terminal block connector to an audio acceptor (for example, active speakers). Connect the controls: 3. On TP-594Txr, connect a device controller (for example, a laptop) to the CONTROL RS-232 port TP-594Txr, TP-594Rxr – Connecting the TP-594Txr... -
Page 11: Connecting The Analog Audio Output To A Balanced/Unbalanced Stereo Audio Acceptor
5. Control the smart TV via RS-232: ▪ TP-594Txr connect a room controller (for example, the Kramer SL-240C with Kramer Control) to the RS-232 3-pin terminal block connector ▪ TP-594Rxr connect the RS-232 3-pin terminal block connector to the smart ▪... -
Page 12: Connecting A Balanced/Unbalanced Stereo Audio Source To The Analog Audio Balanced Input
Figure 6: Connecting a Balanced Stereo Audio Figure 7: Connecting an Unbalanced Stereo Audio Source to the Balanced Input Source to the Balanced Input Connecting to TP-594Txr / TP-594Rxr via RS-232 in this section, TP-594Txr is taken as an example... -
Page 13: Wiring The Rj-45 Connectors
For HDBT cables, it is recommended that the cable ground shielding be connected/soldered to the connector shield. EIA /TIA 568B Wire Color Orange / White Orange Green / White Blue Blue / White Green Brown / White Brown TP-594Txr, TP-594Rxr – Connecting the TP-594Txr... -
Page 14: Routing Audio Signals
TP-594Txr is set to Analog, ARC cannot be output via the analog AUDIO port. Figure 8: TP-594Txr Video and Audio Page – Analog Audio to Receiver Settings 5. In the TP-594Rxr Navigation pane, click Video & Audio. The Video and Audio settings page appears. - Page 15 Set Audio Embedding Selection Priority to HDMI. ▪ View the active audio Current Selection (Embedded in this example). Figure 10: TP-594Txr Video and Audio Page – HDMI Audio to Receiver Settings 5. In the TP-594Rxr Navigation pane, click Video & Audio. The Video and Audio settings page appears.
- Page 16 TP-594Txr is set to Analog, ARC cannot be output via the analog AUDIO port. Figure 12: TP-594Txr Video and Audio Page – Auto Priority Audio Settings 4. In the TP-594Rxr Navigation pane, click Video & Audio. The Video and Audio settings page appears.
- Page 17 When the Audio Embedding Selection Priority on the TP-594Txr is set to Analog, ARC cannot be output via the analog AUDIO port. Figure 15: TP-594Txr Video and Audio Page – Analog Audio to Receiver Settings (no HDMI signal) TP-594Txr, TP-594Rxr – Routing Audio Signals...
-
Page 18: Routing Tp-594Rxr Audio Signals
16), perform the following operations: • Routing HDMI-out ARC signal to AUDIO on TP-594Rxr on page 17. • Routing Audio Return Signals on TP-594Txr on page 17. Defining the ARC Source To define the ARC signal source: 1. In the TP-594Rxr Navigation pane, click Video &... - Page 19 The ARC signals are defined in the TP-594Rxr Video & Audio web page and extended via HDBT to their destination ports on TP-594Txr. To route an ARC signal to the AUDIO port on TP-594Txr: Define the ARC signal source on TP-594Rxr (see...
- Page 20 Audio Line-ARC Extraction Destination (see Setting Audio Parameters on page 34). Figure 19: Setting Audio Line-ARC Extraction Destination on TP-594Txr When ARC De-embedding Destination is set to Analog-out, the analog AUDIO port should not be connected to an analog audio source.
-
Page 21: Extending And Routing Control Signals
ETH port on the transmitter side, and the FC-7 that is connected to the ETH port on the receiver side. FC-7 relays are connected to the blinds. Figure 20: Extending Control Signals via HDBT TP-594Txr, TP-594Rxr – Extending and Routing Control Signals... -
Page 22: Extending Hdmi Cec Commands Via Hdmi Connections
TP-594Rxr built-in control gateway connection. On the transmitter, KT-107 (with Kramer Control) is connected to the Ethernet port via LAN. KT-107 sends IP commands to the receiver control gateway, over the HDBT LAN connection, to send control messages to, and receive control responses from: •... - Page 23 CEC configuration (such as the CEC logical address of the control gateway), as well as its manual commands sending operation, is done via TP-594Rxr control gateway webpages (see Defining TP-594Rxr Gateway and Ports Activation on page 38). TP-594Txr, TP-594Rxr – Extending and Routing Control Signals...
-
Page 24: Operating And Controlling Tp-594Txr And Tp-594Rxr
EDID changes such as EDID Designer EDID setup and EDID changes due to panel keys/switches user changes. The unit must be powered off and on for the new settings to activate. TP-594Txr, TP-594Rxr – Operating and Controlling TP-594Txr and TP-594Rxr... -
Page 25: Operating Via Ethernet
3. Highlight the network adapter you want to use to connect to the device and click Change settings of this connection. The Local Area Connection Properties window for the selected network adapter appears. Figure 24: Local Area Connection Properties Window 4. Highlight Internet Protocol Version 4 (TCP/IPv4). TP-594Txr, TP-594Rxr – Operating and Controlling TP-594Txr and TP-594Rxr... - Page 26 Ethernet port on a network hub or using a straight-through cable with RJ-45 connectors. Configuring the Ethernet Port You can set the Ethernet parameters via the embedded Web pages. TP-594Txr, TP-594Rxr – Operating and Controlling TP-594Txr and TP-594Rxr...
-
Page 27: Using The Embedded Web Pages
To browse the Web pages: 1. Open your browser: ▪ When DHCP is ON – Access the web page for each device by entering the device name in the address bar of your browser. TP-594Txr, TP-594Rxr – Using the Embedded Web Pages... - Page 28 3. Enter the Username and Password (Admin, Admin by-default) and click the arrow button. The General Info page appears: ▪ For TP-594Txr: Figure 29: TP-594Txr Routing Settings Page with Navigation List on Left TP-594Txr, TP-594Rxr – Using the Embedded Web Pages...
- Page 29 Defining TP-594Rxr Gateway and Ports Activation on page 38. • Setting TP-594Rxr Gateway Serial Port Settings on page 41. • Setting Web Page Access Permission on page 42. • Viewing the About Page on page 44. TP-594Txr, TP-594Rxr – Using the Embedded Web Pages...
-
Page 30: Viewing General Information
To view the connected clients list, in the Navigation pane, click Connected Clients page. The Connected Clients page opens: Figure 32: Connected Clients Page • Client IP lists the IP addresses of the connected clients (for example, your PC, an IP-enabled controller and so on). TP-594Txr, TP-594Rxr – Using the Embedded Web Pages... -
Page 31: Changing Device Settings
Viewing the HDBT range mode status as defined by DIP-switch 1 (see Setting the DIP- Switches on page 22). • Upgrading the Firmware on page 31. • Soft Factory Reset on page 32. TP-594Txr, TP-594Rxr – Using the Embedded Web Pages... - Page 32 IP address, auto-acquired after no DHCP server detection, with default set to: • 192.168.1.39 for TP-594Txr. • 192.168.1.40 for TP-594Rxr. The confirmation window appears: Figure 34: Device Settings Page – Changing to DHCP Mode TP-594Txr, TP-594Rxr – Using the Embedded Web Pages...
- Page 33 3. Select the correct firmware file from the PC that is connected to the device. Each device has its own firmware file. 4. Click Open. The selected file appears in the Firmware Update line. TP-594Txr, TP-594Rxr – Using the Embedded Web Pages...
- Page 34 Figure 38: Device Settings Page – Soft Factory Reset Message 3. Click OK and wait for the web page to reload following soft factory reset. Default Communication Parameters on page to view other factory reset procedures. TP-594Txr, TP-594Rxr – Using the Embedded Web Pages...
-
Page 35: Defining Tp-594Txr Video And Audio Settings
18G ultra-high definition 4K60 4:4:4 (4K HDR) HDMI signal extension over the HDBT link. When DSC is disabled, only 10G 4K60 4:2:0 HDMI signal extension is supported over the HDBT. TP-594Txr, TP-594Rxr – Using the Embedded Web Pages... - Page 36 Analog. 4. Select the audio signal detection level (-45dBFS, by default) to determine the signal detection sensitivity level. Signal detection level ranges from -57dBFs (the highest sensitivity) to -20dBFS (the lowest sensitivity). TP-594Txr, TP-594Rxr – Using the Embedded Web Pages...
-
Page 37: Defining Tp-594Rxr Video And Audio Settings
Setting Video Parameters To set the input video parameters: 1. In the Navigation pane, click Video & Audio. The Video and Audio settings page appears. Figure 40: TP-594Rxr Video & Audio Page TP-594Txr, TP-594Rxr – Using the Embedded Web Pages... -
Page 38: Managing Edid
When acquiring the EDID: • TP-594Txr acquires the EDID from HDBT OUT/default/EDID file to use with HDMI IN. • TP-594Rxr acquires the EDID from HDMI OUT/default/EDID file to use with HDBT IN. TP-594Txr, TP-594Rxr – Using the Embedded Web Pages... - Page 39 To acquire the EDID from the default EDID: 1. In the Navigation pane, click EDID. The EDID management page appears. 2. Click Default. Figure 41: TP-594Txr EDID Management Page Figure 42: TP-594Rxr EDID Management Page TP-594Txr, TP-594Rxr – Using the Embedded Web Pages...
-
Page 40: Defining Tp-594Rxr Gateway And Ports Activation
TP-594Rxr, for example, control a display that is connected to the HDMI OUT connector via CEC commands. CEC commands and responses can be routed both via gateway and HDBT simultaneously. TP-594Txr, TP-594Rxr – Using the Embedded Web Pages... - Page 41 HDBT link, while CEC control is done via IR remote control units of the HDMI-connected devices, either on the transmitter side or receiver side. TP-594Txr, TP-594Rxr – Using the Embedded Web Pages...
- Page 42 1. In the Navigation pane select Control Gateway. The Gateway & Ports Activation page appears. 2. Under Manual Control, select the Control Port (RS-232, IR or CEC). 3. Enter a Hex command. TP-594Txr, TP-594Rxr – Using the Embedded Web Pages...
-
Page 43: Setting Tp-594Rxr Gateway Serial Port Settings
IP connection. To set the gateway serial port settings: 1. In the Navigation pane select Control Gateway Serial. The Gateway Serial Ports Settings page appears. Figure 46: Control Gateway Serial page TP-594Txr, TP-594Rxr – Using the Embedded Web Pages... -
Page 44: Setting Web Page Access Permission
By default, the web pages are secured (username and password are both Admin). To change the password: 1. In the Navigation pane, click Security. The Security page appears. Figure 47: Security Page 2. Enter the new password. TP-594Txr, TP-594Rxr – Using the Embedded Web Pages... - Page 45 2. Uncheck Authenticate Web pages Access. Current credentials are grayed out. 3. Click Set changes The following message appears: Figure 50: Security – Security Disable Confirmation 4. Click OK. Authentication is not required. TP-594Txr, TP-594Rxr – Using the Embedded Web Pages...
-
Page 46: Viewing The About Page
Viewing the About Page In the Navigation pane, click About to view the TP-594Txr Web page version and Kramer Electronics Ltd details. Figure 52: About Page TP-594Txr, TP-594Rxr – Using the Embedded Web Pages... -
Page 47: Firmware Upgrade
Kramer Electronics Ltd. Firmware Upgrade The latest firmware version can be downloaded from the Kramer Web site at www.kramerav.com/downloads/TP-594Rxr www.kramerav.com/downloads/TP-594Txr You can upgrade the firmware on TP-594Txr TP-594Rxr (separately) in any of the following methods: • The device embedded web pages (see Upgrading the Firmware on page 31). -
Page 48: Technical Specifications
On a 3-pin terminal block for device control On a female USB-A connector for device firmware upgrade Extension We recommend that you use Kramer shielded cables to achieve optimum extension ranges Compression Low-level standard DSC compression for signals above 4K@60 (4:2:0) - Page 49 (W, D, H) Net Weight, each 0.4kg (0.9bs) approx. Shipping Weight 0.95kg (2.1lbs) approx. Accessories Included 1 power adapter, 1 power cord and 1 bracket set per device Specifications are subject to change without notice at www.kramerav.com TP-594Txr, TP-594Rxr – Technical Specifications...
-
Page 50: Default Communication Parameters
Video bandwidth..170MHz CVT standard..... Not supported GTF standard..... Not supported Additional descriptors... Established timings Preferred timing..Yes Native/preferred timing.. 1920x1080p at 60Hz Modeline...."1920x1080" 148.500 1920 2008 2052 2200 1080 1084 1089 1125 +hsync +vsync TP-594Txr, TP-594Rxr – Technical Specifications... - Page 51 Front LFE....No Front center..... No Rear left/right..No Rear center....No Front left/right center.. No Rear left/right center... No Rear LFE....No CE vendor specific data (VSDB ) IEEE registration number. 0x000C03 CEC physical address..1.0.0.3 TP-594Txr, TP-594Rxr – Technical Specifications...
- Page 52 Date generated... 19/02/2019 Software revision..2.70.0.989 Data source....Real-time 0x0071 Operating system..6.1.7601.2.Service Pack 1 Raw data FF,FF,FF,FF,FF,FF,00,2D,B2,00,12,00,00,00,00,0E,1A,01,03,80,34,20,78,E2,B3,25,AC,51,30,B4,26 , 10,50,54,2 D,CF,00,A9,C0,81,00,A9,40,61,59,45,59,31,59,71,4F,81,40,02,3A,80,18,71,38,2D,40,58,2C , 45,00,0 F,24,21,00,00,1E,00,00,00,FD,00,38,4C,1E,53,11,00,0A,20,20,20,20,20,20,00,00,00,FC,00,56 , 4 D,2D,31,30,48,32,0A,20,20,20,20,20,00,00,00,F7,00,00,08,42,A2,20,00,00,00,00,00,00,00,00,01,AF , 02,03,2 C1,50,90,05,02,14,1F,20,22,5D,5F,61,62,64,66,67,69,6B,23,09,07,07,83,01,00,00,65,03,0C , 00,10,03,51,03 D0,05,21,F0,2D,00,58,31,45,00,0F,1A,21,00,00,9E,51,13,54,D0,32,E0,2D,10,10,31,45 , BA,88,21,00,00,1E,11,21,56,D0,52,00,2D,30,10,31,45,80,BA,88,21,00,00,1E,B1,27,56,D0,52,00,2D , 30,10,31,45,80,BA,88,21,00,00,1E,B1,0A,D0,A0,20,40,2D,20,08,71,22,01,80,E0,21,00,00,00,00,F1,CF TP-594Txr, TP-594Rxr – Technical Specifications...
-
Page 53: Protocol 3000
Kramer Electronics Ltd. Protocol 3000 Kramer devices can be operated using Kramer Protocol 3000 commands sent via serial or Ethernet ports. Understanding Protocol 3000 Protocol 3000 commands are a sequence of ASCII letters, structured according to the following. • Command format:... -
Page 54: Protocol 3000 Commands
0 – Sent 1 – Gateway disabled 2 – Inactive CEC-Master 3 – Busy 4 – Illegal Message Parameter 5 – Illegal CEC Address Parameter 6 – Illegal CEC Command 7 – Timeout 8 – Error TP-594Txr, TP-594Rxr – Protocol 3000... - Page 55 – 1 to 4 (number of DIP dp_sw_id DPSW- Get the DIP-switch state. COMMAND get the DIP-switch 2 status: STATUS? #DPSW-STATUS?dp_sw_id<CR> switches) #DPSW-STATUS?2<CR> – Up/down status TP-594Txr FEEDBACK 0 – Up ~nn@DPSW-STATUSdp_sw_id,status<CR><LF> TP-594Rxr 1 – Down TP-594Txr, TP-594Rxr – Protocol 3000...
- Page 56 TP-594Rxr mode on the device input: 0 – HDCP Off ~nn@HDCP-MODinp_id,mode<CR><LF> 1 – HDCP On HDCP supported - HDCP_ON [default]. HDCP not supported - HDCP OFF. HDCP support changes following detected sink - MIRROR OUTPUT. TP-594Txr, TP-594Rxr – Protocol 3000...
- Page 57 – IR Status Status 0 – Sent (no error) 1 – Stop 2 – Done 3 – Busy 4 – Wrong Parameter 5 – Nothing to Stop 6 – Start 7 – Timeout 8 – Error TP-594Txr, TP-594Rxr – Protocol 3000...
- Page 58 The permission system works only if security is enabled with the “SECUR” command. LOGOUT Cancel current COMMAND #LOGOUT<CR> permission level. #LOGOUT<CR> TP-594Txr FEEDBACK Logs out from End TP-594Rxr ~nn@LOGOUTOK<CR><LF> User or Administrator permission levels to Not Secure. TP-594Txr, TP-594Rxr – Protocol 3000...
- Page 59 RS-232 protocol port, if available. For proper settings consult your network administrator. For Backward compatibility, the parameter can be omitted. In this case, the Network ID, by default, is 0, which is the Ethernet control port. TP-594Txr, TP-594Rxr – Protocol 3000...
- Page 60 Get current security state. COMMAND Get current security state: 0 – OFF (disables security) #SECUR?<CR> #SECUR?<CR> TP-594Txr The permission 1 – ON (enables security) FEEDBACK TP-594Rxr system works only if ~nn@SECURsecurity_mode<CR><LF> security is enabled with the “SECUR” command. TP-594Txr, TP-594Rxr – Protocol 3000...
- Page 61 – <port_type> FEEDBACK .HDMI.1.AUDIO.1],- o HDMI ~nn@X-AUD-DETCT- 47<CR> LVL?<direction_type>.<port_type>.<port_index>.<signal_ty o ANALOG_AUDIO pe>.<index>,signal_level<CR><LF> ▪ – 1 <port_index> ▪ – <signal_type> o AUDIO ▪ – 1 <index> Signal_level – signal level, measured in Db: -90db to +20dB TP-594Txr, TP-594Rxr – Protocol 3000...
- Page 62 HDMI o RS-232 o IR o CEC ▪ – 1 <port_index> ▪ <signal_type> – o RS232 o IR o CEC – 1 <index> – Global gateway activation state state: OFF – disabled ON – enabled TP-594Txr, TP-594Rxr – Protocol 3000...
- Page 63 ▪ – <port_type> ndex1>.<signal_type1>.<index1>,[<direction_type2>.<port_ty fields “[ ]”. o HDMI pe2>.<port_index2>.<signal_type2>.<index2>,..,]<CR><LF> o ANALOG_AUDIO This is an Extended ▪ – 1 <port_index> Protocol 3000 command. ▪ <signal_type> – o VIDEO o AUDIO ▪ <index> – 1 TP-594Txr, TP-594Rxr – Protocol 3000...
- Page 64 Perform FW upgrade for brackets to define a list of o USB_PORT fields “[ ]”. TP-594Rxr: – 1 <port_index> This is an Extended IN.USB_POR #X-UPGRADE – CEC logical ID < file_name Protocol 3000 command. T.1,TP- value (1-15) 594RXR_All*.Bin<CR> TP-594Txr, TP-594Rxr – Protocol 3000...
-
Page 65: Result And Error Codes
ERR_RESERVED_8 (Reserved) ERR_RESERVED_9 (Reserved) ERR_RESERVED_10 (Reserved) ERR_RESERVED_11 (Reserved) ERR_RESERVED_12 (Reserved) ERR_EDID_CORRUPTED EDID corrupted ERR_NON_LISTED Device specific errors File has the same CRC – no changed ERR_SAME_CRC ERR_WRONG_MODE Wrong operation mode ERR_NOT_CONFIGURED Device/chip was not initialized TP-594Txr, TP-594Rxr – Protocol 3000... - Page 66 Electronics products, this product must be insured during shipment, with the insurance and shipping charges prepaid by you. If this product is returned uninsured, you assume all risks of loss or damage during shipment. Kramer Electronics will not be responsible for any costs related to the removal or re- installation of this product from or into any installation.
- Page 67 SAFETY WARNING Disconnect the unit from the power supply before opening and servicing For the latest information on our products and a list of Kramer distributors, visit our Web site where updates to this user manual may be found. We welcome your questions, comments, and feedback.
Need help?
Do you have a question about the TP-594Txr and is the answer not in the manual?
Questions and answers