Table of Contents
Advertisement
Advertisement
Table of Contents

Related Manuals for cable matters 202067-BLK


Summary of Contents for cable matters 202067-BLK
- Page 1 USB-A 3.0 Data Transfer Cable USER MANUAL...
-
Page 2: Table Of Contents
USB-A 3.0 Data Transfer Cable Table of Contents 1. Introduction 1.1 Introduction 1.2 Copyright and Trademarks 2. Product Overview 2.1 Package Contents 2.2 Product Description 2.3 Product Features 2.4 System Requirements 3. Connection and Operation 3.1 Quick Start Instructions 3.2 Getting Started 3.2.1 Installation Checklist 3.2.2 Easy Computer Sync Software Installation 3.3 Data Transfer Cable Installation and Use... -
Page 3: Introduction
Cable Matters. Where they occur, these references are for illustrative purposes only and do not represent an endorsement of a product or service by Cable Matters, or an endorsement of the product(s) to which this manual applies by the third-party company in question. -
Page 4: Product Overview
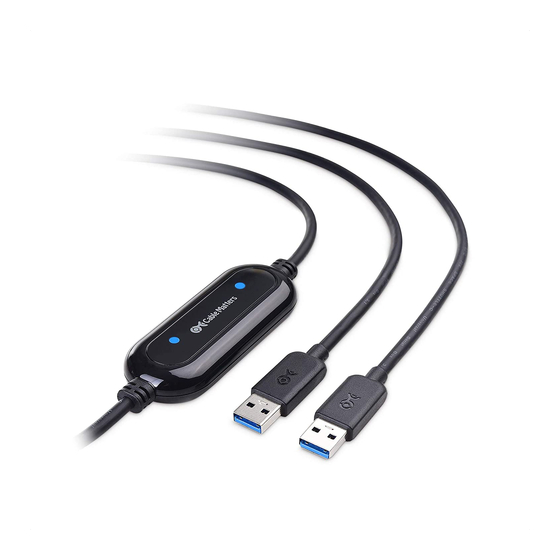
2.2 Product Description The Cable Matters USB-A 3.0 Data Transfer Cable is the perfect choice for migrating your files when upgrading to a new Laptop or PC. The included Easy Computer Sync & PCLinq5 software will also efficiently synchronize files between two computers in much less time than using a network or cloud-based solution. -
Page 5: Connection And Operation
USB-A 3.0 Data Transfer Cable Connection and Operating Instructions 3.1 Quick Start Instructions 1. Install the Easy Computer Sync or PCLinq5 software on both computers. Use the Registration Code (a 16-character alphanumeric code) on the included Easy Computer Sync software full license key card. 2. -
Page 6: Easy Computer Sync Software Installation
USB-A 3.0 Data Transfer Cable • Operating systems on each computer must be using the same language. • Verify that the USB ports on both computers are functioning and will transfer at a minimum USB 2.0 rate. Click on the question mark (or press F1) for access to the off-line Help guide. -
Page 7: Data Transfer Cable Installation And Use (Easy Computer Sync - Windows Only)
USB-A 3.0 Data Transfer Cable The software can be uninstalled from the Control Panel > Programs 3.3 Data Transfer Cable Installation and Use (Easy Computer Sync - Windows only) 3.3.1 Start the Easy Computer Sync Software There are 3 ways to start the software on BOTH computers: 1. - Page 8 USB-A 3.0 Data Transfer Cable 2. Choose the folders to synchronize between both computers. ‘Add Folder’ button: Select to add or create additional folders. Click on the question mark (or press F1) for access to the off-line Help guide.
-
Page 9: Mode: Transfer Data To A New Computer
USB-A 3.0 Data Transfer Cable A synchronization screen will appear followed by the ‘Finished’ screen. A list of files sent and received is presented. Click ‘View Log’ to receive a detailed report of the files transferred, including any errors. 4. - Page 10 USB-A 3.0 Data Transfer Cable 4. Select the items to be transferred. Click ‘Add Folder’ to select or create additional folders. !!! Moving or modifying ‘Protected Folders’ can damage your computer. Choose only the necessary folders to be transferred to save disk space on the target computer and minimize the time needed for the file transfer.
-
Page 11: Mode: Drag & Drop Files
USB-A 3.0 Data Transfer Cable Click ‘View Log’ to receive a detailed report of the files transferred including any errors. 6. Click ‘Exit’ to finish. The software will automatically close on both computers. 3.3.4 Mode: Drag & Drop Files 1. -
Page 12: Data Transfer Cable Installation And Use (Pclinq5 - Windows & Mac)
USB-A 3.0 Data Transfer Cable Control most non-security functions with your keyboard and mouse. 3. When finished, use ‘Back to Tools’ or ‘Exit’ on the pull-down menu on the top left of the Remote Connection screen. Access the Remote Connection with the ‘S’... -
Page 13: Start The Pclinq5 Software
USB-A 3.0 Data Transfer Cable 2. Install the PCLinq5 Software on both computers. The installation process starts from the InstallShield Wizard that will guide you through the rest of the setup process. 3. License Agreement: Click ‘I accept the terms of the license agreement’. Follow the instructions and click Next to continue until installation is complete. - Page 14 USB-A 3.0 Data Transfer Cable cable, you simply click and start PCLinq5 in both computers. The PCLinq5 File Transfer program will appear as follows: Mac: Windows: Using PCLinq5, you can control both the local and remote computers and do the following: •...
- Page 15 USB-A 3.0 Data Transfer Cable Start PCLinq5: Run PCLinq5 on both computers. Connect 2 computers using the USB-A 3.0 Data Transfer cable. Wait for Windows to detect the cable on each computer and check whether it is properly installed. Check the Connection Status LED on the bottom right. Make sure that the program shows two green LEDs to indicate a linked connection.
- Page 16 USB-A 3.0 Data Transfer Cable Right-click the file or folder (example: Pictures) in Windows Vista/7/8 PC, and then click Properties. Click the Security tab and click Edit to change permissions. Click Add button to add user.
- Page 17 USB-A 3.0 Data Transfer Cable Type “Everyone” user name to add to the group. Click on the Allow boxes to grant Full control and Modify permissions. Click OK to confirm. You can now drag-and-drop this folder from Windows Vista or 7 or 8 to XP using PCLinq5 software.
- Page 18 USB-A 3.0 Data Transfer Cable PCLinq5 also allows you open/run files found in the connected PC without copying the files to this PC. You can directly play movie files located in the remote PC. PCLinq5 also provides Options to show hidden, read-only, system files and directories.
-
Page 19: Uninstall The Pclinq5 Program
USB-A 3.0 Data Transfer Cable 3.4.3 Uninstalling the PCLinq5 Program It is easy to uninstall the PCLinq5 program: Unplug the Data Transfer cable and close the PCLinq5 program. Go to Apps & features. Find the PCLinq5 program and click Uninstall button. The PCLinq5 InstallShield Wizard program will appear. -
Page 20: Troubleshooting Notes
USB-A 3.0 Data Transfer Cable 3.5 Troubleshooting Notes Contact support@cablematters.com with any questions. My computer does not recognize the Data Transfer Cable: Make sure that you have downloaded and installed both the Easy Computer Sync software and the latest drivers from Windows. Check that both LED’s are lit. -
Page 21: Frequently Asked Questions (Faq)
USB-A 3.0 Data Transfer Cable 3.6 Frequently Ask Questions (FAQ) Can I transfer programs? No, you can only transfer files and settings. Programs have to be reinstalled. Can I use this cable with a USB Hub? Do not use the Data Transfer Cable with a USB hub. You can use it with an active or passive USB cable extender. -
Page 22: Technical Specifications
USB-A 3.0 Data Transfer Cable 4. Technical Specifications Data Transfer Cable Connectors: 2 x USB Type A - Male OS Support USB Host: Windows XP, Vista, 7, 8, 8.1, 10, Mac OS X LED Indicators: Blue Cable Length: 2 Meters / 6.5 Foot Model No: 202067 Warranty:... -
Page 23: Warranty And Support
Email us with questions at support@cablematters.com. 5.2 Warranty Information This product is backed by a limited one-year warranty. In addition, Cable Matters warrants its products against defects in materials and workmanship for the periods noted, following the initial date of purchase. During this period, the products may be returned for repair, or replaced with equivalent products at our discretion.
Need help?
Do you have a question about the 202067-BLK and is the answer not in the manual?
Questions and answers
how do we set up so we can transfer data from old unit over to new HP loptop.