
Related Manuals for VERITAS Mk.II


Summary of Contents for VERITAS Mk.II
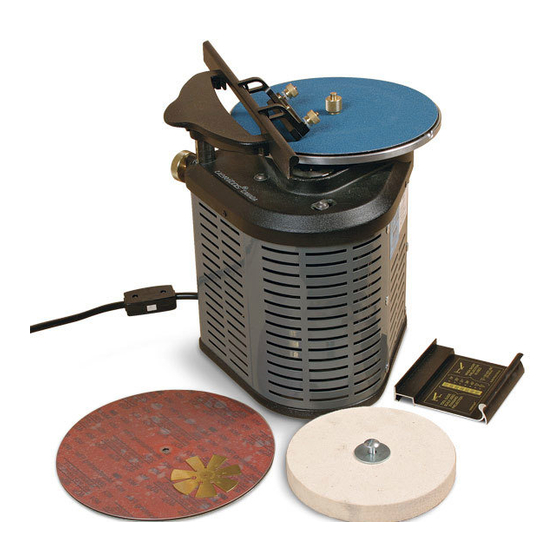
- Page 1 ® Veritas Mk.II Power Sharpening System Mk.II Power Sharpening System U.S. Patent No. 6,676,495 INS-216-02 Rev. G...
- Page 2 Tools Inc. warrants the Veritas ® Mk.II Power Sharpening System against faulty materials or workmanship for a period of fi ve years from date of purchase, less the electrical components (including the motor and all wiring), which are warranted for a period of two years from date of purchase.
-
Page 3: Table Of Contents
Table of Contents Table of Contents Chapter 1: Introduction ....................Safety Rules .......................... 2 Table 1: Minimum Gauge for Extension Cord............2 Requirements ........................3 Grounding Instructions ..................... 3 Règles de sécurité ......................... 5 Tableau 1 : Jauge nominale d’une rallonge............... 5 Exigences .......................... - Page 4 ® Veritas Mk.II Power Sharpening System Chapter 6: Care and Maintenance ................Lubrication ......................... 21 Abrasives ..........................21 Spare Parts .......................... 21 V-Belt ..........................21 To replace the belt ....................21 Sound and Vibration Damping ................... 22 Chapter 7: Troubleshooting ..................
- Page 5 Table of Contents Block Planes ........................41 Bevel Angles ......................42 Low-Angle Block Planes ..................43 KNIVES..........................43 Sharpening Kitchen Knives ....................43 Bevel Angles ......................44 Using a Belt Sander ....................44 Using Stones ......................45 Marking Knives ........................45 Drawknives .........................
- Page 6 ® Veritas Mk.II Power Sharpening System...
-
Page 7: Chapter 1: Introduction
The Veritas ® Mk.II Power Sharpening System will effi ciently sharpen any straight-edged chisel, plane blade or carving tool to a degree of sharpness that cannot be surpassed by any other method. It is also an excellent general- purpose system for a wide variety of tools with shaped edges, including gouges and V-tools. -
Page 8: Safety Rules
MAKE of the Veritas ® Mk.II Power Sharpening System. To ensure WORKSHOP KID PROOF with padlocks, master your own safety, read these before you begin to use this switches, or by removing starter keys. -
Page 9: Requirements
Introduction 15. Do not use the sharpening system if it is damaged. 26. Never attempt a leading cut with a buffing/honing A tool that does not operate correctly is a safety disc. Always use a trailing cut so that the disc hazard and should be fixed before further use. - Page 10 ® Veritas Mk.II Power Sharpening System Cover of Grounded Outlet Box with or without yellow stripes is the equipment- grounding conductor. If repair or replacement of the electric cord or plug is necessary, do not connect the equipment-grounding conductor to a live terminal.
-
Page 11: Règles De Sécurité
Les présentes consignes de sécurité visent à faire en sorte à un affûtage qui dégage de la poussière. Les que le système d’affûtage électrique Mk.II Veritas ® soit visiteurs doivent porter la même protection. - Page 12 ® Veritas Mk.II Power Sharpening System 12. Enlever les clés et les dispositifs de réglage avant 22. Lorsqu’il n’est pas utilisé, ranger le système d’utiliser le système. Prendre l’habitude de vérifier d’affûtage dans un endroit sec, élevé et hors de si les clés et les dispositifs de réglage ont été...
-
Page 13: Exigences
Introduction Exigences un électricien qualifié. L’oreille ou l’œil de couleur verte, ou tout dispositif semblable, qui dépasse de L’utilisation du système d’affûtage électrique est régie l’adaptateur doit être raccordé à une mise à la terre par les exigences fondamentales suivantes : permanente, telle qu’une boîte à... - Page 14 ® Veritas Mk.II Power Sharpening System...
-
Page 15: Chapter 2: Unpacking & Assembly
Unpacking & Assembly Chapter 2 Unpacking & Assembly • Remove the main unit from the box. • Install the turntable using the two -20 × " button-head cap screws. Ensure that the mating • Refer to Appendix A: Exploded Assemblies & Master surfaces are clean before mounting the turntable Parts List to check that you have all the components. - Page 16 ® Veritas Mk.II Power Sharpening System • Using the " ball-end hex key provided, loosely • Tighten the locking screw. install the tool guide rod onto the tool guide yoke with the two 10-24 × " button-head cap screws •...
-
Page 17: Chapter 3: General Principles - Straight-Edged Tools: Chisels And Planes
Set the tool guide to the desired bevel angle, abrasive while the turntable is rotating. Position the ® anywhere from 15° to 45°. The included Veritas blade to make a leading cut as shown in Figure 10. If Bevel Gauge (shown in Figure 1) will help you... -
Page 18: Tool Registration
® Veritas Mk.II Power Sharpening System Tool Registration Abrasives The system relies on the tool holder to be used The types and grades of abrasives used with the system with the tool registration jig and the tool guide to have been carefully selected for fast material removal grind and hone accurate, repeatable bevel angles. -
Page 19: Tool Holding
General Principles – Straight-Edged Tools: Chisels and Planes Tool Holding As noted on the Blade Projection Jig Label, when using short projection do not set the tool guide to 40° or 45°. Standard Projection Using such a combination of settings will create a bevel Use of the tool holder at the standard projection is covered angle of 52°... - Page 20 ® Veritas Mk.II Power Sharpening System...
-
Page 21: Chapter 4: Operation - Straight-Edged Tools:chisels And Planes
Take care not to overheat the ® Included with your sharpening system is the Veritas blade or loss of blade hardness may result. With a Bevel Gauge. This may be used to check the bevel angle large area in contact with the abrasive, the blade can of any of your tools, from 15°... -
Page 22: Step 2: Create The Primary Bevel
® Veritas Mk.II Power Sharpening System f) When the face of the blade has been fully lapped with the 40µ abrasive, switch to 9µ. Continue Contact lapping until the scratch pattern created by the previous step has been removed. When lapping... -
Page 23: Step 3: Create The Micro-Bevel
Operation – Straight-Edged Tools: Chisels and Planes Step 3: Create the Micro-Bevel Note: Make sure the blade does not contact the platter retention thumbscrew while the a) With the thinner (3mm) platter on the turntable and sharpening system is turned on. the 9µ... -
Page 24: Buffi Ng/Honing
® Veritas Mk.II Power Sharpening System Buffing/ Honing Note: Honing must be done on the left side of the turntable so that it creates a trailing cut – i.e., it must be Although the edge produced by the 9µ abrasive is... -
Page 25: Chapter 5: Freehand Sharpening - Carving Tools And Other Tools
Freehand Sharpening – Carving Tools and Other Tools Chapter 5 Freehand Sharpening – Carving Tools and Other Tools Gouges and Parting Tools Sharpening these tools is not as simple as sharpening straight blades. A certain level of technique must be mastered in order to achieve properly sharpened blades. -
Page 26: Other Tools
® Veritas Mk.II Power Sharpening System Other Tools The combination of a range of abrasives and controlled sharpening rates, combined with a simple system for setting bevel angles, will allow a wide range of items to be sharpened such as axe heads, fan-tailed cold chisels, and turning tools. -
Page 27: Chapter 6: Care And Maintenance
Care and Maintenance Chapter 6 Care and Maintenance Lubrication Use: Always bear in mind that the lifetime of any sheet abrasive is limited to the thickness of the abrasive Tool Guide Rod, Tool Holder & Tool Guide Post: mineral applied to the substrate. Abrasive action always Do not use any kind of oil or grease on the mating wears away both the workpiece and the abrasive itself. -
Page 28: Sound And Vibration Damping
® Veritas Mk.II Power Sharpening System Sound and Vibration Damping The rubber extrusion applied to the bottom edge of the base signifi cantly reduces sound and vibration. It also provides a non-skid function for the unit. To avoid damaging the extrusion, be sure to lift the base when... -
Page 29: Chapter 7 Troubleshooting
Troubleshooting Chapter 7 Troubleshooting Sharpening on the Platter b) Platter Damage: The platters supplied are made to a very exacting flatness tolerance. However, if, for Micro-Bevel and Primary Bevel Not Parallel some reason, a platter is warped, dented or has a This is not necessarily a problem, so long as the end mushroomed edge from being dropped edge first on a result is a sharp edge, approximately square to the side. -
Page 30: Edge Not Square Across Tool
® Veritas Mk.II Power Sharpening System Edge Not Square Across Tool Of these factors, the fi rst three are effectively fi xed and the latter three are variable. The relationship is There are several possible causes for this: clear between each of the variable factors and heat generation. -
Page 31: Incomplete Micro-Bevel
Troubleshooting Incomplete Micro-Bevel This is most likely caused by a combination of two factors: a) the edge of the thick platter has been mushroomed either from being dropped edge first on a hard floor or the PSA backing on the abrasive disc is peeling on the edge;... -
Page 32: Appendix A: Exploded Assemblies & Master Parts List
® Veritas Mk.II Power Sharpening System Appendix A Exploded Assemblies & Master Parts List Part # Description Qty. Chassis & Housing Turntable Tool Guide Rod Tool Guide Yoke Tool Holder Assembly* hp Motor 4mm Platter* 3mm Platter (not shown)* 100µ Abrasive Disc* 40µ... - Page 33 Exploded Assemblies & Master Parts List...
-
Page 34: Parts #3 & #4 Tool Guide Assembly
® Veritas Mk.II Power Sharpening System Parts #3 & #4 Tool Guide Assembly Part # Description Qty. Tool Guide Rod Tool Guide Yoke Tool Guide Post Guide Post Label -20 Set Screw 10-24 × " Button-Head Cap Screw Part #5... -
Page 35: Appendix B: Optional & Accessory Parts
Optional & Accessory Parts Appendix B Optional & Accessory Parts Product # Description 05M30.10 Additional 3mm Platter 05M30.11 Additional 4mm Platter 05M30.15 80x (180µ) 8" Zirconia Disc* 05M30.16 120x (120µ) 8" Zirconia Disc 05M30.20 100µ (150x) 8" Aluminum Oxide Disc* 05M30.21 60µ... - Page 36 ® Veritas Mk.II Power Sharpening System...
-
Page 37: Appendix C: General Sharpening Procedures
General Sharpening Procedures Appendix C General Sharpening Procedures Somewhere in the mists of time man discovered that a to the bevel, regardless of how well you honed that wedge-shaped rock could be used to divide things. It bevel it would still be intersecting with a grooved face was probably only a matter of days before he found that and the resulting edge would be ragged. -
Page 38: Shaping The Edge
® Veritas Mk.II Power Sharpening System Chisel Defects Chisel with hollow face Chisel with bellied face If that is not possible, initial fl attening can be done on Most Japanese chisels (above) are ground hollow on the a belt sander. Only when the face is very close to fl at face, whereas Western chisels (top) are ground flat. -
Page 39: When To Resharpen
General Sharpening Procedures While I am all for a method that reduces sharpening The sole purpose of a micro-bevel is to get the fi nest time, hollow grinding often does so at the expense of possible edge in the shortest period of time. There is a strong edge. -
Page 40: Buffi Ng Or Stropping Chisels
® Veritas Mk.II Power Sharpening System Buffing or Stropping Chisels chisels (30° is appropriate). Such narrow chisels are Some woodworkers touch up their chisels between seldom used for light paring so this steeper bevel angle sharpenings on a felt buffi ng wheel or a leather belt on is justifi... -
Page 41: Paring Chisels
General Sharpening Procedures Paring chisels, shown in straight and cranked-neck designs, can be sharpened at relatively low bevel angles. Most people associate the term ‘paring’ with small, light chisels, yet there used to be much larger and heavier (but still slim) styles used in some trades –... -
Page 42: Skew Chisels
Primary bevel (25°) If you are using the Veritas honing guide and angle jig, you will fi nd that the best way to set the honing guide on a skew is to have it on the blade loosely as you set the blade in the angle jig and then just release the honing guide. -
Page 43: Japanese Chisels
General Sharpening Procedures it will probably neither be straight nor at 90° to the spine It is important to keep the two cutting edges at 90° to the of the chisel. The fi rst thing you will have to do in this spine of the tool. -
Page 44: Planes
® Veritas Mk.II Power Sharpening System Tuning a Plane It is perfectly acceptable to use the same micro-bevel sharpening system that you use normally, but I would not recommend relieving the back half of the bevel There is little point in sharpening the blade well if it is not as earlier recommended for Western chisels. - Page 45 General Sharpening Procedures Lapping the Sole When the sole of a plane body is being milled (or ground), the plane is clamped on the cheeks. The clamping pressure causes the sole to arch outward. When the clamps are released after machining, the finished sole is almost invariably hollow.
-
Page 46: Sharpening The Blade Of A Plane
® Veritas Mk.II Power Sharpening System On a block plane, the the bevel-shaping process. The guide lets you apply Dressing a Block-Plane Lever Cap lever cap also serves as greater pressure while holding the exact angle you a cap iron and should want, and you get better results in less time than with fi... -
Page 47: Smoothing Planes (#3, #4½, #5½)
General Sharpening Procedures Scrub Plane Turning to blade shape, the general rule of thumb for standard bench planes (#3 to #8) is that the blade be sharpened square across unless you intend to be The scrub plane is the very roughest of the smoothing working wood wider than the blade;... -
Page 48: Bevel Angles
® Veritas Mk.II Power Sharpening System Grinding a Crown on a Blade Front View Side View There are many ways to grind a crown on a blade. The jig shown Tool-rest table here works with a dry grinder or belt sander. Using thin wood as a... -
Page 49: Low-Angle Block Planes
General Sharpening Procedures In practice, whether or not you get chatter with a low- By now you should also have realized that there is a angle block plane depends almost entirely on the fi t of strong argument for low-angle block planes. Not only the blade to the bed and how well you can tension your can you get the total cutting angle as low as 27°... -
Page 50: Bevel Angles
® Veritas Mk.II Power Sharpening System Tang Back Head Swage Scale Choil Edge The Anatomy of a Knife Using a Belt Sander Unlike wood, meat and soft vegetables have little rigidity to their structure. They are about 95% water held together with fi lms and fi laments of varying I do virtually all kitchen-knife sharpening on a 1-in. -
Page 51: Using Stones
General Sharpening Procedures Using Stones process. Depending upon what you are going to do to Stones are not quite as fast as a belt sander, but they the knife later, you may even want to start with a bevel are kinder to fi ne knives. Unless a knife needs major angle as low as 15°. -
Page 52: Carving Tools
® Veritas Mk.II Power Sharpening System CARVING TOOLS carver. Fortunately, modern technology has provided a vast array of effective and fl exible sharpening materials If you learn to sharpen carving tools well, you should and systems, so the primary problem becomes one of be able to sharpen anything. - Page 53 General Sharpening Procedures Assuming that you have the gouge sharpened at a 25° yourself in the position of the wood. Consider a gouge bevel angle, you would fi nd that it just begins to cut the that has been sharpened at a bevel angle of 25°: viewed wood at about a 30°...
- Page 54 ® Veritas Mk.II Power Sharpening System Carving-Gouge Bevels Cutting edge 25° bevel 1. Gouge viewed head-on 25° Cutting edge 5° 25° 2. Gouge raised to 25° 3. Gouge cutting Gouge must be tilted to 30° or more to get significant depth of cut.
- Page 55 General Sharpening Procedures This shows that the need to be able to change direction In-Cannel and Out-Cannel Gouges while cutting can be maintained only by having a decent As a general rule, carving gouges are out-cannel and amount of the bevel on the outside of the gouge. But so pattern-maker’s gouges are in-cannel.
-
Page 56: Rounding The Bevel
® Veritas Mk.II Power Sharpening System At the risk of being a bore, I would also say that if you Rounding the Bevel have not understood all of the material in this section 10° inside bevel so far, you should re-read it. The principles explained... -
Page 57: Gouge Tips - Fingernail, Square End Or Swept Forward
General Sharpening Procedures Gouge Tips – Fingernail, Square End or Swept Forward? Most carvers like to have a slight fi ngernail on all their gouges because this is the easiest shape to hone. Others will have square-end gouges, and a few will have gouges with a slight forward sweep to the upper edges (see the middle drawing on the facing page). -
Page 58: Honing A Gouge
® Veritas Mk.II Power Sharpening System you have a cylindrical stone of the right diameter, you not come in contact with the wood, is again to make can true the inside of the gouge with that. Since the odds grinding easier. If you were grinding a bevel on a gouge... -
Page 59: Bent Gouges
General Sharpening Procedures On a belt sander, I prefer to hold the gouge nearly Bent Gouges horizontal as I hone (as shown in the bottom photo on page 51). It is important that it be skewed slightly in the direction of travel of the belt. I prefer using a reversible motor on the belt sander, so that shaping can be done with the belt running from top to bottom and honing done with Curved gouge... -
Page 60: Back-Bent Gouges
® Veritas Mk.II Power Sharpening System Back-Bent Gouges you have the inside of the parting tool dressed properly Back-bent gouges present no unique problems that were before you attempt to sharpen it. If you attempted to not dealt with above. Today, only someone carving... -
Page 61: Wing Sweep
General Sharpening Procedures you can simulate this Parting-Tool Profile by shaping the heel into a sharp V so that in use the heel will press into the bottom of the cut and make it appear crisper than it really is. This is only a makeshift solution, Ideal and the bottom of the... -
Page 62: Sharpening Parting Tools
® Veritas Mk.II Power Sharpening System It is also conceivable that you would want the wings on An inshave is not an easy tool to use, and it must be very a parting tool swept back slightly. This would be the well sharpened to be effective. -
Page 63: Scorps
General Sharpening Procedures Scorps To hone the inside of a micro-scorp, use a wooden dowel (a bamboo skewer also works well) charged with A scorp, commonly used for carving spoons, is a variation chromium-oxide compound. The dowel should be just of an inshave and should be sharpened in the same manner;... -
Page 64: Keeping Carving Tools Sharp
® Veritas Mk.II Power Sharpening System Keeping Carving Tools Sharp After doling out all this advice on how to sharpen carving tools, it seems worthwhile to offer some advice on how to avoid dulling them after you have them in the shape you want. -
Page 65: Index
Alternative tool registration ..... . . 16 Bevel Gauge, Veritas ..... . . 1, 11, 15 Aluminum oxide abrasives. - Page 66 ® Veritas Mk.II Power Sharpening System face, dubbed ....... 32 in-cannel .
- Page 67 Index kitchen........43 sharpening....... . . 56 marking .
- Page 68 ® Veritas Mk.II Power Sharpening System Smoothing planes....... 41 Quenching ........34 Sound damping .
- Page 69 Index Unpacking ........9 Utility chisels .
- Page 70 ® Veritas Mk.II Power Sharpening System...
Need help?
Do you have a question about the Mk.II and is the answer not in the manual?
Questions and answers