
Related Manuals for Weldclass WeldForce WF-135s stick


Summary of Contents for Weldclass WeldForce WF-135s stick
- Page 1 OPERATING INSTRUCTIONS IMPORTANT! To qualify for full 12 month warranty, you must register within 30 days of purchase. See inside for details.
- Page 2 Congratulations & thank you for choosing WeldForce! The WeldForce range from Weldclass provides market leading value, features and durability. WeldForce machines have been designed with emphasis on robust construction, with simple and functional operation. Register Your Warranty Now Standard warranty without registration is 6 months. To qualify for an extended full 12 month warranty your purchase you must register within 30 days of purchase.
-
Page 3: Table Of Contents
Contents Know Your Machine ....................5 Power Supply ....................... 6 Operating Environment ..................6 Tips & Tricks ........................6 Care & Maintenance ....................7 MMA (Stick) Basic Welding Guide ............. 7 MMA (Stick) Troubleshooting ..............13 Knowledge & Resources .................. 14 Safety .......................... - Page 4 240V, 10A Max. Input Current Electrode Size 1.6 – 3.2mm Weight 3.8kg Dimensions: (L x W x H) 290 x 132 x 275mm For full machine specifications, refer to technical data plate on back of machine – or go to: www.Weldclass.com.au/WF-135S...
-
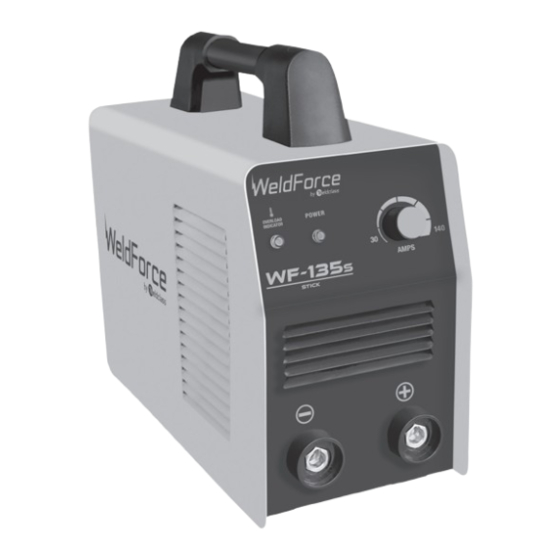
Page 5: Know Your Machine
Know Your Machine Overload indicator lamp* Power indicator lamp Current adjustment knob Negative (-) welding power output connection socket Positive (+) welding power output connection socket 240V AC mains power input lead Mains power switch Cooling fan inlet * Overload indicator lamp - Lights when duty cycle is exceeded and thermal protection is activated. When thermal protection is activated, welding output will be disabled until machines cools sufficiently and overload indicator lamp goes out. -
Page 6: Power Supply
For more useful tips & tricks on welding or selecting the right tool for the job, please visit Basic Operation - ARC/ MMA www.weldclass.com.au 1.1 Connect the earth cable quick connector to the negative welding power output socket (4) Connect the earth clamp to the work piece. -
Page 7: Care & Maintenance
Care & Maintenance WARNING! Before performing cleaning/maintenance, replacing cables / connections , make sure the Keep your Welding Machine in Top welding machine switched Condition disconnected from the power supply. The WF-135S does not require any special MMA (Stick) Basic maintenance, however the user should take care of the machine as follows: Welding Guide... - Page 8 reason it is absolutely essential to keep manganese Flat Position, steel cool during welding by quenching after each Down Hand Butt Weld weld or skip welding to distribute the heat. (Fig 1-11) Cast Iron Most types of cast iron, except white iron, are weldable.
- Page 9 Joint Preparations Corner Weld In many cases, it will be possible to weld steel (Fig 1-19g) sections without any special preparation. For heavier sections and for repair work on castings, etc., it will be necessary to cut or grind an angle between the pieces being joined to ensure proper penetration of the weld metal and to produce sound joints.
- Page 10 MMA Welding Techniques Another difficulty you may meet is the tendency, after the arc is struck, to withdraw the electrode so - A Word for Beginners far that the arc is broken again. A little practice will For those who have not yet done any welding, the soon remedy both of these faults.
- Page 11 Making Welded Joints Heavy plate will require several runs to complete the joint. After completing the first run, chip the Having attained some skill in the handling of an slag out and clean the weld with a wire brush. electrode, you will be ready to go on to make up It is important to do this to prevent slag being welded joints.
- Page 12 Examples of Vertical Fillet Welds Multi-Runs in HV Fillet Weld (Fig 1-27) (Fig 1-24) CORRECT INCORRECT Pause at edge of weave Note: Weld contour allows weld metal to build up and eliminates undercut at edge of weave C. Vertical Welds 1.
-
Page 13: Mma (Stick) Troubleshooting
MMA (Stick) Troubleshooting... -
Page 14: Knowledge & Resources
GENERAL SAFETY WARNINGS 1. Maintain labels and nameplates on the Resources welder. These carry important information. If unreadable or missing, contact Weldclass for a Please refer to Weldclass website replacement. www.weldclass.com.au for more information. 2. Avoid unintentional starting. Make sure the... - Page 15 10. Transportation Methods. Lift unit with DANGER! the handles provided, or use a handcart or Always wear AS/NZS compliant safety glasses similar device of adequate capacity. If using a and full face shield fitted with appropriate filter fork lift vehicle, secure the unit to a skid before shade number.
- Page 16 Use protective screens or barriers to protect Do not apply heat to a container that has others from flash and glare; warn others not to held an unknown substance or a combustible watch the arc. material whose contents, when heated, can produce flammable or explosive vapours.
- Page 17 11. Do not touch the electrode while in contact Use a Welding Helmet or Welding Face Shield with the work (ground) circuit. fitted with a proper shade of filter (see AS 60974-1, AS/NZS 1337.1 and AS/NZS 1338.1 12. Use only well-maintained equipment. Repair Safety Standards) to protect your face and or replace damaged parts as soon as practical.
- Page 18 Fumes And Gases Watch for fire, and keep a fire extinguisher nearby. WARNING! Be aware that welding on a ceiling, floor, Welding produces fumes and gases. Breathing bulkhead, or partition can cause fire on the these fumes and gases can be hazardous to hidden side.
-
Page 19: Warranty
8. Cost for repairs carried out by a party not approved by Weldclass to carry out repairs. 9. Accessories and attachments such as leads and torches. - Page 20 www.Weldclass.com.au/WF-135S...
Need help?
Do you have a question about the WeldForce WF-135s stick and is the answer not in the manual?
Questions and answers