Table of Contents
Advertisement
Quick Links
Advertisement
Table of Contents

Related Manuals for W&H proxeo TWIST PL-40 H


Summary of Contents for W&H proxeo TWIST PL-40 H
- Page 1 Instructions for use PL-40 H...
-
Page 2: Table Of Contents
Contents Symbols .......................................... 4 1. Introduction ....................................... 8 2. Electromagnetic compatibility (EMC) ..............................10 3. Scope of delivery ..................................... 11 4. Safety notes ......................................12 5. Description........................................17 Handpiece drive ....................................17 Foot control ......................................18 Status LED handpiece drive ................................19 Status LED foot control ..................................20 6. - Page 3 Contents Packaging ......................................36 Sterilization ......................................37 Storage ........................................ 38 9. Replacing the O-ring ....................................39 10. Servicing ........................................ 40 11. W&H Accessories and spare parts ............................... 42 12. Technical data ......................................43 13. Disposal........................................46 Explanation of warranty terms ................................... 47 Authorized W&H service partners ................................
-
Page 4: Symbols
Symbols in the instructions for use WARNING! ATTENTION! General explanations, (risk of injury) (to prevent damage occurring) without risk to persons or objects Not for re-use Call customer service... - Page 5 Symbols on the handpiece drive / handpiece sleeve Follow instructions for use Non-sterilizable Catalogue number Date of manufacture Sterilizable Serial number up to the stated temperature Do not dispose of with domestic Thermo washer disinfectable DC – direct current waste Data Matrix code Not suitable for intracardiac for product information...
- Page 6 Symbols on the foot control CE mark Non-ionizing electromagnetic Catalogue number with identification number radiation XXXX of the Notified Body Do not dispose of with DC – direct current Serial number domestic waste Data Matrix code Protection against Date of manufacture IPX1 for product information dripping water...
- Page 7 Symbols on the packaging CE mark Data Matrix code with identification number for product information including UDI XXXX of the Notified Body (Unique Device Identification) This way up Data structure in accordance with Health Industry Bar Code Fragile, handle with care Temperature limitation +60 °C (+140°F) Max.
-
Page 8: Introduction
1. Introduction For your safety and the safety of your patients These Instructions for Use explain how to use your medical device. However, we must also warn against possible hazardous situations. Your safety, the safety of your team and, of course, the safety of your patients are of paramount importance to us. Observe the safety notes. - Page 9 Introduction Production according to EU Directive The handpiece drive meets the requirements of Directive 93/42/EEC. The foot control meets the requirements of Directive 93/42/EEC and RED Directive 2014/53/EU. Responsibility of the manufacturer The manufacturer can only accept responsibility for the safety, reliability and performance of the medical device when it is used in compliance with the following directions: >...
-
Page 10: Electromagnetic Compatibility (Emc)
2. Electromagnetic compatibility (EMC) Medical electrical equipment is subject to particular precautions with regard to EMC and must be installed and put into operation in accordance with the EMC notes included. W&H guarantees the compliance of the device with the EMC requirements only when used with original W&H accessories and spare parts. -
Page 11: Scope Of Delivery
3. Scope of delivery Description 30317000 Handpiece drive 30316000 Foot control C-NW with Stick 07969610 Charger with adaptor 05882600 Handpiece holder... -
Page 12: Safety Notes
4. Safety notes Handpiece drive / Foot control > Before using the medical device for the first time, store it at room temperature for 24 hours. > Check the medical device for damage and loose parts each time before using. >... - Page 13 Safety notes Handpiece drive / Foot control The medical device is classed as »conventional equipment« (closed equipment without protection against the ingress of water). The medical device is not approved for operation in potentially explosive atmospheres. Charger > Only use the charger supplied. Hygiene and maintenance prior to initial use >...
- Page 14 Safety notes Handpiece drive / Foot control Risks due to electromagnetic fields The functionality of implantable systems, such as cardiac pacemakers and implantable cardioverter defibrillators (ICD) can be affected by electric, magnetic and electromagnetic fields. This medical device complies with the reference values defined in EN 50527-2-1/2016 for unipolar and bipolar pacemakers and is therefore suitable for patients with pacemakers.
- Page 15 Safety notes Handpiece drive / Foot control The patient environment (see diagram) encompasses the area up to 2.50 m above the patient and 1.83 m in all horizontal directions 2,5 m The charger must not be used within the patient environment. 1,83 m 1,83 m...
- Page 16 Safety notes Prophy Angle The Prophy Angles are disposable articles. > Use only Prophy Angles which are in perfect condition. Follow the operating instructions of the manufacturer. > Insert the Prophy Angle only when the medical device is stationary. > Never touch the Prophy Angle while it is still rotating. >...
-
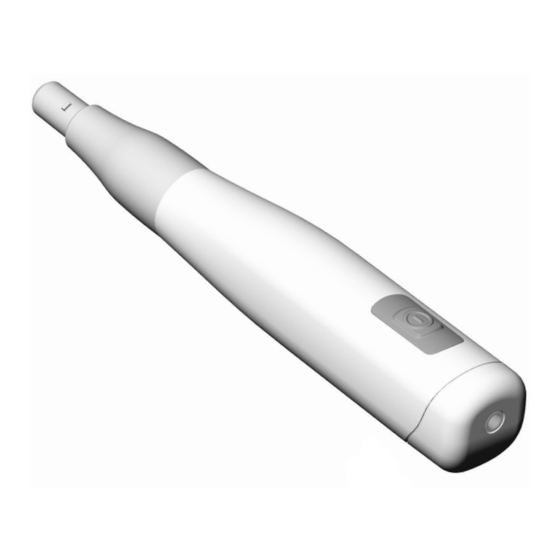
Page 17: Description
5. Description Handpiece drive Coupling for Handpiece sleeve Prophy Angle Status LED handpiece drive (see page 19) Status LED foot control (see page 20) Nose Charging socket ON/OFF button... -
Page 18: Foot Control
Description Foot control Stick Charging LED (orange) Status LED (green) (see page 20 - 21) (see page 20, 23) Charging socket Reset button Pairing button... -
Page 19: Status Led Handpiece Drive
Description Status LED handpiece drive Standby mode > The handpiece can be activated with the ON/OFF button. > If the handpiece drive is not used for longer than 4 minutes, it returns to standby mode automatically. steady flashes flashes intermittently GREEN e Battery is 25–100 % charged e Pairing active... -
Page 20: Status Led Foot Control
Description Status LED foot control flashes flashes alternately ORANGE e Battery of foot control is flat e Pairing unsuccessful > Complete the treatment > Troubleshooting with pairing problems > Charge the battery of the foot control (see page 23) Standby mode >... -
Page 21: Start-Up
6. Start-up Charging the battery Charge the medical device fully before you use them for the first time. Attach the adaptor to the Connect the charging cable power supply unit. into the foot control charging socket. LED orange: Battery is ... -
Page 22: Query Battery Status
Start-up Query battery status You can query the battery status when the handpiece drive is switched on and during the charging process. > Briefly press the ON/OFF button: flashes Battery status 3 x green 75–100 % 2 x green 50–75 % 1 x green 25–50 % orange... -
Page 23: Pairing
Start-up Pairing The foot control and handpiece drive are already paired when delivered! If pairing is active: Status LED (green) flashes on the foot control. > Both devices need to be in pairing mode for it to be possible to pair the handpiece drive and foot control. >... - Page 24 Start-up Pairing Troubleshooting with pairing problems > Remove any metallic objects located between the foot control and handpiece drive. > Change the position of the foot control. > Eliminate any sources of interference (e.g. brush motors, mobile telephones, radios, WLAN, ...) >...
-
Page 25: Assembly/Removal Of The Prophy Angle
Start-up Assembly/removal of the Prophy Angle Prophy Angle Cup or Brush Position the groove on the Prophy Angle with the nose of the handpiece drive. Push the Prophy Angle onto the handpiece drive until the limit stop. Verify full engagement. ... -
Page 26: Handpiece Drive
7. Handpiece drive Switch on/off Switch on Press the foot control to Press the ON/OFF button. variably control the speed of the disposable contra-angle handpiece. Press the foot control as far as it will go to attain the maximum speed of 3,000 rpm. The following light signals are shown on the foot control: Foot control pressed Status LED (green) flashes... -
Page 27: Test Run
Handpiece drive Test run Do not hold the handpiece drive at eye level! > Attach the Prophy Angle to the handpiece drive. > Operate the handpiece drive with the foot control. In the event of operating malfunctions (e.g., vibrations, unusual noise, overheating, coolant failure or leakage) stop the medical device immediately and contact an authorized W&H service partner. -
Page 28: Hygiene And Maintenance
8. Hygiene and maintenance General notes Follow your local and national laws, directives, standards and guidelines for cleaning, disinfection and sterilization. > Wear protective clothing, safety glasses, face mask and gloves. Cleaning agents and disinfectants > Read the notes, follow the instructions and heed the warnings provided by the manufacturers of cleaning agents and/or disinfectants. -
Page 29: Limitations On Processing
Hygiene and maintenance Limitations on processing The product lifetime and the medical device’s ability to operate correctly are mainly determined by mechanical stress during use and chemical influences due to processing. > Send worn or damaged medical devices and/or medical devices with material changes to an authorized W&H service partner. -
Page 30: Initial Treatment At The Point Of Use
Hygiene and maintenance Initial treatment at the point of use > Clean the medical device immediately after every treatment. > Wipe the entire handpiece drive, the handpiece sleeve, the handpiece holder and the foot control with disinfectant. > Ensure that no fluids enter the medical device. >... -
Page 31: Manual Cleaning
Hygiene and maintenance Manual cleaning > Do not place the handpiece drive, the handpiece sleeve, the handpiece holder and the foot control in liquid disinfectant or in an ultrasonic bath. > Do not immerse the handpiece drive and the foot control in water or clean them under running water. Handpiece sleeve / Handpiece holder >... -
Page 32: Manual Disinfection
Hygiene and maintenance Manual disinfection > W&H recommends wiping down with disinfectant. Evidence of the handpiece drive, the handpiece sleeve, the handpiece holder and the foot control basic suitability for effective manual disinfection was provided by an independent test laboratory using the »mikrozid® AF wipes« disinfectant (Schülke &... -
Page 33: Automated Cleaning And Disinfection
Hygiene and maintenance Automated cleaning and disinfection Handpiece sleeve W&H recommends automated cleaning and disinfection using a washer-disinfector (WD). Read the notes, follow the instructions and heed the warnings provided by the manufacturers of washer-disinfectors, cleaning agents and/or disinfectants. > The handpiece drive, the handpiece holder and the foot control are not approved for automated processing in a washer-disinfector and for sterilization. -
Page 34: Drying
Hygiene and maintenance Drying > Ensure that the medical device is completely dry internally and externally after cleaning and disinfection. > Remove any liquid residues using compressed air. -
Page 35: Inspection, Maintenance And Testing
Hygiene and maintenance Inspection, Maintenance and Testing > Check the medical device after cleaning and disinfection for damage, visible residual soiling and surface changes. > Reprocess any medical devices that are still soiled. > Sterilize the handpiece sleeve following cleaning and disinfection. -
Page 36: Packaging
Hygiene and maintenance Packaging Handpiece sleeve Pack the handpiece sleeve in sterilization packages that meet the following requirements: > The sterilization package must meet the applicable standards in respect of quality and use and must be suitable for the sterilization method. >... -
Page 37: Sterilization
Hygiene and maintenance Sterilization Handpiece sleeve W&H recommends sterilization according to EN 13060, EN 285. > Read the notes, follow the instructions and heed the warnings provided by the manufacturers of steam sterilizers. > The program selected must be suitable for the handpiece sleeve. Recommended sterilization procedures >... -
Page 38: Storage
Hygiene and maintenance Storage Handpiece sleeve > Store sterile goods dust-free and dry. > The shelf life of the sterile goods depends on the storage conditions and type of packaging. -
Page 39: Replacing The O-Ring
9. Replacing the O-ring Do not use sharp tools! Pull the handpiece sleeve off the handpiece drive. Squeeze the O-ring between your thumb and index finger firmly so that it forms a loop. Pull the old O-ring off. ... -
Page 40: Servicing
10. Servicing Regular checks Regular servicing of function and safety including the accessories is necessary and should be carried out at least once every three years, unless shorter intervals are prescribed by law. The inspection must be undertaken by a qualified organization and must include the following procedures: Handpiece drive >... - Page 41 Servicing Repairs and returns In the event of operating malfunctions immediately contact an authorized W&H service partner. Repairs and maintenance work must only be undertaken by an authorized W&H service partner. > Ensure that the medical device has been completely processed before returning it. >...
-
Page 42: W&H Accessories And Spare Parts
11. W&H Accessories and spare parts Use only original W&H accessories and spare parts or accessories approved by W&H. Supplier: W&H partners 07954780 05882600 07918800 02695700 Handpiece drive Handpiece holder Handpiece sleeve O-ring (3 pcs) 07969610 07979710 07994950 30316000 Charger incl. adaptor Foot control C-NW Prophy Angle Cup, 105°, Prophy Angle Cup, 105°,... -
Page 43: Technical Data
12. Technical data Ambient conditions Temperature during storage and transport: -20°C bis +60°C (-4°F to +140°F) Humidity for storage and transport: 8% to 80% (relative), non-condensing Temperature in operation: +10°C to +35°C (+50°F to +95°F) Humidity in operation: 15% to 80% (relative), non-condensing Handpiece drive PL-40 H Battery type:... - Page 44 Technical data Foot control C-NW Battery type: Li-ion Runtime: approx. 2 months Standby: automatically if not actuated Charging time: approx. 3 h Rated voltage: 3.7 V Rated capacity: 680 mAh Dimensions (WxDxH): 117 x 117 x 38 mm Weight: 190 g Charger Rated voltage: 100 - 240 V...
- Page 45 Technical data Classification according to Paragraph 6 of the General Specifications for the Safety of Medical Electrical Equipment according to IEC 60601-1/ANSI/AAMI ES 60601-1 Charger: Class II medical electrical equipment Handpiece drive: Internally powered Type BF applied part (not suitable for intracardiac application) The C-NW foot control is protected against vertically falling drops of water (IPX1 as per IEC 60529) Pollution level: Overvoltage category:...
-
Page 46: Disposal
13. Disposal Ensure that the parts are not contaminated on disposal. Follow your local and national laws, directives, standards and guidelines for disposal. > Medical device > Waste electrical equipment > Packaging... -
Page 47: Explanation Of Warranty Terms
Ex p la na ti on o f war ranty ter ms This W&H medical device has been manufactured with great care by highly qualified specialists. A wide variety of tests and controls guarantees faultless operation. Please note that claims under warranty can only be validated when all the directions in the Instructions for Use have been followed. -
Page 48: Authorized W&H Service Partners
Authorized W&H service partners Find your nearest W&H service partner at http://wh.com Simply go to the menu option »Service« for full details. Alternatively please contact: W&H (UK) LIMITED, 6 Stroud Wood Business Centre, Park Street, St Albans, Hertfordshire AL2 2NJ, United Kingdom t + 44 1727 874990, f + 44 1727 872254, E-Mail: technical.uk@wh.com W&H Impex Inc., 6490 Hawthorne Drive, Windsor, Ontario, N8T 1J9, Canada t + 1 800 2656277, 1 519 9446739, f + 1 519 9746121, E-Mail: service.ca@wh.com... - Page 50 Manufacturer W&H Dentalwerk Bürmoos GmbH Ignaz-Glaser-Straße 53, 5111 Bürmoos, Austria Form-Nr. 50928 AEN t +43 6274 6236-0, f +43 6274 6236-55 Rev. 004 / 14.01.2019 office@wh.com wh.com Subject to alterations...
Need help?
Do you have a question about the proxeo TWIST PL-40 H and is the answer not in the manual?
Questions and answers