
Related Manuals for W&H S-11 L G


Summary of Contents for W&H S-11 L G
- Page 1 Instructions for use Surgical Handpieces with mini LED+ and generator S-9 L G, S-11 L G Handpieces without light S-9, S-10, S-11, S-12, S-15...
-
Page 2: Table Of Contents
General (9 – 10), Handpiece with mini LED+ and generator (11 – 13) 3. Product description ..............................14 – 15 Straight handpiece S-11 L G, S-11, S-15 (14) Angled handpiece S-9 L G, S-9, S-10, S-12 (15) 4. Operation ................................. 16 – 20... - Page 3 5. Hygiene and maintenance ............................. 21 – 42 General (21 – 22), Pre-disinfection (23), Disassemble (24 – 27), Manual cleaning (28 – 31), Manual disinfection (32), Mechanical cleaning/disinfection/lubrication (33 – 34), Reassemble (35 – 38), Oil service (39 – 40), Sterilization and storage (41 – 42) 6.
-
Page 4: Symbols
Symbols in the Instructions for use WARNING! ATTENTION! General explanations, Do not dispose of (risk of injury) (to prevent without risk to with domestic waste damage occurring) persons or objects Caution! Federal law restricts this device to sale by or on the order of a dentist, physician or any other practitioner licensed by the law of the State in which he or she practices to use or order the use of the device. -
Page 5: In The Instructions For Use (4), On The Handpiece / Packaging
Symbols on the handpiece / packaging CE 0297 Catalogue number Data Matrix Code for from the manufacturer product identification, e.g., in hygiene/maintenance process Thermo washer disinfectable Serial number Sterilizable up to the Date of manufacture UL Component Recognition stated temperature Mark indicates compliance with Canadian and U.S. -
Page 6: Introduction
1. Introduction Customer satisfaction has absolute priority in the W&H quality policy. This W&H product has been developed, manufactured and subjected to final inspection according to legal regulations, quality norms and industry standards. For your safety and the safety of your patients Prior to initial use please read the Instructions for use. - Page 7 Qualifications of the user The handpiece is intended for use by suitably qualified, medical, technical and specialist staff only. We have based our development and design of the handpiece on the physician target group. Production according to EU Directive The handpiece is a medical product according to the EU Directive 93/42/EEC. Responsibility of the manufacturer The manufacturer can only accept responsibility for the safety, reliability and performance of the handpiece when it is used in compliance with the following directions:...
- Page 8 Skilled application The handpiece is intended only for skilled application in surgery according to its purpose of use in compliance with the valid health and safety at work regulations, the valid accident prevention regulations as well as in compliance with these Instructions for use. The handpiece should be prepared for use and maintained by staff who have been trained in procedures for infection control, personal safety and patient safety.
-
Page 9: Safety Notes
2. Safety notes – General > The operation of the handpiece is permitted only on dental units which correspond to the Medical Device Directive. > Always ensure the correct operating conditions and cooling function. > Always ensure that sufficient and adequate cooling is delivered and ensure adequate suction. >... - Page 10 Hygiene and maintenance prior to initial use The handpiece is in a clean condition and sealed in PE-film when delivered. > Lubricate the handpiece. > Sterilize the handpiece, the nozzle cleaner and the coolant tube. > Oil service page 33, 39 >...
-
Page 11: Safety Notes
2. Safety notes – Handpiece with mini LED+ and generator > Avoid contact between LED and soft tissue (risk of burning due to the LED heating up). > Do not use the handpiece as light sensor. > Do not look directly into the LED. Danger zones M and G In accordance with IEC 60601-1 / ANSI/AAMI ES 60601-1, the handpiece is not suitable for use in potentially explosive atmospheres or with potentially explosive mixtures of anaesthetic substances containing oxygen... - Page 12 Zone M is defined as a »medical environment« and constitutes the part of a room in which potentially explosive atmospheres may form due to the use of anaesthetics or medical antiseptics and antibacterial soaps; such atmospheres are typically localized and temporary. Zone M comprises a truncated pyramid below the operating table which is tilted outwards at a 30°...
- Page 13 Risks due to electromagnetic fields The functionality of implantable systems, such as cardiac pacemakers and implantable cardioverter defibrillator (ICD) can be affected by electric, magnetic and electromagnetic fields. > Find out if patient and user have implanted systems before using the product and consider the application.
-
Page 14: Product Description
3. Product description – Straight handpiece S-11 L G, S-11, S-15 LED (only S-11 L G) Handpiece head* Coolant tube (movable) Chuck lever Area of chuck lever Shaft Sheath* Long nozzle cleaner ... -
Page 15: Angled Handpiece S-9 L G
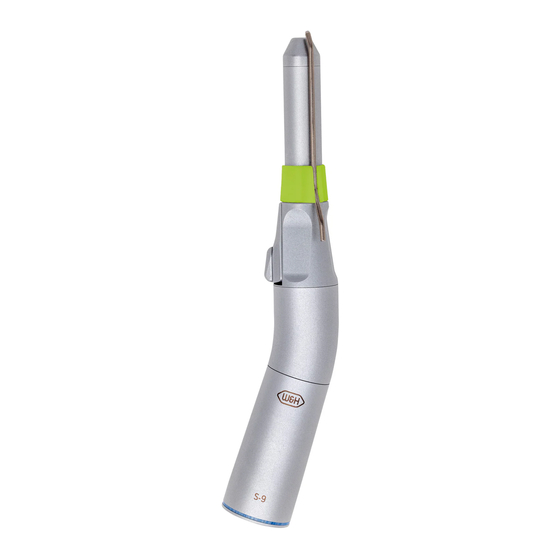
3. Product description – Angled handpiece S-9 L G, S-9, S-10, S-12 LED (only S-9 L G) Handpiece head* Coolant tube (movable) Chuck lever Area of chuck lever Shaft Knee* Lower shaft Sheath* ... -
Page 16: Operation
4. Operation – Assembly/Removal Coolant tube Fit the coolant tube. Pull off the coolant tube. ... - Page 17 Handpiece Do not assemble or remove the handpiece during the operation! Push the handpiece onto the motor. When using a locking pin between motor and handpiece: See Instructions for use of the drive unit. Check the secure hold on the motor. ...
- Page 18 Rotary instruments > Use only rotary instruments which are in perfect condition and pay attention to the direction of rotation of the rotary instrument. Follow the operating instructions of the manufacturer. > Insert the rotary instrument only when the handpiece is stationary. >...
- Page 19 To change rotary instrument Unlock and swivel the chuck lever. Insert the rotary instrument until back stop. When using a locking pin: Insert the rotary instrument until back stop and turn until the locking pin engages. Return the chuck lever to the initial position. ...
-
Page 20: Assembly/Removal (16 - 17), To Change Rotary Instrument (18 - 19), Test Run
Test run Do not hold the handpiece at eye level. > Insert the rotary instrument. > Start the handpiece. In the event of operating malfunctions (e.g., vibrations, unusual noise, overheating, coolant failure or leakage) or discoloration of the LED, stop the handpiece immediately and contact an authorized W&H service partner (see page 51). -
Page 21: Hygiene And Maintenance
5. Hygiene and maintenance > Follow your local and national directives, standards and guidelines for cleaning, disinfection and sterilization. > You can process the handpiece manually or mechanically. > Wear protective clothing. > Remove the handpiece from the motor. > Remove the rotary instrument. >... - Page 22 After manual cleaning, disinfection and lubrication you must carry out a final sterilization (wrapped) in the class B or S steam sterilizer according to EN 13060. For Canada: Hospital grade sterilization with pre and post vacuum cycle. Reassemble the handpiece following manual cleaning and disinfection. >...
- Page 23 Pre-disinfection > If heavily soiled: Clean first with disinfectant cloths. Only use disinfectants that have no protein-fixing effects.
- Page 24 Disassemble straight handpiece S-11 L G, S-11, S-15 Pull off the coolant tube. Turn off the sheath from the handpiece head by turning once. Unlock and swivel the chuck lever. ...
- Page 25 Remove the chuck lever. Remove the shaft from the handpiece head. ...
- Page 26 Disassemble angled handpiece S-9 L G, S-9, S-10, S-12 Pull off the coolant tube. Press sheath firmly against knee. Turn off the sheath from the handpiece head by turning once.
- Page 27 Remove the lower shaft from the knee. Turn off the knee from the handpiece head. Unlock and swivel the chuck lever. Pull off the shaft until back stop and remove the chuck lever. Remove the shaft from the handpiece head.
- Page 28 Manual cleaning internal and external Rinse and brush off under demineralized water (< 38 °C / < 100 °F). Remove any liquid residues (absorbent cloth, blow dry with compressed air). Do not place the handpiece in liquid disinfectant or in an ultrasonic bath.
- Page 29 Cleaning of the external coolant tubes The removable coolant tube and the nozzle cleaner can be cleaned in an ultrasonic bath. Clean coolant outlets carefully with the nozzle cleaner to remove dirt and deposits. Blow through the coolant tube with the air syringe. ...
- Page 30 S-9 L G, S-11 L G Cleaning of the LED Avoid scratching of the LED! Wash the LED with cleaning fluid and a soft cloth. ...
- Page 31 Blow the LED dry with air syringe or dry it carefully with a soft cloth. Carry out a visual inspection after each cleaning process. Do not use the handpiece if the LED is damaged and contact an authorized W&H service partner (see page 51).
- Page 32 Manual disinfection W&H recommends wiping down with disinfectant. > Use only disinfectants which do not contain chlorine and which are certified by officially recognized institutes. For Canada: Use EPA registered surface disinfectants. > Note the manufacturer’s specifications for the use of the disinfectants.
- Page 33 Mechanical cleaning and lubrication W&H recommends mechanical cleaning and lubrication with W&H Assistina. > Follow the instructions in the Assistina Instructions for use. S-10, S-12: only with W&H Assistina 301 Mechanical cleaning and disinfection internal and external The handpiece can be cleaned and disinfected in a thermo washer disinfector. >...
- Page 34 Mechanical cleaning and disinfection of the external coolant tubes Use the W&H adaptor kit REF 07233500 for the thermo washer disinfector. Screw the W&H adaptor into the adaptor on the injector rail. Screw the W&H intermediate adaptor onto the ...
- Page 35 Insert the shaft into the handpiece head. Insert chuck lever (a) and turn it to initial position (b). Only S-11 L G: Position the golden contacts on the shaft and handpiece head so that they are facing each other.
- Page 36 Check free running of the shaft. Insert the sheath onto the handpiece head. Note the symbols and turn until locked. ...
- Page 37 Reassemble angled handpiece S-9 L G, S-9, S-10, S-12 Note the positioning of the area of chuck lever. Insert the shaft into the handpiece head. Insert chuck lever (a) and turn it to initial position (b). Only S-9 L G: Position the golden contacts on ...
- Page 38 Insert the knee onto the handpiece head. Note the symbols and turn until locked. Insert lower shaft into the knee. Check free running of the lower shaft. Insert sheath onto the knee. Note the symbols and turn until locked.
- Page 39 Daily oil service Recommended lubrication cycles > Essential after every internal cleaning > Before each sterilization With W&H Service Oil F1, MD-400 > Follow the instructions on the oil spray can and on the packaging. With W&H Assistina >...
- Page 40 Test run following oil service Place the handpiece with the handpiece head downwards. Start the handpiece for 30 seconds to remove excessive oil. Start at the minimum speed and increase to the maximum speed within 5 to 10 seconds. Repeat the complete hygiene and maintenance process at any sign of dirt re-emerging.
- Page 41 Sterilization and storage > Pull off the coolant tube from the handpiece before sterilizing. > Sterilize the coolant tube and the handpiece. W&H recommends sterilization according to EN 13060, class B. For Canada: Hospital grade sterilization with pre and post vacuum cycle. >...
- Page 42 Approved sterilization procedures Follow your local and national directives, standards and guidelines. > Steam sterilization class B (pre and post vacuum) with sterilizers in accordance with EN 13060. Sterilization holding time a minimum of 3 minutes at 134 °C (273 °F). Required pressure -0.85 bar (-12.3 psi) up to 2.16 bar (31.3 psi).
-
Page 43: W&H Accessories And Spare Parts
Service Oil F1, MD-400 (6 pcs) 02038200 Spray cap with nozzle 00636901 Long nozzle cleaner 06879500 Coolant tube for S-9, S-9 L G, S-11, S-11 L G 06903200 Coolant tube for S-10, S-12 07226900 Coolant tube for S-15 07233500 Adaptor kit for the thermo washer disinfector... -
Page 44: Technical Data
7. Technical data Straight handpiece S-11 L G S-11 S-15 Transmission ratio Colour coding blue blue blue Motor connection according to standard ISO 3964 ISO 3964 ISO 3964 Rotary instruments ISO 1797-1 ( Ø 2.35* 2.35* 2.35* Permitted bur length... -
Page 45: Technical Data
7. Technical data Angled handpiece S-9 L G / S-9 S-10 S-12 Transmission ratio Colour coding blue blue orange Motor connection according to standard ISO 3964 ISO 3964 ISO 3964 Rotary instruments ISO 1797-1 ( Ø 2.35* 2.35 2.35 Permitted bur length (mm) 45** 70**... - Page 46 Temperature information Temperature of the handpiece at the operator side: maximum 55 °C (131 °F) Temperature of the handpiece at the patient side: maximum 50 °C (122 °F) Temperature of the working part (rotary instrument): maximum 41 °C (105.8 °F) Physical characteristics Temperature for storage and transport: -40 °C to +70 °C (-40 °F to +158 °F)
-
Page 47: Recycling And Disposal
8. Recycling and disposal Recycling W&H considers that it has a special duty towards the environment. The handpiece along with its packaging has been designed to be as environmentally friendly as possible. Disposal of the handpiece > Follow your local and national laws, directives, standards and guidelines for the disposal of used electrical devices. - Page 48 Disposal of the packaging material Follow your local and national laws, directives, standards and guidelines for the disposal. All packaging materials have been selected according to environmentally compatible and disposal aspects and can be recycled. Please send old packaging materials to the relevant collection and reprocessing system. This way, you will contribute to the recycling of raw materials and the avoidance of waste.
-
Page 49: Explanation Of Warranty Terms
Explanation of warranty terms This W&H product has been manufactured with great care by highly qualified specialists. A wide variety of tests and controls guarantee faultless operation. Please note that claims under warranty can only be validated when all the directions in the instructions for use have been followed. -
Page 51: Authorized W&H Service Partners
Authorized W&H service partners Find your nearest W&H service partner at http://wh.com Simply go to the menu option »Service« for full details. Alternatively please contact: W&H (UK) Limited, Unit 6, Stroud Wood Business Centre, Park Street, St Albans, AL2 2NJ Hertfordshire t +44 1727 874990, f +44 1727 872254, E-Mail: technical.uk@wh.com W&H IMPEX INC., 6490 Hawthorne Drive, Windsor, Ontario, N8T 1J9, Canada t +1 519 9446739, f +1 519 9746121, E-Mail: service.ca@wh.com... - Page 52 Manufacturer W&H Dentalwerk Bürmoos GmbH Ignaz-Glaser-Straße 53, 5111 Bürmoos, Austria Form-Nr. 50754 AEN t +43 6274 6236-0, f +43 6274 6236-55 Rev. 006 / 07.03.2019 wh.com office@wh.com Subject to alterations...
Need help?
Do you have a question about the S-11 L G and is the answer not in the manual?
Questions and answers