Table of Contents
Advertisement
Advertisement
Table of Contents

Related Manuals for W&H Assistina Twin MB-302


Summary of Contents for W&H Assistina Twin MB-302
- Page 1 Instructions for Use MB-302...
-
Page 2: Table Of Contents
Contents Symbols .......................................... 4 1. Introduction ....................................... 7 2. Electromagnetic compatibility (EMC) ..............................9 3. Unpacking ........................................ 10 4. Scope of delivery ..................................... 11 5. Safety notes ......................................12 6. Description .......................................14 Front panel ......................................14 LED display ......................................15 Quick ISO/Quick RM adaptor (optional accessories) ........................16 Rear panel ......................................17 7. - Page 3 Contents 8. Operation ........................................26 General ........................................ 26 Loading/removing of the transmission instruments with ISO connection ................27 – 28 Loading/removing of the transmission instruments and/or adaptors with fixed RM connection ..........29 Maintenance process ..................................30 Lubrication of the chucking system ..............................32 9.
-
Page 4: Symbols
Symbols in the Instructions for Use WARNING! ATTENTION! General explanations, (risk of injury) (to prevent damage occurring) without risk to persons or property CE mark Do not dispose of with domestic waste... - Page 5 Symbols on the medical device Catalogue number Consult Instructions Do not dispose of with domestic for Use waste Serial number Date of manufacture Data Matrix code Supply voltage for product information of the unit including UDI (Unique Device Identification) DC – direct current Manufacturer CE mark Medical Device...
- Page 6 Symbols on the packaging/cartridge This way up Permitted temperature Caution: According to Federal range for storage law, this medical device may only be sold by or on the order of a dentist, physician or any Fragile, handle with care Permitted temperature other medical practitioner range for transport: licensed by the law of the...
-
Page 7: Introduction
1. Introduction For your safety and the safety of your patients Prior to initial use please read the Instructions for Use. These explain how to use your medical device and guarantee a smooth and efficient operation. Observe the safety notes. Intended use Unit for cleaning the spray channels and lubricating the moving parts of dental transmission instruments, turbines, air motors and air-driven dental scalers. - Page 8 Introduction Production according to EU Regulation The medical device meets the requirements of Regulation (EU) 2017/745. Responsibility of the manufacturer The manufacturer can only accept responsibility for the safety, reliability and performance of the medical device when it is used in compliance with the following directions: >...
-
Page 9: Electromagnetic Compatibility (Emc)
2. Electromagnetic compatibility (EMC) Medical electrical equipment is subject to particular precautions in regard to EMC and must be installed and put into operation in accordance with the EMC notes included. W&H guarantees the compliance of the device with the EMC requirements only when used with original W&H accessories and spare parts. -
Page 10: Unpacking
3. Unpacking W&H packaging is environmentally friendly and can be Remove the cardboard box disposed of by industrial recycling companies. with the Twin Care SET. However, we recommend that you keep the original packaging. Lift out the medical device. e Remove the cardboard box with the: >... -
Page 11: Scope Of Delivery
4. Scope of delivery Description REF 30310 W&H Assistina Twin (MB-302) REF 02697000 Air connection hose REF 07477500 Power supply unit MB-302 REF 07484000 Twin Care SET MB-302: > W&H Activefluid cartridge, MC-302, 200 ml > W&H Service Oil F1 cartridge, MD-302, 200 ml >... -
Page 12: Safety Notes
5. Safety notes Please observe the following instructions under all circumstances > Before using the medical device for the first time, store it at room temperature for 24 hours. > Only set up the product in sufficiently well ventilated rooms! >... - Page 13 Safety notes Medical device The medical device is classed as »conventional equipment« (closed equipment without protection against the ingress of water). Process fluids > If inhaled: Supply fresh air; consult doctor in case of complaints. > Following contact with skin: Wash off with soap and plenty of water. >...
-
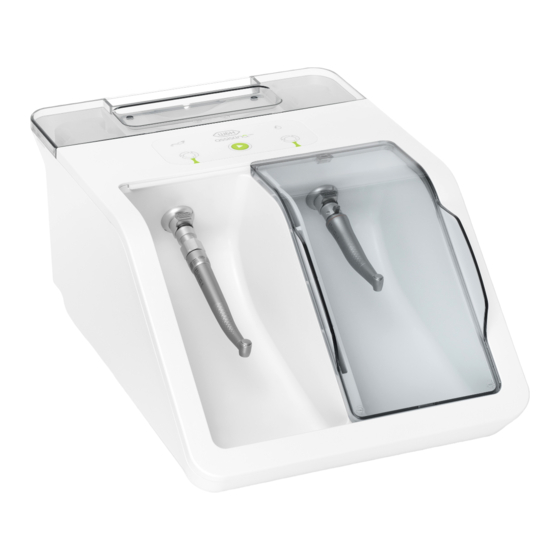
Page 14: Description
6. Description Front panel Cover cartridge compartment Cartridge compartment for W&H Service Oil F1 MD-302 Operating controls Cartridge compartment for W&H Activefluid MC-302 Quick Connect by W&H Sliding window Left chamber Right chamber Air duct... -
Page 15: Led Display
Description LED display W&H Service Oil F1, MD-302 W&H Activefluid, MC-302 Left chamber Start button Right chamber... -
Page 16: Quick Iso/Quick Rm Adaptor (Optional Accessories)
Description Quick ISO/Quick RM adaptor (optional accessories) Quick ISO adaptor Quick RM adaptor Release button Union nut O-rings O-rings... -
Page 17: Rear Panel
Description Rear panel USB port (for Service only!) Filter compartment cover Connecting socket for Connecting socket for power supply unit air connection hose... -
Page 18: Start-Up
7. Start-up Inserting/removing a cartridge The cartridges must be at room temperature when they are inserted. The cartridge spike in the medical device is sharp. Be careful not to injure yourself on the projecting spike. Remove the cartridge e Removing a cartridge. compartment cover. -
Page 19: Inserting/Removing A Filter
Start-up Inserting/removing a filter Open the filter e Close the filter compartment cover. compartment cover. Inserting/removing a filter. > Push the filter in until the limit stop is reached. > Pull out the filter. Always clean the filter compartment whenever you replace a filter. Observe the manufacturer’s instructions on the use of disinfectant. -
Page 20: Connecting/Disconnecting The Air Connection Hose
Start-up General Use only non-contaminated, oil-free, dry and filtered compressed air according to ISO 7494-2. Replace the filter if contaminated. Connecting/disconnecting the air connection hose Connect the air connection hose. Disconnect the air connection hose. Connecting the power supply unit e Connect the power supply unit to the medical device. -
Page 21: Switching The Assistina Twin On/Off
Start-up Switching the Assistina Twin on/off Plug the power supply unit into a power socket. t Pull the power supply unit out of the socket. ... -
Page 22: Initial Filling
Start-up Initial filling > Carry out the initial filling without a transmission instrument. > It does not matter which chamber you fill first. Close one chamber using Press the »Start« button the sliding window. for approx. 5 seconds. The initial filling of the first chamber will take approx. - Page 23 Start-up Initial filling e Close the other chamber using the sliding window. The initial filling continues automatically. The initial filling of the second chamber will take approx. 1 minute. > The LED for the chamber flashes green. > The W&H Service Oil and W&H Activefluid LED are green. The initial filling has completed successfully.
-
Page 24: Standby Mode
Start-up Standby mode The medical device switches to standby mode: > when the power supply unit is inserted into the socket; or > if it is not operated for 15 minutes. All LED are off. Activating the Assistina Twin > Press the »Start« button. All of the LED are white for 1 second. -
Page 25: Test Run
Start-up Test run > Place a pre-disinfected transmission instrument onto the Quick Connect (see pages 27 – 29). > Start the Assistina Twin (see page 30). The transmission instrument will be slightly moist when you take it out. It then needs to be manually disinfected and sterilized. In the event of operating malfunctions (e.g., vibrations, unusual noise, overheating, failure or leakage) stop the medical device immediately and contact an authorized W&H service partner. -
Page 26: Operation
8. Operation General Wear protective clothing, safety glasses, face mask and gloves. > Refer to the »hygiene and maintenance« instructions in the instructions for use of the transmission instruments. -
Page 27: Loading/Removing Of The Transmission Instruments With Iso Connection
Operation Loading/removing with Quick ISO adaptor Replace damaged or leaking O-rings immediately (see page 38). Loading/removing the transmission instruments with ISO connection Loading the transmission instruments with ISO connection Push the transmission instrument onto the adaptor, with the coolant outlet facing downwards. For air motors, set the direction of rotation via the switching ring to clockwise or anti-clockwise. - Page 28 Operation Loading/removing with Quick RM adaptor Removing the transmission instruments with ISO connection Press the release button and pull off the transmission instrument with adaptor. Tip the release button on the adaptor forwards and remove the transmission instrument.
-
Page 29: Loading/Removing Of The Transmission Instruments And/Or Adaptors With Fixed Rm Connection
Operation Loading/removing with Quick RM adaptor Loading of the transmission instruments and/or adaptors with fixed RM connection Push on the transmission Push on the Quick RM instrument and/or adaptor adaptor with transmission on the Quick RM adaptor and instrument or, if applicable, tighten the union nut the adaptor with... -
Page 30: Maintenance Process
Operation Maintenance process > The amount of W&H Activefluid, MC-302 and W&H Service Oil F1, MD-302 used in the maintenance process is carefully metered. > The maintenance process always runs automatically and identically in both chambers. Close the sliding window. ... - Page 31 Operation Maintenance process The maintenance process is performed. > The LED flashes green. > The maintenance process runs automatically and takes approx. 10 seconds. The maintenance process has completed successfully. > The LED for the chamber is green. > A signal tone sounds.
-
Page 32: Lubrication Of The Chucking System
Operation Lubrication of the chucking system > Remove the rotary instrument. > Use the Quick ISO adaptors REF 06422600 and REF 02693000. > It is possible to oil the chucking system in both chambers. Close the sliding window. e Press the »Start« button twice. - Page 33 Operation Lubrication of the chucking system Align the instrument with t Press the »Start« button. the outlet. The lubrication is performed. > The LED flashes purple. > The lubrication runs automatically and takes approx. 5 seconds. Wear protective clothing, safety glasses, face mask and gloves. Aerosol mist escapes.
- Page 34 Operation Lubrication of the chucking system The lubrication has completed successfully. > The LED for the chamber and the start button are purple. > A signal tone sounds. Continuing the lubrication y Align the instrument with u Press the »Start« button. the outlet.
-
Page 35: Cleaning
9. Cleaning the Assistina Twin > Follow your local and national laws, directives, standards and guidelines for cleaning and disinfection. > W&H recommends cleaning the medical device at least once daily or as required. Wear protective clothing, safety glasses, face mask and gloves. Cleaning agents Use only detergents which are intended for cleaning medical devices made of metal and plastic. -
Page 36: Medical Device
Cleaning the Assistina Twin Switching OFF Remove the sliding window. Unplug the medical device from the mains supply. Medical device Manual cleaning of the interior and exterior Clean the chambers with a dry cloth. Wipe down the exterior and the chambers with disinfectant. >... -
Page 37: Start-Up After Cleaning
Cleaning the Assistina Twin Start-up after cleaning Insert the sliding window. Switching ON Connect the medical device to the mains supply. -
Page 38: Maintenance
10. Maintenance Replacing O-rings Replace damaged or leaking O-rings immediately. Do not use sharp tools! Firmly squeeze the O-ring between your thumb and index finger so that it forms a loop. Pull off the O-ring. e Slide on a new O-ring. -
Page 39: Replacing The Air Filter
Maintenance Replacing the air filter Switch off the central air supply before replacing the air filter. > Replace the air filter whenever it is dirty or at least once per year. > Only use clean, filtered compressed air. Remove the air e Replace the air filter and re- connection hose. -
Page 40: Error Messages
11. Error messages LED display Description Solution Medical device in standby mode > Press the »Start« button. Medical device not connected to the mains > Connect the power supply. No LED lit up. supply. Electronics error > Unplug medical device and plug back in. >... - Page 41 Error messages LED display Description Solution Problem with air supply. > Restore the air supply. The start button LED is blue. The maintenance process did not > Press the »Start« button. complete successfully. > Repeat the maintenance process. The LED for the right or left chamber is red.
- Page 42 Error messages LED display Description Solution The initial filling did not complete > Check if the cartridges are: successfully. > connected correctly; > empty (replace cartridge). > Press the »Start« button. > Repeat the initial filling. The LED for the right or left chamber, the W&H Service Oil LED and W&H Activefluid LED are red.
- Page 43 Error messages LED display Description Solution The cartridges are almost empty. > Replace the cartridges as soon as possible. The W&H Service Oil and W&H Activefluid LED are orange. The cartridges are empty. > Replace the cartridges. > Carry out the initial filling. The W&H Service Oil and W&H Activefluid LED are red.
- Page 44 Error messages LED display Description Solution The lubrication of the chucking system > Press the »Start« button. did not complete successfully. > Repeat the lubrication. The LED for the right or left chamber is red. The start button LED is purple. The lubrication of the chucking system >...
-
Page 45: W&H Accessories And Spare Parts
12. W&H Accessories and spare parts Use only original W&H accessories and spare parts or accessories approved by W&H! 06395100 06422600 02679000 Quick RM adaptor Quick ISO adaptor Adaptor for detachable contra-angle handpiece heads 02690400 02083500 Adaptor for all W&H products Borden 2/3-hole adaptor with Roto Quick system for turbine handpieces with... - Page 46 W&H Accessories and spare parts 02691000 02692000 04713200 Adaptor suitable for transmission Adaptor suitable for turbine handpieces Adaptor suitable for instruments T1 CLASSIC from from the series T1, T2, T3 from Multiflex connection from Kaltenbach & Voigt Sirona Dental Systems Sirona Dental Systems 05204600 02693000...
- Page 47 W&H Accessories and spare parts 07484000 07477500 02060100 Twin Care SET Power supply unit MB-302 O-ring, Roto Quick adaptor, large MB-302 02060200 O-ring, Roto Quick adaptor, small 03006100 O-Ring, Quick RM and Quick ISO adaptor, large 01208300 O-Ring, Quick RM and Quick ISO adaptor, small 02695700 O-ring, Quick ISO adaptor...
-
Page 48: Servicing
13. Servicing Repairs If defects occur, always send in the complete medical device. Returns Refer all questions to an authorized W&H service partner (see page 53). Always return equipment in the original packaging! -
Page 49: Technical Data
14. Technical data Assistina Twin MB-302 Supply voltage: 100 – 240 V AC Permitted voltage fluctuation: ±10% Nominal current: 0.4 – 0.2 A Frequency: 50 – 60 Hz Max. power consumption: 18 VA Air consumption: approx. 40 Nl/min. Operating pressure: 5 –... - Page 50 Technical data Ambient conditions Temperature during transport: 0 °C to +50 °C (+32 °F to +122 °F) Temperature during storage: +5 °C to +40 °C (+41 °F to +104 °F) Humidity during storage and transport: 8% to 80% (relative), non-condensing Ambient temperature during operation: +10 °C to +40 °C (+50 °F to +104 °F) Humidity during operation:...
-
Page 51: Disposal
15. Disposal Ensure that the parts are not contaminated on disposal. Follow your local and national laws, directives, standards and guidelines for disposal. > Medical device > Waste electrical equipment > Packaging... -
Page 52: Explanation Of Warranty Terms
E x p la na ti on o f war ranty ter ms This medical device has been manufactured with great care by highly qualified specialists. A wide variety of tests and controls guarantee faultless operation. Please note that claims under warranty can only be validated when all the directions in the instructions for use have been followed. -
Page 53: Authorized W&H Service Partners
Authorized W&H service partners Find your nearest W&H service partner at http://wh.com Simply go to the menu option »Service« for full details. Or simply scan the QR code. - Page 56 Manufacturer W&H Dentalwerk Bürmoos GmbH Ignaz-Glaser-Straße 53, 5111 Bürmoos, Austria Form-Nr. 50927 AEN t + 43 6274 6236-0, f + 43 6274 6236-55 Rev. 006 / 17.02.2020 office@wh.com wh.com Subject to alterations...
Need help?
Do you have a question about the Assistina Twin MB-302 and is the answer not in the manual?
Questions and answers