
Related Manuals for ALDI GARDENLINE GL46


Summary of Contents for ALDI GARDENLINE GL46
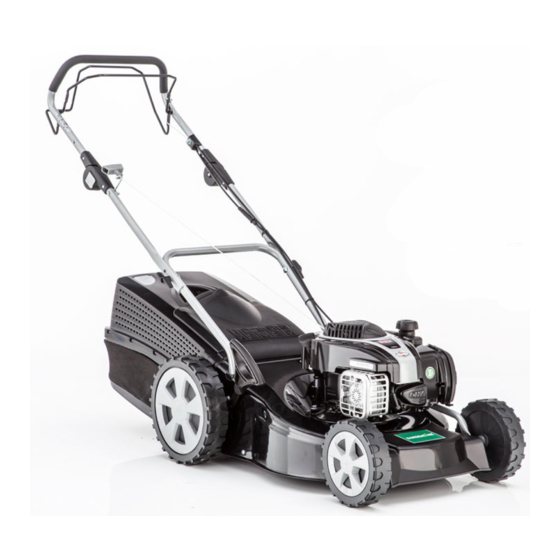
- Page 1 Customer Helpline +44 (0) 808 169 8390 www.al-ko.com/service-aldi Product Assembly Guide GARDENLINE GL46 Petrol Lawnmower Read the supplied user manual carefully before operating the machine GL46_010319...
- Page 2 GARDENLINE GL46 Petrol Lawnmower Congratulations on purchasing a GARDENLINE lawnmower, manufactured by AL-KO in Austria. The following is a step by step guide to compliment the User Manual and assist you in assembling your new machine. If you have any questions, please feel free to call us on 0808 169 8390 I) Place your unopened box on a flat surface with sufficient working space.
- Page 3 GARDENLINE GL46 Petrol Lawnmower Grass Box Assembly 1) Remove the packaging from the Grass Flap and set the straight silver bar to one side. 2) Ref:- User Manual Fig 01. Place the silver Grass Box Brace Bar into the retainers at the front and sides of the Grass Box paying attention to the angle of the bar as shown.
- Page 4 GARDENLINE GL46 Petrol Lawnmower 4) Ref:- User Manual Fig 02 cont. Ensure the Bracing Bar fits into the holes in the solid section of the Grass Box. 5) Starting at the first tab, squeeze the two sections of the Grass Box together, so the...
- Page 5 GARDENLINE GL46 Petrol Lawnmower 8) REF:- User Manual Fig. 04 Line up the holes in the two Grass Box halves, the Brace Plate and the Brace Bar and insert the cross head bolt from the outside and secure with the small round headed nut.
- Page 6 GARDENLINE GL46 Petrol Lawnmower 10) Ref:- User Manual Fig. 05. Pass the black plastic rectangular Grass Box section (flat side up) from the front of the Grass Box, under the top cover and up towards the handle. 11) Line up the three tabs on one side with the corresponding slots in the Grass Box and press the three tabs on the other side down, securing this section into the Grass Box.
- Page 7 GARDENLINE GL46 Petrol Lawnmower 12) Ref:- User Manual Fig. 06 To attach the Fill Indicator, gently bend the rear edge, so the two tabs fit into the holes in the Grass Box. Once fitted, the Fill Indicator should be able to move up and down freely.
- Page 8 GARDENLINE GL46 Petrol Lawnmower 14) Ref:- Manual Fig. 09, 10, 11 Remove the lawnmower from the box. Hold the Grass Flap against the rear of the mower (1). Hold one side of the Grass Flap, and with your other hand, use your thumb to press the middle leg of the Grass Box Spring out, so it locates into the small square hole on the back of the mower frame (2).
- Page 9 GARDENLINE GL46 Petrol Lawnmower 16) Ref:- User Manual Fig. 12 Next, clip in the End Cover Buttons at either end of the Grass Flap, preventing the bar from coming out. Tip: There is a single notch on each end of the Grass Flap (1). To locate the End Cover Buttons securely, any one of the cut outs in the Buttons must be fitted over this notch (2).
- Page 10 GARDENLINE GL46 Petrol Lawnmower 18) Ref:- User Manual Fig. 14 Tip: Before proceeding, rub a small amount of polish over the legs of the Lower Handle (1). Push the ends of the Lower Handle firmly into the holes in the top of the mower (2) until they locate fully.
- Page 11 GARDENLINE GL46 Petrol Lawnmower 20) Ref:- User Manual Manual Fig. 17 Attach the Recoil Retaining Hook using the hole in the Upper Handle, below the Adjuster, on the right hand side (1). From the left: a) Bolt, b) Handle, c) Retaining Hook, d) Washer, e) Nut 21) Ref:- User Manual Fig.
- Page 12 GARDENLINE GL46 Petrol Lawnmower 22) Ref:- User Manual Fig. 19 Using the two cable ties supplied, secure the cables to the handle, above and below the Hand Nut. 23) Ref:- User Manual Fig. 20 Important: Your machine has been supplied from manufacture with NO OIL in the engine.
- Page 13 GARDENLINE GL46 Petrol Lawnmower 24) Ref:- User Manual Fig. 21 Fill the Fuel Tank (1) with fresh unleaded petrol. Note: Unleaded petrol can go stale in as little as 60 days. We recommend the use of a fuel stabiliser, such as B3C Ethanol Shield or Briggs & Stratton Fuel Fit to prolong the life of your fuel and to protect your engine from the harmful effects of ethanol.
- Page 14 GARDENLINE GL46 Petrol Lawnmower 26) Ref:- User Manual Fig. 23 When collecting grass, the Fill Indicator will flap up and down (1). When the Grass Box is full, the Fill Indicator will stay flat (2). 27) Ref:- User Manual Fig. 24 There are 7 heights of cut.
- Page 15 GARDENLINE GL46 Petrol Lawnmower 28) Ref:- User Manual Fig. 25 To start your mower: Press the red Primer on the side of the engine 3 times. 29) Ref:- User Manual Fig. 26, 27 CAUTION: This action will start the engine and ALSO start the Cutting Blade.
- Page 16 GARDENLINE GL46 Petrol Lawnmower 31) Ref:- User Manual Fig. 30 Once the mower has started, it can be pushed along while holding in the front Safety Lever. 32) Ref:- User Manual Fig. 29 To engage the Wheel Drive, hold in the front Safety Lever (a) and also the rear Drive Lever (b).
- Page 17 GARDENLINE GL46 Petrol Lawnmower www.al-ko.com/service-aldi GL46-010319...
- Page 18 GARDENLINE GL46 Petrol Lawnmower After Sales Support +44 (0) 808 169 8390 GL46_010319...
- Page 19 GARDENLINE GL46 Petrol Lawnmower www.al-ko.com/service-aldi GL46-010319...
- Page 20 GARDENLINE GL46 Petrol Lawnmower Notes After Sales Support +44 (0) 808 169 8390 GL46_010319...
Need help?
Do you have a question about the GARDENLINE GL46 and is the answer not in the manual?
Questions and answers
how do i fix a new drive belt tension spring
Does the mower have mulch plug