Cognex In-Sight 7000 Series Optional Configurations
Hide thumbs
Also See for In-Sight 7000 Series:
- Quick start manual (77 pages) ,
- Installation manual (38 pages) ,
- Optional configurations (32 pages)
Table of Contents
Advertisement
Quick Links
Download this manual
See also:
Optional Configurations
Advertisement
Table of Contents

Related Manuals for Cognex In-Sight 7000 Series


Summary of Contents for Cognex In-Sight 7000 Series
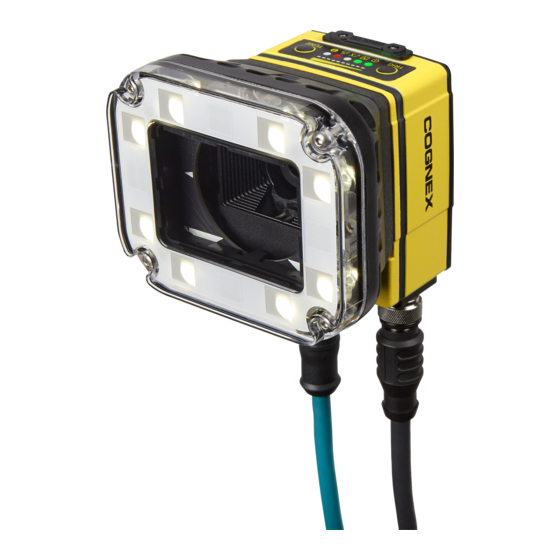
- Page 1 ® In-Sight 7000 Series Vision System Optional Configurations...
- Page 3 Copyright © 2013 Cognex Corporation. All Rights Reserved. Portions of the hardware and software provided by Cognex may be covered by one or more of the U.S. and foreign patents listed below as well as pending U.S. and foreign patents. Such pending U.S. and foreign patents issued after the date of this document are listed on the Cognex web site at: http://www.cognex.com/patents.
-
Page 5: Table Of Contents
Legal Notices Uninstall and Install the M12 Lens Uninstall the M12 Lens Install the M12 Lens Replace the Cognex Lens Tool Pad Install the Lens Filter Install a Lens Filter with a Shroud Install a Lens Filter without a Shroud... -
Page 7: Uninstall And Install The M12 Lens
If you purchased a vision system with the pre-installed M12 lens, the lens can be replaced with other M12 lenses. The Cognex Lens Tool accessory (LNS-M12-TOOLKIT) must be used to replace the M12 lens. Please contact your Cognex sales representative for more information. - Page 8 5. To loosen the lens, turn the lens tool counter-clockwise. Figure 1-2: Turn Counter-Clockwise 6. Remove the lens. Figure 1-3: Remove the Lens...
-
Page 9: Install The M12 Lens
1. Verify that the 24VDC power supply being used is unplugged and not receiving power. 2. Determine the correct lens tool to use, based on the focal length of the lens. Table 1-2: Cognex Lens Tool Lens Focal Length Cognex Lens Tool... -
Page 10: Replace The Cognex Lens Tool Pad
Replace the Cognex Lens Tool Pad If the Cognex Lens Tool's Pad tears, it can be replaced using one of the pads included with the lens tool. 1. Grab the edge of the existing pad and pull it out of the lens tool. -
Page 11: Install The Lens Filter
If you purchased a vision system with the M12 lens configuration, a filter kit is available for purchase. The filter kit can be used to increase the contrast of images and improve the ability of the vision system to distinguish desired characteristics. Please contact your Cognex sales representative for more information. Table 2-1: Cognex Filter Kit... -
Page 12: Install A Lens Filter With A Shroud
Install a Lens Filter with a Shroud If the vision system you purchased has a shroud, complete the following steps to install the lens filter. 1. Verify that the 24VDC power supply being used is unplugged and not receiving power. 2. - Page 13 Install the Lens Filter 5. Reinstall the shroud to the vision system. Gently press the shroud down into the vision system. Figure 2-3: Reinstall Shroud 6. Reattach the lens cover. 7. Restore power to the 24VDC power supply and turn it on if necessary.
-
Page 14: Install A Lens Filter Without A Shroud
Install a Lens Filter without a Shroud If the vision system you purchased does not have a shroud, complete the following steps to install the lens filter. 1. Verify that the 24VDC power supply being used is unplugged and not receiving power. 2. -
Page 15: Replace The Ring Light
Replace the Ring Light If you purchased a vision system with the M12 lens configuration, the vision system is shipped with an internal LED ring light pre-installed. The steps for replacing the ring light vary, depending on whether the pre-installed ring light and the ring light you purchased have a shroud. -
Page 16: Install A Ring Light With A Shroud
Install a Ring Light with a Shroud If the pre-installed ring light on your vision system has a shroud, please complete the following steps to replace the ring light. 1. Verify that the 24VDC power supply being used is unplugged and not receiving power. 2. - Page 17 Replace the Ring Light 4. Remove the ring light and shroud from the vision system. Figure 3-2: Remove Ring Light and Shroud 5. To install the new ring light, align the screws with the threaded screw posts on the vision system. Also align the pins on the back of the ring light with the connector on the vision system, but do not attempt to connect the pins.
- Page 18 7. Using a screwdriver, tighten the screws until they stop turning; the maximum torque is 0.56 Nm (5 in-lb). Figure 3-4: Partially Tighten the Screws 8. Reattach the lens cover. 9. Restore power to the 24VDC power supply and turn it on if necessary.
-
Page 19: Convert To A Ring Light With A Shroud
If the pre-installed ring light does not have a shroud, and you need to convert to a ring light with a shroud, please complete the following steps. To install a ring light with a shroud, you must first install the Cognex Standoff and Connector Kit (LM12-UPDATE). - Page 20 4. Remove the ring light from the vision system. Figure 3-6: Remove Ring Light 5. Install the Cognex Standoff and Connector Kit (LM12-UPDATE). a. Insert the light connector into the connector on the vision system. Figure 3-7: Install the Light Connector...
- Page 21 Replace the Ring Light b. Align the posts with the threaded screw holes on the vision system. Using a post wrench, tighten the posts until they stop turning; the maximum torque is 0.56 Nm (5 in-lb). Figure 3-8: Install the Posts 6.
- Page 22 8. Using a screwdriver, tighten the screws until they stop turning; the maximum torque is 0.56 Nm (5 in-lb). Figure 3-10: Partially Tighten the Screws 9. Reattach the lens cover. 10. Restore power to the 24VDC power supply and turn it on if necessary.
-
Page 23: Install A Ring Light Without A Shroud
Replace the Ring Light Install a Ring Light without a Shroud If the pre-installed ring light on your vision system does not have a shroud, and you need to replace it with another ring light that also does not have a shroud, please complete the following steps. 1. - Page 24 4. Remove the ring light from the vision system. Figure 3-12: Remove Ring Light 5. To install the new ring light, align the screws with the threaded screw holes on the vision system. Also align the pins on the back of the ring light with the connector on the vision system, but do not attempt to connect the pins. Figure 3-13: Align the Screws and Pins...
- Page 25 Replace the Ring Light 6. Using a screwdriver, tighten the screws until they are partially threaded. Figure 3-14: Partially Tighten the Screws 7. Gently press down on the ring light to connect the pins on the back of the ring light to the vision system. CAUTION: If the screws are not partially threaded prior to connecting the pins, the pins may bend or break.
- Page 28 P/N 597-0060-01 Rev. B...
Need help?
Do you have a question about the In-Sight 7000 Series and is the answer not in the manual?
Questions and answers