
Related Manuals for IBM Power System PCIe3


Summary of Contents for IBM Power System PCIe3
- Page 1 Power Systems PCIe3 6-slot fanout module for the EMX0 PCIe Gen3 I/O expansion drawer...
- Page 3 Power Systems PCIe3 6-slot fanout module for the EMX0 PCIe Gen3 I/O expansion drawer...
- Page 4 Note Before using this information and the product it supports, read the information in “Safety notices” on page v, “Notices” on page 37, the IBM Systems Safety Notices manual, G229-9054, and the IBM Environmental Notices and User Guide, Z125–5823. ™...
-
Page 5: Table Of Contents
Notices ........37 Accessibility features for IBM Power Systems servers . - Page 6 Power Systems: PCIe3 6-slot fanout module for the EMX0 PCIe Gen3 I/O expansion drawer...
-
Page 7: Safety Notices
Electrical voltage and current from power, telephone, and communication cables are hazardous. To avoid a shock hazard: v If IBM supplied the power cord(s), connect power to this unit only with the IBM provided power cord. Do not use the IBM provided power cord for any other product. - Page 8 – For racks with AC power, connect all power cords to a properly wired and grounded electrical outlet. Ensure that the outlet supplies proper voltage and phase rotation according to the system rating plate. – For racks with a DC power distribution panel (PDP), connect the customer’s DC power source to the PDP.
- Page 9 v Each rack cabinet might have more than one power cord. – For AC powered racks, be sure to disconnect all power cords in the rack cabinet when directed to disconnect power during servicing. – For racks with a DC power distribution panel (PDP), turn off the circuit breaker that controls the power to the system unit(s), or disconnect the customer’s DC power source, when directed to disconnect power during servicing.
- Page 10 CAUTION: Removing components from the upper positions in the rack cabinet improves rack stability during relocation. Follow these general guidelines whenever you relocate a populated rack cabinet within a room or building. v Reduce the weight of the rack cabinet by removing equipment starting at the top of the rack cabinet.
- Page 11 DANGER: Rack-mounted devices are not to be used as shelves or work spaces. (L002) (L003) Safety notices...
- Page 12 DANGER: Multiple power cords. The product might be equipped with multiple AC power cords or multiple DC power cables. To remove all hazardous voltages, disconnect all power cords and power cables. (L003) (L007) CAUTION: A hot surface nearby. (L007) (L008) Power Systems: PCIe3 6-slot fanout module for the EMX0 PCIe Gen3 I/O expansion drawer...
- Page 13 Exchange only with the IBM-approved part. Recycle or discard the battery as instructed by local regulations. In the United States, IBM has a process for the collection of this battery. For information, call 1-800-426-4333. Have the IBM part number for the battery unit available when you call. (C003)
- Page 14 Power and cabling information for NEBS (Network Equipment-Building System) GR-1089-CORE The following comments apply to the IBM servers that have been designated as conforming to NEBS (Network Equipment-Building System) GR-1089-CORE: Power Systems: PCIe3 6-slot fanout module for the EMX0 PCIe Gen3 I/O expansion drawer...
- Page 15 The equipment is suitable for installation in the following: v Network telecommunications facilities v Locations where the NEC (National Electrical Code) applies The intrabuilding ports of this equipment are suitable for connection to intrabuilding or unexposed wiring or cabling only. The intrabuilding ports of this equipment must not be metallically connected to the interfaces that connect to the OSP (outside plant) or its wiring.
- Page 16 Power Systems: PCIe3 6-slot fanout module for the EMX0 PCIe Gen3 I/O expansion drawer...
-
Page 17: Pcie3 6-Slot Fanout Module For The Emx0 Pcie Gen3 I/O Expansion Drawer
If you do not have an ESD wrist strap, just prior to removing the product from ESD packaging and installing or replacing hardware, touch an unpainted metal surface of the system for a minimum of 5 seconds. © Copyright IBM Corp. 2018... - Page 18 Figure 1. Location of the ESD jack on the rear of the EMX0 PCIe3 expansion drawer 4. At the rear of the EMX0 PCIe3 expansion drawer, put the cable management bracket in the service position. See Figure 2 on page 3. a.
-
Page 19: Installing A Pcie3 6-Slot Fanout Module In The Emx0 Pcie3 Expansion Drawer
Figure 2. Placing the cable management bracket in the raised service position Installing a PCIe3 6-slot fanout module in the EMX0 PCIe3 expansion drawer To install a PCIe3 6-slot fanout module in the EMX0 PCIe3 expansion drawer, complete the steps in this procedure. - Page 20 Figure 3. Removing the filler 3. Place the new PCIe3 6-slot fanout module into the expansion unit chassis. Support the weight of the PCIe3 6-slot fanout module by holding it at the bottom while you push it in. 4. Push the release latches (B) on the PCIe3 6-slot fanout module (A) toward the system until they lock in place.
-
Page 21: Preparing The Emx0 Pcie3 Expansion Drawer For Operation After You Install A Pcie3 6-Slot Fanout Module
PCIe3 expansion drawer. For instructions, see: – Installing a PCIe adapter(http://www.ibm.com/support/knowledgecenter/POWER9/p9hak/ pciadapters.htm) and select the appropriate model – Connecting an EMX0 PCIe3 expansion drawer to your system(http://www.ibm.com/support/ knowledgecenter/POWER9/p9egp/p9egp_connect_kickoff.htm) 3. Put the cable management bracket in the operating position. See Figure 6 on page 6. - Page 22 Figure 6. Placing the cable management bracket in the lowered operating position 4. If necessary, close the rear rack door. 5. Start the system and the EMX0 PCIe3 expansion drawer. When you start the system, the EMX0 PCIe3 expansion drawer powers on automatically. For instructions, see “Starting the system” on page 29. 6.
-
Page 23: Removing And Replacing A Pcie3 6-Slot Fanout Module In The Emx0 Pcie3 Expansion Drawer
a. In the navigation area, click the Resources icon , and then click All Systems. b. Click the system name in which you want to activate the logical partition. c. Select the logical partition name that you want to activate. d. - Page 24 Figure 8. Location of the ESD jack on the rear of the EMX0 PCIe3 expansion drawer 5. At the rear of the EMX0 PCIe3 expansion drawer, put the cable management bracket in the service position. See Figure 9 on page 9. a.
-
Page 25: Removing The Pcie3 6-Slot Fanout Module From The Emx0 Pcie3 Expansion Drawer
Figure 9. Placing the cable management bracket in the raised service position Removing the PCIe3 6-slot fanout module from the EMX0 PCIe3 expansion drawer To remove the PCIe3 6-slot fanout module from the EMX0 PCIe3 expansion drawer, complete the steps in this procedure. - Page 26 Figure 10. Opening the release latches 5. Place the PCIe3 6-slot fanout module on an electrostatic discharge (ESD) surface. 6. Remove the voltage regulator module. See Figure 11 on page 11. a. Press the release latch (A) and lift the latch up to open it. b.
- Page 27 Figure 11. Removing the voltage regulator module 7. Label the PCIe adapter cassettes so that they can be installed again in the correct order. To remove the PCIe adapter cassettes from the PCIe3 6-slot fanout module, complete the following steps: a.
-
Page 28: Replacing The Pcie3 6-Slot Fanout Module In The Emx0 Pcie3 Expansion Drawer
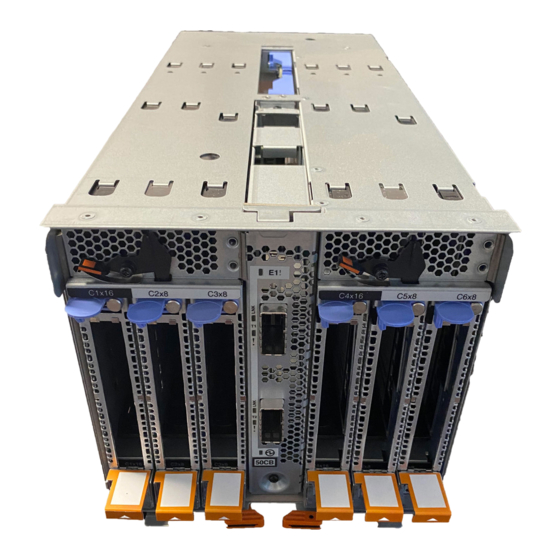
Figure 12. Removing a PCIe adapter cassette Replacing the PCIe3 6-slot fanout module in the EMX0 PCIe3 expansion drawer To replace the PCIe3 6-slot fanout module in the EMX0 PCIe3 expansion drawer, complete the steps in this procedure. Procedure 1. Ensure that you have the electrostatic discharge (ESD) wrist strap on and that the ESD clip is plugged into a ground jack or connected to an unpainted metal surface. - Page 29 Figure 13. Installing a PCIe adapter cassette 3. Replace the voltage regulator module that you removed from the original PCIe3 6-slot fanout module. See Figure 14 on page 14. a. Push the voltage regulator module into the PCIe3 6-slot fanout module. b.
- Page 30 Figure 14. Replacing the voltage regulator module 4. Place the new PCIe3 6-slot fanout module into the expansion unit chassis. Support the weight of the PCIe3 6-slot fanout module by holding it at the bottom while you push it in. 5.
-
Page 31: Preparing The Emx0 Pcie3 Expansion Drawer For Operation After You Remove And Replace A Pcie3 6-Slot Fanout Module
Figure 15. Closing the release latches on the PCIe3 6-slot fanout module 6. Reconnect the cables to the PCIe3 6-slot fanout module. Preparing the EMX0 PCIe3 expansion drawer for operation after you remove and replace a PCIe3 6-slot fanout module To prepare the EMX0 PCIe3 expansion drawer for operation, complete the steps in this procedure. - Page 32 Figure 16. Placing the cable management bracket in the lowered operating position 3. If necessary, close the rear rack door. 4. Start the system and the EMX0 PCIe3 expansion drawer. When you start the system, the EMX0 PCIe3 expansion drawer powers on automatically. For instructions, see “Starting the system” on page 29. 5.
-
Page 33: Permanently Removing A Pcie3 6-Slot Fanout Module From The Emx0 Pcie3 Expansion Drawer
Permanently removing a PCIe3 6-slot fanout module from the EMX0 PCIe3 expansion drawer Find information about permanently removing a PCIe3 6-slot fanout module from the EMX0 PCIe Gen3 I/O expansion drawer. If your system is managed by the Hardware Management Console (HMC), use the HMC to remove a part from the system. - Page 34 Figure 18. Location of the ESD jack on the rear of the EMX0 PCIe3 expansion drawer 5. At the rear of the EMX0 PCIe3 expansion drawer, put the cable management bracket in the service position. See Figure 19 on page 19. a.
-
Page 35: Permanently Removing A Pcie3 6-Slot Fanout Module From An Emx0 Pcie3 Expansion Drawer
Figure 19. Placing the cable management bracket in the raised service position Permanently removing a PCIe3 6-slot fanout module from an EMX0 PCIe3 expansion drawer To permanently remove a PCIe3 6-slot fanout module from the EMX0 PCIe3 expansion drawer, complete the steps in this procedure. - Page 36 Figure 20. Opening the release latches 5. Place the PCIe3 6-slot fanout module on an electrostatic discharge (ESD) surface. 6. Place the PCIe3 6-slot fanout module in a safe place. 7. Install the filler. Figure 21. Installing the filler 8. Put the cable management bracket in the operating position. See Figure 22 on page 21. a.
-
Page 37: Preparing The Emx0 Pcie3 Expansion Drawer For Operation After You Permanently Remove A Pcie3 6-Slot Fanout Module
Figure 22. Placing the cable management bracket in the lowered operating position Preparing the EMX0 PCIe3 expansion drawer for operation after you permanently remove a PCIe3 6-slot fanout module To prepare the EMX0 PCIe3 expansion drawer for operation after you permanently remove a PCIe3 6-slot fanout module, complete the steps in this procedure. - Page 38 Figure 23. Placing the cable management bracket in the lowered operating position 3. If necessary, close the rear rack door. 4. Start the system and the EMX0 PCIe3 expansion drawer. When you start the system, the EMX0 PCIe3 expansion drawer powers on automatically. For instructions, see “Starting the system” on page 29. 5.
- Page 39 6. Complete the following steps to start any logical partitions that are currently stopped. a. In the navigation area, click the Resources icon , and then click All Systems. b. Click the system name in which you want to activate the logical partition. c.
- Page 40 Power Systems: PCIe3 6-slot fanout module for the EMX0 PCIe Gen3 I/O expansion drawer...
-
Page 41: Common Procedures For Installing, Removing, And Replacing The Pcie3 6-Slot Fanout Module
Electrical voltage and current from power, telephone, and communication cables are hazardous. To avoid a shock hazard: v If IBM supplied the power cord(s), connect power to this unit only with the IBM provided power cord. Do not use the IBM provided power cord for any other product. - Page 42 v Connect and disconnect cables as described in the following procedures when installing, moving, or opening covers on this product or attached devices. To Disconnect: 1. Turn off everything (unless instructed otherwise). 2. For AC power, remove the power cords from the outlets. 3.
- Page 43 If you are installing a feature, contact one of the following service organizations: – The provider of your parts or next level of support. – In the United States, the IBM Rochester Manufacturing Automated Information Line (R-MAIL) at 1-800-300-8751.
-
Page 44: Control Panel Leds
If you remove, then re-install an electronic component, temporarily place that component on an ESD mat. 9. If you encounter difficulties during the installation, contact your service provider, your IBM reseller, or your next level of support. -
Page 45: Enabling Enclosure Or Server Indicators By Using The Asmi
Enabling enclosure or server indicators by using the ASMI Find out how to enable enclosure or server indicators by using the Advanced System Management Interface (ASMI). About this task To perform this operation, you must have one of the following authority levels: v Administrator v Authorized service provider To enable the enclosure or server indicator states, complete the following steps:... -
Page 46: Starting A System By Using The Asmi
Figure 26. Control panel LEDs 4. Observe the following aspects after pressing the power button: v A constant green light indicates full system power to the unit. v A flashing green light indicates standby power to the unit. v After the power-on button is pressed, the system takes approximately 30-seconds for the power LED to change from flashing to solid. -
Page 47: Stopping A System
v To activate a logical partition, complete the following steps: 1. In the navigation area, click the Resources icon , and then click All Partitions. 2. Click the logical partition name that you want to activate. 3. In the navigation area, click Partition Actions > Operations > Activate. 4. -
Page 48: Stopping A System By Using The Control Panel
If your system is running the Linux operating system, type shutdown -h now. v If your system is running the IBM i operating system, type PWRDWNSYS. If your system is partitioned, use the PWRDWNSYS command to power off each of the secondary partitions. Then, use the PWRDWNSYS command to power off the primary partition. -
Page 49: Installing Or Replacing A Part By Using An Hmc
v Product engineer Note: If you are a product engineer, verify that the customer has shut down all active partitions and has powered off the managed system. Continue with the procedure only after the status of the server changes to Power Off. Procedure 1. -
Page 50: Removing A Part By Using The Hmc
8. After the part is listed in the Pending Actions section, click Launch Procedure and follow the instructions to remove the part. Note: The HMC might display the IBM Knowledge Center instructions for removing the part. If so, follow those instructions to remove the part. - Page 51 7. Select a serviceable event and use the Selected drop-down menu list to select Repair. 8. Follow the instructions to repair the part. Note: The HMC might open IBM Knowledge Center instructions for repairing the part. If so, follow those instructions to repair the part.
- Page 52 Power Systems: PCIe3 6-slot fanout module for the EMX0 PCIe Gen3 I/O expansion drawer...
-
Page 53: Notices
Consult your local IBM representative for information on the products and services currently available in your area. Any reference to an IBM product, program, or service is not intended to state or imply that only that IBM product, program, or service may be used. Any functionally equivalent product, program, or service that does not infringe any IBM intellectual property right may be used instead. -
Page 54: Accessibility Features For Ibm Power Systems Servers
All IBM prices shown are IBM's suggested retail prices, are current and are subject to change without notice. Dealer prices may vary. This information is for planning purposes only. The information herein is subject to change before the products described become available. -
Page 55: Privacy Policy Considerations
This product uses standard navigation keys. Interface information The IBM Power Systems servers user interfaces do not have content that flashes 2 - 55 times per second. The IBM Power Systems servers web user interface relies on cascading style sheets to render content properly and to provide a usable experience. -
Page 56: Trademarks
IBM, the IBM logo, and ibm.com are trademarks or registered trademarks of International Business Machines Corp., registered in many jurisdictions worldwide. Other product and service names might be trademarks of IBM or other companies. A current list of IBM trademarks is available on the web at Copyright and trademark information at www.ibm.com/legal/copytrade.shtml. - Page 57 Warning: This is a Class A product. In a domestic environment, this product may cause radio interference, in which case the user may be required to take adequate measures. VCCI Statement - Japan The following is a summary of the VCCI Japanese statement in the box above: This is a Class A product based on the standard of the VCCI Council.
- Page 58 Warning: This is a Class A product. In a domestic environment this product may cause radio interference in which case the user will be required to take adequate measures. IBM Taiwan Contact Information: Power Systems: PCIe3 6-slot fanout module for the EMX0 PCIe Gen3 I/O expansion drawer...
- Page 59 Um dieses sicherzustellen, sind die Geräte wie in den Handbüchern beschrieben zu installieren und zu betreiben. Des Weiteren dürfen auch nur von der IBM empfohlene Kabel angeschlossen werden. IBM übernimmt keine Verantwortung für die Einhaltung der Schutzanforderungen, wenn das Produkt ohne Zustimmung von IBM verändert bzw.
-
Page 60: Class B Notices
Properly shielded and grounded cables and connectors must be used in order to meet FCC emission limits. Proper cables and connectors are available from IBM-authorized dealers. IBM is not responsible for any radio or television interference caused by unauthorized changes or modifications to this equipment. - Page 61 European Community contact: IBM Deutschland GmbH Technical Regulations, Abteilung M456 IBM-Allee 1, 71139 Ehningen, Germany Tel: +49 800 225 5426 email: halloibm@de.ibm.com VCCI Statement - Japan Japan Electronics and Information Technology Industries Association Statement This statement explains the Japan JIS C 61000-3-2 product wattage compliance.
- Page 62 Um dieses sicherzustellen, sind die Geräte wie in den Handbüchern beschrieben zu installieren und zu betreiben. Des Weiteren dürfen auch nur von der IBM empfohlene Kabel angeschlossen werden. IBM übernimmt keine Verantwortung für die Einhaltung der Schutzanforderungen, wenn das Produkt ohne Zustimmung von IBM verändert bzw.
-
Page 63: Terms And Conditions
Permissions for the use of these publications are granted subject to the following terms and conditions. Applicability: These terms and conditions are in addition to any terms of use for the IBM website. Personal Use: You may reproduce these publications for your personal, noncommercial use provided that all proprietary notices are preserved. - Page 64 Power Systems: PCIe3 6-slot fanout module for the EMX0 PCIe Gen3 I/O expansion drawer...
- Page 66 IBM®...
Need help?
Do you have a question about the Power System PCIe3 and is the answer not in the manual?
Questions and answers