Advertisement
22 August, 2013, www.brodit.com, © 2013 Brodit AB
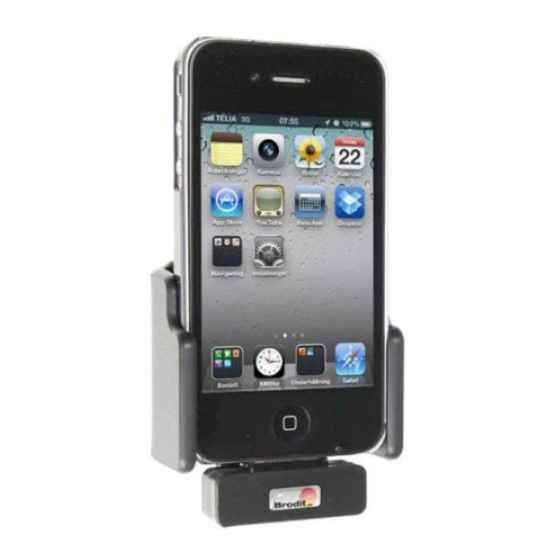
Product 516165
516165 Holder with Pass-Through Connector Adjustable holder. Fits devices with skin.
Fits for all cables! A holder that provides a neat, firm installation for many areas of use. All cables that can be
used with the iPhone can also be used with the holder, for example a charging cable or an interface cable. When
you have attached the cable to the holder it is firmly in place and you do not have connect it manually to the
iPhone each time you put it in the holder. (Cable not included)
Keep your iPhone in a passive holder on the road and you will always have it within easy sight and reach. Safe,
comfortable and convenient! The holder has a neat and discreet design which blends well with the vehicle's
interior. Your iPhone is held securely in place in an upright position for maximum cellular reception.
The holder is made of ABS plastic and has a perfect fit. It is easy to put the device into the holder, and just as
easy to take it with you when leaving the vehicle. The holder fits for iPhone with skin or with Apple original
Bumper (does NOT fit for iPhone without skin). The holder is equipped with a tilt swivel so you can adjust the
angle of your device in order to avoid light reflection on the screen. You can tilt the holder 22° in each direction.
Attach onto ProClip Mounting Platform.
EAN: 7320285161658
Item no 516165 fits:
Apple iPhone 4 (For all countries)
Apple iPhone 4S (For all countries)
1 (2)
Advertisement
Table of Contents

Related Manuals for Brodit 516165


Summary of Contents for Brodit 516165
- Page 1 22 August, 2013, www.brodit.com, © 2013 Brodit AB Product 516165 516165 Holder with Pass-Through Connector Adjustable holder. Fits devices with skin. Fits for all cables! A holder that provides a neat, firm installation for many areas of use. All cables that can be used with the iPhone can also be used with the holder, for example a charging cable or an interface cable.
- Page 2 INSTALLATION INSTRUCTIONS Please read all of the instructions and look at the pictures before attaching the holder. 1. To adjust the holder for your device: Loosen the screws on the back side of the holder, so the sides of the holders can be adjusted.
Need help?
Do you have a question about the 516165 and is the answer not in the manual?
Questions and answers