Synthes Colibri II Instructions For Use Manual
Hide thumbs
Also See for Colibri II:
- Instructions for use manual (64 pages) ,
- Instructions for use manual (72 pages)

Related Manuals for Synthes Colibri II


Summary of Contents for Synthes Colibri II
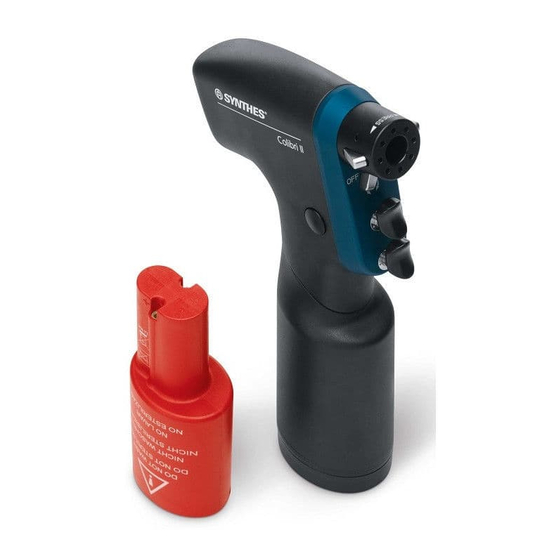
- Page 1 Colibri II. Universal battery power tool system for use in traumatology, hand and foot surgery. Instructions for Use...
-
Page 3: Table Of Contents
Contents Introduction General Information Colibri II Handpiece Attachments General Information Drill Attachments Screw Attachments Ream Attachments Other Rotating Attachments Saw Attachments Other Attachments Care and Maintenance General Information Preparation Prior to Cleaning Manual Cleaning Instruction Mechanical/Automated Cleaning Instruction with Manual Pre-cleaning... - Page 4 System Specifications Electromagnetic Compatibility Accompanying Documents Ordering Information Warning This description alone does not provide sufficient background for the direct use of the product. Instruction by a surgeon experienced in handling this product is highly recommended. Synthes Colibri II Gebrauchsanweisung...
-
Page 5: Introduction
Intended use Efficiently working cutting tools are the basis for successful The Colibri II is a battery-driven power tool for use in trauma- surgery. Therefore, it is mandatory to check used cutting tology and foot surgery, involving surgical procedures such as... - Page 6 General Information Accessories/scope of delivery Warranty The Colibri II consists of a handpiece, one or several battery The warranty for the tools and accessories does not cover casings and batteries and a range of attachments and acces- damage of any kind resulting from improper use, damaged sories designed for the system.
- Page 7 Synthes does not recommend reprocessing contami- The marked device shall only be used within a speci- nated products. Any Synthes product that has been fied temperature range. contaminated by blood, tissue and/or bodily fluids/matter should never be used again and should Colibri II be handled according to hospital protocol.
-
Page 8: Colibri Ii
8 Knob for the battery casing cover Safety system The Colibri II is equipped with a safety system that prevents the machine from being unintentionally started. To lock and unlock the tool, turn the mode selector switch 4 to the ap- propriate setting on the front plate of the handpiece: OFF, or ON position. - Page 9 The small 12 VDC battery pack of the Colibri (532.003 with – Never place the Colibri II on a magnetic surface since the battery casing 532.002) as well as the large 14.4 VDC bat- machine might start unintentionally.
-
Page 10: Use
Colibri II Before initial use, brand-new tools and accessories must un- dergo the entire reprocessing process and the batteries should be charged. Completely remove protective caps and films. Inserting the battery in the battery casing To ensure sterility, the battery is inserted into the battery cas- ing by two people, one of whom is wearing sterile garments: 1. - Page 11 Figure 5 Figure 6 the inside of the casing. After having closed the casing cover, turn the lid sideways (90°) until it clicks. Figure 7 Figure 8 Colibri II Gebrauchsanweisung Synthes...
- Page 12 Colibri II Precautions: – Normally, one battery is sufficient for one surgery. For safety, two battery packs (battery casing with the battery) should be kept ready ensuring fast intraoperative chang- ing of batteries under sterile conditions if necessary. – Never open a battery casing intraoperatively to insert a new battery.
- Page 13 – Charge the batteries within an ambient temperature range of 0 °C to 40 °C. Storage – When the battery is not being used, store it in the Synthes Universal Battery Charger II (05.001.204). This will avoid it from discharging, and the battery will be fully charged and ready to use.
- Page 14 Using the Colibri II with mains current The Colibri II can also be operated with mains current. When the Colibri II is operated with mains current it is classified as type B against electrical shock and leakage current. When operated with mains current use the Colibri adapter (05.001.108) and one of the electrical consoles belonging to...
- Page 15 Attachments General Information The Colibri II system offers a broad range of attachments. A wide range of rotating attachments has color-coded rings, so that they can easily be identified. The table on the next page lists the different types of attachments available, the color coding as well as the speed of each attachment.
-
Page 16: General Information
Torque Limiter, 0.4 Nm, with AO/ASIF Quick Coupling – None Technical data is subject to tolerances. Specifications are approximate and may vary from one device to another or as a result of power supply fluctuations. Synthes Colibri II Instructions for Use... -
Page 17: Drill Attachments
To disconnect, push the coupling sleeve of the attachment back and remove the tool. Chucks There are two Drill Attachments Chucks available as Drill Attachments for the Colibri II system. Article number Clamping range Spare key Comments 05.001.252... -
Page 18: Screw Attachments
AO/ASIF Quick Coupling as the torque may not suffice. – The attachment is also suitable for application at a lower rpm and/or higher torque. Synthes Colibri II Instructions for Use... -
Page 19: Ream Attachments
Quick Coupling for DHS/DCS Triple Reamers (532.015) For DHS/DCS Triple Reamers; can also be used to open the medullary cavity with most of the Synthes nailing systems. Mounting and removing the tools To connect the tool, push the coupling sleeve forward and then introduce the tool while turning slightly. - Page 20 Attachments Ream Attachments Chucks There are two chucks available as Ream Attachments for the Colibri II system. Article number Clamping range Spare key Comments 05.001.254 0 – 7.3 mm 510.191 For drilling and medullary reaming, with reverse motion 05.001.255 0 – 7.3 mm 510.191...
-
Page 21: Other Rotating Attachments
5. Insert the wire into the bone. Apply the clamping force as long as the wire is advanced. 6. To adjust the grip on the wire, reduce the clamping force and move the tool to the desired length. Reclamp the wire by pulling on the tension lever. Colibri II Gebrauchsanweisung Synthes... - Page 22 Attachments Other Rotating Attachments Radiolucent Drive (511.300) The Radiolucent Drive can be used with the Colibri II in com- bination with the AO/ASIF Quick Coupling (05.001.250) and the Adapter for the Radiolucent Drive (532.031). Coupling the Radiolucent Drive to the power tool Connect the AO/ASIF Quick Coupling to the Colibri II and the adapter to the Quick Coupling.
- Page 23 Swing the drive up and center it precisely so that the drill bit appears as a round point and the locking hole is visible around it. The target ring also assists the centering. The lock- ing hole can now be drilled directly. Colibri II Gebrauchsanweisung Synthes...
- Page 24 – Hitting a nail: Remove the drill bit until the flutes are visible and re-aim the drill bit or exchange the drill bit if necessary. Synthes Colibri II Instructions for Use...
- Page 25 M or L on the burr shank is no longer visible. Information on handling burrs Synthes recommends using a new sterile burr for each oper- ation. This prevents health risks to the patient. Used burrs present the following risks: –...
-
Page 26: Saw Attachments
6. Unlock the power tool. Precaution: Saw blades labeled “Single Use” should not be used repeatedly because of cleaning problems. Figure 3 Synthes Colibri II Instructions for Use... - Page 27 Instructions for handling the saw blades Figure 4 Synthes recommends using a new blade for each operation to ensure that the saw blade is optimally sharpened and clean. The following risks are associated with used blades: –...
- Page 28 ON mode. Never use the attachments in oscil- lating drilling mode ( – The appropriate surgical technique (036.000.907) should be observed to ensure the safe and successful application of the Crescentic Technique. Synthes Colibri II Instructions for Use...
- Page 29 (approx. half a revolution). Precautions: – Set the mode switch of the Colibri II to the ON position. Never operate the Large Oscillating Saw attachment in the oscillating drilling mode ( –...
-
Page 30: Other Attachments
Torque Limiter 0.8 Nm (511.776) Torque Limiter 0.4 Nm (511.777) Coupling the Torque Limiter to the power tool Torque Limiters are connected to the Colibri II using the AO/ASIF Quick Coupling (05.001.251). Mounting and removing a screwdriver shaft Insert the screwdriver shaft while rotating it slightly until it locks into place. -
Page 31: General Information
In addition, compliance with internal For more information about Care and Maintenance, please hospital policies and the procedures and recommenda- refer to the Colibri II Care and Maintenance Poster tions of manufacturers of detergents, disinfectants and (036.001.383). any clinical processing equipment is additionally required. -
Page 32: Preparation Prior To Cleaning
Handpieces and attachments may be processed using a) manual cleaning and/or b) automated cleaning with manual pre-cleaning. Figure 2 Note: Clean all movable parts in opened position. Figure 3 Synthes Colibri II Instructions for Use... -
Page 33: Manual Cleaning Instruction
Use a soft-bristled brush and/or soft lint-free cloth to remove all visible soil and de- bris. Follow the enzymatic cleaner or detergent manufacturer’s instructions for use for correct temperature, water quality and concentration/dilution. Colibri II Gebrauchsanweisung Synthes... - Page 34 7. Final rinse with de-ionized/purified water. Final rinse with de-ionized or purified water for a minimum of 2 minutes. 8. Dry. Dry device using a soft lint-free cloth or clean com- pressed air. Synthes Colibri II Instructions for Use...
-
Page 35: Mechanical/Automated Cleaning Instruction With Manual Pre-Cleaning
– Alternative cleaning/disinfection procedures other than in the procedure described below (including manual pre- cleaning) have not been validated by Synthes. 1. Remove debris. Rinse the device under running cold tap water for a minimum of 2 minutes. Use a sponge, soft lint-free cloth or soft-bristled brush to assist in removing gross soil. -
Page 36: With Manual Pre-Cleaning
Repeat steps 1 – 6 until no visible soil remains. 7. Load washing basket. Place devices in the specially designed tray for machine washing supplied by Synthes (68.001.610). Ensure that all cannulations (handpiece and attachments), if applicable, are positioned vertically, i.e. - Page 37 Mechanical cleaning/disinfection is an additional stress for power equipment, especially for seals and bearings. Therefore, systems must be properly lubricated and regu- larly sent to be serviced (at least once per year). Colibri II Gebrauchsanweisung Synthes...
-
Page 38: Lubrication
1 drop of Synthes special oil (519.970); distribute the oil by moving the components. Wipe off the excess oil with a cloth. - Page 39 Lubricating the battery casing (Fig. 3 and 4) – Place oil on the seal of the cover and then evenly distrib- ute the oil on the seal. – Lubricate the lock, hinge and knob, then actuate it several times. Figure 3 Figure 4 Colibri II Gebrauchsanweisung Synthes...
- Page 40 – Saw blade coupling (slot between the saw blade coupling and attachment) – Locking sleeve of the attachment coupling (slots on both sides) Figure 6 – Coupling pins – Opening of the attachment coupling Synthes Colibri II Instructions for Use...
- Page 41 Exception: The Radiolucent Drive (511.300) does not re- quire lubrication. – The power tool and accessories may only be lubricated with Synthes special oil (519.970). The composition of the vapor-permeable and biocompatible oil is optimized for the specific requirements of the power tool. Lubricants with other compositions can cause the power tool to jam and be toxic.
-
Page 42: Function Control
– Check the coupling sleeves of the handpiece and attach- ments for smooth operation and check for function to- gether with instruments such as cutting tools. – Check instruments for correct adjustment and functioning prior to every use. Synthes Colibri II Instructions for Use... -
Page 43: Packaging, Sterilization And Storage
Sterile Barrier System. Sterilization Note: For the sterilization of the Colibri II system, Synthes recommends the use of the specifically designed Synthes Vario Case (68.001.255) or of the specifically designed Washing Basket (68.001.610). - Page 44 Use products in the order in which they are received (“first-in, first-out principle“), taking note of any expiration date on the label. Synthes Colibri II Instructions for Use...
-
Page 45: Repairs And Technical Service
Care and Maintenance Repairs and Technical Service The tool should be sent to the Synthes office for repair if it is faulty or malfunctions. Contaminated products have to run through the complete reprocessing procedure before being sent to the Synthes office for repair or technical service. -
Page 46: Disposal
100 °C or incinerate the battery cells. Please send tools that are no longer used to your local Synthes representative. This ensures that they are disposed of in accordance with the national application of the respective directive. The tool may not be disposed of with household waste. -
Page 47: Troubleshooting
Replace the attachment or tool or send it be coupled or only with difficulty. tool is damaged. to your Synthes service office. Oscillating saw attachment vibrates too The saw blade locking mechanism is Tighten the locking knob of the saw much. - Page 48 36. to the machine. need to be lubricated. Connect console and/or switch it on. Colibri II is used with the EPD console Console is not switched on or not and handpiece does not start up. connected.
-
Page 49: System Specifications
System Specifications The device meets the following standards Technical Data EN 60601-1 / IEC 60601-1 / Colibri II: 532.101 EN 60601-1-2 / IEC 61000-6-1 / Continuously adjustable speed: 0 – 3500 rpm IEC 61000-6-2 / IEC 61000-6-3 IEC 61000-6-4 Weight (w. battery):... - Page 50 Drilling and tapping threads opment in the handpiece and the attachments. and reaming 60 sec 60 sec – The Colibri II must not be stored or operated in an explo- Burring 60 sec 60 sec sive atmosphere. Kirschner Wire setting...
- Page 51 Tool Sound Pressure Sound Power Max. daily Level (LpA) in Level (LwA) in exposure time [dB(A)] [dB(A)] without hearing protection Colibri II – – – > 8 h (532.101) AO/ASIF Quick – – > 8 h Coupling (05.001.250) Oscillating Saw Saw blade –...
- Page 52 The assessment of the vibration emissions [m/s2] is to be made to the hand-arm system according to EN ISO 8662. Information according to test protocol no.: 1711-5323/03.10, date of testing: 18 February 2011. Handpiece Attachment Tool Declaration [m/s Max. daily exposure Colibri II – – < 2.5 No limitation (532.101) AO/ASIF Quick Coupling –...
-
Page 53: Electromagnetic Compatibility
Guidance and manufacturer’s declaration – electromagnetic emissions The Synthes Colibri II system is intended for use in the electromagnetic environment specified below. The customer or user of the Synthes Colibri II system should ensure that it is used in such an environment. Emission test Compliance Electromagnetic environment –... -
Page 54: Accompanying Documents
Guidance and manufacturer’s declaration – electromagnetic immunity The Synthes Colibri II system is intended for use in the electromagnetic environment specified below. The customer or user of the Synthes Colibri II system should ensure that it is used in such an environment. Immunity test... - Page 55 TV broadcast cannot be predicted theoretically with accuracy. To assess the electromagnetic environment due to fixed RF transmitters, an electromagnetic site survey should be considered. If the measured field strength in the location in which the Synthes Colibri II system is used exceeds the applicable RF compliance level above, the Synthes Colibri II system should be observed to verify normal operation.
- Page 56 Synthes Colibri II system The Synthes Colibri II system is intended for use in the electromagnetic environment in which radiated RF disturbances are controlled. The customer or user of the Synthes Colibri II system can help prevent electromagnetic interference by maintaining a minimum distance between portable and mobile RF communications equipment (transmitters) and the Synthes Colibri II system as recommended below, according to the maximum output power of the communication equipment.
-
Page 57: Ordering Information
532.132 Battery Casing for Nos. 532.101 and 532.110, Accessories with Locking for Lid 68.001.255 Vario Case, size 1/1, for Colibri II and Small Battery Drive II, 532.103 Battery for Nos. 532.101 and 532.110 without Lid, without Contents 532.104 Sterile Cover for Nos. 532.101 and 532.110 689.507... - Page 58 Ordering Information Cutting tools Detailed ordering information on the cuttings tools for the Colibri II system with original size pictures can be found in the brochure “Saw blades” (036.000.172). Detailed ordering information on burrs compatible with the Colibri II system can be found in the brochure “Burrs for Electric Pen Drive and Air Pen Drive”, section “Burrs for Burr...
- Page 60 Ö036.001.387öAAoä All technique guides are available as PDF files at 0123 www.synthes.com/lit...
Need help?
Do you have a question about the Colibri II and is the answer not in the manual?
Questions and answers